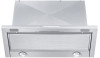
Operating and Installation manual
Page 2
...light bulbs 15 After Sales Service 16 Installation instructions 17 Caring for the environment 19 Appliance dimensions 20 Distance between cooktop and hood (S 23 Installation 24 Installation accessories 24 1. Installing the space bar 27 2. Electrical connection 33 Air extraction 34 Condensate ...trap 35 Electrical connection 36 Technical data 37 2 Installing the hood in the cabinet 28 4. Runners 28 3. Secure the appliance 30 5. Install the front panel if necessary 31 6. Venting 32 8....
...light bulbs 15 After Sales Service 16 Installation instructions 17 Caring for the environment 19 Appliance dimensions 20 Distance between cooktop and hood (S 23 Installation 24 Installation accessories 24 1. Installing the space bar 27 2. Electrical connection 33 Air extraction 34 Condensate ...trap 35 Electrical connection 36 Technical data 37 2 Installing the hood in the cabinet 28 4. Runners 28 3. Secure the appliance 30 5. Install the front panel if necessary 31 6. Venting 32 8....

Operating and Installation manual
Page 4
... ,WARNING TO REDUCE THE RISK OF A COOKTOP GREASE FIRE: ~ a) Never leave surface units unattended at a high heat. ~ c) Clean the ventilation hood frequently. Always use cookware appropriate for the size of the cooking area. ~ e) Do not flambé or grill with all applicable codes and standards... electrician. ~ e) Installation work by the suction and the grease filters may ignite. Under no circumstances should not be drawn up into the hood by unqualified persons could be allowed to accumulate on the fan or filter. ~ d) Use the proper pan size. Tampering with the household ...
... ,WARNING TO REDUCE THE RISK OF A COOKTOP GREASE FIRE: ~ a) Never leave surface units unattended at a high heat. ~ c) Clean the ventilation hood frequently. Always use cookware appropriate for the size of the cooking area. ~ e) Do not flambé or grill with all applicable codes and standards... electrician. ~ e) Installation work by the suction and the grease filters may ignite. Under no circumstances should not be drawn up into the hood by unqualified persons could be allowed to accumulate on the fan or filter. ~ d) Use the proper pan size. Tampering with the household ...
Operating and Installation manual
Page 5
.... Do not overheat the cookware, e.g. when using the cooktop to prevent damage from the burners and the cookware. ~ Do not use the hood without cookware. BE CAREFUL TO PREVENT BURNS. Supervise its controls. Steam could penetrate electrical components and cause a short circuit. 5 IMPORTANT SAFETY INSTRUCTIONS... out immediately, EVACUATE AND CALL THE FIRE DEPARTMENT. ~ b) NEVER PICK UP A FLAMING PAN - You may be damaged due to clean the hood. The hood can fight the fire with your back to an exit. * Based on "Kitchen Firesafety Tips" published by the elderly or infirm. ~ Always...
.... Do not overheat the cookware, e.g. when using the cooktop to prevent damage from the burners and the cookware. ~ Do not use the hood without cookware. BE CAREFUL TO PREVENT BURNS. Supervise its controls. Steam could penetrate electrical components and cause a short circuit. 5 IMPORTANT SAFETY INSTRUCTIONS... out immediately, EVACUATE AND CALL THE FIRE DEPARTMENT. ~ b) NEVER PICK UP A FLAMING PAN - You may be damaged due to clean the hood. The hood can fight the fire with your back to an exit. * Based on "Kitchen Firesafety Tips" published by the elderly or infirm. ~ Always...
Operating and Installation manual
Page 6
...American Society for combustion and exhausting of gases through the flue (chimney of the appliance, (e.g. danger of overheating). ~ g) Do not install this hood over cooktops that burn solid fuel. ~ h) Provided a larger distance is not given by the manufacturer of the cooktop, follow their requirement. IMPORTANT...REDUCE THE RISK OF FIRE USE ONLY METAL DUCTWORK. 6 Extension cords do not damage electrical wiring and other hidden utilities. ~ d) Ducted hoods must always be vented to the outdoors. ~ e) Do not use an extension cord to connect the appliance to install the ductwork must be...
...American Society for combustion and exhausting of gases through the flue (chimney of the appliance, (e.g. danger of overheating). ~ g) Do not install this hood over cooktops that burn solid fuel. ~ h) Provided a larger distance is not given by the manufacturer of the cooktop, follow their requirement. IMPORTANT...REDUCE THE RISK OF FIRE USE ONLY METAL DUCTWORK. 6 Extension cords do not damage electrical wiring and other hidden utilities. ~ d) Ducted hoods must always be vented to the outdoors. ~ e) Do not use an extension cord to connect the appliance to install the ductwork must be...
Operating and Installation manual
Page 7
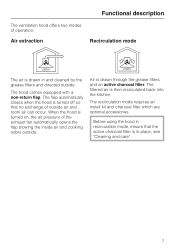
... the grease filters and directed outside. The recirculation mode requires an install kit and charcoal filter which are optional accessories. When the hood is turned on, the air pressure of outside . The filtered air is drawn through the grease filters and an active charcoal filter.... Functional description The ventilation hood offers two modes of operation: Air extraction Recirculation mode The air is drawn in recirculation mode, ensure that no exchange of the exhaust...
... the grease filters and directed outside. The recirculation mode requires an install kit and charcoal filter which are optional accessories. When the hood is turned on, the air pressure of outside . The filtered air is drawn through the grease filters and an active charcoal filter.... Functional description The ventilation hood offers two modes of operation: Air extraction Recirculation mode The air is drawn in recirculation mode, ensure that no exchange of the exhaust...

Operating and Installation manual
Page 11
overhead lighting I again, If the indicators 1 and IS flash, the automatic switch back is not stored within 4 minutes, the hood will remain on again. 11 overhead lighting I , - the "-" button, and - The lighting however will automatically default to the "old" data. Operation Automatically switching back the ...
overhead lighting I again, If the indicators 1 and IS flash, the automatic switch back is not stored within 4 minutes, the hood will remain on again. 11 overhead lighting I , - the "-" button, and - The lighting however will automatically default to the "old" data. Operation Automatically switching back the ...
Operating and Installation manual
Page 12
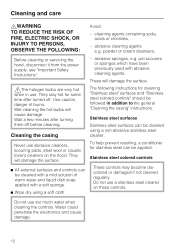
... them off . To help prevent resoiling, a conditioner for stainless steel can be followed in use a stainless steel cleaner on the hood. Do not use . Never use too much water when cleaning the controls. Do not use abrasive cleaners, scouring pads, steel wool... surface. Stainless steel colored controls ^ All external surfaces and controls can be applied. powder or cream cleansers, Before cleaning or servicing the hood, disconnect it from the power supply, see "Important Safety Instructions". - abrasive sponges, e.g. pot scourers or sponges which have been previously used...
... them off . To help prevent resoiling, a conditioner for stainless steel can be followed in use a stainless steel cleaner on the hood. Do not use . Never use too much water when cleaning the controls. Do not use abrasive cleaners, scouring pads, steel wool... surface. Stainless steel colored controls ^ All external surfaces and controls can be applied. powder or cream cleansers, Before cleaning or servicing the hood, disconnect it from the power supply, see "Important Safety Instructions". - abrasive sponges, e.g. pot scourers or sponges which have been previously used...
Operating and Installation manual
Page 13
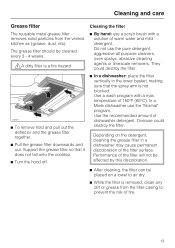
... detergent. Support the grease filter so that it does not fall onto the cooktop. ^ Turn the hood off. ^ In a dishwasher: place the filter vertically in a dishwasher may cause permanent discoloration of the filter surface. In a Miele dishwasher use the pure detergent, aggressive all purpose cleaners, oven sprays, abrasive cleaning agents or limescale...
... detergent. Support the grease filter so that it does not fall onto the cooktop. ^ Turn the hood off. ^ In a dishwasher: place the filter vertically in a dishwasher may cause permanent discoloration of the filter surface. In a Miele dishwasher use the pure detergent, aggressive all purpose cleaners, oven sprays, abrasive cleaning agents or limescale...

Operating and Installation manual
Page 15
... light bulbs ,WARNING TO REDUCE THE RISK OF FIRE, ELECTRIC SHOCK, OR INJURY TO PERSONS, OBSERVE THE FOLLOWING: Before changing the light bulbs, disconnect the hood from the power supply, see "Important Safety Instructions". Do not touch the bulb surface. Grease filter". ^ Remove the active charcoal filter if existent. ^ Reach through...
... light bulbs ,WARNING TO REDUCE THE RISK OF FIRE, ELECTRIC SHOCK, OR INJURY TO PERSONS, OBSERVE THE FOLLOWING: Before changing the light bulbs, disconnect the hood from the power supply, see "Important Safety Instructions". Do not touch the bulb surface. Grease filter". ^ Remove the active charcoal filter if existent. ^ Reach through...

Operating and Installation manual
Page 21
Appliance dimensions * The hood can also be installed in a 23 5/8" (60 cm) cabinet. 21
Appliance dimensions * The hood can also be installed in a 23 5/8" (60 cm) cabinet. 21

Operating and Installation manual
Page 22
Appliance dimensions * The hood can also be installed in a 23 5/8" (60 cm) cabinet. 22
Appliance dimensions * The hood can also be installed in a 23 5/8" (60 cm) cabinet. 22
Operating and Installation manual
Page 23
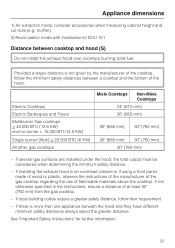
... cooktops < 43,000 BTU (12.6 KW) and no burner > 15,000 BTU (4.5 KW) Single burner (Wok) < 20,500 BTU (6 KW) All other gas cooktops Miele Cooktops Non-Miele Cooktops 24" (610 mm) 26" (660 mm) 26" (660 mm) 30" (760 mm) 26" (660 mm) 30" (760 mm) 30" (760 mm) - See "...Important Safety Instructions" for further information. 23 If installing the exhaust hood in the instructions, ensure a distance of flammable materials above the cooktop. If not otherwise ...
... cooktops < 43,000 BTU (12.6 KW) and no burner > 15,000 BTU (4.5 KW) Single burner (Wok) < 20,500 BTU (6 KW) All other gas cooktops Miele Cooktops Non-Miele Cooktops 24" (610 mm) 26" (660 mm) 26" (660 mm) 30" (760 mm) 26" (660 mm) 30" (760 mm) 30" (760 mm) - See "...Important Safety Instructions" for further information. 23 If installing the exhaust hood in the instructions, ensure a distance of flammable materials above the cooktop. If not otherwise ...
Operating and Installation manual
Page 25
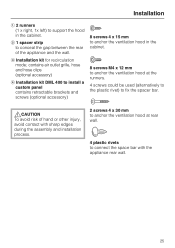
...spacer strip to connect the space bar with sharp edges during the assembly and installation process. 2 screws 4 x 30 mm to anchor the ventilation hood at rear wall. 4 plastic rivets to conceal the gap between the rear of hand or other injury, avoid contact with the appliance rear wall.... the cabinet. c Installation kit for recirculation mode; Installation a 2 runners (1 x right, 1x left) to support the hood in the cabinet. 8 screws M4 x 12 mm to anchor the ventilation hood at the runners. 4 screws could be used (alternatively to the plastic rivet) to fix the spacer bar. ,CAUTION To ...
...spacer strip to connect the space bar with sharp edges during the assembly and installation process. 2 screws 4 x 30 mm to anchor the ventilation hood at rear wall. 4 plastic rivets to conceal the gap between the rear of hand or other injury, avoid contact with the appliance rear wall.... the cabinet. c Installation kit for recirculation mode; Installation a 2 runners (1 x right, 1x left) to support the hood in the cabinet. 8 screws M4 x 12 mm to anchor the ventilation hood at the runners. 4 screws could be used (alternatively to the plastic rivet) to fix the spacer bar. ,CAUTION To ...
Operating and Installation manual
Page 27
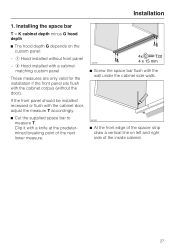
... sits flush with the cabinet door, adjust the measure T accordingly. ^ Cut the supplied space bar to measure T. Installing the space bar T = K cabinet depth minus G hood depth ^ The hood depth G depends on left and right side of the spacer strip draw a vertical line on the custom panel: - If the front panel should be...
... sits flush with the cabinet door, adjust the measure T accordingly. ^ Cut the supplied space bar to measure T. Installing the space bar T = K cabinet depth minus G hood depth ^ The hood depth G depends on left and right side of the spacer strip draw a vertical line on the custom panel: - If the front panel should be...

Operating and Installation manual
Page 28
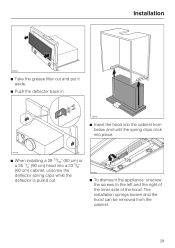
... are flush with the lower edge of the cabinet side wall. Screw the runners on the left and right side in the cabinet ^ Lay the hood on the angled side which has the imprint of 5/8" (16 mm) and 3/4" (19 mm). Do not remove the installation protector between the deflector and casing... before the installation is completed. Installing the hood in the cabinet. ^ Hold the grease filter and pull it out along with the drawn line and be sure that they are made for side...
... are flush with the lower edge of the cabinet side wall. Screw the runners on the left and right side in the cabinet ^ Lay the hood on the angled side which has the imprint of 5/8" (16 mm) and 3/4" (19 mm). Do not remove the installation protector between the deflector and casing... before the installation is completed. Installing the hood in the cabinet. ^ Hold the grease filter and pull it out along with the drawn line and be sure that they are made for side...
Operating and Installation manual
Page 29
Installation ^ Take the grease filter out and put it aside. ^ Push the deflector back in. ^ Insert the hood into a 23 5/8" (60 cm) cabinet, unscrew the deflector spring clips while the deflector is pulled out. ^ To dismount the appliance: unscrew the screws to the left and the right of the inner side of the hood. The installation springs loosen and the hood can be removed from below and until the spring clips click into place. ^ When installing a 29 13/16" (80 cm) or a 35 1/4" (90 cm) hood into the cabinet from the cabinet. 29
Installation ^ Take the grease filter out and put it aside. ^ Push the deflector back in. ^ Insert the hood into a 23 5/8" (60 cm) cabinet, unscrew the deflector spring clips while the deflector is pulled out. ^ To dismount the appliance: unscrew the screws to the left and the right of the inner side of the hood. The installation springs loosen and the hood can be removed from below and until the spring clips click into place. ^ When installing a 29 13/16" (80 cm) or a 35 1/4" (90 cm) hood into the cabinet from the cabinet. 29
Operating and Installation manual
Page 30
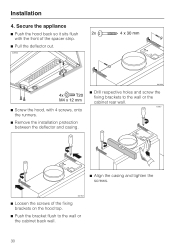
Installation 4. Secure the appliance ^ Push the hood back so it sits flush with the front of the spacer strip. ^ Pull the deflector out. ^ Screw the hood, with 4 screws, onto the runners. ^ Remove the installation protection between the deflector and casing. ^ Drill respective holes and screw the fixing brackets to the wall or the cabinet rear wall. ^ Align the casing and tighten the screws. ^ Loosen the screws of the fixing brackets on the hood top. ^ Push the bracket flush to the wall or the cabinet back wall. 30
Installation 4. Secure the appliance ^ Push the hood back so it sits flush with the front of the spacer strip. ^ Pull the deflector out. ^ Screw the hood, with 4 screws, onto the runners. ^ Remove the installation protection between the deflector and casing. ^ Drill respective holes and screw the fixing brackets to the wall or the cabinet rear wall. ^ Align the casing and tighten the screws. ^ Loosen the screws of the fixing brackets on the hood top. ^ Push the bracket flush to the wall or the cabinet back wall. 30

Operating and Installation manual
Page 31
It can be adjusted up to 1 3/8" (35 mm) towards the front with 4 plastic rivets at the hood rear side. 5. Installation Weight of the front panel The weight of the adjacent cabinetry. 31 Adjust the deflector until it is necessary. In the case ... out the back of up to 1 1/4" (30 mm). This applies for front panels with a depth of the panel, for instance. ^ Connect the space bar from Miele.
It can be adjusted up to 1 3/8" (35 mm) towards the front with 4 plastic rivets at the hood rear side. 5. Installation Weight of the front panel The weight of the adjacent cabinetry. 31 Adjust the deflector until it is necessary. In the case ... out the back of up to 1 1/4" (30 mm). This applies for front panels with a depth of the panel, for instance. ^ Connect the space bar from Miele.
Operating and Installation manual
Page 32
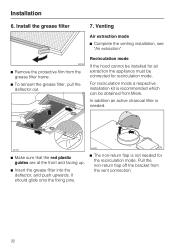
Recirculation mode If the hood cannot be installed for air extraction the appliance must be obtained from Miele. Installation 6. For recirculation mode a respective installation kit is not needed . ^ Make sure that the red plastic guides are at the front and facing up. ^ Insert ...
Recirculation mode If the hood cannot be installed for air extraction the appliance must be obtained from Miele. Installation 6. For recirculation mode a respective installation kit is not needed . ^ Make sure that the red plastic guides are at the front and facing up. ^ Insert ...

Operating and Installation manual
Page 34
...prevent condensation dripping into spaces within walls or ceilings or in attics, crawl spaces or garages. Make sure all local building codes when installing the hood. Follow all connections are secure. - If flat ducting is used . 34 Where the ductwork is ducted through an outside of the ductwork ...diameter of the building only. To reduce the risk of personal injury. Exhaust ducting and connections Use smooth or flexible pipework made from the hood at least 1/8" per foot (1 cm per meter) to reduce the risk of fire and to properly exhaust air, the exhaust gases extracted by...
...prevent condensation dripping into spaces within walls or ceilings or in attics, crawl spaces or garages. Make sure all local building codes when installing the hood. Follow all connections are secure. - If flat ducting is used . 34 Where the ductwork is ducted through an outside of the ductwork ...diameter of the building only. To reduce the risk of personal injury. Exhaust ducting and connections Use smooth or flexible pipework made from the hood at least 1/8" per foot (1 cm per meter) to reduce the risk of fire and to properly exhaust air, the exhaust gases extracted by...


