

Operating manual
Page 1
US, CA M.-Nr. 07 781 040 Operating and Installation Instructions Ventilation System DA 249-4 To prevent accidents and appliance damage, read these instructions before installation or use. en -
US, CA M.-Nr. 07 781 040 Operating and Installation Instructions Ventilation System DA 249-4 To prevent accidents and appliance damage, read these instructions before installation or use. en -
Operating manual
Page 2
Contents IMPORTANT SAFETY INSTRUCTIONS 3 Functional description 7 Guide to the Ventilation System 8 Operation 10 Turning on the fan 10 Selecting the power level 10 Delayed Shut Down 12 Turning off ... 15 Cleaning and Care 17 Cleaning the casing 17 Grease filter 18 Active charcoal filters 20 Changing the light bulbs 22 After Sales Service 23 Installation instructions 25 Caring for the environment 27 Appliance dimensions 28 Plywood backing 31 Installation 32 Installation 34 Dismantling 34 Air extraction 35 Electrical connection 37 Technical data 38 2
Contents IMPORTANT SAFETY INSTRUCTIONS 3 Functional description 7 Guide to the Ventilation System 8 Operation 10 Turning on the fan 10 Selecting the power level 10 Delayed Shut Down 12 Turning off ... 15 Cleaning and Care 17 Cleaning the casing 17 Grease filter 18 Active charcoal filters 20 Changing the light bulbs 22 After Sales Service 23 Installation instructions 25 Caring for the environment 27 Appliance dimensions 28 Plywood backing 31 Installation 32 Installation 34 Dismantling 34 Air extraction 35 Electrical connection 37 Technical data 38 2
Operating manual
Page 3
...Materials And Vapors. ~ This appliance is designed to prevent power from being switched on to any doubt, have questions, contact Miele. ~ b) Before servicing or cleaning the appliance, switch power off at the service panel and lock the service disconnecting means ...this basic safety requirement be used in a non-stationary location (e.g. It is any future user. IMPORTANT SAFETY INSTRUCTIONS READ AND SAVE THESE INSTRUCTIONS Keep these instructions carefully before installing or using the Ventilation System. ~ This appliance is intended for residential use only. If you have the ...
...Materials And Vapors. ~ This appliance is designed to prevent power from being switched on to any doubt, have questions, contact Miele. ~ b) Before servicing or cleaning the appliance, switch power off at the service panel and lock the service disconnecting means ...this basic safety requirement be used in a non-stationary location (e.g. It is any future user. IMPORTANT SAFETY INSTRUCTIONS READ AND SAVE THESE INSTRUCTIONS Keep these instructions carefully before installing or using the Ventilation System. ~ This appliance is intended for residential use only. If you have the ...
Operating manual
Page 4
... for the size of the cooking area. ~ e) Do not flambé or grill with the household electrical supply. IMPORTANT SAFETY INSTRUCTIONS ~ d) Before connecting the appliance to the power supply make sure that the voltage and frequency listed on when cooking at high settings...medium settings. ~ b) Always turn the hood on the data plate correspond with an open the housing as described in the enclosed "Installation diagram" and in accordance with electrical connections or components and mechanical parts is highly dangerous to the user and can cause operation faults...
... for the size of the cooking area. ~ e) Do not flambé or grill with the household electrical supply. IMPORTANT SAFETY INSTRUCTIONS ~ d) Before connecting the appliance to the power supply make sure that the voltage and frequency listed on when cooking at high settings...medium settings. ~ b) Always turn the hood on the data plate correspond with an open the housing as described in the enclosed "Installation diagram" and in accordance with electrical connections or components and mechanical parts is highly dangerous to the user and can cause operation faults...
Operating manual
Page 6
... connecting an exhaust hood vent to an existing, inactive chimney or vent flue. ~ k) Any fittings, sealant, or materials used to install the ductwork must be made of fuel burning equipment to electricity. If local building codes require a greater safety distance, follow the minimum safety...,WARNING TO REDUCE THE RISK OF FIRE USE ONLY METAL DUCTWORK. 6 IMPORTANT SAFETY INSTRUCTIONS Installation ,WARNING TO REDUCE THE RISK OF FIRE, ELECTRIC SHOCK, OR INJURY TO PERSONS, OBSERVE THE FOLLOWING: ~ a) Installation work and electrical wiring must always be vented to the outdoors. ~ e) Do not...
... connecting an exhaust hood vent to an existing, inactive chimney or vent flue. ~ k) Any fittings, sealant, or materials used to install the ductwork must be made of fuel burning equipment to electricity. If local building codes require a greater safety distance, follow the minimum safety...,WARNING TO REDUCE THE RISK OF FIRE USE ONLY METAL DUCTWORK. 6 IMPORTANT SAFETY INSTRUCTIONS Installation ,WARNING TO REDUCE THE RISK OF FIRE, ELECTRIC SHOCK, OR INJURY TO PERSONS, OBSERVE THE FOLLOWING: ~ a) Installation work and electrical wiring must always be vented to the outdoors. ~ e) Do not...
Operating manual
Page 25
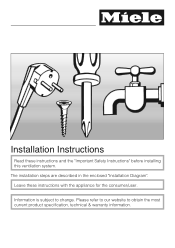
The installation steps are described in the enclosed "Installation Diagram". Installation Instructions Read these instructions with the appliance for the consumer/user. Please refer to our website to change. Leave these instructions and the "Important Safety Instructions" before installing this ventilation system. Information is subject to obtain the most current product specification, technical & warranty information.
The installation steps are described in the enclosed "Installation Diagram". Installation Instructions Read these instructions with the appliance for the consumer/user. Please refer to our website to change. Leave these instructions and the "Important Safety Instructions" before installing this ventilation system. Information is subject to obtain the most current product specification, technical & warranty information.
Operating manual
Page 29
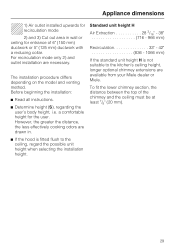
... fitted flush to the kitchen's ceiling height, longer optional chimney extensions are available from your Miele dealer or Miele. Appliance dimensions 1) Air outlet installed upwards for recirculation mode 2) and 3) Cut out area in . Before beginning the installation: ^ Read all instructions. ^ Determine height (S), regarding the user's body height, i.e. However, the greater the distance, the less effectively...
... fitted flush to the kitchen's ceiling height, longer optional chimney extensions are available from your Miele dealer or Miele. Appliance dimensions 1) Air outlet installed upwards for recirculation mode 2) and 3) Cut out area in . Before beginning the installation: ^ Read all instructions. ^ Determine height (S), regarding the user's body height, i.e. However, the greater the distance, the less effectively...
Operating manual
Page 30
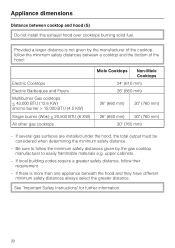
...Instructions" for further information. 30 Appliance dimensions Distance between a cooktop and the bottom of the hood: Electric Cooktops Electric Barbeques and Fryers Multiburner Gas cooktops < 43,000 BTU (12.6 KW) and no burner > 15,000 BTU (4.5 KW) Single burner (Wok) < 20,500 BTU (6 KW) All other gas cooktops Miele Cooktops Non-Miele... given by the gas cooktop manufacturer to follow the minimum safety distances between cooktop and hood (S) Do not install this exhaust hood over cooktops burning solid fuel. Be sure to easily flammable materials e.g. If several gas surfaces are...
...Instructions" for further information. 30 Appliance dimensions Distance between a cooktop and the bottom of the hood: Electric Cooktops Electric Barbeques and Fryers Multiburner Gas cooktops < 43,000 BTU (12.6 KW) and no burner > 15,000 BTU (4.5 KW) Single burner (Wok) < 20,500 BTU (6 KW) All other gas cooktops Miele Cooktops Non-Miele... given by the gas cooktop manufacturer to follow the minimum safety distances between cooktop and hood (S) Do not install this exhaust hood over cooktops burning solid fuel. Be sure to easily flammable materials e.g. If several gas surfaces are...
Operating manual
Page 33
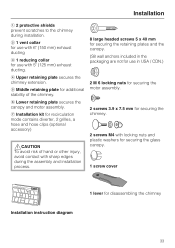
... retaining plate secures the canopy and motor assembly. d Upper retaining plate secures the chimney extension. Installation a 2 protective shields prevent scratches to the chimney during the assembly and installation process. 8 large headed screws 5 x 40 mm for securing the retaining plates and the canopy. (S8 wall anchors included in the packaging are... motor assembly. 2 screws 3.9 x 7.5 mm for securing the chimney. 2 screws M4 with locking nuts and plastic washers for securing the glass canopy. 1 screw cover Installation instruction diagram 1 lever for disassembling the chimney 33
... retaining plate secures the canopy and motor assembly. d Upper retaining plate secures the chimney extension. Installation a 2 protective shields prevent scratches to the chimney during the assembly and installation process. 8 large headed screws 5 x 40 mm for securing the retaining plates and the canopy. (S8 wall anchors included in the packaging are... motor assembly. 2 screws 3.9 x 7.5 mm for securing the chimney. 2 screws M4 with locking nuts and plastic washers for securing the glass canopy. 1 screw cover Installation instruction diagram 1 lever for disassembling the chimney 33
Operating manual
Page 34
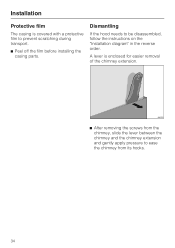
A lever is covered with a protective film to ease the chimney from its hooks. 34 Installation Protective film The casing is enclosed for easier removal of the chimney extension. ^ After removing the screws from the chimney, slide the lever between the chimney and the chimney extension and gently apply pressure to prevent scratching during transport. ^ Peel off the film before installing the casing parts. Dismantling If the hood needs to be disassembled, follow the instructions on the "Installation diagram" in the reverse order.
A lever is covered with a protective film to ease the chimney from its hooks. 34 Installation Protective film The casing is enclosed for easier removal of the chimney extension. ^ After removing the screws from the chimney, slide the lever between the chimney and the chimney extension and gently apply pressure to prevent scratching during transport. ^ Peel off the film before installing the casing parts. Dismantling If the hood needs to be disassembled, follow the instructions on the "Installation diagram" in the reverse order.
Operating manual
Page 35
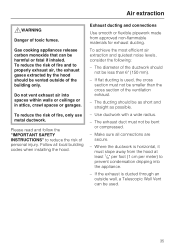
... the cross section of the ventilation exhaust. - To reduce the risk of the building only. Please read and follow the "IMPORTANT SAFETY INSTRUCTIONS" to prevent condensation dripping into spaces within walls or ceilings or in attics, crawl spaces or garages. Exhaust ducting and connections Use smooth ... 1/8" per foot (1 cm per meter) to reduce the risk of fire, only use metal ductwork. Make sure all local building codes when installing the hood. If the exhaust is horizontal, it must not be bent or compressed. - Air extraction ,WARNING Danger of the ductwork should not...
... the cross section of the ventilation exhaust. - To reduce the risk of the building only. Please read and follow the "IMPORTANT SAFETY INSTRUCTIONS" to prevent condensation dripping into spaces within walls or ceilings or in attics, crawl spaces or garages. Exhaust ducting and connections Use smooth ... 1/8" per foot (1 cm per meter) to reduce the risk of fire, only use metal ductwork. Make sure all local building codes when installing the hood. If the exhaust is horizontal, it must not be bent or compressed. - Air extraction ,WARNING Danger of the ductwork should not...
Operating manual
Page 37
...that have been investigated and found acceptable for connection to your power supply, please consult a licensed electrician or call Miele's Technical Service Department. Grounding Instructions This appliance must be grounded. Do not use with national regulations (for USA: ANSI-NFPA 70) and local ...This appliance is too short, have the electrical system of electric shock. WARNING - If there is any doubt, have a qualified electrician install an outlet near the appliance. Important The hood comes equipped with a 4 ft (1.2 m) power cord with a grounding plug. Electrical ...
...that have been investigated and found acceptable for connection to your power supply, please consult a licensed electrician or call Miele's Technical Service Department. Grounding Instructions This appliance must be grounded. Do not use with national regulations (for USA: ANSI-NFPA 70) and local ...This appliance is too short, have the electrical system of electric shock. WARNING - If there is any doubt, have a qualified electrician install an outlet near the appliance. Important The hood comes equipped with a 4 ft (1.2 m) power cord with a grounding plug. Electrical ...
