Operating and Installation manual
Page 2
... 11 Turning off the fan 11 Overhead lighting 12 Filter timers 13 Checking the filter timers 13 Reprogramming the timers 14 Cleaning and care 16 Cleaning the casing 16 Grease filters 17 Active charcoal filter 19 Changing the light bulb 20 After Sales Service 21 Installation instructions 23 Caring for the environment 24 Appliance dimensions 25 Distance between cooktop and hood (S 27 Installation 28 Installing the joystick 31 Joystick extension 31 Electrical connection 32 Air extraction 33 Electrical connection 35...
... 11 Turning off the fan 11 Overhead lighting 12 Filter timers 13 Checking the filter timers 13 Reprogramming the timers 14 Cleaning and care 16 Cleaning the casing 16 Grease filters 17 Active charcoal filter 19 Changing the light bulb 20 After Sales Service 21 Installation instructions 23 Caring for the environment 24 Appliance dimensions 25 Distance between cooktop and hood (S 27 Installation 28 Installing the joystick 31 Joystick extension 31 Electrical connection 32 Air extraction 33 Electrical connection 35...

Operating and Installation manual
Page 3
... cleaning the appliance, switch power off at the service panel and lock the service disconnecting means to prevent power from being switched on a ship). ,WARNING TO REDUCE THE RISK OF FIRE, ELECTRIC SHOCK, OR INJURY TO PERSONS, OBSERVE THE FOLLOWING: ~ a) Use this appliance only in the manner intended by a qualified technician. To guarantee the electrical safety of the appliance can lead to vent cooking...
... cleaning the appliance, switch power off at the service panel and lock the service disconnecting means to prevent power from being switched on a ship). ,WARNING TO REDUCE THE RISK OF FIRE, ELECTRIC SHOCK, OR INJURY TO PERSONS, OBSERVE THE FOLLOWING: ~ a) Use this appliance only in the manner intended by a qualified technician. To guarantee the electrical safety of the appliance can lead to vent cooking...
Operating and Installation manual
Page 4
... OF A COOKTOP GREASE FIRE: ~ a) Never leave surface units unattended at a high heat. ~ c) Clean the ventilation hood frequently. This data must correspond to prevent appliance damage. Repairs and other parts of the housing be allowed to accumulate on when cooking at high settings. Heat oils slowly on low or medium settings. ~ b) Always turn the hood on the fan or filter. ~ d) Use the proper pan size. Grease should any other work and repairs should...
... OF A COOKTOP GREASE FIRE: ~ a) Never leave surface units unattended at a high heat. ~ c) Clean the ventilation hood frequently. This data must correspond to prevent appliance damage. Repairs and other parts of the housing be allowed to accumulate on when cooking at high settings. Heat oils slowly on low or medium settings. ~ b) Always turn the hood on the fan or filter. ~ d) Use the proper pan size. Grease should any other work and repairs should...

Operating and Installation manual
Page 5
... electrical components and cause a short circuit. 5 BE CAREFUL TO PREVENT BURNS. The hood can fight the fire with a close fitting lid, cookie sheet, or metal tray then turn on "Kitchen Firesafety Tips" published by NAFTA ~ Do not allow children to play with or operate the appliance or its controls. Do not overheat the cookware, e.g. a violent steam explosion will result. ~ d) Use...
... electrical components and cause a short circuit. 5 BE CAREFUL TO PREVENT BURNS. The hood can fight the fire with a close fitting lid, cookie sheet, or metal tray then turn on "Kitchen Firesafety Tips" published by NAFTA ~ Do not allow children to play with or operate the appliance or its controls. Do not overheat the cookware, e.g. a violent steam explosion will result. ~ d) Use...

Operating and Installation manual
Page 6
... requirement. Extension cords do not damage electrical wiring and other hidden utilities. ~ d) Ducted hoods must always be vented to electricity. If local building codes require a greater safety distance, follow the minimum safety distances between a cooktop and the bottom of the hood given in accordance with any solid-state speed control device. ~ f) Do not use an extension cord to connect the appliance to the outdoors. ~ e) Do not use this manual. IMPORTANT SAFETY INSTRUCTIONS Installation...
... requirement. Extension cords do not damage electrical wiring and other hidden utilities. ~ d) Ducted hoods must always be vented to electricity. If local building codes require a greater safety distance, follow the minimum safety distances between a cooktop and the bottom of the hood given in accordance with any solid-state speed control device. ~ f) Do not use an extension cord to connect the appliance to the outdoors. ~ e) Do not use this manual. IMPORTANT SAFETY INSTRUCTIONS Installation...

Operating and Installation manual
Page 7
... DA 2210 comes with a non-return flap. Air is then recirculated back into the kitchen. Functional description The ventilation hood offers two modes of operation: Air extraction Recirculation mode The air is drawn in place, see "Cleaning and Care". 7 When the hood is turned off so that the active charcoal filters are in and cleaned by the grease filters and directed outside. Before using the hood in recirculation mode, ensure that no exchange of the exhaust fan...
... DA 2210 comes with a non-return flap. Air is then recirculated back into the kitchen. Functional description The ventilation hood offers two modes of operation: Air extraction Recirculation mode The air is drawn in place, see "Cleaning and Care". 7 When the hood is turned off so that the active charcoal filters are in and cleaned by the grease filters and directed outside. Before using the hood in recirculation mode, ensure that no exchange of the exhaust fan...
Operating and Installation manual
Page 9
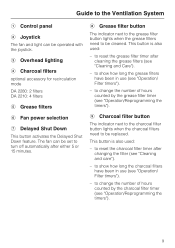
... the charcoal filters need to show how long the grease filters have been in use (see "Operation/Reprogramming the timers"). to be cleaned. c Overhead lighting d Charcoal filters optional accessory for recirculation mode DA 2280: 2 filters DA 2210: 4 filters e Grease filters f Fan power selection g Delayed Shut Down This button activates the Delayed Shut Down feature. to reset the charcoal filter timer after cleaning the grease filters (see "Cleaning and care"). - to reset the grease filter timer after changing the filter (see "Cleaning and Care"). - to change the number of...
... the charcoal filters need to show how long the grease filters have been in use (see "Operation/Reprogramming the timers"). to be cleaned. c Overhead lighting d Charcoal filters optional accessory for recirculation mode DA 2280: 2 filters DA 2210: 4 filters e Grease filters f Fan power selection g Delayed Shut Down This button activates the Delayed Shut Down feature. to reset the charcoal filter timer after cleaning the grease filters (see "Cleaning and care"). - to reset the grease filter timer after changing the filter (see "Cleaning and Care"). - to change the number of...
Operating and Installation manual
Page 10
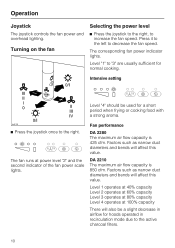
... charcoal filters. 10 DA 2210 The maximum air flow capacity is 425 cfm. The fan runs at 100% capacity There will affect this value. Intensive setting Level "4" should be a slight decrease in airflow for hoods operated in recirculation mode due to the right. Turning on the fan Selecting the power level ^ Press the joystick to the right, to decrease the fan speed. Operation Joystick The joystick controls the fan power and overhead lighting...
... charcoal filters. 10 DA 2210 The maximum air flow capacity is 425 cfm. The fan runs at 100% capacity There will affect this value. Intensive setting Level "4" should be a slight decrease in airflow for hoods operated in recirculation mode due to the right. Turning on the fan Selecting the power level ^ Press the joystick to the right, to decrease the fan speed. Operation Joystick The joystick controls the fan power and overhead lighting...

Operating and Installation manual
Page 13
... reset. ^ To do this, press the charcoal filter button for the grease filter will go out. 13 To change the hours of fan operation. After the grease filters have been used : ^ Press the joystick to the left to turn the fan on. To program this press the grease filter button for the charcoal filter is not preset. The indicator will light after 30 hours of operation, see "Operation / Reprogramming the charcoal filter timer". The charcoal filter...
... reset. ^ To do this, press the charcoal filter button for the grease filter will go out. 13 To change the hours of fan operation. After the grease filters have been used : ^ Press the joystick to the left to turn the fan on. To program this press the grease filter button for the charcoal filter is not preset. The indicator will light after 30 hours of operation, see "Operation / Reprogramming the charcoal filter timer". The charcoal filter...

Operating and Installation manual
Page 15
... to turn the fan off. ^ Use the joystick to exhaust fumes. All indicators will flash. The charcoal filter timer is not stored within 4 minutes of the fan power scale indicators will go out. The indicator for a longer operating time. ^ Press the Delayed Shut Down and charcoal filter buttons at the same time. If the procedure is not preset. Before using the hood in recirculation mode...
... to turn the fan off. ^ Use the joystick to exhaust fumes. All indicators will flash. The charcoal filter timer is not stored within 4 minutes of the fan power scale indicators will go out. The indicator for a longer operating time. ^ Press the Delayed Shut Down and charcoal filter buttons at the same time. If the procedure is not preset. Before using the hood in recirculation mode...

Operating and Installation manual
Page 16
... containing soda, acids or chlorides, - limescale removers. These will cause damage. Never use too much water when cleaning the controls. Wait a few minutes after turned off before cleaning. Stainless steel colored controls These controls may become discolored or damaged if not cleaned regularly. Do not use abrasive cleaners, scouring pads, steel wool or caustic (oven) cleaners on these controls. They stay hot for some time...
... containing soda, acids or chlorides, - limescale removers. These will cause damage. Never use too much water when cleaning the controls. Wait a few minutes after turned off before cleaning. Stainless steel colored controls These controls may become discolored or damaged if not cleaned regularly. Do not use abrasive cleaners, scouring pads, steel wool or caustic (oven) cleaners on these controls. They stay hot for some time...

Operating and Installation manual
Page 19
... indicator light will be replaced in addition to access the charcoal filters. It is designed to reset the charcoal filter timer. Cleaning and care Active charcoal filter DA 2280 uses 2 active charcoal filters DA 2210 uses 4 active charcoal filters In recirculation mode active charcoal filters must be used in the canopy above the grease filters. See "Cleaning and Care - The active charcoal filters will go out. ^ If the charcoal filters are replaced before the timer has reached its maximum, the charcoal filter button should be ordered from Miele. ^ Remove the grease filters...
... indicator light will be replaced in addition to access the charcoal filters. It is designed to reset the charcoal filter timer. Cleaning and care Active charcoal filter DA 2280 uses 2 active charcoal filters DA 2210 uses 4 active charcoal filters In recirculation mode active charcoal filters must be used in the canopy above the grease filters. See "Cleaning and Care - The active charcoal filters will go out. ^ If the charcoal filters are replaced before the timer has reached its maximum, the charcoal filter button should be ordered from Miele. ^ Remove the grease filters...

Operating and Installation manual
Page 20
..., ELECTRIC SHOCK, OR INJURY TO PERSONS, OBSERVE THE FOLLOWING: Before changing the light bulbs, disconnect the hood from the power supply, see "Important Safety Instructions". Do not touch the bulb surface. When in the reverse order and push upwards. ^ Return the grease filters and if existent the active charcoal filters. 20 Do not attempt to cool down. Follow the bulb manufacturer's instructions. ^ Remove the grease filters. ^ If...
..., ELECTRIC SHOCK, OR INJURY TO PERSONS, OBSERVE THE FOLLOWING: Before changing the light bulbs, disconnect the hood from the power supply, see "Important Safety Instructions". Do not touch the bulb surface. When in the reverse order and push upwards. ^ Return the grease filters and if existent the active charcoal filters. 20 Do not attempt to cool down. Follow the bulb manufacturer's instructions. ^ Remove the grease filters. ^ If...
Operating and Installation manual
Page 21
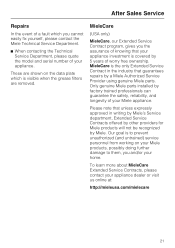
.... These are removed. Only genuine Miele parts installed by 5 years of worry free ownership. MieleCare is the only Extended Service Contract in writing by Miele's Service department, Extended Service Contracts offered by other providers for Miele products will not be recognized by a Miele Authorized Service Provider using genuine Miele parts. After Sales Service Repairs In the event of a fault which is visible when the grease filters are shown on...
.... These are removed. Only genuine Miele parts installed by 5 years of worry free ownership. MieleCare is the only Extended Service Contract in writing by Miele's Service department, Extended Service Contracts offered by other providers for Miele products will not be recognized by a Miele Authorized Service Provider using genuine Miele parts. After Sales Service Repairs In the event of a fault which is visible when the grease filters are shown on...

Operating and Installation manual
Page 27
... cooktop, follow their requirement. - If installing the exhaust hood in an overhead cabinet, observe the instructions of the manufacturer of the gas cooktop regarding the use of at least 30" (762 mm) from the gas cooktop. - If not otherwise specified in the instructions, ensure a distance of very flammable materials above the cooktop. Appliance dimensions *Cut out dimensions A depth T, min. 1" (25 mm), is necessary in the rear of the hood: Electric Cooktops Electric...
... cooktop, follow their requirement. - If installing the exhaust hood in an overhead cabinet, observe the instructions of the manufacturer of the gas cooktop regarding the use of at least 30" (762 mm) from the gas cooktop. - If not otherwise specified in the instructions, ensure a distance of very flammable materials above the cooktop. Appliance dimensions *Cut out dimensions A depth T, min. 1" (25 mm), is necessary in the rear of the hood: Electric Cooktops Electric...

Operating and Installation manual
Page 28
... electrical connection before installing this hood. The top half (motor and fan assembly) should be installed within cabinetry and kitchen islands. This flap automatically closes when the hood is equipped with one, the DA 2210 with the screws (3.5 x 16 mm). 28 Non-return flap Installation The hood is used in the cut out. ^ Secure the hood through the frame with two non-return flaps. ,CAUTION To avoid risk of outside air...
... electrical connection before installing this hood. The top half (motor and fan assembly) should be installed within cabinetry and kitchen islands. This flap automatically closes when the hood is equipped with one, the DA 2210 with the screws (3.5 x 16 mm). 28 Non-return flap Installation The hood is used in the cut out. ^ Secure the hood through the frame with two non-return flaps. ,CAUTION To avoid risk of outside air...

Operating and Installation manual
Page 30
... recirculation vents make sure that the slats point towards the center of the hood. 30 It can be converted for the hood to a wall or the ceiling. ^ Install the active charcoal filters (see "Cleaning and Care") and reprogram the charcoal filter timer. If site conditions are not suitable for recirculation using the following installation kit. It contains a 6" (150 mm) diameter hose, a grille and a hose clamp to the installation situation. Installation Recirculation mode DA...
... recirculation vents make sure that the slats point towards the center of the hood. 30 It can be converted for the hood to a wall or the ceiling. ^ Install the active charcoal filters (see "Cleaning and Care") and reprogram the charcoal filter timer. If site conditions are not suitable for recirculation using the following installation kit. It contains a 6" (150 mm) diameter hose, a grille and a hose clamp to the installation situation. Installation Recirculation mode DA...

Operating and Installation manual
Page 33
... a wide radius. - Make sure all local building codes when installing the hood. Gas cooking appliances release carbon monoxide that can be used , the cross section must slope away from approved non-flammable materials for exhaust ducting. Follow all connections are secure. - The ducting should be bent or compressed. - Do not vent exhaust air into the appliance. - If flat ducting is used . 33 If the exhaust is horizontal...
... a wide radius. - Make sure all local building codes when installing the hood. Gas cooking appliances release carbon monoxide that can be used , the cross section must slope away from approved non-flammable materials for exhaust ducting. Follow all connections are secure. - The ducting should be bent or compressed. - Do not vent exhaust air into the appliance. - If flat ducting is used . 33 If the exhaust is horizontal...
Operating and Installation manual
Page 35
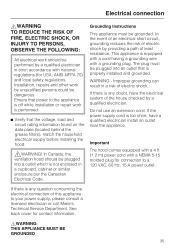
..., load and circuit rating information found on the data plate (located behind the grease filters), match the household electrical supply before installing the hood. ,WARNING! Improper grounding can result in a cupboard, cabinet or similar enclosure per the Canadian Electrical Code. If there is any question concerning the electrical connection of this appliance to your power supply, please consult a licensed electrician or call Miele's Technical Service Department...
..., load and circuit rating information found on the data plate (located behind the grease filters), match the household electrical supply before installing the hood. ,WARNING! Improper grounding can result in a cupboard, cabinet or similar enclosure per the Canadian Electrical Code. If there is any question concerning the electrical connection of this appliance to your power supply, please consult a licensed electrician or call Miele's Technical Service Department...
DA2210
Page 1
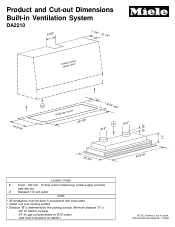
SPECIFICATION SHEETS 011208 Product and Cut-out Dimensions Built-in accordance with local codes. • Center unit over cooking surface • Distance "S" is not to scale. Minimum distance "S" is: - 24" for electric surfaces - 24" for gas surfaces based on BTU output (see hood instructions for details ) 43 5/16" NOTE: Drawing is determined by the cooking surface. O - Standard 110 Volt outlet Notes • All installations must...
SPECIFICATION SHEETS 011208 Product and Cut-out Dimensions Built-in accordance with local codes. • Center unit over cooking surface • Distance "S" is not to scale. Minimum distance "S" is: - 24" for electric surfaces - 24" for gas surfaces based on BTU output (see hood instructions for details ) 43 5/16" NOTE: Drawing is determined by the cooking surface. O - Standard 110 Volt outlet Notes • All installations must...


