Operating and Installation manual
Page 2
Contents IMPORTANT SAFETY INSTRUCTIONS 3 Description of functions 7 Guide to the ventilation system 8 Turning the light on/off 9 Fan control 9 Cleaning and care 10 Grease filters 11 Odor-free filter (active charcoal filter 13 Changing the light bulbs 14 After Sales Service 15 Installation instructions 17 Caring for the environment 18 Appliance dimensions 19 Installation 21 Diverter 21 Under-cabinet installation 22 Wall mounting 23 Electrical connection 27 Exhaust ducting 28 Condensate trap 30 Technical data 31 2
Contents IMPORTANT SAFETY INSTRUCTIONS 3 Description of functions 7 Guide to the ventilation system 8 Turning the light on/off 9 Fan control 9 Cleaning and care 10 Grease filters 11 Odor-free filter (active charcoal filter 13 Changing the light bulbs 14 After Sales Service 15 Installation instructions 17 Caring for the environment 18 Appliance dimensions 19 Installation 21 Diverter 21 Under-cabinet installation 22 Wall mounting 23 Electrical connection 27 Exhaust ducting 28 Condensate trap 30 Technical data 31 2
Operating and Installation manual
Page 3
... servicing or cleaning the appliance, switch power off at the service panel and lock the service disconnecting means to vent cooking smoke and odors only. ~ This appliance is suitable for installation above gas or electric cooking surfaces. ~ This appliance is properly installed and grounded by the manufacturer. Do Not Use To Exhaust Hazardous Or Explosive Materials And Vapors. ~ This appliance is designed to prevent power from being switched on a ship...
... servicing or cleaning the appliance, switch power off at the service panel and lock the service disconnecting means to vent cooking smoke and odors only. ~ This appliance is suitable for installation above gas or electric cooking surfaces. ~ This appliance is properly installed and grounded by the manufacturer. Do Not Use To Exhaust Hazardous Or Explosive Materials And Vapors. ~ This appliance is designed to prevent power from being switched on a ship...
Operating and Installation manual
Page 4
... medium settings. ~ b) Always turn the hood on the data plate correspond with electrical connections or components and mechanical parts is highly dangerous to the user and can cause operation faults. ~ g) Before discarding an old appliance, disconnect it from the power supply and remove the power cord to prevent appliance damage. Repairs and other parts of the cooking area. ~ e) Do not flambé or grill with all applicable codes and...
... medium settings. ~ b) Always turn the hood on the data plate correspond with electrical connections or components and mechanical parts is highly dangerous to the user and can cause operation faults. ~ g) Before discarding an old appliance, disconnect it from the power supply and remove the power cord to prevent appliance damage. Repairs and other parts of the cooking area. ~ e) Do not flambé or grill with all applicable codes and...

Operating and Installation manual
Page 5
... EVENT OF A COOKTOP GREASE FIRE, OBSERVE THE FOLLOWING*: ~ a) SMOTHER FLAMES with a close fitting lid, cookie sheet, or metal tray then turn on "Kitchen Firesafety Tips" published by the elderly or infirm. ~ Always turn off when not in place. ~ Do not use . You may be damaged due to excessive heat from condensation. ~ Never operate gas burners without the grease filter in use a steam...
... EVENT OF A COOKTOP GREASE FIRE, OBSERVE THE FOLLOWING*: ~ a) SMOTHER FLAMES with a close fitting lid, cookie sheet, or metal tray then turn on "Kitchen Firesafety Tips" published by the elderly or infirm. ~ Always turn off when not in place. ~ Do not use . You may be damaged due to excessive heat from condensation. ~ Never operate gas burners without the grease filter in use a steam...

Operating and Installation manual
Page 6
...: ~ a) Installation work and electrical wiring must be vented to the outdoors. ~ e) Do not use this hood with all applicable codes and standards, including fire-rated construction. ~ b) Sufficient air is needed for Heating, Refrigeration and Air Conditioning Engineers (ASHRAE), and the local code authorities. ~ c) When cutting or drilling into the wall or ceiling, do not guarantee the required safety of this manual. Extension cords do not damage electrical wiring and other hidden utilities. ~ d) Ducted hoods...
...: ~ a) Installation work and electrical wiring must be vented to the outdoors. ~ e) Do not use this hood with all applicable codes and standards, including fire-rated construction. ~ b) Sufficient air is needed for Heating, Refrigeration and Air Conditioning Engineers (ASHRAE), and the local code authorities. ~ c) When cutting or drilling into the wall or ceiling, do not guarantee the required safety of this manual. Extension cords do not damage electrical wiring and other hidden utilities. ~ d) Ducted hoods...

Operating and Installation manual
Page 9
... for normal cooking. ^ The "IS" level should be used temporarily for the fan Turning the light on/off The overhead light and the fan can be turned on and off separately j. Guide to the ventilation system a Control panel b Overhead lighting c Odor-free filter (active charcoal filter) Optional accessory for recirculation mode d Cover for the odor-free filter duct e Grease filter f Vent collar C 125 mm or 150 mm g Non-return flap h Vent for air extraction i Recirculation vent j Switch for the overhead lighting k Switch for a short...
... for normal cooking. ^ The "IS" level should be used temporarily for the fan Turning the light on/off The overhead light and the fan can be turned on and off separately j. Guide to the ventilation system a Control panel b Overhead lighting c Odor-free filter (active charcoal filter) Optional accessory for recirculation mode d Cover for the odor-free filter duct e Grease filter f Vent collar C 125 mm or 150 mm g Non-return flap h Vent for air extraction i Recirculation vent j Switch for the overhead lighting k Switch for a short...
Operating and Installation manual
Page 10
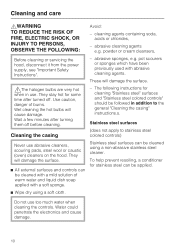
... resoiling, a conditioner for cleaning "Stainless steel" surfaces and "Stainless steel colored controls" should be cleaned using a soft cloth. powder or cream cleansers, Before cleaning or servicing the hood, disconnect it from the power supply, see "Important Safety Instructions". - The following instructions for stainless steel can be followed in use. Stainless steel surfaces can be cleaned with abrasive cleaning agents. Do not use abrasive cleaners, scouring pads, steel wool or caustic (oven) cleaners on the...
... resoiling, a conditioner for cleaning "Stainless steel" surfaces and "Stainless steel colored controls" should be cleaned using a soft cloth. powder or cream cleansers, Before cleaning or servicing the hood, disconnect it from the power supply, see "Important Safety Instructions". - The following instructions for stainless steel can be followed in use. Stainless steel surfaces can be cleaned with abrasive cleaning agents. Do not use abrasive cleaners, scouring pads, steel wool or caustic (oven) cleaners on the...

Operating and Installation manual
Page 11
... the filter and the cooktop, hold the filter securely when handling it. 11 To prevent damage to clean this chapter. Observe the general cleaning information in this type of the ventilation system. This can become discolored or damaged if not cleaned regularly. Stainless steel colored controls These controls may become particularly noticeable if there is halogen light in the hood remove solid particles from the vented kitchen air (grease...
... the filter and the cooktop, hold the filter securely when handling it. 11 To prevent damage to clean this chapter. Observe the general cleaning information in this type of the ventilation system. This can become discolored or damaged if not cleaned regularly. Stainless steel colored controls These controls may become particularly noticeable if there is halogen light in the hood remove solid particles from the vented kitchen air (grease...

Operating and Installation manual
Page 13
.... ^ Insert the odor-free filter into the duct and push upward until it is positioned under the vent. ^ Remove the grease filters. ^ Slide the cover of the odor-free filter duct slightly to the right and downward to absorb cooking odors. Replace the filter every 6 months or when it is no longer absorbing cooking odors. ^ Used odor-free filters may be used in addition to the grease filter. Cleaning and care Odor-free filter (active charcoal filter) For recirculation...
.... ^ Insert the odor-free filter into the duct and push upward until it is positioned under the vent. ^ Remove the grease filters. ^ Slide the cover of the odor-free filter duct slightly to the right and downward to absorb cooking odors. Replace the filter every 6 months or when it is no longer absorbing cooking odors. ^ Used odor-free filters may be used in addition to the grease filter. Cleaning and care Odor-free filter (active charcoal filter) For recirculation...

Operating and Installation manual
Page 14
... 10, 120 V, 50 W. ^ Install the new light in the reverse order. ^ Put the grease filter back in use halogen bulbs become extremely hot, and can burn your hands. Replace it out. Cleaning and care Changing the light bulbs ^ Remove the grease filter. ,WARNING TO REDUCE THE RISK OF FIRE, ELECTRIC SHOCK, OR INJURY TO PERSONS, OBSERVE THE FOLLOWING: Before changing the light bulbs, disconnect the hood from the power supply, see "Important...
... 10, 120 V, 50 W. ^ Install the new light in the reverse order. ^ Put the grease filter back in use halogen bulbs become extremely hot, and can burn your hands. Replace it out. Cleaning and care Changing the light bulbs ^ Remove the grease filter. ,WARNING TO REDUCE THE RISK OF FIRE, ELECTRIC SHOCK, OR INJURY TO PERSONS, OBSERVE THE FOLLOWING: Before changing the light bulbs, disconnect the hood from the power supply, see "Important...
Operating and Installation manual
Page 15
... longevity of your Miele appliance. These are removed. Our goal is visible when the grease filter are shown on your Miele products, possibly doing further damage to them, you cannot easily fix yourself, please contact the Miele Technical Service Department. ^ When contacting the Technical Service Department, please quote the model and serial number of your appliance. After Sales Service Repairs In the event...
... longevity of your Miele appliance. These are removed. Our goal is visible when the grease filter are shown on your Miele products, possibly doing further damage to them, you cannot easily fix yourself, please contact the Miele Technical Service Department. ^ When contacting the Technical Service Department, please quote the model and serial number of your appliance. After Sales Service Repairs In the event...
Operating and Installation manual
Page 20
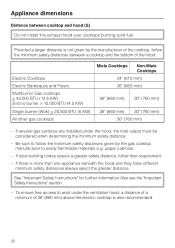
..." (660 mm) above the electric cooktop is more than one appliance beneath the hood and they have different minimum safety distances always select the greater distance. To ensure free access to easily flammable materials e.g. If local building codes require a greater safety distance, follow the minimum safety distances between cooktop and hood (S) Do not install this exhaust hood over cooktops burning solid fuel.
..." (660 mm) above the electric cooktop is more than one appliance beneath the hood and they have different minimum safety distances always select the greater distance. To ensure free access to easily flammable materials e.g. If local building codes require a greater safety distance, follow the minimum safety distances between cooktop and hood (S) Do not install this exhaust hood over cooktops burning solid fuel.
Operating and Installation manual
Page 21
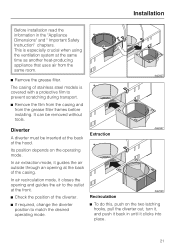
... appliance that uses air from the grease filter frames before installing. Installation Before installation read the information in until it clicks into place. 21 This is covered with a protective film to the outlet at the back of the casing. Extraction Recirculation ^ To do this, push on the operating mode. Diverter A diverter must be removed without tools. The casing of stainless steel models is especially...
... appliance that uses air from the grease filter frames before installing. Installation Before installation read the information in until it clicks into place. 21 This is covered with a protective film to the outlet at the back of the casing. Extraction Recirculation ^ To do this, push on the operating mode. Diverter A diverter must be removed without tools. The casing of stainless steel models is especially...

Operating and Installation manual
Page 22
... of the cabinet. 22 electric shocks). Installation Under-cabinet installation Several holes for fastening the device under a cabinet are provided in recirculation mode, cover the opening at the back with the sticker. Use only the specified screws. Faulty installation can damage the ventilation system and impair the electrical safety (e.g. The sticker comes with the odor-free filter which is available as an optional accessory (active charcoal filter). ,Use only...
... of the cabinet. 22 electric shocks). Installation Under-cabinet installation Several holes for fastening the device under a cabinet are provided in recirculation mode, cover the opening at the back with the sticker. Use only the specified screws. Faulty installation can damage the ventilation system and impair the electrical safety (e.g. The sticker comes with the odor-free filter which is available as an optional accessory (active charcoal filter). ,Use only...
Operating and Installation manual
Page 23
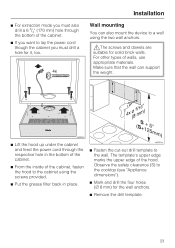
... the cabinet, fasten the hood to the cabinet using the two wall anchors. ,The screws and dowels are suitable for solid brick walls. Installation Wall mounting You can support the weight. ^ Lift the hood up under the cabinet and feed the power cord through the bottom of the cabinet. ^ If you want to lay the power cord though the cabinet you must drill a hole for the wall anchors. ^ Remove the drill template. 23...
... the cabinet, fasten the hood to the cabinet using the two wall anchors. ,The screws and dowels are suitable for solid brick walls. Installation Wall mounting You can support the weight. ^ Lift the hood up under the cabinet and feed the power cord through the bottom of the cabinet. ^ If you want to lay the power cord though the cabinet you must drill a hole for the wall anchors. ^ Remove the drill template. 23...

Operating and Installation manual
Page 25
... as is used, install the exhaust ducting and connections. ^ If required, insert the non-return flap. These are used to cut off the exhaust collar where it tapers. Ensure that the flap opens easily and closes by itself. 25 For an C 5" (125 mm) exhaust duct, use a pointed knife to adjust the tilt and secure the hood in position. ^ Reinstall the overhead lights. ^ Put the grease filter back...
... as is used, install the exhaust ducting and connections. ^ If required, insert the non-return flap. These are used to cut off the exhaust collar where it tapers. Ensure that the flap opens easily and closes by itself. 25 For an C 5" (125 mm) exhaust duct, use a pointed knife to adjust the tilt and secure the hood in position. ^ Reinstall the overhead lights. ^ Put the grease filter back...

Operating and Installation manual
Page 26
... the hood. - For recirculation mode: ^ Insert the odor-free filter (see "Exhaust ducting". Installation ^ Fasten the exhaust duct to the exhaust collar e.g. Observe the instructions in not installed correctly (see "Diverter"). using a flexible duct and a clamp (optional accessory). ^ Insert the exhaust collar into the power outlet. ^ To carry out a function test, turn the fan on. - If this is not the case, the diverter in "Important safety instructions" and "Electrical connection". ^ Plug the power cord into the exhaust...
... the hood. - For recirculation mode: ^ Insert the odor-free filter (see "Exhaust ducting". Installation ^ Fasten the exhaust duct to the exhaust collar e.g. Observe the instructions in not installed correctly (see "Diverter"). using a flexible duct and a clamp (optional accessory). ^ Insert the exhaust collar into the power outlet. ^ To carry out a function test, turn the fan on. - If this is not the case, the diverter in "Important safety instructions" and "Electrical connection". ^ Plug the power cord into the exhaust...
Operating and Installation manual
Page 27
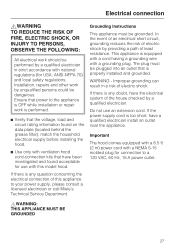
... electrician or call Miele's Technical Service Department. The plug must be plugged into an outlet that is performed. ^ Verify that the voltage, load and circuit rating information found acceptable for USA: ANSI-NFPA 70) and local safety regulations. Do not use with ventilation hood cord-connection kits that power to the appliance is OFF while installation or repair work is properly installed and grounded. Ensure...
... electrician or call Miele's Technical Service Department. The plug must be plugged into an outlet that is performed. ^ Verify that the voltage, load and circuit rating information found acceptable for USA: ANSI-NFPA 70) and local safety regulations. Do not use with ventilation hood cord-connection kits that power to the appliance is OFF while installation or repair work is properly installed and grounded. Ensure...
Operating and Installation manual
Page 28
... dripping into spaces within walls or ceilings or in attics, crawl spaces or garages. Make sure all local building codes when installing the hood. Use smooth or flexible pipework made from the hood at least 1/8" per foot (1 cm per meter) to properly exhaust air, the exhaust gases extracted by the hood should be harmful or fatal if inhaled. The exhaust duct must slope away...
... dripping into spaces within walls or ceilings or in attics, crawl spaces or garages. Make sure all local building codes when installing the hood. Use smooth or flexible pipework made from the hood at least 1/8" per foot (1 cm per meter) to properly exhaust air, the exhaust gases extracted by the hood should be harmful or fatal if inhaled. The exhaust duct must slope away...
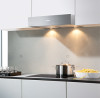
DA 1160 Built-Under Hood
Page 2
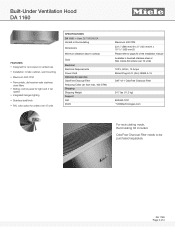
... Integrated halogen lighting Stainless steel finish RAL color option for orders over 10 units SPECIFICATIONS DA 1160 - OdorFree Charcoal Filter needs to page 20 of 4 NEMA 5-15 DKF 18-1 OdorFree Charcoal Filter 24.7 lbs (11.2 kg) 800.843.7231 82020technologies.com For recirculating mode, Recirculating Kit included. Item 28116055USA Vented or Recirculating Dimensions Minimum distance above cooktop Color Electrical Electrical Requirements Power Cord Optional Accessories OdorFree Charcoal Filter Reducing Collar (air flow max. 400 CFM) Shipping Shipping Weight Support Call...
... Integrated halogen lighting Stainless steel finish RAL color option for orders over 10 units SPECIFICATIONS DA 1160 - OdorFree Charcoal Filter needs to page 20 of 4 NEMA 5-15 DKF 18-1 OdorFree Charcoal Filter 24.7 lbs (11.2 kg) 800.843.7231 82020technologies.com For recirculating mode, Recirculating Kit included. Item 28116055USA Vented or Recirculating Dimensions Minimum distance above cooktop Color Electrical Electrical Requirements Power Cord Optional Accessories OdorFree Charcoal Filter Reducing Collar (air flow max. 400 CFM) Shipping Shipping Weight Support Call...


