Operating and Installation manual
Page 2
... SAFETY INSTRUCTIONS 4 Guide to the dishwasher 7 Control panel 8 Caring for the environment 9 Before using for the first time 10 To open the door 10 To close the door 10 Displaying and setting the water hardness 12 Filling the salt container 13 Salt indicator 14 Deactivating refill indicators 15 Rinse aid 16 Adding rinse aid 16 Rinse aid indicator 17 Setting the rinse aid dosage 18 Loading the dishwasher 19 Items not recommended for dishwashing 20 Typical load for 10 place settings with...
... SAFETY INSTRUCTIONS 4 Guide to the dishwasher 7 Control panel 8 Caring for the environment 9 Before using for the first time 10 To open the door 10 To close the door 10 Displaying and setting the water hardness 12 Filling the salt container 13 Salt indicator 14 Deactivating refill indicators 15 Rinse aid 16 Adding rinse aid 16 Rinse aid indicator 17 Setting the rinse aid dosage 18 Loading the dishwasher 19 Items not recommended for dishwashing 20 Typical load for 10 place settings with...
Operating and Installation manual
Page 3
Contents Additional options 37 Turbo 37 Delay start 38 Buzzer 39 Optimize Standby 40 Factory defaults 41 Frequently Asked Questions 42 Technical faults 42 Faults in the water intake or water drain 43 General problems with the dishwasher 44 Sounds 45 Poor cleaning results 46 After sales service 49 User Maintenance Instructions 51 Cleaning and Care 52 Triple filter system 53 Cleaning the drain pump and non-return valve 56 Installation instructions 57 Electrical connection 58 Plumbing 60 Connection to the water supply 60 Drainage 61 3
Contents Additional options 37 Turbo 37 Delay start 38 Buzzer 39 Optimize Standby 40 Factory defaults 41 Frequently Asked Questions 42 Technical faults 42 Faults in the water intake or water drain 43 General problems with the dishwasher 44 Sounds 45 Poor cleaning results 46 After sales service 49 User Maintenance Instructions 51 Cleaning and Care 52 Triple filter system 53 Cleaning the drain pump and non-return valve 56 Installation instructions 57 Electrical connection 58 Plumbing 60 Connection to the water supply 60 Drainage 61 3
Operating and Installation manual
Page 4
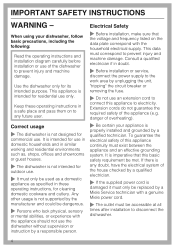
..., "tripping" the circuit breaker or removing the fuse. ~ Do not use an extension cord to connect this appliance to electricity. To guarantee the electrical safety of the appliance (e.g. IMPORTANT SAFETY INSTRUCTIONS WARNING - Correct usage ~ The dishwasher is damaged it must only be accessible at all times after installation to the work area by a qualified electrician. ~ If the supplied power cord is not designed for its intended...
..., "tripping" the circuit breaker or removing the fuse. ~ Do not use an extension cord to connect this appliance to electricity. To guarantee the electrical safety of the appliance (e.g. IMPORTANT SAFETY INSTRUCTIONS WARNING - Correct usage ~ The dishwasher is damaged it must only be accessible at all times after installation to the work area by a qualified electrician. ~ If the supplied power cord is not designed for its intended...
Operating and Installation manual
Page 5
... the supplied toe-kick is not used with the installation instructions. ~ Installation and repair work is dangerous. Damage of suffocation! ~ This appliance must be dangerous and may void the warranty. ~ Do not install or use a damaged dishwasher. Installing the dishwasher in liquid. Do not expose hose or power cord to adjacent cabinetry. ~ Do not install this dishwasher beneath a cooking surface, oven or any plastic wrappings, bags, etc. Work by a Miele authorized service...
... the supplied toe-kick is not used with the installation instructions. ~ Installation and repair work is dangerous. Damage of suffocation! ~ This appliance must be dangerous and may void the warranty. ~ Do not install or use a damaged dishwasher. Installing the dishwasher in liquid. Do not expose hose or power cord to adjacent cabinetry. ~ Do not install this dishwasher beneath a cooking surface, oven or any plastic wrappings, bags, etc. Work by a Miele authorized service...
Operating and Installation manual
Page 6
... for residential dishwashers. It is not used , remove the doorlock to the wash cabinet to prevent children from the door to prevent damage to cool until they are "dishwasher safe". Do not smoke or use detergents and rinse aids recommended for several minutes before unloading them. ~ The water supply must be present. ~ Do not fill the rinse aid reservoir or salt container with the controls. ~ Do...
... for residential dishwashers. It is not used , remove the doorlock to the wash cabinet to prevent children from the door to prevent damage to cool until they are "dishwasher safe". Do not smoke or use detergents and rinse aids recommended for several minutes before unloading them. ~ The water supply must be present. ~ Do not fill the rinse aid reservoir or salt container with the controls. ~ Do...
Operating and Installation manual
Page 8
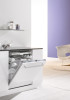
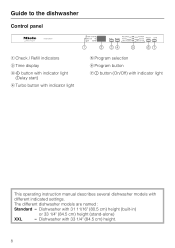
The different dishwasher models are named : Standard = Dishwasher with 31 11/16" (80.5 cm) height (built-in) or 33 1/4" (84.5 cm) height (stand-alone) XXL = Dishwasher with different indicated settings. Guide to the dishwasher Control panel a Check / Refill indicators b Time display c , button with indicator light (Delay start) d Turbo button with indicator light e Program selection f Program button g K button (On/Off) with indicator light This operating instruction manual describes several dishwasher models with 33 1/4" (84.5 cm) height. 8
The different dishwasher models are named : Standard = Dishwasher with 31 11/16" (80.5 cm) height (built-in) or 33 1/4" (84.5 cm) height (stand-alone) XXL = Dishwasher with different indicated settings. Guide to the dishwasher Control panel a Check / Refill indicators b Time display c , button with indicator light (Delay start) d Turbo button with indicator light e Program selection f Program button g K button (On/Off) with indicator light This operating instruction manual describes several dishwasher models with 33 1/4" (84.5 cm) height. 8
Operating and Installation manual
Page 16
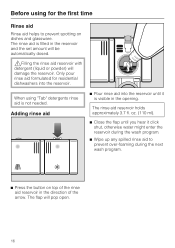
... it is not needed. The flap will damage the reservoir. Before using "Tab" detergents rinse aid is visible in the opening. oz. (110 ml). ^ Close the flap until it click shut, otherwise water might enter the reservoir during the wash program. ^ Wipe up any spilled rinse aid to prevent spotting on top of the rinse aid reservoir in the reservoir and the set amount will...
... it is not needed. The flap will damage the reservoir. Before using "Tab" detergents rinse aid is visible in the opening. oz. (110 ml). ^ Close the flap until it click shut, otherwise water might enter the reservoir during the wash program. ^ Wipe up any spilled rinse aid to prevent spotting on top of the rinse aid reservoir in the reservoir and the set amount will...
Operating and Installation manual
Page 20
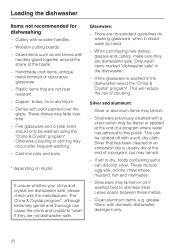
... end of a program, but may tarnish or pit if washed next to dry, foods containing sulfur can be washed using the "China & Crystal" program*. grease filters, with wooden handles - Glued items such as old knives with color painted over time - Dishes with handles glued together around the shank of clouding. When purchasing new dishes, glasses and cutlery, make sure they are not heat resistant - Clean...
... end of a program, but may tarnish or pit if washed next to dry, foods containing sulfur can be washed using the "China & Crystal" program*. grease filters, with wooden handles - Glued items such as old knives with color painted over time - Dishes with handles glued together around the shank of clouding. When purchasing new dishes, glasses and cutlery, make sure they are not heat resistant - Clean...
Operating and Installation manual
Page 32
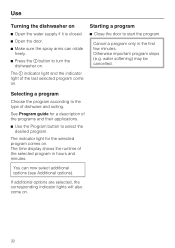
... selected, the corresponding indicator lights will also come on. Cancel a program only in hours and minutes. Otherwise important program steps (e.g. Use Turning the dishwasher on ^ Open the water supply if it is closed. ^ Open the door. ^ Make sure the spray arms can now select additional options (see Additional options). The time display shows the runtime of the programs and their applications. ^ Use the Program button to the type...
... selected, the corresponding indicator lights will also come on. Cancel a program only in hours and minutes. Otherwise important program steps (e.g. Use Turning the dishwasher on ^ Open the water supply if it is closed. ^ Open the door. ^ Make sure the spray arms can now select additional options (see Additional options). The time display shows the runtime of the programs and their applications. ^ Use the Program button to the type...
Operating and Installation manual
Page 34
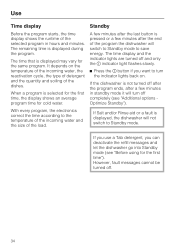
... Rinse aid or a fault is displayed may vary for cold water. The time that is displayed, the dishwasher will switch to Standby mode to save energy. If you use a Tab detergent, you want to Standby mode. Use Time display Standby Before the program starts, the time display shows the runtime of the dishes. The time display and the indicator lights are turned off after the program ends, after the end of the load. If the dishwasher is displayed...
... Rinse aid or a fault is displayed may vary for cold water. The time that is displayed, the dishwasher will switch to Standby mode to save energy. If you use a Tab detergent, you want to Standby mode. Use Time display Standby Before the program starts, the time display shows the runtime of the dishes. The time display and the indicator lights are turned off after the program ends, after the end of the load. If the dishwasher is displayed...
Operating and Installation manual
Page 35
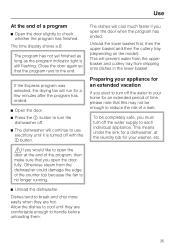
... yet finished as long as the program indicator light is no longer running. Unload the lower basket first, then the upper basket and then the cutlery tray (depending on the model). Close the door again so that you elect to turn the dishwasher off the water to your washer, etc. ^ Unload the dishwasher. Use At the end of a program ^ Open the door slightly to reduce the risk of a leak. Preparing your...
... yet finished as long as the program indicator light is no longer running. Unload the lower basket first, then the upper basket and then the cutlery tray (depending on the model). Close the door again so that you elect to turn the dishwasher off the water to your washer, etc. ^ Unload the dishwasher. Use At the end of a program ^ Open the door slightly to reduce the risk of a leak. Preparing your...

Operating and Installation manual
Page 40
.... The time display and the indicator lights do not go out, and the dishwasher turns off and only the K indicator light flashes slowly. Keep the Program button pressed for at least four seconds until the lower right program indicator lights up. The Turbo indicator light shows 8 short flashes in higher energy consumption. You can also deactivate the Optimize Standby function. If Salt and/or Rinse aid or a fault is pressed...
.... The time display and the indicator lights do not go out, and the dishwasher turns off and only the K indicator light flashes slowly. Keep the Program button pressed for at least four seconds until the lower right program indicator lights up. The Turbo indicator light shows 8 short flashes in higher energy consumption. You can also deactivate the Optimize Standby function. If Salt and/or Rinse aid or a fault is pressed...
Operating and Installation manual
Page 42
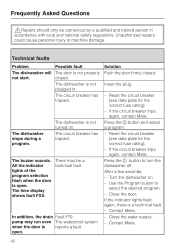
... program. - Use the Program button to turn the dishwasher off. The dishwasher is open . Turn the dishwasher on . The buzzer sounds. In addition, the drain Fault F70: pump may be carried out by a qualified and trained person in . Reset the circuit breaker (see data plate for the correct fuse rating). - If the circuit breaker trips again, contact Miele. Contact Miele, - Technical faults Problem The dishwasher will not start. The dishwasher stops during...
... program. - Use the Program button to turn the dishwasher off. The dishwasher is open . Turn the dishwasher on . The buzzer sounds. In addition, the drain Fault F70: pump may be carried out by a qualified and trained person in . Reset the circuit breaker (see data plate for the correct fuse rating). - If the circuit breaker trips again, contact Miele. Contact Miele, - Technical faults Problem The dishwasher will not start. The dishwasher stops during...
Operating and Installation manual
Page 43
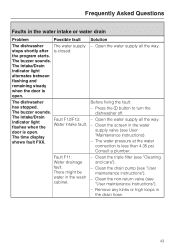
... to turn the dishwasher off. - Clean the triple filter (see "User maintenance instructions"). - Before fixing the fault: - The water pressure at the water connection is closed. Fault F11: Water drainage fault. Remove any kinks or high loops in the wash cabinet. - Open the water supply all the way. - There might be water in the drain hose. 43 the program starts. Clean the non-return valve (see "Cleaning and care"). - Clean the screen in the water supply valve (see "User maintenance instructions"). - Consult a plumber. The Intake/Drain indicator light...
... to turn the dishwasher off. - Clean the triple filter (see "User maintenance instructions"). - Before fixing the fault: - The water pressure at the water connection is closed. Fault F11: Water drainage fault. Remove any kinks or high loops in the wash cabinet. - Open the water supply all the way. - There might be water in the drain hose. 43 the program starts. Clean the non-return valve (see "Cleaning and care"). - Clean the screen in the water supply valve (see "User maintenance instructions"). - Consult a plumber. The Intake/Drain indicator light...
Operating and Installation manual
Page 44
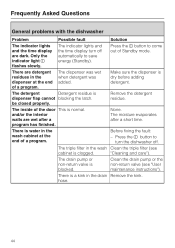
... the wash Clean the triple filter (see "User maintenance instructions"). The dispenser was wet when detergent was added. and/or the interior walls are dark. Press the K button to turn off . None. The indicator lights and the time display turn the dishwasher off automatically to come out of the door This is blocked. be closed properly. The drain pump or non-return valve is normal. Press the K button to save energy (Standby). "Cleaning and care"). Only the indicator light K flashes...
... the wash Clean the triple filter (see "User maintenance instructions"). The dispenser was wet when detergent was added. and/or the interior walls are dark. Press the K button to turn off . None. The indicator lights and the time display turn the dishwasher off automatically to come out of the door This is blocked. be closed properly. The drain pump or non-return valve is normal. Press the K button to save energy (Standby). "Cleaning and care"). Only the indicator light K flashes...

Operating and Installation manual
Page 45
... dishwasher. rearrange loose pieces. If in the drain pump. Remove the foreign object from the drain pump (see "Cleaning the drain pump and non-return valve") This may be caused by the installation or the diameter of the pipe. Frequently Asked Questions Sounds Problem There is a knocking noise in the wash cabinet There is a rattling noise in the wash cabinet There is a knocking noise in the water line Possible fault Solution The spray arm...
... dishwasher. rearrange loose pieces. If in the drain pump. Remove the foreign object from the drain pump (see "Cleaning the drain pump and non-return valve") This may be caused by the installation or the diameter of the pipe. Frequently Asked Questions Sounds Problem There is a knocking noise in the wash cabinet There is a rattling noise in the wash cabinet There is a knocking noise in the water line Possible fault Solution The spray arm...
Operating and Installation manual
Page 46
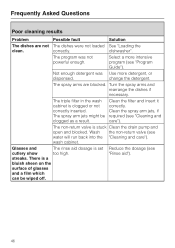
... filter in the wash cabinet is stuck Clean the drain pump and open and blocked. Clean the filter and insert it correctly. Turn the spray arms and rearrange the dishes if necessary. Clean the spray arm jets, if required (see "Rinse aid"). 46 wash cabinet. Reduce the dosage (see "Cleaning and care"). Select a more detergent, or dispensed. The non-return valve is clogged or not correctly inserted. There is set cutlery show too high. change the detergent. dishwasher". The spray arms...
... filter in the wash cabinet is stuck Clean the drain pump and open and blocked. Clean the filter and insert it correctly. Turn the spray arms and rearrange the dishes if necessary. Clean the spray arm jets, if required (see "Rinse aid"). 46 wash cabinet. Reduce the dosage (see "Cleaning and care"). Select a more detergent, or dispensed. The non-return valve is clogged or not correctly inserted. There is set cutlery show too high. change the detergent. dishwasher". The spray arms...
Operating and Installation manual
Page 52
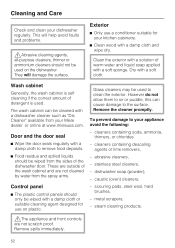
... help avoid faults and problems. ,Abrasive cleaning agents, all-purpose cleaners, thinner or ammonium cleaners should be used on plastic. Dry with a dishwasher cleaner such as "Dis Cleaner" available from your appliance avoid the following: - The wash cabinet can cause damage to remove food deposits. ^ Food residue and spilled liquids should not be wiped from the spray arms. Control panel ^ The plastic control panels should only...
... help avoid faults and problems. ,Abrasive cleaning agents, all-purpose cleaners, thinner or ammonium cleaners should be used on plastic. Dry with a dishwasher cleaner such as "Dis Cleaner" available from your appliance avoid the following: - The wash cabinet can cause damage to remove food deposits. ^ Food residue and spilled liquids should not be wiped from the spray arms. Control panel ^ The plastic control panels should only...
Operating and Installation manual
Page 58
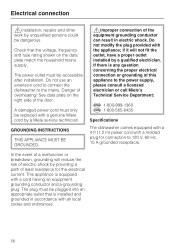
..., frequency and fuse rating shown on the right side of this appliance to the power supply, please consult a licensed electrician or call Miele's Technical Service Department: U 1-800-999-1360 V 1-800-565-6435 Specifications The dishwasher comes equipped with a 4 ft (1.2 m) power cord with a molded plug for the electrical current. In the event of electric shock by a Miele service technician. The plug must be dangerous. Electrical connection ,Installation, repairs and other work by...
..., frequency and fuse rating shown on the right side of this appliance to the power supply, please consult a licensed electrician or call Miele's Technical Service Department: U 1-800-999-1360 V 1-800-565-6435 Specifications The dishwasher comes equipped with a 4 ft (1.2 m) power cord with a molded plug for the electrical current. In the event of electric shock by a Miele service technician. The plug must be dangerous. Electrical connection ,Installation, repairs and other work by...
Operating and Installation manual
Page 61
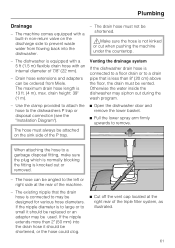
... it should be replaced or an adapter may siphon out during the wash program. - Use the clamp provided to attach the hose to the dishwashers P trap or disposal connection (see the "Installation Diagram"). ^ Open the dishwasher door and remove the lower basket. ^ Pull the lower spray arm firmly upwards to a garbage disposal fitting, make sure the plug which is normally blocking the fitting is not kinked or cut when pushing the...
... it should be replaced or an adapter may siphon out during the wash program. - Use the clamp provided to attach the hose to the dishwashers P trap or disposal connection (see the "Installation Diagram"). ^ Open the dishwasher door and remove the lower basket. ^ Pull the lower spray arm firmly upwards to a garbage disposal fitting, make sure the plug which is normally blocking the fitting is not kinked or cut when pushing the...


