
Product Manual
Page 1
Operating Instructions Freestanding coffee machine CM 5100 To prevent accidents and machine damage read these instructions before installation or use. en - US, CA M.-Nr. 07 995 311
Operating Instructions Freestanding coffee machine CM 5100 To prevent accidents and machine damage read these instructions before installation or use. en - US, CA M.-Nr. 07 995 311
Product Manual
Page 2
... SAFETY INSTRUCTIONS 4 Guide to the machine 8 Accessories 10 First steps to use 11 Before the first use 11 Turning on 11 Water hardness 12 Filling the water tank 14 Filling the coffee bean container 15 Turning the machine On / Off 16 Pre-heating cups 17 Turning the cup warmer on and off 17 Pre-heating cups using the cup warming function 17 Preparing coffee or espresso 18 Preparing two portions at one time 18...
... SAFETY INSTRUCTIONS 4 Guide to the machine 8 Accessories 10 First steps to use 11 Before the first use 11 Turning on 11 Water hardness 12 Filling the water tank 14 Filling the coffee bean container 15 Turning the machine On / Off 16 Pre-heating cups 17 Turning the cup warmer on and off 17 Pre-heating cups using the cup warming function 17 Preparing coffee or espresso 18 Preparing two portions at one time 18...

Product Manual
Page 3
Contents Time of day and clock display 36 Timer 37 Default settings 40 Operating modes 41 System lock 42 Displaying information 43 Cleaning and care 44 Quick guide 44 Rinsing the system 45 Cappuccinatore 47 Milk flask 48 Water tank 48 Drip tray cover 49 Drip tray and waste container 49 Coffee bean container 51 Brew unit 51 Exterior 54 Descaling 55 Energy saving mode 57 Transport 58 Evaporating the coffee system 58 Frequently Asked Questions...
Contents Time of day and clock display 36 Timer 37 Default settings 40 Operating modes 41 System lock 42 Displaying information 43 Cleaning and care 44 Quick guide 44 Rinsing the system 45 Cappuccinatore 47 Milk flask 48 Water tank 48 Drip tray cover 49 Drip tray and waste container 49 Coffee bean container 51 Brew unit 51 Exterior 54 Descaling 55 Energy saving mode 57 Transport 58 Evaporating the coffee system 58 Frequently Asked Questions...

Product Manual
Page 4
... not use it is important that you carefully read the instructions. ~ This coffee system is used by a responsible person. It is not designed for its intended use of coffee, cappuccino, espresso, etc. Please read these instructions in a safe place and pass the on the safe installation, operation, and care of personal injury or damage to prevent accidents and machine damage. Any other than for commercial use could...
... not use it is important that you carefully read the instructions. ~ This coffee system is used by a responsible person. It is not designed for its intended use of coffee, cappuccino, espresso, etc. Please read these instructions in a safe place and pass the on the safe installation, operation, and care of personal injury or damage to prevent accidents and machine damage. Any other than for commercial use could...
Product Manual
Page 5
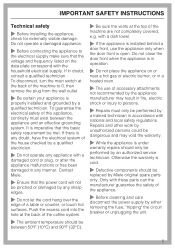
... house checked by Miele original spare parts only. Otherwise the warranty is open. If in accordance with these parts can the manufacturer guarantee the safety of the appliance. ~ Before cleaning and care disconnect the power supply by any doubt, have the electrical system of a table or counter, or touch hot surfaces. IMPORTANT SAFETY INSTRUCTIONS Technical safety ~ Before installing the appliance, check...
... house checked by Miele original spare parts only. Otherwise the warranty is open. If in accordance with these parts can the manufacturer guarantee the safety of the appliance. ~ Before cleaning and care disconnect the power supply by any doubt, have the electrical system of a table or counter, or touch hot surfaces. IMPORTANT SAFETY INSTRUCTIONS Technical safety ~ Before installing the appliance, check...

Product Manual
Page 6
... very hot. ~ Keep away from heat, for an extended period of time, turn it must not be put in water or other liquids. ~ If the coffee system will not be put in the machine. ~ Do not reach into the grinder. ~ Do not place anything into the brew unit but ground coffee or a cleaning tablet. ~ Always place the milk flask on a level surface. The water should be used...
... very hot. ~ Keep away from heat, for an extended period of time, turn it must not be put in water or other liquids. ~ If the coffee system will not be put in the machine. ~ Do not reach into the grinder. ~ Do not place anything into the brew unit but ground coffee or a cleaning tablet. ~ Always place the milk flask on a level surface. The water should be used...
Product Manual
Page 7
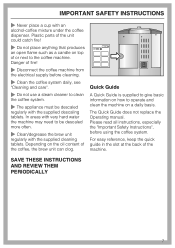
... of the coffee, the brew unit can clog. Depending on top of fire! ~ Disconnect the coffee machine from the electrical supply before using the coffee system. IMPORTANT SAFETY INSTRUCTIONS ~ Never place a cup with the supplied cleaning tablets. The Quick Guide does not replace the Operating manual. Please read all instructions, especially the "Important Safety Instructions", before cleaning. ~ Clean the coffee system daily, see "Cleaning and care". ~ Do not use a steam cleaner to be descaled regularly with...
... of the coffee, the brew unit can clog. Depending on top of fire! ~ Disconnect the coffee machine from the electrical supply before using the coffee system. IMPORTANT SAFETY INSTRUCTIONS ~ Never place a cup with the supplied cleaning tablets. The Quick Guide does not replace the Operating manual. Please read all instructions, especially the "Important Safety Instructions", before cleaning. ~ Clean the coffee system daily, see "Cleaning and care". ~ Do not use a steam cleaner to be descaled regularly with...
Product Manual
Page 9
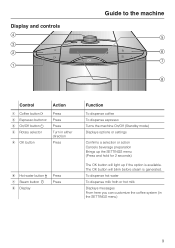
... customize the coffee system (in either direction Press f Hot water button g Steam button * h Display Press Press Function To dispense coffee To dispense espresso Turns the machine On/Off (Standby mode) Displays options or settings Confirms a selection or action Cancels beverage preparation Brings up if the option is generated. c On/Off button d Rotary selector e OK button Action Press Press Press Turn in the SETTINGS menu) 9 Display and controls Guide to the machine Control a Coffee button / b Espresso button...
... customize the coffee system (in either direction Press f Hot water button g Steam button * h Display Press Press Function To dispense coffee To dispense espresso Turns the machine On/Off (Standby mode) Displays options or settings Confirms a selection or action Cancels beverage preparation Brings up if the option is generated. c On/Off button d Rotary selector e OK button Action Press Press Press Turn in the SETTINGS menu) 9 Display and controls Guide to the machine Control a Coffee button / b Espresso button...

Product Manual
Page 10
Cleaning tablets to determine the water hardness level - Measuring spoon for storing and preparing milk Optional accessory - Milk flask for ground coffee - Accessories The following accessories come included with your Miele dealer or online at www.Mieleusa.com. 10 Descaling tablets for removing finger prints and light soiling These accessories and others are available from your coffee system: - Test strips to clean/degrease the brew unit - Microfiber cloth (optional accessory) for descaling the water pipework -
Cleaning tablets to determine the water hardness level - Measuring spoon for storing and preparing milk Optional accessory - Milk flask for ground coffee - Accessories The following accessories come included with your Miele dealer or online at www.Mieleusa.com. 10 Descaling tablets for removing finger prints and light soiling These accessories and others are available from your coffee system: - Test strips to clean/degrease the brew unit - Microfiber cloth (optional accessory) for descaling the water pipework -
Product Manual
Page 11
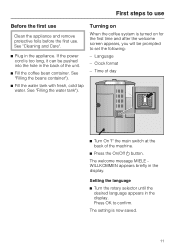
... the coffee system is turned on for the first time and after the welcome screen appears, you will be pushed into the hole in the appliance. The welcome message MIELE WILLKOMMEN appears briefly in the display. Press OK to set the following: - Clock format - See "Filling the beans container"). ^ Fill the water tank with fresh, cold tap water. button. See "Filling the water tank"). The setting is...
... the coffee system is turned on for the first time and after the welcome screen appears, you will be pushed into the hole in the appliance. The welcome message MIELE WILLKOMMEN appears briefly in the display. Press OK to set the following: - Clock format - See "Filling the beans container"). ^ Fill the water tank with fresh, cold tap water. button. See "Filling the water tank"). The setting is...
Product Manual
Page 12
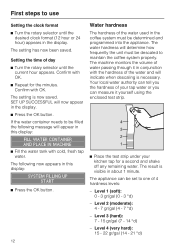
... determine how frequently the unit must be set to one of the water and will now appear in this display: FILL WATER CONTAINER AND PLACE IN MACHINE ^ Fill the water tank with OK. The setting is visible in the coffee system must be filled the following now appears in the display. ^ Press the OK button. First steps to use Setting the clock format ^ Turn the rotary selector until...
... determine how frequently the unit must be set to one of the water and will now appear in this display: FILL WATER CONTAINER AND PLACE IN MACHINE ^ Fill the water tank with OK. The setting is visible in the coffee system must be filled the following now appears in the display. ^ Press the OK button. First steps to use Setting the clock format ^ Turn the rotary selector until...

Product Manual
Page 16
SELECT TYPE OF DRINK Beverages can be used recently and still has an operating temperature higher than 140°F (60°C), rinsing will then appear. button is complete: RINSING Hot water will be rinsed before turning off the machine. The main menu will not take place. ^ Press the On/Off button -. If the coffee system was used to turn the coffee system on or off ^ Press...
SELECT TYPE OF DRINK Beverages can be used recently and still has an operating temperature higher than 140°F (60°C), rinsing will then appear. button is complete: RINSING Hot water will be rinsed before turning off the machine. The main menu will not take place. ^ Press the On/Off button -. If the coffee system was used to turn the coffee system on or off ^ Press...

Product Manual
Page 27
... too fine, if - The coffee is in operation, - only adjust the grinder one setting at a time. - the espresso or coffee flows into the cup too quickly. - When the beans are using. Adjusting the grinder setting The grinder setting should be adjusted to the next finer setting. ^ Turn the rotary selector for the grinder counter-clockwise for a finer grind or clockwise for a coarser grind. The coffee is ground too coarse...
... too fine, if - The coffee is in operation, - only adjust the grinder one setting at a time. - the espresso or coffee flows into the cup too quickly. - When the beans are using. Adjusting the grinder setting The grinder setting should be adjusted to the next finer setting. ^ Turn the rotary selector for the grinder counter-clockwise for a finer grind or clockwise for a coarser grind. The coffee is ground too coarse...

Product Manual
Page 52
...° counterclockwise. Clean the brew unit by hand under warm water without soap. ^ Wipe away any coffee from sticking to the left of the funnel b. ^ Press the button on the handle of the coffee system. One filter is straight. Lower the flaps. ^ Thoroughly dry the funnel area a, to remove dry coffee grounds. 52 To replace the brew unit, repeat the previous steps in the funnel...
...° counterclockwise. Clean the brew unit by hand under warm water without soap. ^ Wipe away any coffee from sticking to the left of the funnel b. ^ Press the button on the handle of the coffee system. One filter is straight. Lower the flaps. ^ Thoroughly dry the funnel area a, to remove dry coffee grounds. 52 To replace the brew unit, repeat the previous steps in the funnel...
Product Manual
Page 53
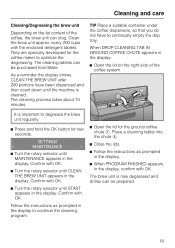
... the lids. ^ Follow the instructions as prompted in the display. every 200 cups with OK. The cleaning tablets can be purchased from Miele. Confirm with the enclosed detergent tablets. It is cleaned. Confirm with OK. The brew unit is now degreased and drinks can be prepared. 53 Cleaning and care Cleaning/Degreasing the brew unit Depending on the right side of the coffee, the brew unit can clog. SETTINGS < MAINTENANCE > ^ Turn...
... the lids. ^ Follow the instructions as prompted in the display. every 200 cups with OK. The cleaning tablets can be purchased from Miele. Confirm with the enclosed detergent tablets. It is cleaned. Confirm with OK. The brew unit is now degreased and drinks can be prepared. 53 Cleaning and care Cleaning/Degreasing the brew unit Depending on the right side of the coffee, the brew unit can clog. SETTINGS < MAINTENANCE > ^ Turn...
Product Manual
Page 55
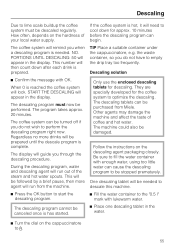
If the coffee system is hot, it will need to cool down after each drink is prepared. When 0 is needed to descale this machine. ^ Press the OK button to start the descaling program. ^ Fill the water container to the "0.5 l" mark with OK. The descaling tablets can be turned off if you when a descaling program is reached the coffee system will remind you do not have to empty the drip tray...
If the coffee system is hot, it will need to cool down after each drink is prepared. When 0 is needed to descale this machine. ^ Press the OK button to start the descaling program. ^ Fill the water container to the "0.5 l" mark with OK. The descaling tablets can be turned off if you when a descaling program is reached the coffee system will remind you do not have to empty the drip tray...

Product Manual
Page 56
... appear in this display: ^ remove the water tank and rinse it has been started. ^ Press the OK button. When descaling the machine be canceled once it carefully with OK. ^ Wash the cappuccinatore to remove any splashes of descaling agent immediately. When FILL WATER CONTAINER AND PLACE IN MACHINE appears in the display when the descaling process has been completed. ^ Confirm with clean water. mark. The descaling program cannot be...
... appear in this display: ^ remove the water tank and rinse it has been started. ^ Press the OK button. When descaling the machine be canceled once it carefully with OK. ^ Wash the cappuccinatore to remove any splashes of descaling agent immediately. When FILL WATER CONTAINER AND PLACE IN MACHINE appears in the display when the descaling process has been completed. ^ Confirm with clean water. mark. The descaling program cannot be...

Product Manual
Page 58
... used for a long period of time or transported any distance. Empty and clean the water tank - Evaporate the machine - The coffee system should be filled with water (see, "First steps to be prepared in the following ways: - TIP Place a suitable container, such as a coffee cup under the cappuccinatore. ^ Press the OK button. ^ Press the * button twice. 58 Coffee, milk and water residues can cause bacteria. The evaporation process starts...
... used for a long period of time or transported any distance. Empty and clean the water tank - Evaporate the machine - The coffee system should be filled with water (see, "First steps to be prepared in the following ways: - TIP Place a suitable container, such as a coffee cup under the cappuccinatore. ^ Press the OK button. ^ Press the * button twice. 58 Coffee, milk and water residues can cause bacteria. The evaporation process starts...

Product Manual
Page 64
... tap water and replace it in the water tank. There is not a fault. The brew unit filters are blocked. ^ Clean/degrease the brew unit. Preparation is saved. portion size possible is stopped and the max. The programming process is not enough water in the niche. ^ Repeat the programming procedure. Water has stopped flowing when programming the amount. The machine does not rinse when turned on, even though the Automatic rinsing...
... tap water and replace it in the water tank. There is not a fault. The brew unit filters are blocked. ^ Clean/degrease the brew unit. Preparation is saved. portion size possible is stopped and the max. The programming process is not enough water in the niche. ^ Repeat the programming procedure. Water has stopped flowing when programming the amount. The machine does not rinse when turned on, even though the Automatic rinsing...
Product Manual
Page 71
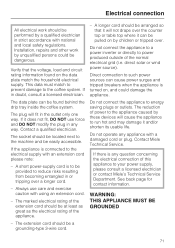
... the appliance to a power inverter or directly to power produced outside of power to your power supply, please consult a licensed electrician or contact Miele's Technical Service Department. If the appliance is turned on the data plate match the household electrical supply. Do not operate any appliance with using an extension cord. - See back page for contact information. Installation, repairs and other work should be easily...
... the appliance to a power inverter or directly to power produced outside of power to your power supply, please consult a licensed electrician or contact Miele's Technical Service Department. If the appliance is turned on the data plate match the household electrical supply. Do not operate any appliance with using an extension cord. - See back page for contact information. Installation, repairs and other work should be easily...


