User Guide
Page 2
... the Power On/Off.......7 Operation 8 Taking A Single Picture...........8 Setting the Self-Timer Mode...8 Recording Video 9 Taking Three Continuous Pictures 9 Deleting All Pictures/Videos..10 Deleting the Last Picture/ Video 10 Setting the Image Quality Mode 11 Setting the Compression ......12 Setting the Video Frequency Mode 13 Computer Connection ...........14 Software installation 15 Installing the Camera Software 15 Installing the Camera Driver ..15 Installing the Photo Editing Program 16 Uninstalling the Photo Editing Program 16 Downloading Pictures/Movies .17 To Use SpongeBob...
... the Power On/Off.......7 Operation 8 Taking A Single Picture...........8 Setting the Self-Timer Mode...8 Recording Video 9 Taking Three Continuous Pictures 9 Deleting All Pictures/Videos..10 Deleting the Last Picture/ Video 10 Setting the Image Quality Mode 11 Setting the Compression ......12 Setting the Video Frequency Mode 13 Computer Connection ...........14 Software installation 15 Installing the Camera Software 15 Installing the Camera Driver ..15 Installing the Photo Editing Program 16 Uninstalling the Photo Editing Program 16 Downloading Pictures/Movies .17 To Use SpongeBob...

User Guide
Page 3
... receiver is connected. • Consult the dealer or an experienced radio/TV technician for a class B digital device, pursuant to comply with the instructions, may cause undesired operation. If this equipment. USER INFORMATION This equipment has been tested and found to Part 15 of the FCC Rules. This equipment generates, uses and can be determined by turning the equipment...
... receiver is connected. • Consult the dealer or an experienced radio/TV technician for a class B digital device, pursuant to comply with the instructions, may cause undesired operation. If this equipment. USER INFORMATION This equipment has been tested and found to Part 15 of the FCC Rules. This equipment generates, uses and can be determined by turning the equipment...

User Guide
Page 4
... ICES-003. Always leave service to authorized repair facilities. • Keep the camera away from water and other liquids, and never let it is raining or snowing. • Should foreign matter or water get wet. IMPORTANT INFORMATION (CONTINUED) Be sure to observe the following precautions when using the camera: • This camera works best when used in its memory to be deleted.
... ICES-003. Always leave service to authorized repair facilities. • Keep the camera away from water and other liquids, and never let it is raining or snowing. • Should foreign matter or water get wet. IMPORTANT INFORMATION (CONTINUED) Be sure to observe the following precautions when using the camera: • This camera works best when used in its memory to be deleted.
User Guide
Page 5
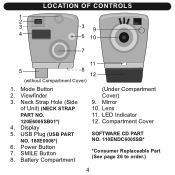
LOCATION OF CONTROLS 1 2 3 39 4 6 10 7 11 5 8 12 (without Compartment Cover) 1. Viewfinder 3. Power Button 7. Battery Compartment (Under Compartment Cover) 9. Compartment Cover SOFTWARE CD PART NO. 110ENDC6005SB* *Consumer Replaceable Part (See page 26 to order.) 4 LED Indicator 12. Mirror 10. SMILE Button 8. Display 5. Lens 11. Neck Strap Hole (Side of Unit) (NECK STRAP PART NO. 120E6005SB01*) 4. USB Plug (USB PART NO. 180E0008*) 6. Mode Button 2.
LOCATION OF CONTROLS 1 2 3 39 4 6 10 7 11 5 8 12 (without Compartment Cover) 1. Viewfinder 3. Power Button 7. Battery Compartment (Under Compartment Cover) 9. Compartment Cover SOFTWARE CD PART NO. 110ENDC6005SB* *Consumer Replaceable Part (See page 26 to order.) 4 LED Indicator 12. Mirror 10. SMILE Button 8. Display 5. Lens 11. Neck Strap Hole (Side of Unit) (NECK STRAP PART NO. 120E6005SB01*) 4. USB Plug (USB PART NO. 180E0008*) 6. Mode Button 2.
User Guide
Page 7
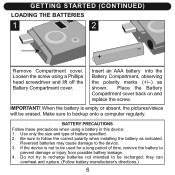
... installing the battery as shown. Loosen the screw using a battery in this device: 1. BATTERY PRECAUTIONS Follow these precautions when using a Phillips head screwdriver and lift off the Battery Compartment cover. they can overheat and rupture. (Follow battery manufacturer's directions.) 6 If the device is empty or absent, the pictures/videos will be used for a long period of battery specified. 2. GETTING STARTED (CONTINUED) LOADING THE BATTERIES 1 2 - + Remove...
... installing the battery as shown. Loosen the screw using a battery in this device: 1. BATTERY PRECAUTIONS Follow these precautions when using a Phillips head screwdriver and lift off the Battery Compartment cover. they can overheat and rupture. (Follow battery manufacturer's directions.) 6 If the device is empty or absent, the pictures/videos will be used for a long period of battery specified. 2. GETTING STARTED (CONTINUED) LOADING THE BATTERIES 1 2 - + Remove...

User Guide
Page 8
... by pressing the MODE button 2, "oFF" will automatically turn on when a USB cable is removed. 7 Then, press the SMILE button 3 to turn the camera off, press the Power button 1 until a beep is low, the display will blink; GETTING STARTED (CONTINUED) CHECKING THE BATTERY LEVEL If the battery is heard and 1 3 the display turns off after 30 seconds of inactivity, but the pictures will remain in memory. • For self portraits, use the mirror...
... by pressing the MODE button 2, "oFF" will automatically turn on when a USB cable is removed. 7 Then, press the SMILE button 3 to turn the camera off, press the Power button 1 until a beep is low, the display will blink; GETTING STARTED (CONTINUED) CHECKING THE BATTERY LEVEL If the battery is heard and 1 3 the display turns off after 30 seconds of inactivity, but the pictures will remain in memory. • For self portraits, use the mirror...
User Guide
Page 9
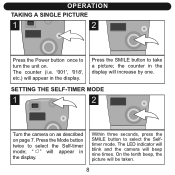
... indicator will blink and the camera will appear in the display. Press the SMILE button to select the Self-timer mode; the counter in the display. The counter (i.e. '001', '018', etc.) will beep nine times. On the tenth beep, the picture will increase by one. Press the Mode button twice to take a picture; Within three seconds, press the SMILE button to turn the unit on page 7. SETTING THE SELF-TIMER MODE 1 2 Turn...
... indicator will blink and the camera will appear in the display. Press the SMILE button to select the Self-timer mode; the counter in the display. The counter (i.e. '001', '018', etc.) will beep nine times. On the tenth beep, the picture will increase by one. Press the Mode button twice to take a picture; Within three seconds, press the SMILE button to turn the unit on page 7. SETTING THE SELF-TIMER MODE 1 2 Turn...

User Guide
Page 10
... SMILE button to record a video. TAKING THREE CONTINUOUS PICTURES 1 2 Turn the camera on as described on page 7. Press the Mode button four times to select the Video mode; The LED indicator will blink three times and the counter will appear in the display. " " will change to Hi (High) image quality mode to take 3 pictures automatically then revert to Lo (Low) image quality mode. 9 If you using this function while in the display. Release when you take the pictures, the...
... SMILE button to record a video. TAKING THREE CONTINUOUS PICTURES 1 2 Turn the camera on as described on page 7. Press the Mode button four times to select the Video mode; The LED indicator will blink three times and the counter will appear in the display. " " will change to Hi (High) image quality mode to take 3 pictures automatically then revert to Lo (Low) image quality mode. 9 If you using this function while in the display. Release when you take the pictures, the...
User Guide
Page 11
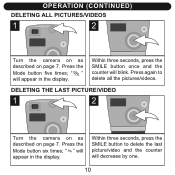
Within three seconds, press the SMILE button once and the counter will appear in the display. " " will blink. Press the Mode button six times; Within three seconds, press the SMILE button to delete all the pictures/videos. OPERATION (CONTINUED) DELETING ALL PICTURES/VIDEOS 1 2 Turn the camera on as described on page 7. Press again to delete the last picture/video and the counter will appear in the display. Press the Mode button five times; DELETING THE LAST PICTURE/VIDEO 1 2 Turn the camera on as described on page 7. " " will decrease by one. 10
Within three seconds, press the SMILE button once and the counter will appear in the display. " " will blink. Press the Mode button six times; Within three seconds, press the SMILE button to delete all the pictures/videos. OPERATION (CONTINUED) DELETING ALL PICTURES/VIDEOS 1 2 Turn the camera on as described on page 7. Press again to delete the last picture/video and the counter will appear in the display. Press the Mode button five times; DELETING THE LAST PICTURE/VIDEO 1 2 Turn the camera on as described on page 7. " " will decrease by one. 10
User Guide
Page 12
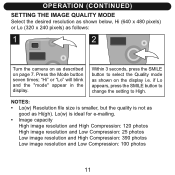
...: 390 photos Low image resolution and Low Compression: 100 photos 11 Lo(w) is not as good as Hi(gh). Press the Mode button seven times; "Hi" or "Lo" will blink and the "mode" appear in the display. OPERATION (CONTINUED) SETTING THE IMAGE QUALITY MODE Select the desired resolution as shown below, Hi (640 x 480 pixels) or Lo (320 x 240 pixels) as follows: 1 2 Turn the camera on...
...: 390 photos Low image resolution and Low Compression: 100 photos 11 Lo(w) is not as good as Hi(gh). Press the Mode button seven times; "Hi" or "Lo" will blink and the "mode" appear in the display. OPERATION (CONTINUED) SETTING THE IMAGE QUALITY MODE Select the desired resolution as shown below, Hi (640 x 480 pixels) or Lo (320 x 240 pixels) as follows: 1 2 Turn the camera on...

User Guide
Page 13
... "Hd" appears in the camera. If "Ld" appears, then press the SMILE button to change to Hd. OPERATION (CONTINUED) SETTING THE COMPRESSION 1 Turn the camera on as described on page 7. Press the Mode button eight times and the display will show one of the following: Hd (Hd means High compression): this option will compress the pictures, allowing more pictures to Ld. 12 Ld (Ld...
... "Hd" appears in the camera. If "Ld" appears, then press the SMILE button to change to Hd. OPERATION (CONTINUED) SETTING THE COMPRESSION 1 Turn the camera on as described on page 7. Press the Mode button eight times and the display will show one of the following: Hd (Hd means High compression): this option will compress the pictures, allowing more pictures to Ld. 12 Ld (Ld...
User Guide
Page 14
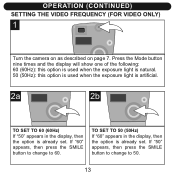
... in the display, then the option is already set . TO SET TO 50 (50Hz) If "60" appears in the display, then the option is already set . If "50" appears, then press the SMILE button to change to 50. 13 If "60" appears, then press the SMILE button to change to 60. OPERATION (CONTINUED) SETTING THE VIDEO FREQUENCY (FOR VIDEO ONLY) 1 Turn the camera on as described...
... in the display, then the option is already set . TO SET TO 50 (50Hz) If "60" appears in the display, then the option is already set . If "50" appears, then press the SMILE button to change to 50. 13 If "60" appears, then press the SMILE button to change to 60. OPERATION (CONTINUED) SETTING THE VIDEO FREQUENCY (FOR VIDEO ONLY) 1 Turn the camera on as described...
User Guide
Page 16
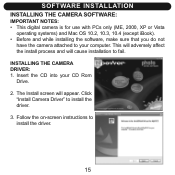
.... This will adversely affect the install process and will appear. Click "Install Camera Driver" to install the driver. 15 Follow the on-screen instructions to install the driver. 3. SOFTWARE INSTALLATION INSTALLING THE CAMERA SOFTWARE: IMPORTANT NOTES: • This digital camera is for use with PCs only (ME, 2000, XP or Vista operating systems) and Mac OS 10.2, 10.3, 10.4 (except iBook). • Before and while installing the software, make sure that you do not...
.... This will adversely affect the install process and will appear. Click "Install Camera Driver" to install the driver. 15 Follow the on-screen instructions to install the driver. 3. SOFTWARE INSTALLATION INSTALLING THE CAMERA SOFTWARE: IMPORTANT NOTES: • This digital camera is for use with PCs only (ME, 2000, XP or Vista operating systems) and Mac OS 10.2, 10.3, 10.4 (except iBook). • Before and while installing the software, make sure that you do not...
User Guide
Page 18
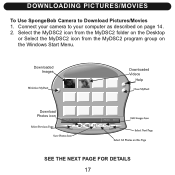
Connect your camera to Download Pictures/Movies 1. Downloaded Images Downloaded Videos Help Download Photos icon SEE THE NEXT PAGE FOR DETAILS 17 DOWNLOADING PICTURES/MOVIES To Use SpongeBob Camera to your computer as described on the Windows Start Menu. Select the MyDSC2 icon from the MyDSC2 folder on the Desktop or Select the MyDSC2 icon from the MyDSC2 program group on page 14. 2.
Connect your camera to Download Pictures/Movies 1. Downloaded Images Downloaded Videos Help Download Photos icon SEE THE NEXT PAGE FOR DETAILS 17 DOWNLOADING PICTURES/MOVIES To Use SpongeBob Camera to your computer as described on the Windows Start Menu. Select the MyDSC2 icon from the MyDSC2 folder on the Desktop or Select the MyDSC2 icon from the MyDSC2 program group on page 14. 2.

User Guide
Page 19
SAVE PICTURES/MOVIES: Select the pictures/movies by left-clicking on them or by clicking the "Select All Photos on this , a "SAVE AS" pop-up window will appear, follow the instructions to select all images on the current page). EDIT IMAGES: Click the "Edit Images" icon. UPLOADING PICTURES/MOVIES (CONT.) You can then: UPLOAD PICTURES/MOVIES: Click the "Download Photos" icon. After this Page" icon (to save your selected images. Click the "Save Photos" icon to view other pages. VIEW PICTURES/MOVIES: SpongeBob Camera shows...
SAVE PICTURES/MOVIES: Select the pictures/movies by left-clicking on them or by clicking the "Select All Photos on this , a "SAVE AS" pop-up window will appear, follow the instructions to select all images on the current page). EDIT IMAGES: Click the "Edit Images" icon. UPLOADING PICTURES/MOVIES (CONT.) You can then: UPLOAD PICTURES/MOVIES: Click the "Download Photos" icon. After this Page" icon (to save your selected images. Click the "Save Photos" icon to view other pages. VIEW PICTURES/MOVIES: SpongeBob Camera shows...
User Guide
Page 22
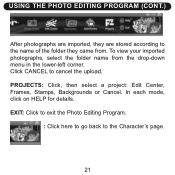
USING THE PHOTO EDITING PROGRAM (CONT.) After photographs are imported, they are stored according to the name of the folder they came from the drop-down menu in the lower-left corner. In each mode, click on HELP for details. To view your imported photographs, select the folder name from . EXIT: Click to exit the Photo Editing Program. : Click here to go back to cancel the upload. PROJECTS: Click, then select a project: Edit Center, Frames, Stamps, Backgrounds or Cancel. Click CANCEL to the Character's page. 21
USING THE PHOTO EDITING PROGRAM (CONT.) After photographs are imported, they are stored according to the name of the folder they came from the drop-down menu in the lower-left corner. In each mode, click on HELP for details. To view your imported photographs, select the folder name from . EXIT: Click to exit the Photo Editing Program. : Click here to go back to cancel the upload. PROJECTS: Click, then select a project: Edit Center, Frames, Stamps, Backgrounds or Cancel. Click CANCEL to the Character's page. 21
User Guide
Page 24
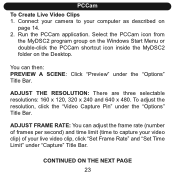
...) and time limit (time to your live video clip, click "Set Frame Rate" and "Set Time Limit" under the "Options" Title Bar. PCCam To Create Live Video Clips 1. CONTINUED ON THE NEXT PAGE 23 Select the PCCam icon from the MyDSC2 program group on the Windows Start Menu or double-click the PCCam shortcut icon inside the MyDSC2 folder on page 14. 2. ADJUST THE RESOLUTION...
...) and time limit (time to your live video clip, click "Set Frame Rate" and "Set Time Limit" under the "Options" Title Bar. PCCam To Create Live Video Clips 1. CONTINUED ON THE NEXT PAGE 23 Select the PCCam icon from the MyDSC2 program group on the Windows Start Menu or double-click the PCCam shortcut icon inside the MyDSC2 folder on page 14. 2. ADJUST THE RESOLUTION...
User Guide
Page 25
To adjust the video imaging properties, click "Video Capture Filter" under the "Capture" Title Bar, then click "OK" when prompted. PCCam (CONTINUED) NOTE: The camera supports a maximum of your video clip, click "Set Capture File" under the "Capture" Title Bar. 24 CAPTURE LIVE VIDEO: To start capturing, click "Start Capture" under the "Options" Title Bar. ADJUST MISC. SETTINGS: To set a default path and file name of 2fps at 640 x 480 resolution and 5fps for 320 x 240 and 20fps for 160 x 120 resolutions. To stop the video capture, click "Stop Capture" under the "File" Title Bar.
To adjust the video imaging properties, click "Video Capture Filter" under the "Capture" Title Bar, then click "OK" when prompted. PCCam (CONTINUED) NOTE: The camera supports a maximum of your video clip, click "Set Capture File" under the "Capture" Title Bar. 24 CAPTURE LIVE VIDEO: To start capturing, click "Start Capture" under the "Options" Title Bar. ADJUST MISC. SETTINGS: To set a default path and file name of 2fps at 640 x 480 resolution and 5fps for 320 x 240 and 20fps for 160 x 120 resolutions. To stop the video capture, click "Stop Capture" under the "File" Title Bar.

User Guide
Page 26
... subject further away. Replace battery. Battery is dirty. Replace battery. Set Image Quality to Hi(gh). Solution Turn power on . Subject or camera moved as described in better lighting. Memory is taken. Delete some pictures. Take picture in this manual. is full. Turn power on . TROUBLESHOOTING GUIDE Symptom Display is weak or dead. Battery is not on. Clean lens with a soft cloth. Can't upload pictures. Can't take picture. Unit shuts off . Possible Cause Power is off . Poor lighting. Subject too close...
... subject further away. Replace battery. Battery is dirty. Replace battery. Set Image Quality to Hi(gh). Solution Turn power on . Subject or camera moved as described in better lighting. Memory is taken. Delete some pictures. Take picture in this manual. is full. Turn power on . TROUBLESHOOTING GUIDE Symptom Display is weak or dead. Battery is not on. Clean lens with a soft cloth. Can't upload pictures. Can't take picture. Unit shuts off . Possible Cause Power is off . Poor lighting. Subject too close...
User Guide
Page 27
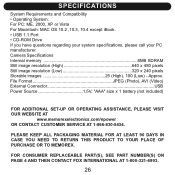
.... File Format JPEG (Photo), AVI (Video) External Connector USB Power Source 1.5V, "AAA" size x 1 battery (not included) FOR ADDITIONAL SET-UP OR OPERATING ASSISTANCE, PLEASE VISIT OUR WEBSITE AT www.memorexelectronics.com/npower OR CONTACT CUSTOMER SERVICE AT 1-866-830-5434. Camera Specifications Internal memory 8MB SDRAM Still image resolution (High 640 x 480 pixels Still image resolution (Low 320 x 240 pixels Storable images 25 (High), 100 (Low) - FOR CONSUMER REPLACEABLE PART(S), SEE PART NUMBER...
.... File Format JPEG (Photo), AVI (Video) External Connector USB Power Source 1.5V, "AAA" size x 1 battery (not included) FOR ADDITIONAL SET-UP OR OPERATING ASSISTANCE, PLEASE VISIT OUR WEBSITE AT www.memorexelectronics.com/npower OR CONTACT CUSTOMER SERVICE AT 1-866-830-5434. Camera Specifications Internal memory 8MB SDRAM Still image resolution (High 640 x 480 pixels Still image resolution (Low 320 x 240 pixels Storable images 25 (High), 100 (Low) - FOR CONSUMER REPLACEABLE PART(S), SEE PART NUMBER...


