Manual
Page 6
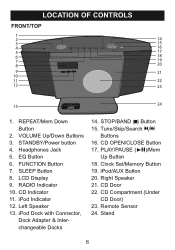
... Down Button 2. EQ Button 6. LCD Display 9. iPod Dock with Connector, Dock Adapter & Interchangeable Docks 14. Right Speaker 21. CD Door 22. LOCATION OF CONTROLS FRONT/TOP 1 2 14 3 15 4 16 5 17 6 7 8 18 19 20 9 21 10 11 22 12 23 13 24 1. Clock Set/Memory Button 19. CD Indicator 11. STOP/BAND (X) Button 15. Stand 6 STANDBY...
... Down Button 2. EQ Button 6. LCD Display 9. iPod Dock with Connector, Dock Adapter & Interchangeable Docks 14. Right Speaker 21. CD Door 22. LOCATION OF CONTROLS FRONT/TOP 1 2 14 3 15 4 16 5 17 6 7 8 18 19 20 9 21 10 11 22 12 23 13 24 1. Clock Set/Memory Button 19. CD Indicator 11. STOP/BAND (X) Button 15. Stand 6 STANDBY...
Manual
Page 14
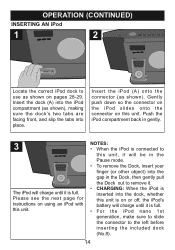
...-29. Insert the iPod (A) onto the connector (as shown on or off, the iPod's battery will be in the Pause mode. • To remove the Dock, insert your finger (or other object) into the gap in gently. 3 The iPod will charge until it . • CHARGING: When the iPod is inserted into... charge until it is full. • For the iPod nano 1st generation, make sure to slide the connector to the left before inserting the included dock (No.8). 14 Please see the next page for instructions on this unit. OPERATION (CONTINUED) INSERTING AN iPod 1 2 (A) (A) (B) Locate the correct iPod...
...-29. Insert the iPod (A) onto the connector (as shown on or off, the iPod's battery will be in the Pause mode. • To remove the Dock, insert your finger (or other object) into the gap in gently. 3 The iPod will charge until it . • CHARGING: When the iPod is inserted into... charge until it is full. • For the iPod nano 1st generation, make sure to slide the connector to the left before inserting the included dock (No.8). 14 Please see the next page for instructions on this unit. OPERATION (CONTINUED) INSERTING AN iPod 1 2 (A) (A) (B) Locate the correct iPod...
Manual
Page 28
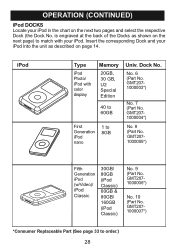
... your iPod into the unit as shown on the next two pages and select the respective Dock (the Dock No. Insert the corresponding Dock and your iPod in the chart on the next page) to match with color display Memory 20GB, 30 GB, U2 Special Edition 40 to 60GB .... iPod Type iPod Photo/ iPod with your iPod. GMT2071000007*) *Consumer Replaceable Part (See page 33 to 8GB Univ. is engraved at the back of the Docks as described on page 14.
... your iPod into the unit as shown on the next two pages and select the respective Dock (the Dock No. Insert the corresponding Dock and your iPod in the chart on the next page) to match with color display Memory 20GB, 30 GB, U2 Special Edition 40 to 60GB .... iPod Type iPod Photo/ iPod with your iPod. GMT2071000007*) *Consumer Replaceable Part (See page 33 to 8GB Univ. is engraved at the back of the Docks as described on page 14.
Manual
Page 29
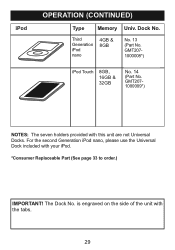
For the second Generation iPod nano, please use the Universal Dock included with this unit are not Universal Docks. GMT2071000009*) NOTES: The seven holders provided with your iPod. *Consumer Replaceable Part (See page 33 to order.) IMPORTANT! is engraved on the side of the unit with the tabs. 29 GMT2071000008*) iPod Touch 8GB, 16GB & 32GB No. 14 (Part No. Third Generation iPod nano 4GB & 8GB No. 13 (Part No. iPod OPERATION (CONTINUED) Type Memory Univ. The Dock No. Dock No.
For the second Generation iPod nano, please use the Universal Dock included with this unit are not Universal Docks. GMT2071000009*) NOTES: The seven holders provided with your iPod. *Consumer Replaceable Part (See page 33 to order.) IMPORTANT! is engraved on the side of the unit with the tabs. 29 GMT2071000008*) iPod Touch 8GB, 16GB & 32GB No. 14 (Part No. Third Generation iPod nano 4GB & 8GB No. 13 (Part No. iPod OPERATION (CONTINUED) Type Memory Univ. The Dock No. Dock No.

