User Guide
Page 5
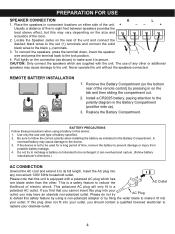
...and connect the dashed black wires to the red (+) terminals and connect the solid black wires to prevent damage or injury from possible battery leakage. 4. REMOTE BATTERY INSTALLATION 1. Install a CR2025 battery, paying attention to its full length. it can overheat and rupture. (Follow battery manufacturer's directions.) AC CONNECTION ... (-) terminals. 3. Locate the Speaker Jacks on the bottom rear of battery specified. 2. Use only the size and type of the remote control) by filing the wider blade to make sure it to the polarity diagram in a polarized AC outlet.
...and connect the dashed black wires to the red (+) terminals and connect the solid black wires to prevent damage or injury from possible battery leakage. 4. REMOTE BATTERY INSTALLATION 1. Install a CR2025 battery, paying attention to its full length. it can overheat and rupture. (Follow battery manufacturer's directions.) AC CONNECTION ... (-) terminals. 3. Locate the Speaker Jacks on the bottom rear of battery specified. 2. Use only the size and type of the remote control) by filing the wider blade to make sure it to the polarity diagram in a polarized AC outlet.
User Guide
Page 6
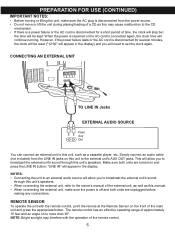
...through this unit's speakers. • When connecting the external unit, refer to broadcast the external unit's sound through this unit's speakers. The remote control has an effective operating range of approximately 15 feet and an angle of the external unit, as well as this unit, such as this... may interfere with the remote control, point the remote at the Remote Sensor on the front of the remote control. 5 PREPARATION FOR USE (CONTINUED) IMPORTANT NOTES: • Before moving or lifting the unit, make sure...
...through this unit's speakers. • When connecting the external unit, refer to broadcast the external unit's sound through this unit's speakers. The remote control has an effective operating range of approximately 15 feet and an angle of the external unit, as well as this unit, such as this... may interfere with the remote control, point the remote at the Remote Sensor on the front of the remote control. 5 PREPARATION FOR USE (CONTINUED) IMPORTANT NOTES: • Before moving or lifting the unit, make sure...
User Guide
Page 7
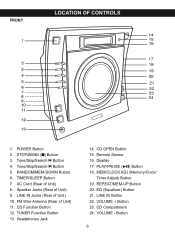
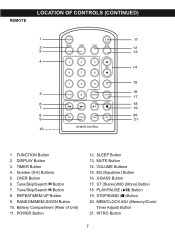
... 23. Tune/Skip/Search o Button 5. FRONT LOCATION OF CONTROLS 1. RANDOM/MEM-DOWN Button 6. Speaker Jacks (Rear of Unit) 11. FM Wire Antenna (Rear of Unit) 9. Remote Sensor 16. EQ (Equalizer) Button 21. REPEAT/MEM-UP Button 20. POWER Button 2.
... 23. Tune/Skip/Search o Button 5. FRONT LOCATION OF CONTROLS 1. RANDOM/MEM-DOWN Button 6. Speaker Jacks (Rear of Unit) 11. FM Wire Antenna (Rear of Unit) 9. Remote Sensor 16. EQ (Equalizer) Button 21. REPEAT/MEM-UP Button 20. POWER Button 2.
User Guide
Page 8
.... Number (0-9) Buttons 5. PLAY/PAUSE (®p) Button 19. MUTE Button 14. ST (Stereo)/MO (Mono) Button 18. RANDOM/MEM-DOWN Button 10. STOP/BAND (s) Button 20. REMOTE LOCATION OF CONTROLS (CONTINUED) 1. FUNCTION Button 2. REPEAT/MEM-UP Button 9. INTRO Button 7
.... Number (0-9) Buttons 5. PLAY/PAUSE (®p) Button 19. MUTE Button 14. ST (Stereo)/MO (Mono) Button 18. RANDOM/MEM-DOWN Button 10. STOP/BAND (s) Button 20. REMOTE LOCATION OF CONTROLS (CONTINUED) 1. FUNCTION Button 2. REPEAT/MEM-UP Button 9. INTRO Button 7
User Guide
Page 9
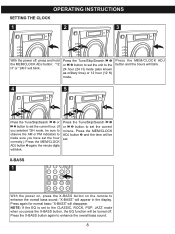
... hour correctly.) Press the MEM/CLOCK ADJ button 3 again; Press again for normal bass; X-BASS 1 With the power on, press the X-BASS button on the remote to enhance the overall bass sound. 1 8 "X-BASS" will disappear. OPERATING INSTRUCTIONS SETTING THE CLOCK 1 2 3 2 1 With the power off . the minute digits will be sure to...
... hour correctly.) Press the MEM/CLOCK ADJ button 3 again; Press again for normal bass; X-BASS 1 With the power on, press the X-BASS button on the remote to enhance the overall bass sound. 1 8 "X-BASS" will disappear. OPERATING INSTRUCTIONS SETTING THE CLOCK 1 2 3 2 1 With the power off . the minute digits will be sure to...
User Guide
Page 10
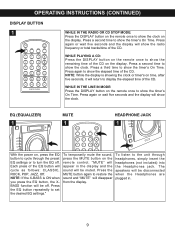
...to display the elapsed time of the CD. WHILE PLAYING A CD: Press the DISPLAY button on the remote once to show the clock on the display. EQ (EQUALIZER1) 1 MUTE 1 HEADPHONE JACK 1 With the...EQ off . OPERATING INSTRUCTIONS (CONTINUED) DISPLAY BUTTON 1 WHILE IN THE RADIO OR CD STOP MODE: Press the DISPLAY button on the remote once to show the remaining time of the CD on the display. Each... press of the CD. "MUTE" will appear in . 9 Press a second time to show the radio frequency or ...
...to display the elapsed time of the CD. WHILE PLAYING A CD: Press the DISPLAY button on the remote once to show the clock on the display. EQ (EQUALIZER1) 1 MUTE 1 HEADPHONE JACK 1 With the...EQ off . OPERATING INSTRUCTIONS (CONTINUED) DISPLAY BUTTON 1 WHILE IN THE RADIO OR CD STOP MODE: Press the DISPLAY button on the remote once to show the remaining time of the CD on the display. Each... press of the CD. "MUTE" will appear in . 9 Press a second time to show the radio frequency or ...
User Guide
Page 11
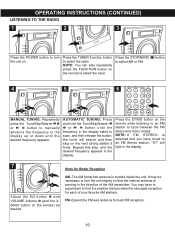
... or FM. 4 5 2 6 2 2 1 2 1 MANUAL TUNING: Repeatedly press the Tune/Skip/Search o 1 or n 2 button to select the radio. Press the ST/MO button on the remote to find the position that the internal antenna is located inside the unit. Press the TUNER Function button to manually advance the... necessary to an FM Stereo station, "ST" will search and then stop on the remote) as desired. Repeat this step until the frequency in the display. OPERATING INSTRUCTIONS (CONTINUED) LISTENING TO THE RADIO 1 2 3 Press the POWER button to scan, and then release the button; It...
... or FM. 4 5 2 6 2 2 1 2 1 MANUAL TUNING: Repeatedly press the Tune/Skip/Search o 1 or n 2 button to select the radio. Press the ST/MO button on the remote to find the position that the internal antenna is located inside the unit. Press the TUNER Function button to manually advance the... necessary to an FM Stereo station, "ST" will search and then stop on the remote) as desired. Repeat this step until the frequency in the display. OPERATING INSTRUCTIONS (CONTINUED) LISTENING TO THE RADIO 1 2 3 Press the POWER button to scan, and then release the button; It...
User Guide
Page 12
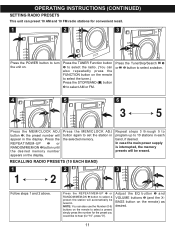
... to hear (for "10", press "0"). Press the REPEAT/MEM-UP 2 or RANDOM/MEM-DN 3 button until the desired memory number appears on the remote) as desired. 11 RECALLING RADIO PRESETS (10 EACH B1AND) 1 2 3 1 2 1 2 2 Follow steps 1 and 2 above. simply press the number for convenient recall. 1 ...station. 4 2 5 6 1 2 3 Press the MEM/CLOCK ADJ button 1; OPERATING INSTRUCTIONS (CONTINUED) SETTING RADIO PRESETS This unit can also use the Number (0-9) buttons on the remote to select a preset; In case the main power supply is interrupted, the memory presets will appear in each ...
... to hear (for "10", press "0"). Press the REPEAT/MEM-UP 2 or RANDOM/MEM-DN 3 button until the desired memory number appears on the remote) as desired. 11 RECALLING RADIO PRESETS (10 EACH B1AND) 1 2 3 1 2 1 2 2 Follow steps 1 and 2 above. simply press the number for convenient recall. 1 ...station. 4 2 5 6 1 2 3 Press the MEM/CLOCK ADJ button 1; OPERATING INSTRUCTIONS (CONTINUED) SETTING RADIO PRESETS This unit can also use the Number (0-9) buttons on the remote to select a preset; In case the main power supply is interrupted, the memory presets will appear in each ...

User Guide
Page 13
... spin and the elapsed time will blink. OPERATING INSTRUCTIONS (CONTINUED) PLAYING COMPACT DISCS This unit can also repeatedly press the FUNCTION butto2n on the remote to select CD. "CD" appears in the display. Playback stops but the disc continues to release pause and resume normal CD playback. 12 ...until all the tracks on the disc have been played. CD PAUSE CONTROL 1 2 2 2 During CD playback, if you wish to turn the unit on the remote) as desired. NOTE: You can play standard, CD-R or CD-RW CDs. 1 2 3 Press the POWER button to pause the disc momentarily, press the...
... spin and the elapsed time will blink. OPERATING INSTRUCTIONS (CONTINUED) PLAYING COMPACT DISCS This unit can also repeatedly press the FUNCTION butto2n on the remote to select CD. "CD" appears in the display. Playback stops but the disc continues to release pause and resume normal CD playback. 12 ...until all the tracks on the disc have been played. CD PAUSE CONTROL 1 2 2 2 During CD playback, if you wish to turn the unit on the remote) as desired. NOTE: You can play standard, CD-R or CD-RW CDs. 1 2 3 Press the POWER button to pause the disc momentarily, press the...
User Guide
Page 14
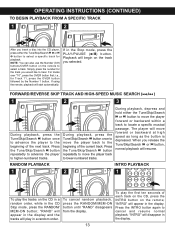
Playback will begin on the remote; During playback, press the Tune/Skip/Search o button once to move the player back to higher-numbered tracks. The player ... track for Track 11, press the OVER button followed by the Number 1 button. When you selected. "INTRO" will resume. If using the remote, playback will move the player forward or backward within a track to the beginning of the next track. To cancel random playback, press the RANDOM...display. 13 Press the INTRO button again to cancel and resume normal playback; "INTRO" will play the tracks on the remote to hear.
Playback will begin on the remote; During playback, press the Tune/Skip/Search o button once to move the player back to higher-numbered tracks. The player ... track for Track 11, press the OVER button followed by the Number 1 button. When you selected. "INTRO" will resume. If using the remote, playback will move the player forward or backward within a track to the beginning of the next track. To cancel random playback, press the RANDOM...display. 13 Press the INTRO button again to cancel and resume normal playback; "INTRO" will play the tracks on the remote to hear.
User Guide
Page 15
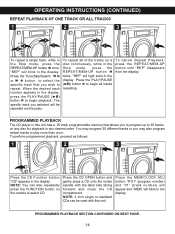
... select the specific track that allows you may program 20 different tracks or you to program up to begin all of the tracks on the remote to begin playback. "REP" will blink in the display. 1 PROGRAMMED PLAYBACK SECTION CONTINUED ON NEXT PAGE. 2 14 "CD" appears in the Stop mode, press the...
... select the specific track that allows you may program 20 different tracks or you to program up to begin all of the tracks on the remote to begin playback. "REP" will blink in the display. 1 PROGRAMMED PLAYBACK SECTION CONTINUED ON NEXT PAGE. 2 14 "CD" appears in the Stop mode, press the...
User Guide
Page 17
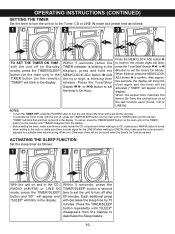
... CD compartment when waking to a CD, make sure a AM/FM station is tuned when waking to the radio or make sure the volume level is audio signal for the next day. • To activate the Timer ...or LINE IN mode at a preset time as follows: 1 2 With the unit on and in the CD, RADIO (AM/FM) or LINE IN mode, press the TIMER/SLEEP button and "90" will appear and "SLEEP" will...off (in Standby mode), press the TIMER/SLEEP button (on the main unit) or the TIMER button (on the remote), "TIMER" will blink in the display. 1 Within 5 seconds (when the TIMER indicator is blinking then release. After...
... CD compartment when waking to a CD, make sure a AM/FM station is tuned when waking to the radio or make sure the volume level is audio signal for the next day. • To activate the Timer ...or LINE IN mode at a preset time as follows: 1 2 With the unit on and in the CD, RADIO (AM/FM) or LINE IN mode, press the TIMER/SLEEP button and "90" will appear and "SLEEP" will...off (in Standby mode), press the TIMER/SLEEP button (on the main unit) or the TIMER button (on the remote), "TIMER" will blink in the display. 1 Within 5 seconds (when the TIMER indicator is blinking then release. After...
User Guide
Page 19
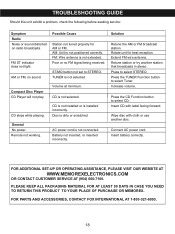
... correctly. TROUBLESHOOTING GUIDE Should this unit exhibit a problem, check the following before seeking service: Symptom Radio Noise or sound distorted on radio broadcasts. AM or FM, no FM signal being received. Remote not working. FM: Wire antenna is not connected. AC power cord is not extended. Press the... CD Function button to STEREO. PLEASE KEEP ALL PACKAGING MATERIAL FOR AT LEAST 90 DAYS IN CASE YOU NEED TO RETURN THIS PRODUCT TO YOUR PLACE OF PURCHASE OR MEMOREX....
... correctly. TROUBLESHOOTING GUIDE Should this unit exhibit a problem, check the following before seeking service: Symptom Radio Noise or sound distorted on radio broadcasts. AM or FM, no FM signal being received. Remote not working. FM: Wire antenna is not connected. AC power cord is not extended. Press the... CD Function button to STEREO. PLEASE KEEP ALL PACKAGING MATERIAL FOR AT LEAST 90 DAYS IN CASE YOU NEED TO RETURN THIS PRODUCT TO YOUR PLACE OF PURCHASE OR MEMOREX....
User Guide
Page 20
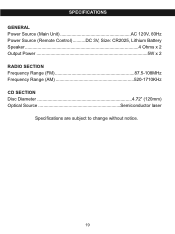
SPECIFICATIONS GENERAL Power Source (Main Unit AC 120V, 60Hz Power Source (Remote Control) ..........DC 3V, Size: CR2025, Lithium Battery Speaker 4 Ohms x 2 Output Power 5W x 2 RADIO SECTION Frequency Range (FM 87.5-108MHz Frequency Range (AM 520-1710KHz CD SECTION Disc Diameter 4.72" (120mm) Optical Source Semiconductor laser Specifications are subject to change without notice. 19
SPECIFICATIONS GENERAL Power Source (Main Unit AC 120V, 60Hz Power Source (Remote Control) ..........DC 3V, Size: CR2025, Lithium Battery Speaker 4 Ohms x 2 Output Power 5W x 2 RADIO SECTION Frequency Range (FM 87.5-108MHz Frequency Range (AM 520-1710KHz CD SECTION Disc Diameter 4.72" (120mm) Optical Source Semiconductor laser Specifications are subject to change without notice. 19


