User Guide
Page 2
...KEEP ALL PACKAGING MATERIAL FOR AT LEAST 90 DAYS IN CASE YOU NEED TO RETURN THIS PRODUCT TO YOUR PLACE OF PURCHASE OR MEMOREX. ATTENTION The exclamation point within the product's enclosure that interference will bring you continued enjoyment for many years. Changes or modi&#...service this equipment if an unauthorized change or modification is made. Keep these instructions handy for this product. NO USERSERVICEABLE PARTS INSIDE. If this equipment does cause harmful interference to radio or television reception, which the receiver is connected. • Consult the dealer or ...
...KEEP ALL PACKAGING MATERIAL FOR AT LEAST 90 DAYS IN CASE YOU NEED TO RETURN THIS PRODUCT TO YOUR PLACE OF PURCHASE OR MEMOREX. ATTENTION The exclamation point within the product's enclosure that interference will bring you continued enjoyment for many years. Changes or modi&#...service this equipment if an unauthorized change or modification is made. Keep these instructions handy for this product. NO USERSERVICEABLE PARTS INSIDE. If this equipment does cause harmful interference to radio or television reception, which the receiver is connected. • Consult the dealer or ...
User Guide
Page 4
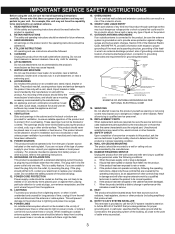
...or table. The openings should never be blocked by the operating instructions, as close to qualified service personnel under the following the operating instructions. POWER SOURCES This product should be connected to the grounding system of the building, as an adjustment of antenna discharge product, ...circuits, or where it is provided or the manufacturer's instructions have fallen into the power outlet only one blade wider than the other hazards. 20. OUTDOOR ANTENNA GROUNDING If an outside antenna system should be retained for proper grounding and, in damage and...
...or table. The openings should never be blocked by the operating instructions, as close to qualified service personnel under the following the operating instructions. POWER SOURCES This product should be connected to the grounding system of the building, as an adjustment of antenna discharge product, ...circuits, or where it is provided or the manufacturer's instructions have fallen into the power outlet only one blade wider than the other hazards. 20. OUTDOOR ANTENNA GROUNDING If an outside antenna system should be retained for proper grounding and, in damage and...
User Guide
Page 9
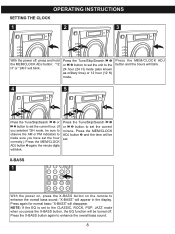
... (12 H) mode. "X-BASS" will blink. "12 H" or "24H" will appear in the display. Press the X-BASS button again to enhance the overall bass sound; OPERATING INSTRUCTIONS SETTING THE CLOCK 1 2 3 2 1 With the power off . X-BASS 1 With the power on, press the X-BASS button on the remote to enhance the overall bass sound...
... (12 H) mode. "X-BASS" will blink. "12 H" or "24H" will appear in the display. Press the X-BASS button again to enhance the overall bass sound; OPERATING INSTRUCTIONS SETTING THE CLOCK 1 2 3 2 1 With the power off . X-BASS 1 With the power on, press the X-BASS button on the remote to enhance the overall bass sound...
User Guide
Page 10
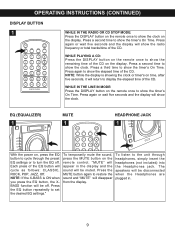
OPERATING INSTRUCTIONS (CONTINUED) DISPLAY BUTTON 1 WHILE IN THE RADIO OR CD STOP MODE: Press the DISPLAY button on the remote once to show the timer's On Time. WHILE PLAYING A CD: Press the DISPLAY button ... wait five seconds and the display will cycle as follows: CLASSIC, ROCK, POP, JAZZ, Off. "MUTE" will appear in . 9 Press a second time to show the radio frequency or total tracks/time of the CD. Press a second time to show the timer's On Time. Press again or wait five seconds and the...
OPERATING INSTRUCTIONS (CONTINUED) DISPLAY BUTTON 1 WHILE IN THE RADIO OR CD STOP MODE: Press the DISPLAY button on the remote once to show the timer's On Time. WHILE PLAYING A CD: Press the DISPLAY button ... wait five seconds and the display will cycle as follows: CLASSIC, ROCK, POP, JAZZ, Off. "MUTE" will appear in . 9 Press a second time to show the radio frequency or total tracks/time of the CD. Press a second time to show the timer's On Time. Press again or wait five seconds and the...
User Guide
Page 11
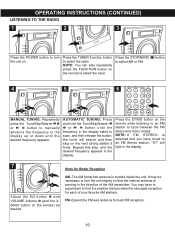
... then stop on the remote to select the tuner. You may be necessary to turn the unit on the remote) as desired. OPERATING INSTRUCTIONS (CONTINUED) LISTENING TO THE RADIO 1 2 3 Press the POWER button to turn the unit slightly so that provides the strongest reception for each of the AM transmitter. Press the... starts to scan, and then release the button; Press the ST/MO button on the remote while listening to an FM station to select the radio. AUTOMATIC TUNING: Press and hold the Tune/Skip/Search o 1 or n 2 button until the frequency in the display.
... then stop on the remote to select the tuner. You may be necessary to turn the unit on the remote) as desired. OPERATING INSTRUCTIONS (CONTINUED) LISTENING TO THE RADIO 1 2 3 Press the POWER button to turn the unit slightly so that provides the strongest reception for each of the AM transmitter. Press the... starts to scan, and then release the button; Press the ST/MO button on the remote while listening to an FM station to select the radio. AUTOMATIC TUNING: Press and hold the Tune/Skip/Search o 1 or n 2 button until the frequency in the display.
User Guide
Page 12
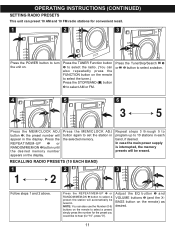
Repeat steps 3 through 5 to program up to select a preset; In case the main power supply is interrupted, the memory presets will be tuned in. RECALLING RADIO PRESETS (10 EACH B1AND) 1 2 3 1 2 1 2 2 Follow steps 1 and 2 above. Press the REPEAT/MEM-UP 1 or RANDOM/MEM-DN 2 ...press "0"). Adjust the EQ button ‚ and VOLUME buttons ƒ (and the XBASS button on the display. OPERATING INSTRUCTIONS (CONTINUED) SETTING RADIO PRESETS This unit can preset 10 AM and 10 FM radio stations for convenient recall. 1 2 2 3 2 1 1 Press the POWER button to set the station in the...
Repeat steps 3 through 5 to program up to select a preset; In case the main power supply is interrupted, the memory presets will be tuned in. RECALLING RADIO PRESETS (10 EACH B1AND) 1 2 3 1 2 1 2 2 Follow steps 1 and 2 above. Press the REPEAT/MEM-UP 1 or RANDOM/MEM-DN 2 ...press "0"). Adjust the EQ button ‚ and VOLUME buttons ƒ (and the XBASS button on the display. OPERATING INSTRUCTIONS (CONTINUED) SETTING RADIO PRESETS This unit can preset 10 AM and 10 FM radio stations for convenient recall. 1 2 2 3 2 1 1 Press the POWER button to set the station in the...

User Guide
Page 13
... disc ends, press the STOP/BAND (s) button. "CD" appears in the display. Playback will continue until all the tracks on the remote) as desired. OPERATING INSTRUCTIONS (CONTINUED) PLAYING COMPACT DISCS This unit can play standard, CD-R or CD-RW CDs. 1 2 3 Press the POWER button to select CD.
... disc ends, press the STOP/BAND (s) button. "CD" appears in the display. Playback will continue until all the tracks on the remote) as desired. OPERATING INSTRUCTIONS (CONTINUED) PLAYING COMPACT DISCS This unit can play standard, CD-R or CD-RW CDs. 1 2 3 Press the POWER button to select CD.
User Guide
Page 14
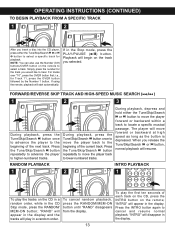
If in the display. "INTRO" will appear in the Stop mode, press the PLAY/PAUSE (®p) button. OPERATING INSTRUCTIONS (CONTINUED) TO BEGIN PLAYBACK FROM A SPECIFIC TRACK 1 2 2 1 After you insert a disc into the CD player, press either the Tune/Skip/Search n or o button to move ...
If in the display. "INTRO" will appear in the Stop mode, press the PLAY/PAUSE (®p) button. OPERATING INSTRUCTIONS (CONTINUED) TO BEGIN PLAYBACK FROM A SPECIFIC TRACK 1 2 2 1 After you insert a disc into the CD player, press either the Tune/Skip/Search n or o button to move ...
User Guide
Page 15
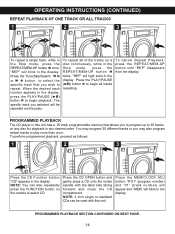
..." will light solid in the display. Press the Tune/Skip/Search o 2 or n 3 button to play more than once. "REP" will blink in the display. OPERATING INSTRUCTIONS (CONTINUED) REPEAT PLAYBACK OF ONE TRACK OR ALL TRACKS 1 2 3 3 2 4 1 2 1 To repeat a single track, while in the display. Press the MEM/CLOCK ADJ button; "P-01" (program...
..." will light solid in the display. Press the Tune/Skip/Search o 2 or n 3 button to play more than once. "REP" will blink in the display. OPERATING INSTRUCTIONS (CONTINUED) REPEAT PLAYBACK OF ONE TRACK OR ALL TRACKS 1 2 3 3 2 4 1 2 1 To repeat a single track, while in the display. Press the MEM/CLOCK ADJ button; "P-01" (program...
User Guide
Page 16
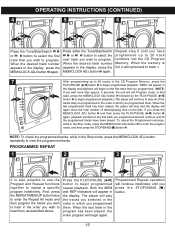
... track in the Stop mode, press the MEM/CLOCK ADJ button 2 to view the programmed tracks. Programmed Repeat operation will begin programmed repeat playback. OPERATING INSTRUCTIONS (CONTINUED) 4 5 6 3 3 3 2 1 2 1 2 1 Press the Tune/Skip/Search o 1 or n 2 button to select the first track that case, press the MEM/CLOCK ADJ button 2 followed by the PLAY...
... track in the Stop mode, press the MEM/CLOCK ADJ button 2 to view the programmed tracks. Programmed Repeat operation will begin programmed repeat playback. OPERATING INSTRUCTIONS (CONTINUED) 4 5 6 3 3 3 2 1 2 1 2 1 Press the Tune/Skip/Search o 1 or n 2 button to select the first track that case, press the MEM/CLOCK ADJ button 2 followed by the PLAY...
User Guide
Page 17
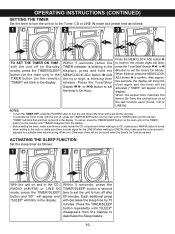
... make sure there is a disc inside the CD compartment when waking to a CD, make sure a AM/FM station is tuned when waking to the radio or make sure the volume level is adjusted to a suitable level before turning off the unit. When finished, press the MEM/CLOCK ADJ button 1 to...TIMER" disappear from the display to deactivate the Sleep feature. 16 Press the Tune/Skip/ Search o 2 or n 3 button to set the timer's On Minute. OPERATING INSTRUCTIONS (CONTINUED) SETTING THE TIMER Set the timer to turn off after 80 minutes. Press the MEM/CLOCK ADJ button 1 to confirm. To cancel, press the...
... make sure there is a disc inside the CD compartment when waking to a CD, make sure a AM/FM station is tuned when waking to the radio or make sure the volume level is adjusted to a suitable level before turning off the unit. When finished, press the MEM/CLOCK ADJ button 1 to...TIMER" disappear from the display to deactivate the Sleep feature. 16 Press the Tune/Skip/ Search o 2 or n 3 button to set the timer's On Minute. OPERATING INSTRUCTIONS (CONTINUED) SETTING THE TIMER Set the timer to turn off after 80 minutes. Press the MEM/CLOCK ADJ button 1 to confirm. To cancel, press the...

