Manual
Page 2
...11 • Battery Installation 11 • Effective Distance of the Remote Control Transmitter 11 Connection 12 • Connecting the Unit to a TV Using the A/V Cable 12 • Connecting the Unit to a TV Using the S-Video Cable 13 • Connecting Another Unit to this DVD Player 14 About ... Search 30 • Bookmark 31 • Repeat Playback 32 • Repeat A-B Playback 32 • Audio Menu 33 • Subtitle Menu 33 • DVD Menu 33 • Title Menu 33 • Zoom In/Out 34 • Angle 34 • Programmed Playback 35 MP3 Operation 36 • Playback of...
...11 • Battery Installation 11 • Effective Distance of the Remote Control Transmitter 11 Connection 12 • Connecting the Unit to a TV Using the A/V Cable 12 • Connecting the Unit to a TV Using the S-Video Cable 13 • Connecting Another Unit to this DVD Player 14 About ... Search 30 • Bookmark 31 • Repeat Playback 32 • Repeat A-B Playback 32 • Audio Menu 33 • Subtitle Menu 33 • DVD Menu 33 • Title Menu 33 • Zoom In/Out 34 • Angle 34 • Programmed Playback 35 MP3 Operation 36 • Playback of...
Manual
Page 6
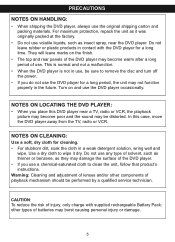
... product's instructions. For maximum protection, repack the unit as they may damage the surface of use the DVD player occasionally. In this DVD player near the DVD player. Warning: Cleaning and adjustment of lenses and/or other types of batteries may not function properly in use, be performed by a qualified service technician. Do not use any type...
... product's instructions. For maximum protection, repack the unit as they may damage the surface of use the DVD player occasionally. In this DVD player near the DVD player. Warning: Cleaning and adjustment of lenses and/or other types of batteries may not function properly in use, be performed by a qualified service technician. Do not use any type...
Manual
Page 8
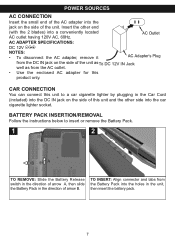
... located AC outlet having 120V AC, 60Hz. AC ADAPTER SPECIFICATIONS: DC 12V Z NOTES: • To disconnect the AC adapter, remove it from the Battery Pack into the car cigarette lighter socket. TO INSERT: Align connector and tabs from the DC IN jack on the side of the unit. Insert... the other side into the holes in the direction of arrow A, then slide the Battery Pack in the unit, then insert the battery pack. 7 BATTERY PACK INSERTION/REMOVAL Follow the instructions below to a car cigarette lighter by plugging in the Car Cord (included) into ...
... located AC outlet having 120V AC, 60Hz. AC ADAPTER SPECIFICATIONS: DC 12V Z NOTES: • To disconnect the AC adapter, remove it from the Battery Pack into the car cigarette lighter socket. TO INSERT: Align connector and tabs from the DC IN jack on the side of the unit. Insert... the other side into the holes in the direction of arrow A, then slide the Battery Pack in the unit, then insert the battery pack. 7 BATTERY PACK INSERTION/REMOVAL Follow the instructions below to a car cigarette lighter by plugging in the Car Cord (included) into ...
Manual
Page 9
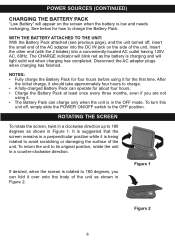
...of the unit as shown in Figure 2. See below for four hours before using it should take approximately four hours to 180 degrees as the battery is low and needs recharging. Disconnect the AC adapter plugs when charging has finished. ROTATING THE SCREEN To rotate the screen, twist in a ...only when the unit is being rotated to its original position, rotate the unit in the OFF mode. After the initial charge, it . • The Battery Pack can operate for the first time. It is suggested that the screen remains in Figure 1. Figure 1 Figure 2 8 To return the unit to ...
...of the unit as shown in Figure 2. See below for four hours before using it should take approximately four hours to 180 degrees as the battery is low and needs recharging. Disconnect the AC adapter plugs when charging has finished. ROTATING THE SCREEN To rotate the screen, twist in a ...only when the unit is being rotated to its original position, rotate the unit in the OFF mode. After the initial charge, it . • The Battery Pack can operate for the first time. It is suggested that the screen remains in Figure 1. Figure 1 Figure 2 8 To return the unit to ...
Manual
Page 11
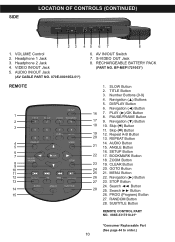
.... STOP Button 24. Search ®® Button 26. S-VIDEO OUT Jack 8. TITLE Button 3. PAUSE/FRAME Button 17 9. ANGLE Button 16. GOTO Button 25 21. RECHARGEABLE BATTERY PACK (PART NO. Navigation (π) Buttons 5. AUDIO IN/OUT Jack (AV CABLE PART NO. 070E-0001652-01*) 6. DISPLAY Button 6. Navigation (√) Button 16 7. MENU Button...
.... STOP Button 24. Search ®® Button 26. S-VIDEO OUT Jack 8. TITLE Button 3. PAUSE/FRAME Button 17 9. ANGLE Button 16. GOTO Button 25 21. RECHARGEABLE BATTERY PACK (PART NO. Navigation (π) Buttons 5. AUDIO IN/OUT Jack (AV CABLE PART NO. 070E-0001652-01*) 6. DISPLAY Button 6. Navigation (√) Button 16 7. MENU Button...

Manual
Page 12
... transmitter may be used for a long period of the DVD, the remote operation may not operate. • When direct sunlight, an incandescent lamp, fluorescent lamp or any other pointy object, into the groove on the Remote Sensor of time, remove the battery to the polarity diagram in this device: 1. Be sure...
... transmitter may be used for a long period of the DVD, the remote operation may not operate. • When direct sunlight, an incandescent lamp, fluorescent lamp or any other pointy object, into the groove on the Remote Sensor of time, remove the battery to the polarity diagram in this device: 1. Be sure...
Manual
Page 44
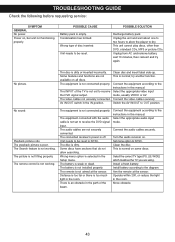
...the unit and wait about one to two hours to allow searching. Some discs have sections that do not allow the player to receive the DVD signal output. The battery is poor. Distance is too far or there is not set to dry. The playback picture is weak or dead...position. Select the appropriate video input mode, usually VIDEO or AV. Playback picture rolls. No sound. The disc is not installed properly. The battery is dirty. No picture. The INPUT of disc inserted. The video cables not securely connected. The Search feature is not working . The ...
...the unit and wait about one to two hours to allow searching. Some discs have sections that do not allow the player to receive the DVD signal output. The battery is poor. Distance is too far or there is not set to dry. The playback picture is weak or dead...position. Select the appropriate video input mode, usually VIDEO or AV. Playback picture rolls. No sound. The disc is not installed properly. The battery is dirty. No picture. The INPUT of disc inserted. The video cables not securely connected. The Search feature is not working . The ...
Manual
Page 47
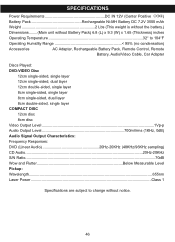
...° to 104°F Operating Humidity Range 95% (no condensation) Accessories AC Adapter, Rechargeable Battery Pack, Remote Control, Remote Battery, Audio/Video Cable, Car Adapter Discs Played: DVD-VIDEO Disc 12cm single-sided, single layer 12cm single-sided, dual layer 12cm double-sided, single...12cm disc 8cm disc Video Output Level ...1Vp-p Audio Output Level 700mVrms (1KHz, 0dB) Audio Signal Output Characteristics: Frequency Responses: DVD (Linear Audio 20Hz-20KHz (48KHz/96KHz sampling) CD Audio...20Hz-20KHz S/N Ratio...70dB Wow and Flutter Below Measurable Level Pickup: Wavelength...
...° to 104°F Operating Humidity Range 95% (no condensation) Accessories AC Adapter, Rechargeable Battery Pack, Remote Control, Remote Battery, Audio/Video Cable, Car Adapter Discs Played: DVD-VIDEO Disc 12cm single-sided, single layer 12cm single-sided, dual layer 12cm double-sided, single...12cm disc 8cm disc Video Output Level ...1Vp-p Audio Output Level 700mVrms (1KHz, 0dB) Audio Signal Output Characteristics: Frequency Responses: DVD (Linear Audio 20Hz-20KHz (48KHz/96KHz sampling) CD Audio...20Hz-20KHz S/N Ratio...70dB Wow and Flutter Below Measurable Level Pickup: Wavelength...


