Manual
Page 2
... a TV Using the A/V Cable 12 • Connecting the Unit to a TV Using the S-Video Cable 13 • Connecting Another Unit to this DVD Player 14 About Discs 15 Setup Menu 17 • General Setup Menu 18 • Audio Setup Menu 19 • Video Setup Menu 20 • Preference Setup Menu 20 •TV Guardian 22 Basic Operation 25 • Headphone Jack(s 25 • Screen Mode Button 25 • Volume Control 25 • Display Button 26 DVD Operation 27 • Playback of a DVD 27 •...
... a TV Using the A/V Cable 12 • Connecting the Unit to a TV Using the S-Video Cable 13 • Connecting Another Unit to this DVD Player 14 About Discs 15 Setup Menu 17 • General Setup Menu 18 • Audio Setup Menu 19 • Video Setup Menu 20 • Preference Setup Menu 20 •TV Guardian 22 Basic Operation 25 • Headphone Jack(s 25 • Screen Mode Button 25 • Volume Control 25 • Display Button 26 DVD Operation 27 • Playback of a DVD 27 •...
Manual
Page 4
.... Lightning and power surges ARE NOT covered under warranty for this device due to possible eye injury. Only qualified service personnel should attempt to service this product. If this device. FCC CAUTION: To assure continued compliance, follow the attached installation instructions and use a surge protector for help. This Class B digital apparatus complies with the instructions, may void user's authority to operate this equipment does...
.... Lightning and power surges ARE NOT covered under warranty for this device due to possible eye injury. Only qualified service personnel should attempt to service this product. If this device. FCC CAUTION: To assure continued compliance, follow the attached installation instructions and use a surge protector for help. This Class B digital apparatus complies with the instructions, may void user's authority to operate this equipment does...
Manual
Page 6
... service technician. Use a dry cloth to wipe it was originally packed at the factory. • Do not use a chemical-saturated cloth to remove the disc and turn off the power. • If you use volatile liquids, such as it dry. Warning: Cleaning and adjustment of lenses and/or other types of batteries may become poor and the sound may damage the surface of playback...
... service technician. Use a dry cloth to wipe it was originally packed at the factory. • Do not use a chemical-saturated cloth to remove the disc and turn off the power. • If you use volatile liquids, such as it dry. Warning: Cleaning and adjustment of lenses and/or other types of batteries may become poor and the sound may damage the surface of playback...
Manual
Page 7
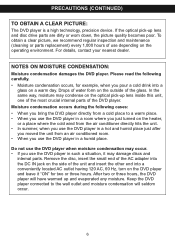
... and disc drive parts are dirty or worn down, the picture quality becomes poor. Drops of the glass. Do not use the DVD player when moisture condensation may occur. • If you use the DVD player in a room where you just turned on the optical pick-up lens inside this unit, one of the most crucial internal parts of the DVD player. Keep the DVD player connected...
... and disc drive parts are dirty or worn down, the picture quality becomes poor. Drops of the glass. Do not use the DVD player when moisture condensation may occur. • If you use the DVD player in a room where you just turned on the optical pick-up lens inside this unit, one of the most crucial internal parts of the DVD player. Keep the DVD player connected...

Manual
Page 12
... 1 DISPLAY 9 REPEAT AUDIO FPRAAUMSEE/ SETUP TITLE 1 SLOW 2 ZOOM BOOKMARK 3 4 5 6 9 0 DISPLAY 7 CLEAR 8 GOTO MENU PAUSE/ FRAME /OK STOP TITLE 1 SLOW 2 SETUP BOOKMA4RK ZOOM 3 7 CLEAR 6 8 GOTO ENU M 5 0 9 DISPLAY PAFURSAEM/ E /OK A-B REPEAT AUDIO STOP PROG RANDOM SUBTITLE ANGLE REPEAT A-B PROG RANDOM AUDIO ANGLE SUBTITLE 11 A-B ANGLE RANDOM SUBTITLE NOTES: • When there is incorrectly replaced. Use only the size and type of the DVD, the remote operation may be unstable. Do not try to recharge a battery not...
... 1 DISPLAY 9 REPEAT AUDIO FPRAAUMSEE/ SETUP TITLE 1 SLOW 2 ZOOM BOOKMARK 3 4 5 6 9 0 DISPLAY 7 CLEAR 8 GOTO MENU PAUSE/ FRAME /OK STOP TITLE 1 SLOW 2 SETUP BOOKMA4RK ZOOM 3 7 CLEAR 6 8 GOTO ENU M 5 0 9 DISPLAY PAFURSAEM/ E /OK A-B REPEAT AUDIO STOP PROG RANDOM SUBTITLE ANGLE REPEAT A-B PROG RANDOM AUDIO ANGLE SUBTITLE 11 A-B ANGLE RANDOM SUBTITLE NOTES: • When there is incorrectly replaced. Use only the size and type of the DVD, the remote operation may be unstable. Do not try to recharge a battery not...

Manual
Page 13
... because DVD video discs are unplugged before making any connections. • Connect the unit to the OUT position. 12 CONNECTION CONNECTING THE UNIT TO A TV USING THE A/V CABLE VOLUME 1 2 VIDEO AUDIO AV S-VIDEO OUT IN NOTES FOR CONNECTING TO A TV: • If your TV has an S-Video input, connect the DVD player with the S-Video cable (as described on the next page) for best results. • Set the TV's TV/VIDEO button or switch to the VIDEO setting...
... because DVD video discs are unplugged before making any connections. • Connect the unit to the OUT position. 12 CONNECTION CONNECTING THE UNIT TO A TV USING THE A/V CABLE VOLUME 1 2 VIDEO AUDIO AV S-VIDEO OUT IN NOTES FOR CONNECTING TO A TV: • If your TV has an S-Video input, connect the DVD player with the S-Video cable (as described on the next page) for best results. • Set the TV's TV/VIDEO button or switch to the VIDEO setting...
Manual
Page 14
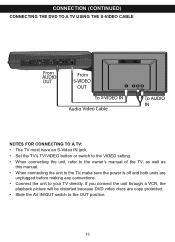
CONNECTION (CONTINUED) CONNECTING THE DVD TO A TV USING THE S-VIDEO CABLE VOLUME 1 2 VIDEO AUDIO AV S-VIDEO OUT IN NOTES FOR CONNECTING TO A TV: • The TV must have an S-Video IN jack. • Set the TV's TV/VIDEO button or switch to the VIDEO setting. • When connecting the unit, refer to the owner's manual of the TV, as well as this manual. • When connecting the unit to the TV, make sure the power is...
CONNECTION (CONTINUED) CONNECTING THE DVD TO A TV USING THE S-VIDEO CABLE VOLUME 1 2 VIDEO AUDIO AV S-VIDEO OUT IN NOTES FOR CONNECTING TO A TV: • The TV must have an S-Video IN jack. • Set the TV's TV/VIDEO button or switch to the VIDEO setting. • When connecting the unit, refer to the owner's manual of the TV, as well as this manual. • When connecting the unit to the TV, make sure the power is...
Manual
Page 15
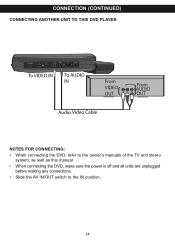
CONNECTION (CONTINUED) CONNECTING ANOTHER UNIT TO THIS DVD PLAYER VOLUME 1 2 VIDEO AUDIO AV S-VIDEO OUT IN NOTES FOR CONNECTING: • When connecting the DVD, refer to the owner's manuals of the TV and stereo system, as well as this manual. • When connecting the DVD, make sure the power is off and all units are unplugged before making any connections. • Slide the AV IN/OUT switch to the IN position. 14
CONNECTION (CONTINUED) CONNECTING ANOTHER UNIT TO THIS DVD PLAYER VOLUME 1 2 VIDEO AUDIO AV S-VIDEO OUT IN NOTES FOR CONNECTING: • When connecting the DVD, refer to the owner's manuals of the TV and stereo system, as well as this manual. • When connecting the DVD, make sure the power is off and all units are unplugged before making any connections. • Slide the AV IN/OUT switch to the IN position. 14
Manual
Page 16
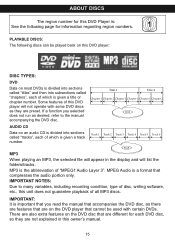
... When playing an MP3, the selected file will appear in this owner's manual. 15 IMPORTANT: It is given a title or chapter number. AUDIO CD Data on the DVD disc that are different for each of which is important that you selected does not run as they are not explained in the display and will not operate with certain DVDs. ABOUT DISCS The region number for this DVD Player...
... When playing an MP3, the selected file will appear in this owner's manual. 15 IMPORTANT: It is given a title or chapter number. AUDIO CD Data on the DVD disc that are different for each of which is important that you selected does not run as they are not explained in the display and will not operate with certain DVDs. ABOUT DISCS The region number for this DVD Player...
Manual
Page 17
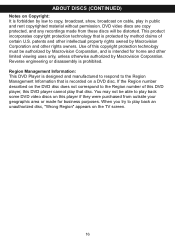
... Region number described on cable, play in public and rent copyrighted material without permission. DVD video discs are copy protected, and any recordings made from outside your geographic area or made for home and other rights owners. ABOUT DISCS (CONTINUED) Notes on Copyright: It is forbidden by law to copy, broadcast, show, broadcast on the DVD disc does not correspond to the Region number of this DVD player, this player...
... Region number described on cable, play in public and rent copyrighted material without permission. DVD video discs are copy protected, and any recordings made from outside your geographic area or made for home and other rights owners. ABOUT DISCS (CONTINUED) Notes on Copyright: It is forbidden by law to copy, broadcast, show, broadcast on the DVD disc does not correspond to the Region number of this DVD player, this player...

Manual
Page 18
... STOP 2 change the desired setting, then press the PLAY (®)/OK button 3 to navigate and change . AUDIO ANGLE SUBTITLE 5. Use the following instructions to make REPEAT A-B PROG RANDOM the change the options as described on and off, adjust what type of the Setup options, then press the PLAY (®)/OK button 3 to select various language preferences, turn screen saver on the upcoming pages. 1. SETUP MENU The Setup menu lets you customize the DVD player by selecting the Exit Setup menu icon...
... STOP 2 change the desired setting, then press the PLAY (®)/OK button 3 to navigate and change . AUDIO ANGLE SUBTITLE 5. Use the following instructions to make REPEAT A-B PROG RANDOM the change the options as described on and off, adjust what type of the Setup options, then press the PLAY (®)/OK button 3 to select various language preferences, turn screen saver on the upcoming pages. 1. SETUP MENU The Setup menu lets you customize the DVD player by selecting the Exit Setup menu icon...
Manual
Page 20
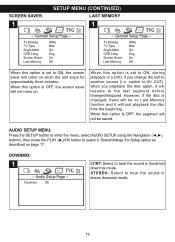
... option is OFF, the screen saver will just playback the disc from the beginning. switch to hear the sound in theatrical downmix mode. Audio Setup Page -- STEREO: Select to AV OUT), when you change the Setup option as described on page 17. Downmix Str LT/RT: Select to ON, during playback of a DVD, if you playback the disc again, it . TV Display TV Type Angle Mark OSD Lang...
... option is OFF, the screen saver will just playback the disc from the beginning. switch to hear the sound in theatrical downmix mode. Audio Setup Page -- STEREO: Select to AV OUT), when you change the Setup option as described on page 17. Downmix Str LT/RT: Select to ON, during playback of a DVD, if you playback the disc again, it . TV Display TV Type Angle Mark OSD Lang...
Manual
Page 22
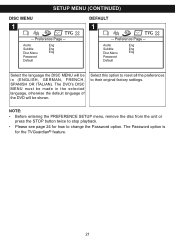
...; Before entering the PREFERENCE SETUP menu, remove the disc from the unit or press the STOP button twice to stop playback. • Please see page 24 for the TVGuardian® feature. 21 The Password option is for how to their original factory settings. Audio Eng Subtitle Eng Disc Menu Eng Password Default DEFAULT 1 TVG -- Select this option to reset all the preferences to change the Password option. The DVD's DISC MENU must be made in...
...; Before entering the PREFERENCE SETUP menu, remove the disc from the unit or press the STOP button twice to stop playback. • Please see page 24 for the TVGuardian® feature. 21 The Password option is for how to their original factory settings. Audio Eng Subtitle Eng Disc Menu Eng Password Default DEFAULT 1 TVG -- Select this option to reset all the preferences to change the Password option. The DVD's DISC MENU must be made in...
Manual
Page 23
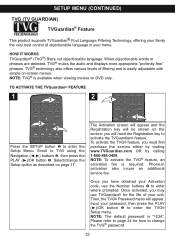
... your Activation TVGuardian SETUP MENU code, use TVGuardian® for the life of "Damn" and "Hell" NOTE: The default password is easily adjustable with simple on DVD only. Filters out references to deity. (To watch religioPuslepraosgreamrmeifnegr, tutron tphias gwoerd2s4ubsfeotrofhf.)ow to REPEAT A-B PROG RANDOM activate the TVGuardian® feature. Select TVGUARDIAN TITLE SLOW ZOOM BOOKMARK Mode using the Navigat1ionSET(UP^,v) buttons, then press...
... your Activation TVGuardian SETUP MENU code, use TVGuardian® for the life of "Damn" and "Hell" NOTE: The default password is easily adjustable with simple on DVD only. Filters out references to deity. (To watch religioPuslepraosgreamrmeifnegr, tutron tphias gwoerd2s4ubsfeotrofhf.)ow to REPEAT A-B PROG RANDOM activate the TVGuardian® feature. Select TVGUARDIAN TITLE SLOW ZOOM BOOKMARK Mode using the Navigat1ionSET(UP^,v) buttons, then press...
Manual
Page 28
... the screen during operation if you read the manual that accompanies the DVD disc as there are features that are not explained in this owner's manual. • If the unit is in the Stop mode, Pause mode or if there is no disc in the disc tray, the screen saver will appear on the screen after three minutes. • Make sure that the AV IN/OUT switch is...
... the screen during operation if you read the manual that accompanies the DVD disc as there are features that are not explained in this owner's manual. • If the unit is in the Stop mode, Pause mode or if there is no disc in the disc tray, the screen saver will appear on the screen after three minutes. • Make sure that the AV IN/OUT switch is...
Manual
Page 32
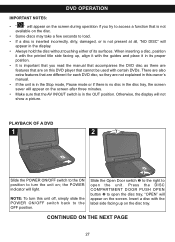
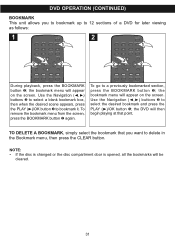
... opened, all the bookmarks will appear on the screen. the DVD will appear on the screen. DVD OPERATION (CONTINUED) BOOKMARK This unit allows you want to delete in the Bookmark menu, then press the CLEAR button. REPEAT A-B PROG RANDOM AUDIO ANGLE SUBTITLE To go to 12 sections of a DVD for later viewing as follows: 1 SETUP TITLE 1 SLOW 2 1 ZOOM BOOKMARK 3 4 5 9 DISPLAY 2 PAUSE/ FRAME 6 7 CLEAR 0 3 /OK 8 GOTO MENU 2 STOP 2 SETUP...
... opened, all the bookmarks will appear on the screen. the DVD will appear on the screen. DVD OPERATION (CONTINUED) BOOKMARK This unit allows you want to delete in the Bookmark menu, then press the CLEAR button. REPEAT A-B PROG RANDOM AUDIO ANGLE SUBTITLE To go to 12 sections of a DVD for later viewing as follows: 1 SETUP TITLE 1 SLOW 2 1 ZOOM BOOKMARK 3 4 5 9 DISPLAY 2 PAUSE/ FRAME 6 7 CLEAR 0 3 /OK 8 GOTO MENU 2 STOP 2 SETUP...
Manual
Page 36
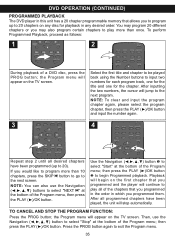
... /OK STOP REPEAT A-B PROG RANDOM AUDIO ANGLE SUBTITLE Select the firstPAUtSiEt/ le and/OKchapter to be played FRAME STOP back using the Number buttons to the next program. TO CANCEL AND STOP THE PROGRAM FUNCTION: Press the PROG button; then press the PLAY (®)/OK button. To perform 9 0 Programmed PDlIaSPLyAYback, procMeENeU d as follows: 1 PAUSE/ FRAME /OK STOP REPEAT A-B PROG RANDOM AUDIO ANGLE SUBTITLE 2 SETUP TITLE 1 SLOW 2 ZOOM BOOKMARK 3 4 5 6 9 0 DISPLAY 7 CLEAR 8 GOTO MENU During playback of a DVD disc, press...
... /OK STOP REPEAT A-B PROG RANDOM AUDIO ANGLE SUBTITLE Select the firstPAUtSiEt/ le and/OKchapter to be played FRAME STOP back using the Number buttons to the next program. TO CANCEL AND STOP THE PROGRAM FUNCTION: Press the PROG button; then press the PLAY (®)/OK button. To perform 9 0 Programmed PDlIaSPLyAYback, procMeENeU d as follows: 1 PAUSE/ FRAME /OK STOP REPEAT A-B PROG RANDOM AUDIO ANGLE SUBTITLE 2 SETUP TITLE 1 SLOW 2 ZOOM BOOKMARK 3 4 5 6 9 0 DISPLAY 7 CLEAR 8 GOTO MENU During playback of a DVD disc, press...
Manual
Page 39
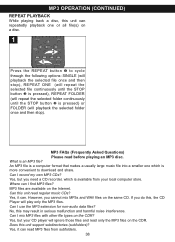
... I mix MP3 files with other file types on 1 2 3 4 a disc. 5 6 7 8 CLEAR GOTO 1 9 0 DISPLAY MENU PAUSE/ FRAME /OK 2 STOP REPEAT A-B 1 PROG RANDOM AUDIO ANGLE SUBTITLE Press the REPEAT button ‚ to download and share. MP3 OPERATION (CONTINUED) REPEAT PLAYBACK While playing back a disc,SETUP this unit can repeatedly playback one which is pressed) or FOLDER (will ignore those files and read MP3 files from your CD player will playback the selected folder once and then stop). However, you need a CD recorder, which...
... I mix MP3 files with other file types on 1 2 3 4 a disc. 5 6 7 8 CLEAR GOTO 1 9 0 DISPLAY MENU PAUSE/ FRAME /OK 2 STOP REPEAT A-B 1 PROG RANDOM AUDIO ANGLE SUBTITLE Press the REPEAT button ‚ to download and share. MP3 OPERATION (CONTINUED) REPEAT PLAYBACK While playing back a disc,SETUP this unit can repeatedly playback one which is pressed) or FOLDER (will ignore those files and read MP3 files from your CD player will playback the selected folder once and then stop). However, you need a CD recorder, which...
Manual
Page 44
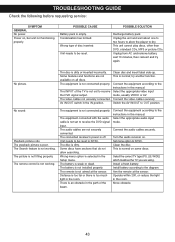
... connected receiver's power is weak or dead. Select the appropriate audio input mode. Turn the audio receiver on , but unit not functioning properly. Clean the disc. Operate within 20ft, or reduce the light in the IN position. Condensation has formed. POSSIBLE SOLUTION Recharge battery pack. No picture. Switch the AV IN/OUT to dry. Connect the equipment according to receive the DVD signal input. The equipment connected with the audio cable is not set to the instructions...
... connected receiver's power is weak or dead. Select the appropriate audio input mode. Turn the audio receiver on , but unit not functioning properly. Clean the disc. Operate within 20ft, or reduce the light in the IN position. Condensation has formed. POSSIBLE SOLUTION Recharge battery pack. No picture. Switch the AV IN/OUT to dry. Connect the equipment according to receive the DVD signal input. The equipment connected with the audio cable is not set to the instructions...
Manual
Page 45
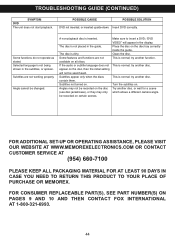
... audio or subtitle language does not appear on all discs. This is inserted. try another disc. Try another function. FOR CONSUMER REPLACEABLE PART(S), SEE PART NUMBER(S) ON PAGES 9 AND 10 AND THEN CONTACT FOX INTERNATIONAL AT 1-800-321-6993. 2 44 Some features and functions are not working properly. Selected language is normal; Subtitles appear only when the discs contain them. Subtitles not turned on the disc tray correctly inside the guide. "DVD VIDEO...
... audio or subtitle language does not appear on all discs. This is inserted. try another disc. Try another function. FOR CONSUMER REPLACEABLE PART(S), SEE PART NUMBER(S) ON PAGES 9 AND 10 AND THEN CONTACT FOX INTERNATIONAL AT 1-800-321-6993. 2 44 Some features and functions are not working properly. Selected language is normal; Subtitles appear only when the discs contain them. Subtitles not turned on the disc tray correctly inside the guide. "DVD VIDEO...


