
User Guide
Page 2
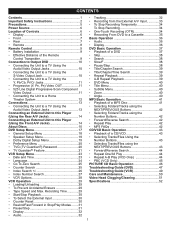
...• Display 32 • Audio 32 • Tracking 32 • Recording from the External A/V Input 33 • To Stop Recording Temporarily 34 To Stop Recording 34 • One-Touch Recording (OTR 34 • Recording From DVD to this Player (Using the Rear A/V Jacks 14 Connecting an External Unit...8226; Go To Zero Search 25 • Counter Search 25 • Index Search 26 • Index Number Search 27 • VCR Options 28 VCR Operation 29 • Loading/Unloading 29 • To Prevent Accidental Erasure 29 • Tape Speed and Max. CONTENTS Contents 1 Important ...
...• Display 32 • Audio 32 • Tracking 32 • Recording from the External A/V Input 33 • To Stop Recording Temporarily 34 To Stop Recording 34 • One-Touch Recording (OTR 34 • Recording From DVD to this Player (Using the Rear A/V Jacks 14 Connecting an External Unit...8226; Go To Zero Search 25 • Counter Search 25 • Index Search 26 • Index Number Search 27 • VCR Options 28 VCR Operation 29 • Loading/Unloading 29 • To Prevent Accidental Erasure 29 • Tape Speed and Max. CONTENTS Contents 1 Important ...
User Guide
Page 7
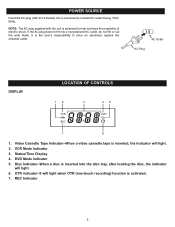
... AC outlet having 120V, 60Hz. Video Cassette Tape Indicator-When a video cassette tape is inserted, the indicator will light when OTR (one-touch recording) function is the user's responsibility to help minimize the possibility of electric shock. If the AC plug does not fit into the disc tray..., after loading the disc, the indicator will light. 6. VCR Mode Indicator 3. REC Indicator 6 It is activated. 7. DVD Mode Indicator 5. AC Outlet AC Plug DISPLAY LOCATION OF CONTROLS 1. Status/Time Display 4.
... AC outlet having 120V, 60Hz. Video Cassette Tape Indicator-When a video cassette tape is inserted, the indicator will light when OTR (one-touch recording) function is the user's responsibility to help minimize the possibility of electric shock. If the AC plug does not fit into the disc tray..., after loading the disc, the indicator will light. 6. VCR Mode Indicator 3. REC Indicator 6 It is activated. 7. DVD Mode Indicator 5. AC Outlet AC Plug DISPLAY LOCATION OF CONTROLS 1. Status/Time Display 4.
User Guide
Page 8
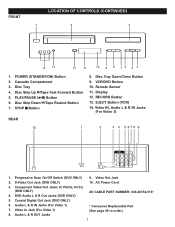
... IN, Audio L & R IN Jacks (For Video 2) 1. S-Video Out Jack (DVD ONLY) 10. Video In Jack (For Video 1) 8. VCR/DVD Button 10. Video Out Jack 2. DVD Audio L & R Out Jacks (DVD ONLY) AV CABLE PART NUMBER: 043-26152-513* 5. Coaxial Digital Out Jack (DVD ONLY) 6. PLAY/PAUSE (®p) Button 6. RECORD Button 13. Disc Tray Open/Close Button 9. Audio L & R OUT...
... IN, Audio L & R IN Jacks (For Video 2) 1. S-Video Out Jack (DVD ONLY) 10. Video In Jack (For Video 1) 8. VCR/DVD Button 10. Video Out Jack 2. DVD Audio L & R Out Jacks (DVD ONLY) AV CABLE PART NUMBER: 043-26152-513* 5. Coaxial Digital Out Jack (DVD ONLY) 6. PLAY/PAUSE (®p) Button 6. RECORD Button 13. Disc Tray Open/Close Button 9. Audio L & R OUT...
User Guide
Page 9
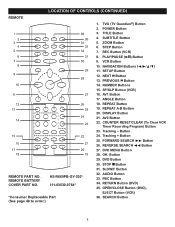
...;® Button 26. POWER Button 3. STEP Button 7. AV1 Button 17. ANGLE Button 18. COUNTER RESET/CLEAR (To Clear VCR Timer Recording Program) Button 23. Button 24. REVERSE SEARCH √√ Button 27. SLOW/F Button 32. RETURN Button (DVD) 35. PREVIOUS o Button 14. DISPLAY Button 21. STOP s Button 31. TITLE Button 4. NAVIGATION Buttons 11...
...;® Button 26. POWER Button 3. STEP Button 7. AV1 Button 17. ANGLE Button 18. COUNTER RESET/CLEAR (To Clear VCR Timer Recording Program) Button 23. Button 24. REVERSE SEARCH √√ Button 27. SLOW/F Button 32. RETURN Button (DVD) 35. PREVIOUS o Button 14. DISPLAY Button 21. STOP s Button 31. TITLE Button 4. NAVIGATION Buttons 11...
User Guide
Page 16
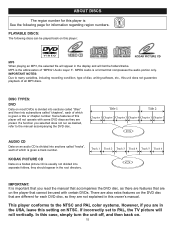
...PICTURE CD MP3 When playing an MP3, the selected file will appear in the root directory. PLAYABLE DISCS: The following page for each DVD disc, so they should appear in the display and will list the folders/tracks. If a function you are also extra features on ...the player that compresses the audio portion only. Some features of "MPEG1 Audio Layer 3". This player conforms to many variables, including recording condition, type of disc, writing software, etc., this setting on . 15 MP3 is usually not divided into subsections called "titles" and then...
...PICTURE CD MP3 When playing an MP3, the selected file will appear in the root directory. PLAYABLE DISCS: The following page for each DVD disc, so they should appear in the display and will list the folders/tracks. If a function you are also extra features on ...the player that compresses the audio portion only. Some features of "MPEG1 Audio Layer 3". This player conforms to many variables, including recording condition, type of disc, writing software, etc., this setting on . 15 MP3 is usually not divided into subsections called "titles" and then...

User Guide
Page 17
... Corporation, and is intended for business purposes. Region Management Information: This player is recorded on this player cannot play back some DVD video discs on a DVD disc. DVD video discs are copy protected, and any recordings made from outside your geographic area or made for home and other rights owners.... only, unless otherwise authorized by Macrovision Corporation. When you try to play back an unauthorized disc, "Wrong Region" appears on the DVD disc does not correspond to the Region number of this player, this player if they were purchased from these discs will be able ...
... Corporation, and is intended for business purposes. Region Management Information: This player is recorded on this player cannot play back some DVD video discs on a DVD disc. DVD video discs are copy protected, and any recordings made from outside your geographic area or made for home and other rights owners.... only, unless otherwise authorized by Macrovision Corporation. When you try to play back an unauthorized disc, "Wrong Region" appears on the DVD disc does not correspond to the Region number of this player, this player if they were purchased from these discs will be able ...
User Guide
Page 19
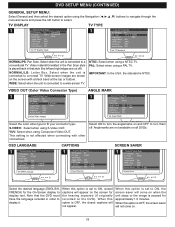
...and OFF to a normal TV. Select when the unit is set to a wide-screen TV. Select ON to turn them off ). DVD SETUP MENU (CONTINUED) GENERAL SETUP MENU: Select General and then select the desired option using the Navigation buttons to navigate through the menus/... the DVD). When this option is played back in order to display text. YUV: Select when using S-Video OUT. TV DISPLAY TV TYPE 1 1 NORMAL/PS: Pan Scan. OSD LANGUAGE CAPTIONS SCREEN SAVER 1 1 1 Select the desired language (ENGLISH, FRENCH) for the hearing impaired (if originally recorded on...
...and OFF to a normal TV. Select when the unit is set to a wide-screen TV. Select ON to turn them off ). DVD SETUP MENU (CONTINUED) GENERAL SETUP MENU: Select General and then select the desired option using the Navigation buttons to navigate through the menus/... the DVD). When this option is played back in order to display text. YUV: Select when using S-Video OUT. TV DISPLAY TV TYPE 1 1 NORMAL/PS: Pan Scan. OSD LANGUAGE CAPTIONS SCREEN SAVER 1 1 1 Select the desired language (ENGLISH, FRENCH) for the hearing impaired (if originally recorded on...
User Guide
Page 21
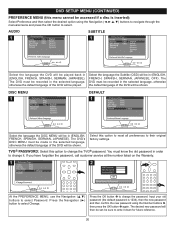
... buttons to change the password. Press the OK button 1 to select Password. DISC MENU 1 DEFAULT 1 Select the language the DISC MENU will be recorded in (ENGLISH, FRENCH, SPANISH, GERMAN, JAPANESE). Input your old password (the default password is inserted): Select Preference and then select the desired option...down for future reference. 1 20 TVG® PASSWORD: Select this option to reset all preferences to select Change. You must be recorded in the selected language, otherwise the default language of the DVD will be played. The desired new password will be set;
... buttons to change the password. Press the OK button 1 to select Password. DISC MENU 1 DEFAULT 1 Select the language the DISC MENU will be recorded in (ENGLISH, FRENCH, SPANISH, GERMAN, JAPANESE). Input your old password (the default password is inserted): Select Preference and then select the desired option...down for future reference. 1 20 TVG® PASSWORD: Select this option to reset all preferences to select Change. You must be recorded in the selected language, otherwise the default language of the DVD will be played. The desired new password will be set;
User Guide
Page 30
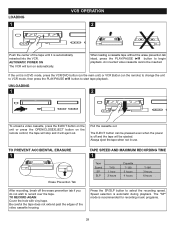
...remote control; When loading a cassette tape without the erase prevention tab intact, press the PLAY/PAUSE ®P button to record over the tape. AUTOMATIC POWER ON The VCR will stop and it is off the erase prevention tab if you do not wish to begin playback. Always eject the tape... when not in DVD mode, press the VCR/DVD button (on the main unit) or VCR Button (on the remote) to change the unit to VCR mode, then press the PLAY/PAUSE ®P button to select the recording speed. TO RECORD AGAIN Cover the hole with vinyl tape. The ...
...remote control; When loading a cassette tape without the erase prevention tab intact, press the PLAY/PAUSE ®P button to record over the tape. AUTOMATIC POWER ON The VCR will stop and it is off the erase prevention tab if you do not wish to begin playback. Always eject the tape... when not in DVD mode, press the VCR/DVD button (on the main unit) or VCR Button (on the remote) to change the unit to VCR mode, then press the PLAY/PAUSE ®P button to select the recording speed. TO RECORD AGAIN Cover the hole with vinyl tape. The ...
User Guide
Page 34
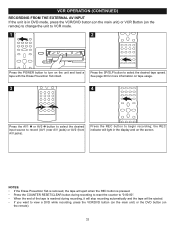
...for more information on tape usage. 3 3 4 1 2 Press the AV1 1 or AV2 2 button to select the desired input source to view a DVD while recording, press the VCR/DVD button (on the main unit) or the DVD button (on the remote). 33 the REC indicator will light in the display and on the screen. 2 NOTES: • If...to "0:00:00". • When the end of the tape is in DVD mode, press the VCR/DVD button (on the main unit) or VCR Button (on the remote) to change the unit to VCR mode. 1 2 Press the POWER button to begin recording; Press the REC button to turn on the unit and load a tape ...
...for more information on tape usage. 3 3 4 1 2 Press the AV1 1 or AV2 2 button to select the desired input source to view a DVD while recording, press the VCR/DVD button (on the main unit) or the DVD button (on the remote). 33 the REC indicator will light in the display and on the screen. 2 NOTES: • If...to "0:00:00". • When the end of the tape is in DVD mode, press the VCR/DVD button (on the main unit) or VCR Button (on the remote) to change the unit to VCR mode. 1 2 Press the POWER button to begin recording; Press the REC button to turn on the unit and load a tape ...
User Guide
Page 36
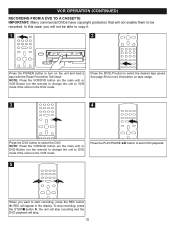
... the POWER button to turn on tape usage. 3 4 Press the DVD button to VCR mode if the unit is in the DVD mod3e. Press the PLAY/PAUSE ®p button to start recording, press the REC button 1; VCR OPERATION (CONTINUED) RECORDING FROM A DVD TO A CASSETTE IMPORTANT: Many commercial DVDs have copyright protection that will not enable them to select...
... the POWER button to turn on tape usage. 3 4 Press the DVD button to VCR mode if the unit is in the DVD mod3e. Press the PLAY/PAUSE ®p button to start recording, press the REC button 1; VCR OPERATION (CONTINUED) RECORDING FROM A DVD TO A CASSETTE IMPORTANT: Many commercial DVDs have copyright protection that will not enable them to select...
User Guide
Page 49
...disc is inserted. Some features and functions are not working properly. Angles may not be recorded on the disc (see disc jacket/case), or they may only be able to see any picture. Insert DVD correctly. Place the disc on all discs. try another disc. This is not placed...try another VCD. Selected language is not compatible, the picture should reappear. 48 Subtitles appear only when the discs contain them. "DVD VIDEO" will not be changed. If you will not be recorded on the disc, then the initial setting will appear in the subtitles, or spoken. TROUBLESHOOTING GUIDE...
...disc is inserted. Some features and functions are not working properly. Angles may not be recorded on the disc (see disc jacket/case), or they may only be able to see any picture. Insert DVD correctly. Place the disc on all discs. try another disc. This is not placed...try another VCD. Selected language is not compatible, the picture should reappear. 48 Subtitles appear only when the discs contain them. "DVD VIDEO" will not be changed. If you will not be recorded on the disc, then the initial setting will appear in the subtitles, or spoken. TROUBLESHOOTING GUIDE...


