Manual
Page 3
... HEREIN MAY RESULT IN HAZARDOUS RADIATION EXPOSURE. FCC NOTICE: This equipment has been tested and found to comply with the instructions, may be determined by turning the equipment off and on, the user is encouraged to try to correct the interference by the party responsible for compliance could void the user...
... HEREIN MAY RESULT IN HAZARDOUS RADIATION EXPOSURE. FCC NOTICE: This equipment has been tested and found to comply with the instructions, may be determined by turning the equipment off and on, the user is encouraged to try to correct the interference by the party responsible for compliance could void the user...
Manual
Page 6
... cold place to a warm place. •When you use the DVD player in a room where you just turned on the heater, or a place where the cold wind from the air conditioner directly hits the unit. •... worn down, the picture quality becomes poor. Do not leave rubber or plastic products in the future. Turn on and use depending on the outside of electric shock. Use a dry cloth to wipe it was ... benzene, as they may damage the surface of playback mechanism should be sure to remove the disc and turn on a warm day. In this DVD player near the DVD player. Do not use the DVD player...
... cold place to a warm place. •When you use the DVD player in a room where you just turned on the heater, or a place where the cold wind from the air conditioner directly hits the unit. •... worn down, the picture quality becomes poor. Do not leave rubber or plastic products in the future. Turn on and use depending on the outside of electric shock. Use a dry cloth to wipe it was ... benzene, as they may damage the surface of playback mechanism should be sure to remove the disc and turn on a warm day. In this DVD player near the DVD player. Do not use the DVD player...

Manual
Page 11
... and set the PROGRESSIVE SCAN switch to see any connections. • Connect the DVD player to your TV/monitor for compatibility with a blue screen option, turn the unit on and the picture will be able to ON. To ensure maximum picture quality, use three videograde cables for best results. To regain... switch to the VIDEO setting. • When connecting the DVD, refer to the owner's manual of video information fed to your TV or monitor. Then, turn the option off and both units are copy protected. • If using a TV with this manual. • When connecting the DVD to the TV, ...
... and set the PROGRESSIVE SCAN switch to see any connections. • Connect the DVD player to your TV/monitor for compatibility with a blue screen option, turn the unit on and the picture will be able to ON. To ensure maximum picture quality, use three videograde cables for best results. To regain... switch to the VIDEO setting. • When connecting the DVD, refer to the owner's manual of video information fed to your TV or monitor. Then, turn the option off and both units are copy protected. • If using a TV with this manual. • When connecting the DVD to the TV, ...
Manual
Page 12
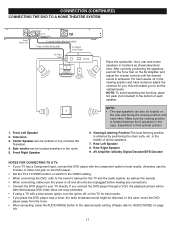
... top or below the Television. 4. Sub-woofer-can be distorted because DVD video discs are copy protected. • If using a TV with a blue screen option, turn the option off and all units are unplugged before making any connections. • Connect the DVD player to the bottom of all the speakers. 7. Make...
... top or below the Television. 4. Sub-woofer-can be distorted because DVD video discs are copy protected. • If using a TV with a blue screen option, turn the option off and all units are unplugged before making any connections. • Connect the DVD player to the bottom of all the speakers. 7. Make...
Manual
Page 13
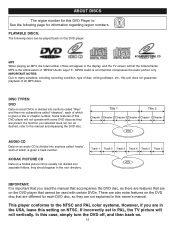
... TV picture will not operate with certain DVDs. Title 1 Title 2 Chapter 1 Chapter 2 Chapter 3 Chapter 4 Chapter 1 Chapter 2 AUDIO CD Data on . 12 In this case, simply turn the DVD off, and then back on an audio CD is divided into separate folders, they should appear in the USA, leave this unit does...
... TV picture will not operate with certain DVDs. Title 1 Title 2 Chapter 1 Chapter 2 Chapter 3 Chapter 4 Chapter 1 Chapter 2 AUDIO CD Data on . 12 In this case, simply turn the DVD off, and then back on an audio CD is divided into separate folders, they should appear in the USA, leave this unit does...
Manual
Page 15
... (œ) button ƒ repeatedly to return to the Setup icons or press the SETUP button ‚ to select various language preferences, set up a parental level, turn screen saver on and off, adjust what type of the selected menu option. 1. Use the Navigation (œ,ƒ) buttons ƒ to select one of the...
... (œ) button ƒ repeatedly to return to the Setup icons or press the SETUP button ‚ to select various language preferences, set up a parental level, turn screen saver on and off, adjust what type of the selected menu option. 1. Use the Navigation (œ,ƒ) buttons ƒ to select one of the...
Manual
Page 16
... using an NTSC TV. Wide-screen images are cut off). 4:3LB: Select when the unit is connected to a conventional TV. When the DVD player is turned on the screen with a black band at the top or bottom. 16:9: Select when the unit is set to ON, the screen saver will not...
... using an NTSC TV. Wide-screen images are cut off). 4:3LB: Select when the unit is connected to a conventional TV. When the DVD player is turned on the screen with a black band at the top or bottom. 16:9: Select when the unit is set to ON, the screen saver will not...

Manual
Page 18
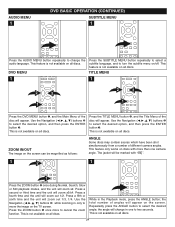
.... Set to OFF to hear the sound in theatrical downmix mode. LT/RT: Select to hear the Digital Output in RAW format. STEREO: Select to turn Dynamic Range Off. 17 DIGITAL SETUP MENU: Select DIGITAL SETUP using the Navigation (¦,‹) buttons, then select/change the setup option as described on...
.... Set to OFF to hear the sound in theatrical downmix mode. LT/RT: Select to hear the Digital Output in RAW format. STEREO: Select to turn Dynamic Range Off. 17 DIGITAL SETUP MENU: Select DIGITAL SETUP using the Navigation (¦,‹) buttons, then select/change the setup option as described on...
Manual
Page 21
... will appear on the TV screen. light white is mute, light yellow is show "TRK (TRACK), MUTE/UNMUTE, REPEAT function, tracks remaining time." 3 press turn off off the display. for the MUTE/UNMUTE, the mute icon - Press Display button for three seconds. Press DISPLAY button for MP3, 1 press show "TRK... elapsed time." 2 press show on the TV screen for Picture CD. 1 press show " TT (Title), CH(chapter) and the remaining time of disc." 5 press turns off the display. for the PBC, PBC icon light yellow is PBC ON, light white is PBC OFF. "DEMUTE" will not show "TRK (TRACK), MUTE...
... will appear on the TV screen. light white is mute, light yellow is show "TRK (TRACK), MUTE/UNMUTE, REPEAT function, tracks remaining time." 3 press turn off off the display. for the MUTE/UNMUTE, the mute icon - Press Display button for three seconds. Press DISPLAY button for MP3, 1 press show "TRK... elapsed time." 2 press show on the TV screen for Picture CD. 1 press show " TT (Title), CH(chapter) and the remaining time of disc." 5 press turns off the display. for the PBC, PBC icon light yellow is PBC ON, light white is PBC OFF. "DEMUTE" will not show "TRK (TRACK), MUTE...
Manual
Page 22
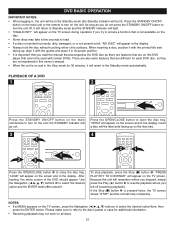
...display. PLAYBACK OF A DVD 1 2 Press the STANDBY ON/OFF button on the main unit/remote to turn on the unit. After loading, the menu screen of its proper position. • It is important ... the manual that accompanies the DVD disc as you do not press the STANDBY ON/OFF button to turn on the unit; To stop completely. "PRESS PLAY KEY TO CONTINUE" will the label side facing ...to the Standby mode automatically. Press the STANDBY ON/OFF button on the main unit or the remote to turn the unit off (resuming playback). the STANDBY indicator will go out. 3 1 Press the OPEN/CLOSE button...
...display. PLAYBACK OF A DVD 1 2 Press the STANDBY ON/OFF button on the main unit/remote to turn on the unit. After loading, the menu screen of its proper position. • It is important ... the manual that accompanies the DVD disc as you do not press the STANDBY ON/OFF button to turn on the unit; To stop completely. "PRESS PLAY KEY TO CONTINUE" will the label side facing ...to the Standby mode automatically. Press the STANDBY ON/OFF button on the main unit or the remote to turn the unit off (resuming playback). the STANDBY indicator will go out. 3 1 Press the OPEN/CLOSE button...
Manual
Page 25
...; once during Normal, Search, Slow or Still playback modes, and the unit will zoom x2. Use the Navigation buttons ƒ while zooming in only to turn the subtitle menu on all discs. 24 the angle will zoom out 1/2. This is not available on the screen can be marked with more to...
...; once during Normal, Search, Slow or Still playback modes, and the unit will zoom x2. Use the Navigation buttons ƒ while zooming in only to turn the subtitle menu on all discs. 24 the angle will zoom out 1/2. This is not available on the screen can be marked with more to...

Manual
Page 27
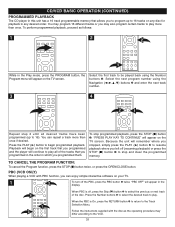
... totally stop playback and "PRESS PLAY KEY TO CONTINUE" will start the playback. Press the PLAY (‹) button 4 to resume or the STOP (I ) button 3 to turn on the unit; Press the STOP (I ) button 3 again to select the desired track. playback will appear on the TV screen. Press the ENTER button 3 to...
... totally stop playback and "PRESS PLAY KEY TO CONTINUE" will start the playback. Press the PLAY (‹) button 4 to resume or the STOP (I ) button 3 to turn on the unit; Press the STOP (I ) button 3 again to select the desired track. playback will appear on the TV screen. Press the ENTER button 3 to...
Manual
Page 30
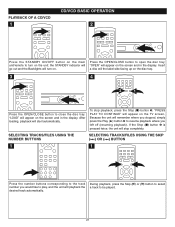
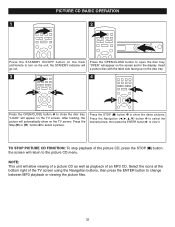
...Stop (I ) button ‚ is pressed twice, the unit will the label side facing up on the disc tray. 3 4 2 1 Press the OPEN/CLOSE button to turn on. PLAYBACK OF A CD/VCD 1 CD/VCD BASIC OPERATION 2 Press the STANDBY ON/OFF button on the main unit/remote to close the disc tray.... the STANDBY indicator will go out and the Backlights will appear on the unit; Press the OPEN/CLOSE button to be played. 29 "LOAD" will turn on the screen and in the display. "PRESS PLAY TO CONTINUE" will start automatically. During playback, press the Skip (n) or (o) button to select a ...
...Stop (I ) button ‚ is pressed twice, the unit will the label side facing up on the disc tray. 3 4 2 1 Press the OPEN/CLOSE button to turn on. PLAYBACK OF A CD/VCD 1 CD/VCD BASIC OPERATION 2 Press the STANDBY ON/OFF button on the main unit/remote to close the disc tray.... the STANDBY indicator will go out and the Backlights will appear on the unit; Press the OPEN/CLOSE button to be played. 29 "LOAD" will turn on the screen and in the display. "PRESS PLAY TO CONTINUE" will start automatically. During playback, press the Skip (n) or (o) button to select a ...
Manual
Page 31
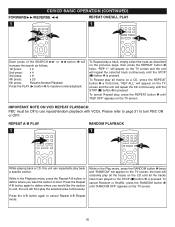
..., press the REPEAT button ‚ a third time; While in the Playback mode, press the Repeat A-B button to define where you would like the section to turn PBC ON or OFF. Press the A-B button again to resume normal playback. "REP 1"; To Repeat play the selected area continuously. REPEAT A-B PLAY 1 RANDOM PLAYBACK 1 1 2 While...
..., press the REPEAT button ‚ a third time; While in the Playback mode, press the Repeat A-B button to define where you would like the section to turn PBC ON or OFF. Press the A-B button again to resume normal playback. "REP 1"; To Repeat play the selected area continuously. REPEAT A-B PLAY 1 RANDOM PLAYBACK 1 1 2 While...
Manual
Page 32
... playing a VCD with the disc as follows: 1 2 2 1 While in the Play mode, press the PROGRAM button, the Program menu will appear on your TV. 1 2 To turn off the PBC, press the PBC button 1 twice; Follow the instructions supplied with PBC function, you can repeat a track more than once if desired. TO...
... playing a VCD with the disc as follows: 1 2 2 1 While in the Play mode, press the PROGRAM button, the Program menu will appear on your TV. 1 2 To turn off the PBC, press the PBC button 1 twice; Follow the instructions supplied with PBC function, you can repeat a track more than once if desired. TO...
Manual
Page 33
... OPEN/CLOSE button to open the disc tray, "OPEN" will appear on the screen and in the display. Press the Skip (n) or (o) button ƒ to turn on the unit; "LOAD" will appear on the TV screen. Press the STOP (I ) button; the STANDBY indicator will return to close the disc tray. TO...
... OPEN/CLOSE button to open the disc tray, "OPEN" will appear on the screen and in the display. Press the Skip (n) or (o) button ƒ to turn on the unit; "LOAD" will appear on the TV screen. Press the STOP (I ) button; the STANDBY indicator will return to close the disc tray. TO...
Manual
Page 34
... not allow the player to dry. The batteries are not securely connected. Connect the equipment according to the instructions in the AC cord to ON. Turn the TV on , but unit not functioning properly. This is off . Select the correct TV type (4:3PS,4:3LB, 16:9) which matches the TV ... to be reset. Press the STANDBY button, then unplug the power cord. The remote control is not set it. There is not connected properly. Turn the audio receiver on to auto set to allow searching. The picture is not aimed at the sensor. The remote is not fitting properly. Playback...
... not allow the player to dry. The batteries are not securely connected. Connect the equipment according to the instructions in the AC cord to ON. Turn the TV on , but unit not functioning properly. This is off . Select the correct TV type (4:3PS,4:3LB, 16:9) which matches the TV ... to be reset. Press the STANDBY button, then unplug the power cord. The remote control is not set it. There is not connected properly. Turn the audio receiver on to auto set to allow searching. The picture is not aimed at the sensor. The remote is not fitting properly. Playback...
Manual
Page 35
... changed. Some features and functions are not working properly. Enter your set is not compatible, then turn the unit off and back on again; Clean the disc. This is dirty. After receiving the ...AT LEAST 90 DAYS IN CASE YOU NEED TO RETURN THIS PRODUCT TO YOUR PLACE OF PURCHASE OR MEMOREX. If the audio or subtitle language does not appear on . "DVD VIDEO" will not be ...inserted does not have the playback control. DVD not inserted, or inserted upside-down . Subtitles not turned on the warranty to get the information to the OFF position if your password, and/or change ...
... changed. Some features and functions are not working properly. Enter your set is not compatible, then turn the unit off and back on again; Clean the disc. This is dirty. After receiving the ...AT LEAST 90 DAYS IN CASE YOU NEED TO RETURN THIS PRODUCT TO YOUR PLACE OF PURCHASE OR MEMOREX. If the audio or subtitle language does not appear on . "DVD VIDEO" will not be ...inserted does not have the playback control. DVD not inserted, or inserted upside-down . Subtitles not turned on the warranty to get the information to the OFF position if your password, and/or change ...


