User Guide
Page 1
MP8806 User's Guide Portable CD Player with AM/FM Stereo Radio Before operating this product, please read these instructions completely.
MP8806 User's Guide Portable CD Player with AM/FM Stereo Radio Before operating this product, please read these instructions completely.

User Guide
Page 2
... USER-SERVICEABLE PARTS INSIDE. DANGER: FCC WARNING: This equipment may generate or use radio frequency energy. Invisible and hazardous laser radiation when open and interlock failed or defeated. The user could lose the authority to operate this equipment if an unauthorized change or modification is intended to alert the user to the presence of important operating and maintenance (servicing) instructions in the instruction manual...
... USER-SERVICEABLE PARTS INSIDE. DANGER: FCC WARNING: This equipment may generate or use radio frequency energy. Invisible and hazardous laser radiation when open and interlock failed or defeated. The user could lose the authority to operate this equipment if an unauthorized change or modification is intended to alert the user to the presence of important operating and maintenance (servicing) instructions in the instruction manual...

User Guide
Page 3
.... CAUTION: USE OF CONTROLS, ADJUSTMENTS OR PERFORMANCE PROCEDURE HEREIN MAY RESULT IN HAZARDOUS RADIATION EXPOSURE. These limits are designed to use a surge protector for AC connection. This equipment generates, uses and can be determined by turning the equipment off and on, the user is recommended to provide reasonable protection against harmful interference in a residential installation. This Class B digital apparatus...
.... CAUTION: USE OF CONTROLS, ADJUSTMENTS OR PERFORMANCE PROCEDURE HEREIN MAY RESULT IN HAZARDOUS RADIATION EXPOSURE. These limits are designed to use a surge protector for AC connection. This equipment generates, uses and can be determined by turning the equipment off and on, the user is recommended to provide reasonable protection against harmful interference in a residential installation. This Class B digital apparatus...
User Guide
Page 4
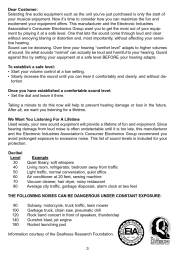
Now it's time to consider how you have established a comfortable sound level: • Set the dial and leave it is included for a lifetime. Sound can maximize the fun and excitement your volume control at two feet Subway, motorcycle, truck traffic, lawn mower Garbage truck, chain saw, pneumatic drill Rock band concert in front of speakers, thunderclap Gunshot blast...
Now it's time to consider how you have established a comfortable sound level: • Set the dial and leave it is included for a lifetime. Sound can maximize the fun and excitement your volume control at two feet Subway, motorcycle, truck traffic, lawn mower Garbage truck, chain saw, pneumatic drill Rock band concert in front of speakers, thunderclap Gunshot blast...
User Guide
Page 5
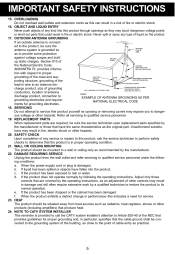
... not defeat the safety purpose of overhead power lines or other similar surface. VENTILATION Slots and openings in the cabinet and in installation such as they are provided for long periods of power supply to . 10. For products intended to operate from the wall outlet and disconnect the antenna or cable system. POWER-CORD PROTECTION Power-supply cords should not be placed in a built...
... not defeat the safety purpose of overhead power lines or other similar surface. VENTILATION Slots and openings in the cabinet and in installation such as they are provided for long periods of power supply to . 10. For products intended to operate from the wall outlet and disconnect the antenna or cable system. POWER-CORD PROTECTION Power-supply cords should not be placed in a built...
User Guide
Page 6
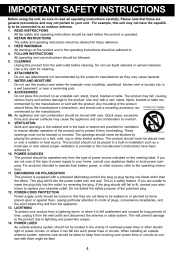
... the service technician uses replacement parts specified by the operating instructions, as an adjustment of cable entry as practical. b. Adjust only those that produce heat. 24. IMPORTANT SAFETY INSTRUCTIONS 5 REPLACEMENT PARTS When replacement parts are covered by the manufacturer or those controls that the product is grounded so as recommended by the manufacturer. 22. When the power-supply cord or plug is provided to call the CATV system installer's attention...
... the service technician uses replacement parts specified by the operating instructions, as an adjustment of cable entry as practical. b. Adjust only those that produce heat. 24. IMPORTANT SAFETY INSTRUCTIONS 5 REPLACEMENT PARTS When replacement parts are covered by the manufacturer or those controls that the product is grounded so as recommended by the manufacturer. 22. When the power-supply cord or plug is provided to call the CATV system installer's attention...
User Guide
Page 7
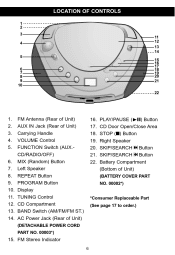
... Antenna (Rear of Unit) AUX IN Jack (Rear of Unit) Carrying Handle VOLUME Control FUNCTION Switch (AUX.CD/RADIO/OFF) MIX (Random) Button Left Speaker REPEAT Button PROGRAM Button Display TUNING Control CD Compartment BAND Switch (AM/FM/FM ST.) AC Power Jack (Rear of Unit) NO. 00002*) (BATTERY COVER PART *Consumer Replaceable Part (See page 17 to order.) 15. PLAY/PAUSE (®p) Button CD Door Open/Close Area STOP (I) Button Right Speaker SKIP/SEARCH n Button SKIP/SEARCH o Button Battery Compartment (Bottom of Unit) (DETACHABLE POWER CORD PART NO...
... Antenna (Rear of Unit) AUX IN Jack (Rear of Unit) Carrying Handle VOLUME Control FUNCTION Switch (AUX.CD/RADIO/OFF) MIX (Random) Button Left Speaker REPEAT Button PROGRAM Button Display TUNING Control CD Compartment BAND Switch (AM/FM/FM ST.) AC Power Jack (Rear of Unit) NO. 00002*) (BATTERY COVER PART *Consumer Replaceable Part (See page 17 to order.) 15. PLAY/PAUSE (®p) Button CD Door Open/Close Area STOP (I) Button Right Speaker SKIP/SEARCH n Button SKIP/SEARCH o Button Battery Compartment (Bottom of Unit) (DETACHABLE POWER CORD PART NO...
User Guide
Page 8
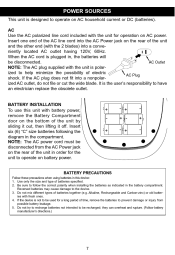
... an electrician replace the obsolete outlet. If the AC plug does not fit into the AC Power jack on AC power. Do not mix different types of batteries specified. 2. Insert six (6) "C" size batteries following the diagram in , the batteries will AC Outlet be disconnected from possible battery leakage. 5. When the AC cord is not to be recharged; BATTERY INSTALLATION To use this device...
... an electrician replace the obsolete outlet. If the AC plug does not fit into the AC Power jack on AC power. Do not mix different types of batteries specified. 2. Insert six (6) "C" size batteries following the diagram in , the batteries will AC Outlet be disconnected from possible battery leakage. 5. When the AC cord is not to be recharged; BATTERY INSTALLATION To use this device...

User Guide
Page 9
If a strong stereo station is selected. LISTENING TO THE RADIO OPERATION 1 1 2 2 Rotate the TUNING control to manually advance the frequency until the desired frequency is broadcasting, the FM Stereo indicator will light. to turn the unit on and select the radio. FM-The FM Antenna is weak, adjust the length and the angle of the antenna. 8 Slide the BAND switch 2 to select AM or FM. 3 FM...
If a strong stereo station is selected. LISTENING TO THE RADIO OPERATION 1 1 2 2 Rotate the TUNING control to manually advance the frequency until the desired frequency is broadcasting, the FM Stereo indicator will light. to turn the unit on and select the radio. FM-The FM Antenna is weak, adjust the length and the angle of the antenna. 8 Slide the BAND switch 2 to select AM or FM. 3 FM...
User Guide
Page 10
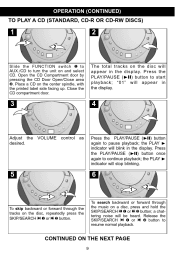
.... 3 4 Adjust the VOLUME control as desired. 5 1 2 Press the PLAY/PAUSE (®p) button again to turn the unit on and select CD. CONTINUED ON THE NEXT PAGE 9 "01" will stop blinking. 6 1 2 To skip backward or forward through the music on the disc, repeatedly press the SKIP/SEARCH o 1 or n 2 button. the PLAY ® indicator will appear in the display. Slide the FUNCTION switch 1 to AUX./CD to pause playback; Place a CD...
.... 3 4 Adjust the VOLUME control as desired. 5 1 2 Press the PLAY/PAUSE (®p) button again to turn the unit on and select CD. CONTINUED ON THE NEXT PAGE 9 "01" will stop blinking. 6 1 2 To skip backward or forward through the music on the disc, repeatedly press the SKIP/SEARCH o 1 or n 2 button. the PLAY ® indicator will appear in the display. Slide the FUNCTION switch 1 to AUX./CD to pause playback; Place a CD...
User Guide
Page 11
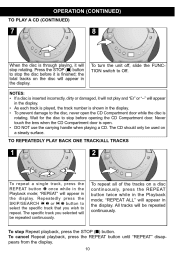
... the display. • As each track is played, the track number is shown in the Playback mode; "REPEAT" will be repeated continuously. The specific track you wish to the disc, never open the CD Compartment door while the disc is through playing, it is open. • DO NOT use the carrying handle when playing a CD. TO PLAY A CD (CONTINUED) OPERATION (CONTINUED) 7 8 When the disc is rotating. "REPEAT ALL" will be used on a steady surface. 1 2 1 2 3 To repeat all...
... the display. • As each track is played, the track number is shown in the Playback mode; "REPEAT" will be repeated continuously. The specific track you wish to the disc, never open the CD Compartment door while the disc is through playing, it is open. • DO NOT use the carrying handle when playing a CD. TO PLAY A CD (CONTINUED) OPERATION (CONTINUED) 7 8 When the disc is rotating. "REPEAT ALL" will be used on a steady surface. 1 2 1 2 3 To repeat all...
User Guide
Page 12
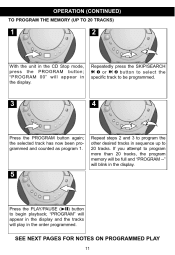
... select the specific track to 20 tracks. SEE NEXT PAGES FOR NOTES ON PROGRAMMED PLAY 11 TO PROGRAM THE MEMORY (UP TO 20 TRACKS) OPERATION (CONTINUED) 1 2 1 With the unit in sequence up to be full and "PROGRAM --" will blink in the display. the selected track has now been programmed and counted as program 1. 5 Repeat steps 2 and 3 to program the other desired tracks in the CD Stop mode, press the PROGRAM button;
... select the specific track to 20 tracks. SEE NEXT PAGES FOR NOTES ON PROGRAMMED PLAY 11 TO PROGRAM THE MEMORY (UP TO 20 TRACKS) OPERATION (CONTINUED) 1 2 1 With the unit in sequence up to be full and "PROGRAM --" will blink in the display. the selected track has now been programmed and counted as program 1. 5 Repeat steps 2 and 3 to program the other desired tracks in the CD Stop mode, press the PROGRAM button;
User Guide
Page 13
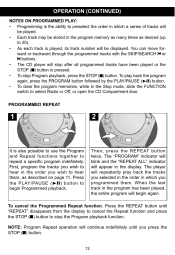
... the Stop mode, slide the FUNCTION switch to hear them . When the last track in the program has been played, the entire program will repeatedly play back the program again, press the PROGRAM button followed by the PLAY/PAUSE (®p) button. • To clear the program memories, while in the display. You can move forward or backward through the programmed tracks with the SKIP/SEARCH o or n buttons. • The CD player will continue...
... the Stop mode, slide the FUNCTION switch to hear them . When the last track in the program has been played, the entire program will repeatedly play back the program again, press the PROGRAM button followed by the PLAY/PAUSE (®p) button. • To clear the program memories, while in the display. You can move forward or backward through the programmed tracks with the SKIP/SEARCH o or n buttons. • The CD player will continue...
User Guide
Page 14
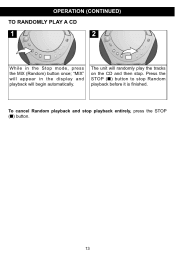
To cancel Random playback and stop playback entirely, press the STOP (I ) button to stop . Press the STOP ( I ) button. 13 TO RANDOMLY PLAY A CD OPERATION (CONTINUED) 1 2 While in the display and playback will randomly play the tracks on the CD and then stop Random playback before it is finished. The unit will begin automatically. "MIX" will appear in the Stop mode, press the MIX (Random) button once;
To cancel Random playback and stop playback entirely, press the STOP (I ) button to stop . Press the STOP ( I ) button. 13 TO RANDOMLY PLAY A CD OPERATION (CONTINUED) 1 2 While in the display and playback will randomly play the tracks on the CD and then stop Random playback before it is finished. The unit will begin automatically. "MIX" will appear in the Stop mode, press the MIX (Random) button once;
User Guide
Page 15
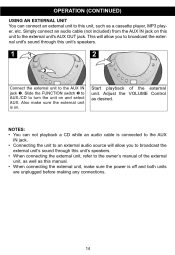
... external unit to the external unit's AUX OUT jack. Also make sure the power is on and select AUX. Slide the FUNCTION switch 2 to AUX./CD to the owner's manual of the external unit. Adjust the VOLUME Control as this unit, such as a cassette player, MP3 player, etc. This will allow you to broadcast the external unit's sound through this unit's speakers. Start playback of the external unit, as well as desired. Simply connect an audio cable...
... external unit to the external unit's AUX OUT jack. Also make sure the power is on and select AUX. Slide the FUNCTION switch 2 to AUX./CD to the owner's manual of the external unit. Adjust the VOLUME Control as this unit, such as a cassette player, MP3 player, etc. This will allow you to broadcast the external unit's sound through this unit's speakers. Start playback of the external unit, as well as desired. Simply connect an audio cable...
User Guide
Page 16
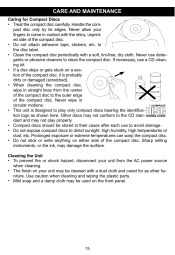
... a soft, lint-free, dry cloth. to the disc label. • Clean the compact disc periodically with the shiny, unprinted side of the compact disc. • Do not attach adhesive tape, stickers, etc. If necessary, use a CD cleaning kit. • If a disc skips or gets stuck on a section of the compact disc, it is designed to play properly. • Compact discs should be used on your unit...
... a soft, lint-free, dry cloth. to the disc label. • Clean the compact disc periodically with the shiny, unprinted side of the compact disc. • Do not attach adhesive tape, stickers, etc. If necessary, use a CD cleaning kit. • If a disc skips or gets stuck on a section of the compact disc, it is designed to play properly. • Compact discs should be used on your unit...
User Guide
Page 17
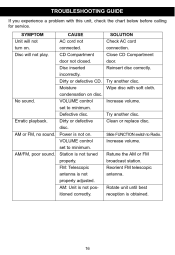
... on . Station is not positioned correctly. TROUBLESHOOTING GUIDE Try another disc. AM or FM, no sound. CAUSE AC cord not connected. Erratic playback. No sound. Wipe disc with this unit, check the chart below before calling for service. VOLUME control set to Radio. AM: Unit is not tuned properly. CD Compartment door not closed. If you experience a problem with soft cloth. FM: Telescopic antenna is not properly adjusted. SOLUTION...
... on . Station is not positioned correctly. TROUBLESHOOTING GUIDE Try another disc. AM or FM, no sound. CAUSE AC cord not connected. Erratic playback. No sound. Wipe disc with this unit, check the chart below before calling for service. VOLUME control set to Radio. AM: Unit is not tuned properly. CD Compartment door not closed. If you experience a problem with soft cloth. FM: Telescopic antenna is not properly adjusted. SOLUTION...
User Guide
Page 18
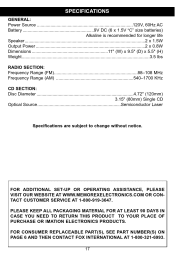
... CONSUMER REPLACEABLE PART(S), SEE PART NUMBER(S) ON PAGE 6 AND THEN CONTACT FOX INTERNATIONAL AT 1-800-321-6993. 17 GENERAL: Power Source ...120V, 60Hz AC Battery ...9V DC (6 x 1.5V "C" size batteries) Alkaline is recommended for longer life Speaker...2 x 1.5W Output Power ...2 x 0.8W Dimensions ...11" (W) x 9.5" (D) x 5.5" (H) Weight...3.5 lbs RADIO SECTION: Frequency Range (FM)...88-108 MHz Frequency Range (AM) ...540-1700 KHz SPECIFICATIONS CD SECTION: Disc Diameter...
... CONSUMER REPLACEABLE PART(S), SEE PART NUMBER(S) ON PAGE 6 AND THEN CONTACT FOX INTERNATIONAL AT 1-800-321-6993. 17 GENERAL: Power Source ...120V, 60Hz AC Battery ...9V DC (6 x 1.5V "C" size batteries) Alkaline is recommended for longer life Speaker...2 x 1.5W Output Power ...2 x 0.8W Dimensions ...11" (W) x 9.5" (D) x 5.5" (H) Weight...3.5 lbs RADIO SECTION: Frequency Range (FM)...88-108 MHz Frequency Range (AM) ...540-1700 KHz SPECIFICATIONS CD SECTION: Disc Diameter...


