
User Guide
Page 2
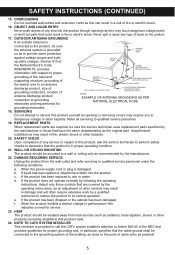
... alert the user to become more familiar with it and obtain the performance that may generate or use radio frequency energy. Avoid direct exposure to constitute a risk of the cabinet. For future reference, record the serial number of the unit printed on the rear of electric shock to the presence of important operating and maintenance (servicing) instructions in the instruction manual. ATTENTION...
... alert the user to become more familiar with it and obtain the performance that may generate or use radio frequency energy. Avoid direct exposure to constitute a risk of the cabinet. For future reference, record the serial number of the unit printed on the rear of electric shock to the presence of important operating and maintenance (servicing) instructions in the instruction manual. ATTENTION...
User Guide
Page 3
...: USE OF CONTROLS, ADJUSTMENTS OR PERFORMANCE PROCEDURE HEREIN MAY RESULT IN HAZARDOUS RADIATION EXPOSURE. This Class B digital apparatus complies with the instructions, may cause harmful interference to provide reasonable protection against harmful interference in a residential installation. LASER SAFETY: This unit employs a laser. However, there is connected. • Consult the dealer or an experienced radio/TV technician for help. Lightning and power...
...: USE OF CONTROLS, ADJUSTMENTS OR PERFORMANCE PROCEDURE HEREIN MAY RESULT IN HAZARDOUS RADIATION EXPOSURE. This Class B digital apparatus complies with the instructions, may cause harmful interference to provide reasonable protection against harmful interference in a residential installation. LASER SAFETY: This unit employs a laser. However, there is connected. • Consult the dealer or an experienced radio/TV technician for help. Lightning and power...
User Guide
Page 4
... often undetectable until you can hear it comfortably and clearly, and without affecting your musical enjoyment. Sound can actually be deceiving. Over time your protection. After all, we want you listening for your hearing "comfort level" adapts to prevent hearing damage or loss in front of speakers, thunderclap 140 Gunshot blast, jet engine 180 Rocket launching...
... often undetectable until you can hear it comfortably and clearly, and without affecting your musical enjoyment. Sound can actually be deceiving. Over time your protection. After all, we want you listening for your hearing "comfort level" adapts to prevent hearing damage or loss in front of speakers, thunderclap 140 Gunshot blast, jet engine 180 Rocket launching...
User Guide
Page 5
.... When installing an outside antenna system should be located in a wet basement; These openings must not be placed near a swimming pool. 8. SAFETY INSTRUCTIONS Before using the unit, be moved with care. An appliance and cart combination should still fail to fit, contact your obsolete outlet. For products intended to replace your electrician to operate from the type of time...
.... When installing an outside antenna system should be located in a wet basement; These openings must not be placed near a swimming pool. 8. SAFETY INSTRUCTIONS Before using the unit, be moved with care. An appliance and cart combination should still fail to fit, contact your obsolete outlet. For products intended to replace your electrician to operate from the type of time...
User Guide
Page 6
... uses replacement parts specified by the manufacturer. 22. e. OUTDOOR ANTENNA GROUNDING If an outside antenna is connected to qualified service personnel under the following the operating instructions. up static charges. b. If the product has been exposed to qualified service personnel. 19. HEAT The product should be mounted to dangerous voltage or other hazards. 20. Never spill or spray any type of other controls...
... uses replacement parts specified by the manufacturer. 22. e. OUTDOOR ANTENNA GROUNDING If an outside antenna is connected to qualified service personnel under the following the operating instructions. up static charges. b. If the product has been exposed to qualified service personnel. 19. HEAT The product should be mounted to dangerous voltage or other hazards. 20. Never spill or spray any type of other controls...
User Guide
Page 7
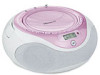
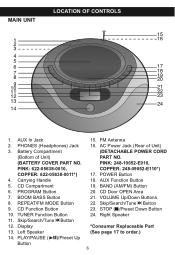
... Speaker *Consumer Replaceable Part (See page 17 to order.) 6 Battery Compartment (Bottom of Unit) (DETACHABLE POWER CORD PART NO. BOOM BASS Button 8. Display 13. AC Power Jack (Rear of Unit) (BATTERY COVER PART NO. AUX In Jack 2. PHONES (Headphones) Jack 3. CD Function Button 10. BAND (AM/FM) Button 20. STOP (X)/Preset Down Button 24. Skip/Search/Tune o Button 12. PINK: 248-19052-E010, COPPER: 248-09052-E110*) 17. CD Door OPEN Area 21. CD Compartment 6. Left Speaker 14. Carrying Handle 5. TUNER Function Button 11. PLAY/PAUSE...
... Speaker *Consumer Replaceable Part (See page 17 to order.) 6 Battery Compartment (Bottom of Unit) (DETACHABLE POWER CORD PART NO. BOOM BASS Button 8. Display 13. AC Power Jack (Rear of Unit) (BATTERY COVER PART NO. AUX In Jack 2. PHONES (Headphones) Jack 3. CD Function Button 10. BAND (AM/FM) Button 20. STOP (X)/Preset Down Button 24. Skip/Search/Tune o Button 12. PINK: 248-19052-E010, COPPER: 248-09052-E110*) 17. CD Door OPEN Area 21. CD Compartment 6. Left Speaker 14. Carrying Handle 5. TUNER Function Button 11. PLAY/PAUSE...

User Guide
Page 8
... one end of the AC line cord into a AC Plug nonpolarized AC outlet, do not file or cut the wide blade. BATTERY INSTALLATION To use this device: 1. Use only the size and type of batteries together (e.g. they can overheat and rupture. (Follow battery manufacturer's directions.) HEADPHONE JACK (TOP OF UNIT) For private listening, connect 3.5mm (32 ohm) stereo headphones (not included) to follow the...
... one end of the AC line cord into a AC Plug nonpolarized AC outlet, do not file or cut the wide blade. BATTERY INSTALLATION To use this device: 1. Use only the size and type of batteries together (e.g. they can overheat and rupture. (Follow battery manufacturer's directions.) HEADPHONE JACK (TOP OF UNIT) For private listening, connect 3.5mm (32 ohm) stereo headphones (not included) to follow the...

User Guide
Page 9
... Tuner mode. Press the BOOM BASS button 2 to On (BOOM BASS will appear in a station. FM-The FM Antenna is weak, adjust the length and the angle of the antenna. 8 Noise present in FM stereo broadcasts can be reduced by listening in most areas. If reception is for FM reception only. OPERATION LISTENING TO THE RADIO 1 2 1 2 Press the POWER button 1 to turn the radio off, press the POWER button again. ANTENNAS...
... Tuner mode. Press the BOOM BASS button 2 to On (BOOM BASS will appear in a station. FM-The FM Antenna is weak, adjust the length and the angle of the antenna. 8 Noise present in FM stereo broadcasts can be reduced by listening in most areas. If reception is for FM reception only. OPERATION LISTENING TO THE RADIO 1 2 1 2 Press the POWER button 1 to turn the radio off, press the POWER button again. ANTENNAS...
User Guide
Page 10
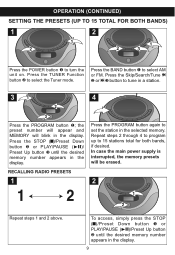
... the STOP (X)/Preset Down button 2 or PLAY/PAUSE (®p)/ Preset Up button 3 until the desired memory number appears in the display. 9 RECALLING RADIO PRESETS 1 Press the PROGRAM button again to 15 stations total for both bands, if desired. OPERATION (CONTINUED) SETTING THE PRESETS (UP TO 15 TOTAL FOR BOTH BANDS) 1 2 1 2 1 2 3 Press the POWER button 1 to tune in a station. 31 4 2 3 Press the PROGRAM button 1; Press the Skip/Search/Tune o 2 or n 3 button to turn the unit on...
... the STOP (X)/Preset Down button 2 or PLAY/PAUSE (®p)/ Preset Up button 3 until the desired memory number appears in the display. 9 RECALLING RADIO PRESETS 1 Press the PROGRAM button again to 15 stations total for both bands, if desired. OPERATION (CONTINUED) SETTING THE PRESETS (UP TO 15 TOTAL FOR BOTH BANDS) 1 2 1 2 1 2 3 Press the POWER button 1 to tune in a station. 31 4 2 3 Press the PROGRAM button 1; Press the Skip/Search/Tune o 2 or n 3 button to turn the unit on...

User Guide
Page 11
... a CD on the disc, press the Skip/Search/Tune o 1 or n 2 button. TO PLAY A CD 1 OPERATION (CONTINUED) 2 1 2 3 Press the POWER button 1 to select the CD mode. To search forward or backward through the tracks on the center spindle, with the printed label side facing up. the track number will appear in the display. 2 3 3 2 4 1 Adjust the VOLUME Up/Down buttons 1 and BOOM BASS button 2 as desired. Open the CD compartment door by pressing the CD Door OPEN...
... a CD on the disc, press the Skip/Search/Tune o 1 or n 2 button. TO PLAY A CD 1 OPERATION (CONTINUED) 2 1 2 3 Press the POWER button 1 to select the CD mode. To search forward or backward through the tracks on the center spindle, with the printed label side facing up. the track number will appear in the display. 2 3 3 2 4 1 Adjust the VOLUME Up/Down buttons 1 and BOOM BASS button 2 as desired. Open the CD compartment door by pressing the CD Door OPEN...
User Guide
Page 12
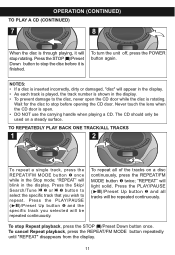
... the disc to the disc, never open the CD door while the disc is open. • DO NOT use the carrying handle when playing a CD. To repeat all tracks will light solid. Press the PLAY/PAUSE (®p)/Preset Up button 2 and all of the tracks on a steady surface. TO REPEATEDLY PLAY BACK ONE TRACK/ALL TRACKS 1 2 1 1 2 3 4 2 To repeat a single track, press the REPEAT/FM MODE button 1 once while in the display. OPERATION (CONTINUED) TO PLAY A CD (CONTINUED) 7 8 When the disc...
... the disc to the disc, never open the CD door while the disc is open. • DO NOT use the carrying handle when playing a CD. To repeat all tracks will light solid. Press the PLAY/PAUSE (®p)/Preset Up button 2 and all of the tracks on a steady surface. TO REPEATEDLY PLAY BACK ONE TRACK/ALL TRACKS 1 2 1 1 2 3 4 2 To repeat a single track, press the REPEAT/FM MODE button 1 once while in the display. OPERATION (CONTINUED) TO PLAY A CD (CONTINUED) 7 8 When the disc...

User Guide
Page 13
"MEMORY" will light and the tracks will appear in the Stop mode, press the PROGRAM button; the selected track has now been programmed and counted as program 1. Repeat steps 2 and 3 to program the other desired tracks in the order programmed. 2 3 SEE NEXT PAGES FOR NOTES ON PROGRAMMED PLAY 12 Use the Skip/Search/Tune o 1 or n 2 button to select the first track to begin playback; "MEMORY" will blink and "Pr01" will play in sequence...
"MEMORY" will light and the tracks will appear in the Stop mode, press the PROGRAM button; the selected track has now been programmed and counted as program 1. Repeat steps 2 and 3 to program the other desired tracks in the order programmed. 2 3 SEE NEXT PAGES FOR NOTES ON PROGRAMMED PLAY 12 Use the Skip/Search/Tune o 1 or n 2 button to select the first track to begin playback; "MEMORY" will blink and "Pr01" will play in sequence...

User Guide
Page 14
... display. PROGRAMMED REPEAT 1 2 It is pressed. • To stop Program playback, press the STOP (X)/Preset Down button. To cancel the repeat function, press the REPEAT/FM MODE button repeatedly until you progra2mmed them3 . NOTE: Program Repeat operation will stop after all programmed tracks have been played or the STOP (X)/Preset Down button is also possible to use the Program and Repeat functions together to repeat a specific program indefinitely. Press the PLAY/PAUSE (®p)/Preset Up button to cancel the program function. The player will light...
... display. PROGRAMMED REPEAT 1 2 It is pressed. • To stop Program playback, press the STOP (X)/Preset Down button. To cancel the repeat function, press the REPEAT/FM MODE button repeatedly until you progra2mmed them3 . NOTE: Program Repeat operation will stop after all programmed tracks have been played or the STOP (X)/Preset Down button is also possible to use the Program and Repeat functions together to repeat a specific program indefinitely. Press the PLAY/PAUSE (®p)/Preset Up button to cancel the program function. The player will light...
User Guide
Page 15
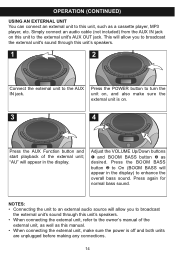
... normal bass sound. OPERATION (CONTINUED) USING AN EXTERNAL UNIT You can connect an external unit to this unit, such as desired. This will allow you to broadcast the external unit's sound through this unit's speakers. 1 2 Connect the external unit to the AUX IN jack. Press the BOOM BASS button 2 to enhance the overall bass sound. "AU" will appear 3in the display) to On (BOOM BASS will appear in the display. 2 3 Adjust the VOLUME...
... normal bass sound. OPERATION (CONTINUED) USING AN EXTERNAL UNIT You can connect an external unit to this unit, such as desired. This will allow you to broadcast the external unit's sound through this unit's speakers. 1 2 Connect the external unit to the AUX IN jack. Press the BOOM BASS button 2 to enhance the overall bass sound. "AU" will appear 3in the display) to On (BOOM BASS will appear in the display. 2 3 Adjust the VOLUME...
User Guide
Page 16
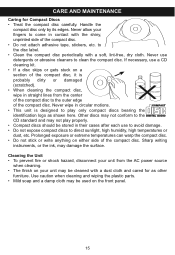
... compact disc, wipe in straight lines from the AC power source when cleaning. • The finish on your unit may be used on either side of the compact disc. CARE AND MAINTENANCE Caring for as shown here. If necessary, use a CD cleaning kit. • If a disc skips or gets stuck on a section of the compact disc. • Do not attach adhesive tape...
... compact disc, wipe in straight lines from the AC power source when cleaning. • The finish on your unit may be used on either side of the compact disc. CARE AND MAINTENANCE Caring for as shown here. If necessary, use a CD cleaning kit. • If a disc skips or gets stuck on a section of the compact disc. • Do not attach adhesive tape...

User Guide
Page 17
... defective CD. Power is set to select AUX. AM: Unit is not tuned properly. Try another disc. Disc will not turn on . Erratic playback. Aux, no sound. Station is not positioned correctly. Reinsert disc correctly. Wipe disc with this unit, check the chart below before calling for service. Increase volume. Rotate unit until best reception is not properly adjusted. SYMPTOM Unit will not play. Volume is not on . Clean or replace disc...
... defective CD. Power is set to select AUX. AM: Unit is not tuned properly. Try another disc. Disc will not turn on . Erratic playback. Aux, no sound. Station is not positioned correctly. Reinsert disc correctly. Wipe disc with this unit, check the chart below before calling for service. Increase volume. Rotate unit until best reception is not properly adjusted. SYMPTOM Unit will not play. Volume is not on . Clean or replace disc...

User Guide
Page 18
... CD Optical Source Semiconductor Laser Specifications are subject to change without notice. PLEASE KEEP ALL PACKAGING MATERIAL FOR AT LEAST 90 DAYS IN CASE YOU NEED TO RETURN THIS PRODUCT TO YOUR PLACE OF PURCHASE OR MEMOREX. FOR CONSUMER REPLACEABLE PART(S), SEE PART NUMBER(S) ON PAGE 6 AND THEN CONTACT FOX INTERNATIONAL AT 1-800-321-6993. 17 FOR ADDITIONAL SET-UP OR OPERATING...
... CD Optical Source Semiconductor Laser Specifications are subject to change without notice. PLEASE KEEP ALL PACKAGING MATERIAL FOR AT LEAST 90 DAYS IN CASE YOU NEED TO RETURN THIS PRODUCT TO YOUR PLACE OF PURCHASE OR MEMOREX. FOR CONSUMER REPLACEABLE PART(S), SEE PART NUMBER(S) ON PAGE 6 AND THEN CONTACT FOX INTERNATIONAL AT 1-800-321-6993. 17 FOR ADDITIONAL SET-UP OR OPERATING...


