User Guide
Page 2
Serial Number SAFETY PRECAUTIONS CAUTION RISK OF ELECTRIC SHOCK DO NOT OPEN CAUTION: TO REDUCE THE RISK OF ELECTRIC SHOCK, DO NOT REMOVE COVER (OR BACK). NO USER-SERVICEABLE PARTS INSIDE. REFER SERVICING TO QUALIFIED SERVICE PERSONNEL. This laser Compact Disc Player is equipped with safety switches to operate this equipment if an unauthorized change... that may generate or use radio frequency energy. Keep these instructions handy for many years. Avoid direct exposure to defeat or bypass the safety switches. For future reference, record the serial number of the unit printed on...
Serial Number SAFETY PRECAUTIONS CAUTION RISK OF ELECTRIC SHOCK DO NOT OPEN CAUTION: TO REDUCE THE RISK OF ELECTRIC SHOCK, DO NOT REMOVE COVER (OR BACK). NO USER-SERVICEABLE PARTS INSIDE. REFER SERVICING TO QUALIFIED SERVICE PERSONNEL. This laser Compact Disc Player is equipped with safety switches to operate this equipment if an unauthorized change... that may generate or use radio frequency energy. Keep these instructions handy for many years. Avoid direct exposure to defeat or bypass the safety switches. For future reference, record the serial number of the unit printed on...
User Guide
Page 3
... connected. • Consult the dealer or an experienced radio/TV technician for help. SAFETY PRECAUTIONS INFORMATION: This equipment has been tested and found to comply with the limits for a Class B digital device, pursuant to provide reasonable protection against harmful interference in a particular installation. CAUTION: USE OF CONTROLS, ADJUSTMENTS OR PERFORMANCE PROCEDURE HEREIN MAY RESULT IN HAZARDOUS RADIATION...
... connected. • Consult the dealer or an experienced radio/TV technician for help. SAFETY PRECAUTIONS INFORMATION: This equipment has been tested and found to comply with the limits for a Class B digital device, pursuant to provide reasonable protection against harmful interference in a particular installation. CAUTION: USE OF CONTROLS, ADJUSTMENTS OR PERFORMANCE PROCEDURE HEREIN MAY RESULT IN HAZARDOUS RADIATION...
User Guide
Page 4
..., garbage disposals, alarm clock at a safe level. Dear Customer: Selecting fine audio equipment such as the unit you've just purchased is included for a lifetime. So what sounds "normal" can maximize the fun and excitement your sensitive hearing. Once you have established a comfortable sound level: • Set the dial and leave it comfortably and clearly, and without affecting...
..., garbage disposals, alarm clock at a safe level. Dear Customer: Selecting fine audio equipment such as the unit you've just purchased is included for a lifetime. So what sounds "normal" can maximize the fun and excitement your sensitive hearing. Once you have established a comfortable sound level: • Set the dial and leave it comfortably and clearly, and without affecting...
User Guide
Page 5
... line plug (a plug having one way. The openings should be walked on or pinched by placing the product on the marking label. in the back or bottom are unable to be read all operating instructions carefully. If the plug should be blocked by items placed upon or against them might be located in installation such as con- POWER-CORD PROTECTION Power-supply cords...
... line plug (a plug having one way. The openings should be walked on or pinched by placing the product on the marking label. in the back or bottom are unable to be read all operating instructions carefully. If the plug should be blocked by items placed upon or against them might be located in installation such as con- POWER-CORD PROTECTION Power-supply cords...
User Guide
Page 6
... outside antenna is connected to qualified service personnel under the following the operating instructions. WALL OR CEILING MOUNTING The product should be situated away from the wall outlet and refer servicing to the product, be sure the service technician uses replacement parts ELECTRIC SERVICE EQUIPMENT GROUNDING CONDUCTORS (NEC SECTION 810-21) specified by the manufacturer. 22. When the power-supply cord or plug is...
... outside antenna is connected to qualified service personnel under the following the operating instructions. WALL OR CEILING MOUNTING The product should be situated away from the wall outlet and refer servicing to the product, be sure the service technician uses replacement parts ELECTRIC SERVICE EQUIPMENT GROUNDING CONDUCTORS (NEC SECTION 810-21) specified by the manufacturer. 22. When the power-supply cord or plug is...
User Guide
Page 7
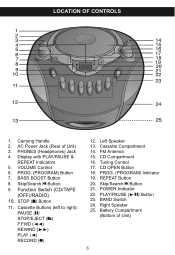
... 2. VOLUME Control 6. Skip/Search o Button 9. PROG. (PROGRAM) Indicator 19. BAND Switch 24. POWER Indicator 22. Battery Compartment (Bottom of Unit) 3. PROG. (PROGRAM) Button 7. STOP (I) Button 11. CD OPEN Button 18. Function Switch (CD/TAPE (OFF)/RADIO) 10. Cassette Compartment 14. LOCATION OF CONTROLS 1. AC Power Jack (Rear of Unit) 6 PHONES (Headphones) Jack 4. BASS BOOST Button 8. Cassette Buttons (left to right): PAUSE (p) STOP/EJECT (r) F.FWD (√√) REWIND (®®) PLAY (√) RECORD (q) 12. Left Speaker 13. REPEAT Button 20...
... 2. VOLUME Control 6. Skip/Search o Button 9. PROG. (PROGRAM) Indicator 19. BAND Switch 24. POWER Indicator 22. Battery Compartment (Bottom of Unit) 3. PROG. (PROGRAM) Button 7. STOP (I) Button 11. CD OPEN Button 18. Function Switch (CD/TAPE (OFF)/RADIO) 10. Cassette Compartment 14. LOCATION OF CONTROLS 1. AC Power Jack (Rear of Unit) 6 PHONES (Headphones) Jack 4. BASS BOOST Button 8. Cassette Buttons (left to right): PAUSE (p) STOP/EJECT (r) F.FWD (√√) REWIND (®®) PLAY (√) RECORD (q) 12. Left Speaker 13. REPEAT Button 20...
User Guide
Page 8
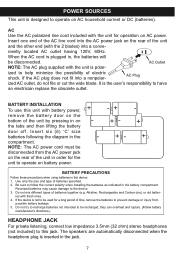
... the diagram in the jack. 7 remove the battery door on the tabs and then lifting the battery door off. NOTE: The AC power cord must be used for operation on battery power. + BATTERY PRECAUTIONS Follow these precautions when using batteries in the battery compartment. Do not mix different types of batteries specified. 2. ies with the 2 blades) into a nonpolar- The speakers are automatically disconnected when the headphone plug...
... the diagram in the jack. 7 remove the battery door on the tabs and then lifting the battery door off. NOTE: The AC power cord must be used for operation on battery power. + BATTERY PRECAUTIONS Follow these precautions when using batteries in the battery compartment. Do not mix different types of batteries specified. 2. ies with the 2 blades) into a nonpolar- The speakers are automatically disconnected when the headphone plug...
User Guide
Page 9
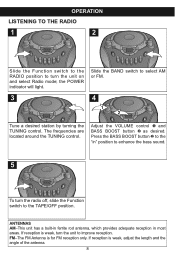
... the antenna. 8 Adjust the VOLUME control 1 and BASS BOOST button 2 as desired. Press the BASS BOOST button 2 to the "in most areas. the POWER indicator will light. 3 11 Slide the BAND switch to the TAPE/OFF position. If reception is weak, turn the unit to turn the radio off, slide the Function switch to select AM or FM. 4 1 11 2 Tune a desired station by turning the TUNING control. OPERATION LISTENING TO THE RADIO 1 2 Slide the Function switch...
... the antenna. 8 Adjust the VOLUME control 1 and BASS BOOST button 2 as desired. Press the BASS BOOST button 2 to the "in most areas. the POWER indicator will light. 3 11 Slide the BAND switch to the TAPE/OFF position. If reception is weak, turn the unit to turn the radio off, slide the Function switch to select AM or FM. 4 1 11 2 Tune a desired station by turning the TUNING control. OPERATION LISTENING TO THE RADIO 1 2 Slide the Function switch...
User Guide
Page 10
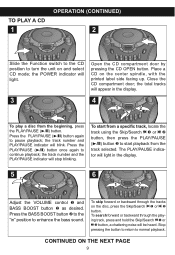
... disc, press the Skip/Search o 1 or n 2 button. Open the CD compartment door by pressing the CD OPEN button. CONTINUED ON THE NEXT PAGE 9 TO PLAY A CD 1 OPERATION (CONTINUED) 2 Slide the Function switch to the CD position to turn the unit on the center spindle, with the printed label side facing up. the POWER indicator will be heard. the total tracks will light in " position to enhance the bass sound...
... disc, press the Skip/Search o 1 or n 2 button. Open the CD compartment door by pressing the CD OPEN button. CONTINUED ON THE NEXT PAGE 9 TO PLAY A CD 1 OPERATION (CONTINUED) 2 Slide the Function switch to the CD position to turn the unit on the center spindle, with the printed label side facing up. the POWER indicator will be heard. the total tracks will light in " position to enhance the bass sound...
User Guide
Page 11
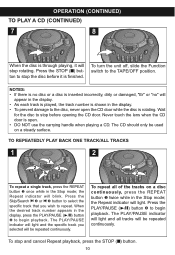
... be used on a disc continuously, press the REPEAT button 1 twice while in the display, press the PLAY/PAUSE (®/p) button 4 to stop rotating. To repeat all tracks will be repeated continuously. To turn the unit off, slide the Function switch to repeat. When the desired track number appears in the Stop mode; the Repeat indicator will blink. The PLAY/PAUSE indicator will stop before opening the CD door. OPERATION (CONTINUED) TO PLAY A CD (CONTINUED...
... be used on a disc continuously, press the REPEAT button 1 twice while in the display, press the PLAY/PAUSE (®/p) button 4 to stop rotating. To repeat all tracks will be repeated continuously. To turn the unit off, slide the Function switch to repeat. When the desired track number appears in the Stop mode; the Repeat indicator will blink. The PLAY/PAUSE indicator will stop before opening the CD door. OPERATION (CONTINUED) TO PLAY A CD (CONTINUED...
User Guide
Page 12
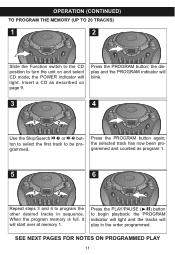
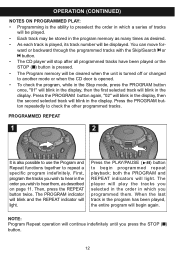
... memory 1. 1 2 Press the PLAY/PAUSE (®/p) button to begin playback; the display and the PROGRAM indicator will light. the selected track has now been programmed and counted as described on and select CD mode; When the program memory is full, it will play in sequence. SEE NEXT PAGES FOR NOTES ON PROGRAMMED PLAY 11 1 2 OPERATION (CONTINUED) TO PROGRAM THE MEMORY (UP TO 20 TRACKS) 1 2 Slide the Function switch to the CD position to turn...
... memory 1. 1 2 Press the PLAY/PAUSE (®/p) button to begin playback; the display and the PROGRAM indicator will light. the selected track has now been programmed and counted as described on and select CD mode; When the program memory is full, it will play in sequence. SEE NEXT PAGES FOR NOTES ON PROGRAMMED PLAY 11 1 2 OPERATION (CONTINUED) TO PROGRAM THE MEMORY (UP TO 20 TRACKS) 1 2 Slide the Function switch to the CD position to turn...
User Guide
Page 13
... use the Program and Repeat functions together to repeat a specific program indefinitely. Press the PROGRAM button repeatedly to begin programmed repeat playback; PROGRAMMED REPEAT 1 2 It is played, its track number will be cleared when the unit is turned off or changed to another mode or when the CD door is opened. • To check the program, while in the Stop mode, press the PROGRAM button once, "01" will blink in the display. Then, press the REPEAT button twice. both the PROGRAM and REPEAT...
... use the Program and Repeat functions together to repeat a specific program indefinitely. Press the PROGRAM button repeatedly to begin programmed repeat playback; PROGRAMMED REPEAT 1 2 It is played, its track number will be cleared when the unit is turned off or changed to another mode or when the CD door is opened. • To check the program, while in the Stop mode, press the PROGRAM button once, "01" will blink in the display. Then, press the REPEAT button twice. both the PROGRAM and REPEAT...
User Guide
Page 14
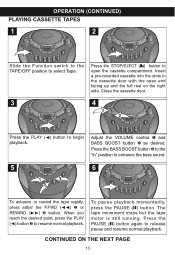
... point, press the PLAY (√) button 3 to begin playback. Adjust the VOLUME control 1 and BASS BOOST button 2 as desired. Press the BASS BOOST button 2 to enhance the bass sound. 5 6 1 3 2 1 2 To advance or rewind the tape rapidly, press either the F.FWD (√√) 1 or REWIND (®®) 2 button. To pause playback momentarily, press the PAUSE (p) button. Press the PAUSE (p) button again to select Tape. Insert a pre-recorded cassette into the slots in...
... point, press the PLAY (√) button 3 to begin playback. Adjust the VOLUME control 1 and BASS BOOST button 2 as desired. Press the BASS BOOST button 2 to enhance the bass sound. 5 6 1 3 2 1 2 To advance or rewind the tape rapidly, press either the F.FWD (√√) 1 or REWIND (®®) 2 button. To pause playback momentarily, press the PAUSE (p) button. Press the PAUSE (p) button again to select Tape. Insert a pre-recorded cassette into the slots in...

User Guide
Page 15
The PLAY (√) button is released and the tape motor shuts off . When the tape reaches the end, the auto-stop playback before the tape ends, press the STOP/EJECT (r) button. Press the STOP/EJECT (r) button to open the cassette compartment and remove the cassette. 1 1 2 2 14 OPERATION (CONTINUED) 7 8 To stop mechanism activates, the PLAY (√) button is released and the tape motor shuts off .
The PLAY (√) button is released and the tape motor shuts off . When the tape reaches the end, the auto-stop playback before the tape ends, press the STOP/EJECT (r) button. Press the STOP/EJECT (r) button to open the cassette compartment and remove the cassette. 1 1 2 2 14 OPERATION (CONTINUED) 7 8 To stop mechanism activates, the PLAY (√) button is released and the tape motor shuts off .
User Guide
Page 16
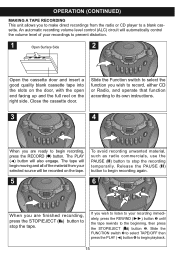
... the radio or CD player to begin playback. 15 Close the cassette door. The tape will also engage. Release the PAUSE (p) button to a blank cassette. If you are finished recording, press the STOP/EJECT (r) button to stop the tape. Slide the FUNCTION switch 3 to select TAPE/OFF then press the PLAY (√) button 4 to begin recording again. 6 3 12 34 1 When you to make direct recordings from your recordings to prevent distortion. 1 Open...
... the radio or CD player to begin playback. 15 Close the cassette door. The tape will also engage. Release the PAUSE (p) button to a blank cassette. If you are finished recording, press the STOP/EJECT (r) button to stop the tape. Slide the FUNCTION switch 3 to select TAPE/OFF then press the PLAY (√) button 4 to begin recording again. 6 3 12 34 1 When you to make direct recordings from your recordings to prevent distortion. 1 Open...
User Guide
Page 17
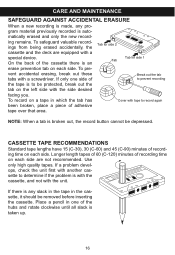
... of recording time on each side. If a problem develops, check the unit first with tape to prevent recording the tape is auto- CARE AND MAINTENANCE SAFEGUARD AGAINST ACCIDENTAL ERASURE When a new recording is broken out, the record button cannot be depressed. To record on each side. NOTE: When a tab is made, any slack in the tape in one side of the cassette there...
... of recording time on each side. If a problem develops, check the unit first with tape to prevent recording the tape is auto- CARE AND MAINTENANCE SAFEGUARD AGAINST ACCIDENTAL ERASURE When a new recording is broken out, the record button cannot be depressed. To record on each side. NOTE: When a tab is made, any slack in the tape in one side of the cassette there...
User Guide
Page 18
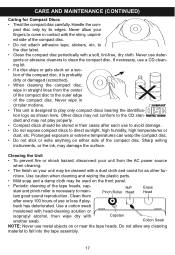
... objects on a section of the compact disc. Other discs may not conform to direct sunlight, high humidity, high temperatures or dust, etc. Never wipe in their cases after every 100 hours of the compact disc. • Do not attach adhesive tape, stickers, etc. Cotton Swab NOTE: Never use a CD cleaning kit. • If a disc skips or gets stuck on or...
... objects on a section of the compact disc. Other discs may not conform to direct sunlight, high humidity, high temperatures or dust, etc. Never wipe in their cases after every 100 hours of the compact disc. • Do not attach adhesive tape, stickers, etc. Cotton Swab NOTE: Never use a CD cleaning kit. • If a disc skips or gets stuck on or...
User Guide
Page 19
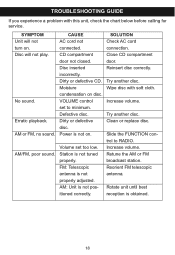
... CD compartment door. Clean or replace disc. Retune the AM or FM broadcast station. Disc will not turn on disc. Disc inserted incorrectly. Defective disc. Reinsert disc correctly. Wipe disc with this unit, check the chart below before calling for service. Try another disc. CD compartment door not closed. Volume set to RADIO. Rotate unit until best reception is not tuned properly. Erratic playback. AM or FM, no sound. CAUSE AC cord...
... CD compartment door. Clean or replace disc. Retune the AM or FM broadcast station. Disc will not turn on disc. Disc inserted incorrectly. Defective disc. Reinsert disc correctly. Wipe disc with this unit, check the chart below before calling for service. Try another disc. CD compartment door not closed. Volume set to RADIO. Rotate unit until best reception is not tuned properly. Erratic playback. AM or FM, no sound. CAUSE AC cord...
User Guide
Page 20
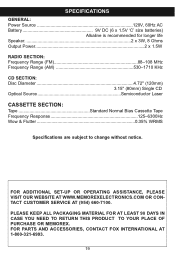
... for longer life Speaker 2 x 3W, 8 Ohms Output Power 2 x 1.5W RADIO SECTION: Frequency Range (FM 88-108 MHz Frequency Range (AM 530-1710 KHz CD SECTION: Disc Diameter 4.72" (120mm) 3.15" (80mm) Single CD Optical Source Semiconductor Laser CASSETTE SECTION: Tape Standard Normal Bias Cassette Tape Frequency Response 125-6300Hz Wow & Flutter 0.35% WRMS Specifications are subject to change without notice. FOR PARTS AND ACCESSORIES, CONTACT FOX...
... for longer life Speaker 2 x 3W, 8 Ohms Output Power 2 x 1.5W RADIO SECTION: Frequency Range (FM 88-108 MHz Frequency Range (AM 530-1710 KHz CD SECTION: Disc Diameter 4.72" (120mm) 3.15" (80mm) Single CD Optical Source Semiconductor Laser CASSETTE SECTION: Tape Standard Normal Bias Cassette Tape Frequency Response 125-6300Hz Wow & Flutter 0.35% WRMS Specifications are subject to change without notice. FOR PARTS AND ACCESSORIES, CONTACT FOX...


