User Guide
Page 2
...OF CONTENTS Precautions 2 FCC Declaration 3 EIA Guidelines 4 Location of Controls 6 Charging the Battery 7 Installing the Software 8 • Installing Windows Media Player 10 9 • Installing Windows Media Player 11 12 Downloading and Transferring Files 14 Operation 18 • Turning the Power On/Off 18 • Hold Switch 18 • Headphones Jack 18... the Files 20 • Forward/Reverse Skip 21 • High-Speed Music Search 21 Settings Menu 22 Troubleshooting Guide 29 Formatting the Player 31 Resetting the Unit 32 Updating the Firmware 32 Specifications 33 1
...OF CONTENTS Precautions 2 FCC Declaration 3 EIA Guidelines 4 Location of Controls 6 Charging the Battery 7 Installing the Software 8 • Installing Windows Media Player 10 9 • Installing Windows Media Player 11 12 Downloading and Transferring Files 14 Operation 18 • Turning the Power On/Off 18 • Hold Switch 18 • Headphones Jack 18... the Files 20 • Forward/Reverse Skip 21 • High-Speed Music Search 21 Settings Menu 22 Troubleshooting Guide 29 Formatting the Player 31 Resetting the Unit 32 Updating the Firmware 32 Specifications 33 1

User Guide
Page 3
...003. Changes or modifications to this equipment if an unauthorized change or modification is illegal in a location subject to play your headset at a high volume while walking, especially at pedestrian crossings. Cet appareil numérique de la classe B est conforme...FCC WARNING: • This equipment may result in potentially hazardous situations. This Class B digital apparatus complies with the windows closed during walking or exercising will not affect the player. on the player may generate or use radio frequency energy. ROAD SAFETY: • Do not use in ...
...003. Changes or modifications to this equipment if an unauthorized change or modification is illegal in a location subject to play your headset at a high volume while walking, especially at pedestrian crossings. Cet appareil numérique de la classe B est conforme...FCC WARNING: • This equipment may result in potentially hazardous situations. This Class B digital apparatus complies with the windows closed during walking or exercising will not affect the player. on the player may generate or use radio frequency energy. ROAD SAFETY: • Do not use in ...
User Guide
Page 4
... encouraged to try to Part 15 of the FCC Rules. This equipment generates, uses and can be used in accordance with the limits for a Class B digital device, pursuant to correct the interference by the party responsible for help. These limits are designed to radio communications. If this unit not expressly approved...
... encouraged to try to Part 15 of the FCC Rules. This equipment generates, uses and can be used in accordance with the limits for a Class B digital device, pursuant to correct the interference by the party responsible for help. These limits are designed to radio communications. If this unit not expressly approved...

User Guide
Page 5
... Group recommend you avoid prolonged exposure to excessive noise. Sound can maximize the fun and excitement your equipment at a safe level. Guard against this by playing it at a safe level BEFORE your hearing. Dear Customer: Selecting fine audio and video equipment such as the unit you've just purchased is only...
... Group recommend you avoid prolonged exposure to excessive noise. Sound can maximize the fun and excitement your equipment at a safe level. Guard against this by playing it at a safe level BEFORE your hearing. Dear Customer: Selecting fine audio and video equipment such as the unit you've just purchased is only...

User Guide
Page 6
ELECTR N TRIES S A We Want You LISTENING For A Lifetime NIC O IND U EIA EST. 1924 S SO C I A TIO 5 Decibel Level 30 40 50 60 70 80 Example Quiet library, soft whispers Living room, refrigerator, bedroom away from traffic Light traffic, normal conversation, quiet office Air conditioner at 20 feet, sewing machine Vacuum cleaner, hair dryer, noisy restaurant Average city traffic, garbage disposals, alarm clock at two feet THE FOLLOWING NOISES CAN BE DANGEROUS UNDER CONSTANT EXPOSURE: 90 Subway, motorcycle, truck traffic, lawn mower 100 Garbage truck, chain saw, pneumatic drill 120 ...
ELECTR N TRIES S A We Want You LISTENING For A Lifetime NIC O IND U EIA EST. 1924 S SO C I A TIO 5 Decibel Level 30 40 50 60 70 80 Example Quiet library, soft whispers Living room, refrigerator, bedroom away from traffic Light traffic, normal conversation, quiet office Air conditioner at 20 feet, sewing machine Vacuum cleaner, hair dryer, noisy restaurant Average city traffic, garbage disposals, alarm clock at two feet THE FOLLOWING NOISES CAN BE DANGEROUS UNDER CONSTANT EXPOSURE: 90 Subway, motorcycle, truck traffic, lawn mower 100 Garbage truck, chain saw, pneumatic drill 120 ...
User Guide
Page 7
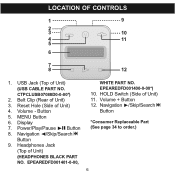
CTPCLUSB07088D0-0-00*) 2. Volume - Power/Play/Pause ®p Button 8. EPEAREDFD001400-0-00*) 10. Navigation ®/Skip/Search n Button *Consumer Replaceable Part (See page 34 to order.) 6 LOCATION OF CONTROLS 1 9 23 10 4 11 5 6 7 8 ... Jack (Top of Unit) 11. HOLD Switch (Side of Unit) (HEADPHONES BLACK PART NO. Navigation √/Skip/Search o Button 9. USB Jack (Top of Unit) 3. Belt Clip (Rear of Unit) (USB CABLE PART NO. Reset Hole (Side of Unit) 4. Volume + Button 12. EPEAREDFD001401-0-00, WHITE PART NO. Button 5. Display 7.
CTPCLUSB07088D0-0-00*) 2. Volume - Power/Play/Pause ®p Button 8. EPEAREDFD001400-0-00*) 10. Navigation ®/Skip/Search n Button *Consumer Replaceable Part (See page 34 to order.) 6 LOCATION OF CONTROLS 1 9 23 10 4 11 5 6 7 8 ... Jack (Top of Unit) 11. HOLD Switch (Side of Unit) (HEADPHONES BLACK PART NO. Navigation √/Skip/Search o Button 9. USB Jack (Top of Unit) 3. Belt Clip (Rear of Unit) (USB CABLE PART NO. Reset Hole (Side of Unit) 4. Volume + Button 12. EPEAREDFD001401-0-00, WHITE PART NO. Button 5. Display 7.
User Guide
Page 8
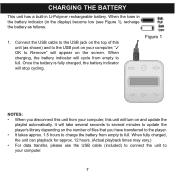
... depending on and update the playlist automatically. Figure 1 NOTES: • When you have transferred to the player. • It takes approx. 1.5 hours to charge the battery from empty to the USB jack on the top of files that you disconnect this unit (...
... depending on and update the playlist automatically. Figure 1 NOTES: • When you have transferred to the player. • It takes approx. 1.5 hours to charge the battery from empty to the USB jack on the top of files that you disconnect this unit (...
User Guide
Page 9
Use the CD to order.) 8 however, Windows Media Player 10 and 11 can not be used with Service Pack 2 or higher) ... X: This unit is compatible with Microsoft Windows XP (Home or Professional Edition with Mac OS X. Mac OS X will not play if you connect it using the "drag and drop" method. Please refer to Mac OS X's owner's manual for more detailed... instructions on how to transfer audio files to a digital audio unit, and for how to safely eject the digital audio unit from anywhere on your computer. *Consumer Replaceable Part (See page 34 to install ...
Use the CD to order.) 8 however, Windows Media Player 10 and 11 can not be used with Service Pack 2 or higher) ... X: This unit is compatible with Microsoft Windows XP (Home or Professional Edition with Mac OS X. Mac OS X will not play if you connect it using the "drag and drop" method. Please refer to Mac OS X's owner's manual for more detailed... instructions on how to transfer audio files to a digital audio unit, and for how to safely eject the digital audio unit from anywhere on your computer. *Consumer Replaceable Part (See page 34 to install ...

User Guide
Page 10
...then click I ACCEPT. 9 See page 12 for how to install Windows Media Player 11. (Windows Vista users must use with DRM 9 or 10 to your computer. 3. Installation will be detected ...by your player using the "Sync" function. 1. Insert the installation CD-Rom into the CD Drive, then ..., then the installation screen will appear. WINDOWS MEDIA PLAYER 10 INSTALLATION Windows Media Player 10 is for use Windows Media Player 11.) Once you have installed Windows Media Player 10, you can transfer MP3 files, WMA files and...
...then click I ACCEPT. 9 See page 12 for how to install Windows Media Player 11. (Windows Vista users must use with DRM 9 or 10 to your computer. 3. Installation will be detected ...by your player using the "Sync" function. 1. Insert the installation CD-Rom into the CD Drive, then ..., then the installation screen will appear. WINDOWS MEDIA PLAYER 10 INSTALLATION Windows Media Player 10 is for use Windows Media Player 11.) Once you have installed Windows Media Player 10, you can transfer MP3 files, WMA files and...
User Guide
Page 11
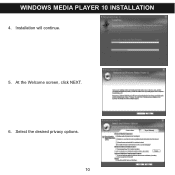
Select the desired privacy options. 10 Installation will continue. 5. At the Welcome screen, click NEXT. 6. WINDOWS MEDIA PLAYER 10 INSTALLATION 4.
Select the desired privacy options. 10 Installation will continue. 5. At the Welcome screen, click NEXT. 6. WINDOWS MEDIA PLAYER 10 INSTALLATION 4.
User Guide
Page 12
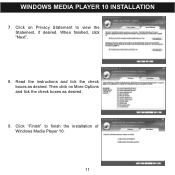
Read the instructions and tick the check boxes as desired. 9. Then click on Privacy Statement to finish the installation of Windows Media Player 10. 11 Click on More Options and tick the check boxes as desired. When finished, click "Next". 8. Click "Finish" to view the Statement, if desired. WINDOWS MEDIA PLAYER 10 INSTALLATION 7.
Read the instructions and tick the check boxes as desired. 9. Then click on Privacy Statement to finish the installation of Windows Media Player 10. 11 Click on More Options and tick the check boxes as desired. When finished, click "Next". 8. Click "Finish" to view the Statement, if desired. WINDOWS MEDIA PLAYER 10 INSTALLATION 7.

User Guide
Page 13
... the "Sync" function. 1. Then, click "Download Now". Click "Download Windows Media Player". 2. Select Download (Windows Media Player), Version (Player 11 [for Windows XP]) and Language. WINDOWS MEDIA PLAYER 11 INSTALLATION Once you have installed Windows Media Player 11, you can transfer MP3 files, WMA files and WMA files with DRM 9 or 10 to read it...
... the "Sync" function. 1. Then, click "Download Now". Click "Download Windows Media Player". 2. Select Download (Windows Media Player), Version (Player 11 [for Windows XP]) and Language. WINDOWS MEDIA PLAYER 11 INSTALLATION Once you have installed Windows Media Player 11, you can transfer MP3 files, WMA files and WMA files with DRM 9 or 10 to read it...

User Guide
Page 14
The newly-installed Windows Media Player 11 will continue. 6. Read the License Agreement, then click "I Accept". 5. Installation will open. At the Welcome screen, it is available. WINDOWS MEDIA PLAYER 11 INSTALLATION 4. Follow the on "Finish". Do you choose to select "Express Settings" and then click on -screen prompts if you want to update now?" You may also see a popup window asking, "A Windows Media Player update is recommended to update at this time. 13
The newly-installed Windows Media Player 11 will continue. 6. Read the License Agreement, then click "I Accept". 5. Installation will open. At the Welcome screen, it is available. WINDOWS MEDIA PLAYER 11 INSTALLATION 4. Follow the on "Finish". Do you choose to select "Express Settings" and then click on -screen prompts if you want to update now?" You may also see a popup window asking, "A Windows Media Player update is recommended to update at this time. 13

User Guide
Page 15
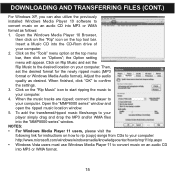
If you have on page 16 to transfer files to your player. DOWNLOADING AND TRANSFERRING FILES TRANSFERRING FILES You can download digital music files from the Internet or use encoding software to the player through the "Sync" function of WMP 10 or 11. Then, follow the procedure on an audio CD into MP3 ...kbps, WMA files with DRM 9 or 10 with DRM 9 or 10) to convert music that you can easily copy them to the player. Once these files are stored on page 7. Connect your player to the USB port on your computer as shown on your computer you have already installed WMP (Windows Media...
If you have on page 16 to transfer files to your player. DOWNLOADING AND TRANSFERRING FILES TRANSFERRING FILES You can download digital music files from the Internet or use encoding software to the player through the "Sync" function of WMP 10 or 11. Then, follow the procedure on an audio CD into MP3 ...kbps, WMA files with DRM 9 or 10 with DRM 9 or 10) to convert music that you can easily copy them to the player. Once these files are stored on page 7. Connect your player to the USB port on your computer as shown on your computer you have already installed WMP (Windows Media...
User Guide
Page 16
... CD-Rom drive of your computer: http://www.microsoft.com/windows/windowsmedia/knowledgecenter/howto/mp11/rip.aspx • Windows Vista users must use Windows Media Player 11 to convert music on an audio CD into MP3 or WMA format as desired. When finished, click "OK" to your computer. Then, set... (copy) songs from CDs to your computer. 2. DOWNLOADING AND TRANSFERRING FILES (CONT.) For Windows XP, you can also utilize the previously installed Windows Media Player 10 software to convert music on an audio CD into MP3 or WMA format. 15 Click on the "Tools" menu option at the top menu...
... CD-Rom drive of your computer: http://www.microsoft.com/windows/windowsmedia/knowledgecenter/howto/mp11/rip.aspx • Windows Vista users must use Windows Media Player 11 to convert music on an audio CD into MP3 or WMA format as desired. When finished, click "OK" to your computer. Then, set... (copy) songs from CDs to your computer. 2. DOWNLOADING AND TRANSFERRING FILES (CONT.) For Windows XP, you can also utilize the previously installed Windows Media Player 10 software to convert music on an audio CD into MP3 or WMA format. 15 Click on the "Tools" menu option at the top menu...
User Guide
Page 17
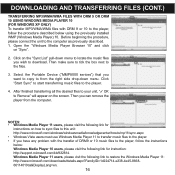
...unit: http://www.microsoft.com/windows/windowsmedia/knowledgecenter/howto/mp11/sync.aspx • Windows Vista users must use Windows Media Player 11 to transfer music files to the player. • If you want to copy to from the computer. Select the Portable Device ("MMP8000 serices") that you ...on the screen. Then make sure to tick the box next to Remove" will appear on the "Sync List" pull-down menu. Windows Media Player 11 users, please visit the following link for instructions on "Sync". 2. DOWNLOADING AND TRANSFERRING FILES (CONT.) TRANSFERRING MP3/WMA/WMA FILES WITH DRM ...
...unit: http://www.microsoft.com/windows/windowsmedia/knowledgecenter/howto/mp11/sync.aspx • Windows Vista users must use Windows Media Player 11 to transfer music files to the player. • If you want to copy to from the computer. Select the Portable Device ("MMP8000 serices") that you ...on the screen. Then make sure to tick the box next to Remove" will appear on the "Sync List" pull-down menu. Windows Media Player 11 users, please visit the following link for instructions on "Sync". 2. DOWNLOADING AND TRANSFERRING FILES (CONT.) TRANSFERRING MP3/WMA/WMA FILES WITH DRM ...
User Guide
Page 18
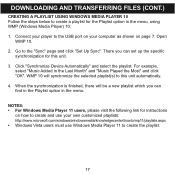
.../windowsmedia/knowledgecenter/howto/mp11/playlists.aspx • Windows Vista users must use your computer as shown on how to create and use Windows Media Player 11 to create the playlist. 17 For example, select "Music Added in the menu. WMP 10 will be a new playlist which you ...can find in the Playlist option in the Last Month" and "Music Played the Most" and click "OK". Connect your player to this unit. 3. Open WMP 10. 2. DOWNLOADING AND TRANSFERRING FILES (CONT.) CREATING A PLAYLIST USING WINDOWS MEDIA...
.../windowsmedia/knowledgecenter/howto/mp11/playlists.aspx • Windows Vista users must use your computer as shown on how to create and use Windows Media Player 11 to create the playlist. 17 For example, select "Music Added in the menu. WMP 10 will be a new playlist which you ...can find in the Playlist option in the Last Month" and "Music Played the Most" and click "OK". Connect your player to this unit. 3. Open WMP 10. 2. DOWNLOADING AND TRANSFERRING FILES (CONT.) CREATING A PLAYLIST USING WINDOWS MEDIA...
User Guide
Page 19
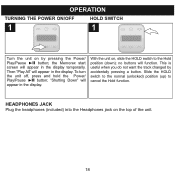
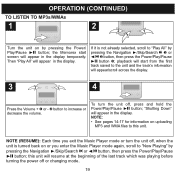
...TURNING THE POWER ON/OFF HOLD SWITCH 1 1 Turn the unit on by accidentally pressing a button. Then "Play All" will appear in the display. To turn the unit off, press and hold the Power/ Play/Pause ®p button; This is useful when you do not want the track changed by pressing the... Power/ Play/Pause ®p button; Slide the HOLD switch to the normal (unlocked) position (up) to the Hold position (down); the Memorex start screen will function. no buttons...
...TURNING THE POWER ON/OFF HOLD SWITCH 1 1 Turn the unit on by accidentally pressing a button. Then "Play All" will appear in the display. To turn the unit off, press and hold the Power/ Play/Pause ®p button; This is useful when you do not want the track changed by pressing the... Power/ Play/Pause ®p button; Slide the HOLD switch to the normal (unlocked) position (up) to the Hold position (down); the Memorex start screen will function. no buttons...
User Guide
Page 20
... the power off , press and hold the Power/Play/Pause ®p button; NOTE (RESUME): Each time you enter the Music Player mode again, scroll to "Now Playing" by pressing the Navigation ®/Skip/Search n 1 or √/o 2 button, then press the Power/Play/Pause ®p button 3; the Memorex start from the first track saved to this...
... the power off , press and hold the Power/Play/Pause ®p button; NOTE (RESUME): Each time you enter the Music Player mode again, scroll to "Now Playing" by pressing the Navigation ®/Skip/Search n 1 or √/o 2 button, then press the Power/Play/Pause ®p button 3; the Memorex start from the first track saved to this...
User Guide
Page 21
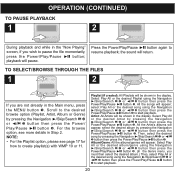
... 3 to the desired browse option (Playlist, Artist, Album or Genre) by pressing the Navigation ®/Skip/Search n 1 or √/o 2 button then press the Power/Play/Pause ®p button 3. Album/Genre: All the albums/genres will pause. TO SELECT/BROWSE THROUGH THE FILES 1 1 2 2 1 3 3 2 4 If you must... 11. select the desired album by pressing the Navigation ®/Skip/Search n 1 or √/o 2 button then press the Power/Play/Pause ®p button 3. Then, select the desired song by pressing the Navigation ®/Skip/Search n 1 or √/o 2 button then press the Power...
... 3 to the desired browse option (Playlist, Artist, Album or Genre) by pressing the Navigation ®/Skip/Search n 1 or √/o 2 button then press the Power/Play/Pause ®p button 3. Album/Genre: All the albums/genres will pause. TO SELECT/BROWSE THROUGH THE FILES 1 1 2 2 1 3 3 2 4 If you must... 11. select the desired album by pressing the Navigation ®/Skip/Search n 1 or √/o 2 button then press the Power/Play/Pause ®p button 3. Then, select the desired song by pressing the Navigation ®/Skip/Search n 1 or √/o 2 button then press the Power...