User Guide
Page 3
... interference will not occur in a residential installation. LASER SYSTEM. Manufactured under warranty for help. TO ENSURE PROPER USE OF THIS PRODUCT, PLEASE READ THIS OWNER'S MANUAL CAREFULLY AND RETAIN FOR FUTURE REFERENCE. TO PREVENT DIRECT EXPOSURE TO LASER BEAM, DO NOT TRY TO OPEN THE ENCLOSURE. VISIBLE LASER RADIATION MAY BE...
... interference will not occur in a residential installation. LASER SYSTEM. Manufactured under warranty for help. TO ENSURE PROPER USE OF THIS PRODUCT, PLEASE READ THIS OWNER'S MANUAL CAREFULLY AND RETAIN FOR FUTURE REFERENCE. TO PREVENT DIRECT EXPOSURE TO LASER BEAM, DO NOT TRY TO OPEN THE ENCLOSURE. VISIBLE LASER RADIATION MAY BE...
User Guide
Page 12
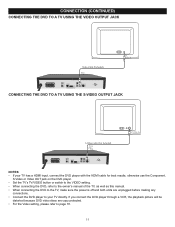
...; Set the TV's TV/VIDEO button or switch to the VIDEO setting. • When connecting the DVD, refer to the owner's manual of the TV, as well as this manual. • When connecting the DVD to the TV, make sure the power is off and both units are copy protected. • For...
...; Set the TV's TV/VIDEO button or switch to the VIDEO setting. • When connecting the DVD, refer to the owner's manual of the TV, as well as this manual. • When connecting the DVD to the TV, make sure the power is off and both units are copy protected. • For...
User Guide
Page 13
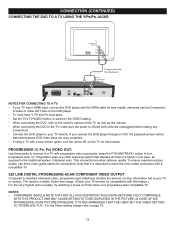
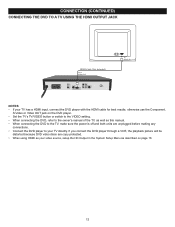
..., turn progressive scan on a progressive-scan compatible TV. The result is a stable, flicker-free image. (Check your TV/monitor for compatibility with this manual. • When connecting the DVD to the TV, make sure the power is off , on the TV for best results. This connection provides optimum ...input jacks. • Set the TV's TV/VIDEO button or switch to the VIDEO setting. • When connecting the DVD, refer to the owner's manual of video information fed to page 18. 12 PROGRESSIVE (Y, PB, PR) VIDEO OUT: Use these jacks to connect to a TV with progressive video input...
..., turn progressive scan on a progressive-scan compatible TV. The result is a stable, flicker-free image. (Check your TV/monitor for compatibility with this manual. • When connecting the DVD to the TV, make sure the power is off , on the TV for best results. This connection provides optimum ...input jacks. • Set the TV's TV/VIDEO button or switch to the VIDEO setting. • When connecting the DVD, refer to the owner's manual of video information fed to page 18. 12 PROGRESSIVE (Y, PB, PR) VIDEO OUT: Use these jacks to connect to a TV with progressive video input...
User Guide
Page 14
...; Set the TV's TV/VIDEO button or switch to the VIDEO setting. • When connecting the DVD, refer to the owner's manual of the TV, as well as this manual. • When connecting the DVD to the TV, make sure the power is off and both units are unplugged before making any...
...; Set the TV's TV/VIDEO button or switch to the VIDEO setting. • When connecting the DVD, refer to the owner's manual of the TV, as well as this manual. • When connecting the DVD to the TV, make sure the power is off and both units are unplugged before making any...
User Guide
Page 16
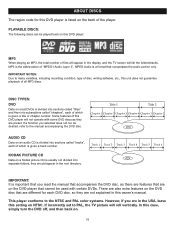
... DVDs. If a function you selected does not run as desired, refer to PAL, the TV picture will roll vertically. If incorrectly set to the manual accompanying the DVD disc. MP3 is given a track number. Some features of "MPEG1 Audio Layer 3". This player conforms to many variables, including recording condition...the DVD disc that compresses the audio portion only. IMPORTANT NOTES: Due to the NTSC and PAL color systems. However, if you read the manual that accompanies the DVD disc, as they are preset. There are also extra features on this DVD player: MP3 When playing an MP3, ...
... DVDs. If a function you selected does not run as desired, refer to PAL, the TV picture will roll vertically. If incorrectly set to the manual accompanying the DVD disc. MP3 is given a track number. Some features of "MPEG1 Audio Layer 3". This player conforms to many variables, including recording condition...the DVD disc that compresses the audio portion only. IMPORTANT NOTES: Due to the NTSC and PAL color systems. However, if you read the manual that accompanies the DVD disc, as they are preset. There are also extra features on this DVD player: MP3 When playing an MP3, ...
User Guide
Page 18
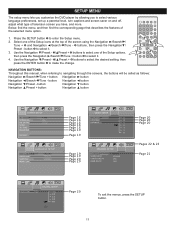
... the screens, the buttons will be called as follows: Navigation ®/Search l/Tune + button: Navigation ® button Navigation √/Search m/Tune - NAVIGATION BUTTONS: Throughout this manual, when referring to make the change. Press the SETUP button 1 to select various language preferences, set up a parental level, turn captions and screen saver on...
... the screens, the buttons will be called as follows: Navigation ®/Search l/Tune + button: Navigation ® button Navigation √/Search m/Tune - NAVIGATION BUTTONS: Throughout this manual, when referring to make the change. Press the SETUP button 1 to select various language preferences, set up a parental level, turn captions and screen saver on...
User Guide
Page 27
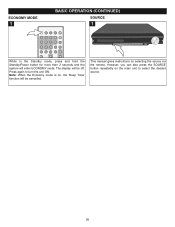
However, you can also press the SOURCE button repeatedly on the main unit to turn the unit ON. Press again to select the desired source. 26 This manual gives instructions on , the Sleep Timer function will be off. Note: When the Economy mode is on selecting the source via the remote. The display will enter ECONOMY mode. ECONOMY MODE 1 BASIC OPERATION (CONTINUED) SOURCE 1 While in the Standby mode, press and hold the Standby/Power button for more than 2 seconds and the system will be cancelled.
However, you can also press the SOURCE button repeatedly on the main unit to turn the unit ON. Press again to select the desired source. 26 This manual gives instructions on , the Sleep Timer function will be off. Note: When the Economy mode is on selecting the source via the remote. The display will enter ECONOMY mode. ECONOMY MODE 1 BASIC OPERATION (CONTINUED) SOURCE 1 While in the Standby mode, press and hold the Standby/Power button for more than 2 seconds and the system will be cancelled.
User Guide
Page 28
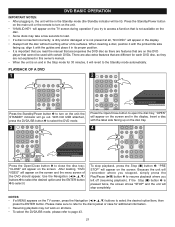
... should appear. "PRE STOP" will appear on the screen and the menu screen of its proper position. • It is important that you read the manual that accompanies the DVD disc as there are features that are not explained in this DVD player that are different for 30 minutes, it with... on the main unit or the remote to turn on and in the Stop mode for each DVD disc, so they are on this owner's manual. • When the unit is pressed twice, the screen shows "STOP" and the unit will remember where you stopped, simply press the Play/Pause (®...
... should appear. "PRE STOP" will appear on the screen and the menu screen of its proper position. • It is important that you read the manual that accompanies the DVD disc as there are features that are not explained in this DVD player that are different for 30 minutes, it with... on the main unit or the remote to turn on and in the Stop mode for each DVD disc, so they are on this owner's manual. • When the unit is pressed twice, the screen shows "STOP" and the unit will remember where you stopped, simply press the Play/Pause (®...
User Guide
Page 40
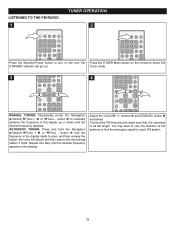
... find the strongest signal for each FM station. 39 Adjust the VOLUME +/- You may have to vary the direction of the antenna to manually advance the frequency in the display up or down until the desired frequency appears. AUTOMATIC TUNING: Press and hold the Navigation ®/Search .... the Press the TUNER Mode button on the unit; Connect the FM Antenna and make sure that it finds. Tuner mode. 3 4 2 1 2 1 MANUAL TUNING: Repeatedly press the Navigation ®/Search l/Tune + 1 or m/Tune - LISTENING TO THE FM RADIO 1 TUNER OPERATION 2 Press the Standby/Power button...
... find the strongest signal for each FM station. 39 Adjust the VOLUME +/- You may have to vary the direction of the antenna to manually advance the frequency in the display up or down until the desired frequency appears. AUTOMATIC TUNING: Press and hold the Navigation ®/Search .... the Press the TUNER Mode button on the unit; Connect the FM Antenna and make sure that it finds. Tuner mode. 3 4 2 1 2 1 MANUAL TUNING: Repeatedly press the Navigation ®/Search l/Tune + 1 or m/Tune - LISTENING TO THE FM RADIO 1 TUNER OPERATION 2 Press the Standby/Power button...
User Guide
Page 47
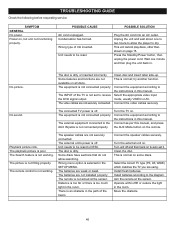
... picture. The disc is not working . Connect the equipment according to the instructions in this manual, and press the AUX Mode button on . Connect the equipment according to the instructions in this manual. The remote control is dirty or inserted incorrectly. The disc is not connected properly. The ...the sensor. POSSIBLE CAUSE AC cord unplugged. Some discs have sections that do not allow the player to be reset. Connect as per this manual. Turn unit off . The equipment is an obstacle in the room. The INPUT of CD inserted. This is off and then back ...
... picture. The disc is not working . Connect the equipment according to the instructions in this manual, and press the AUX Mode button on . Connect the equipment according to the instructions in this manual. The remote control is dirty or inserted incorrectly. The disc is not connected properly. The ...the sensor. POSSIBLE CAUSE AC cord unplugged. Some discs have sections that do not allow the player to be reset. Connect as per this manual. Turn unit off . The equipment is an obstacle in the room. The INPUT of CD inserted. This is off and then back ...


