Operating Instructions
Page 1
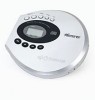
MD6886.O/M.QXD 2/11/03 8:14 AM Page 19 PERSONAL AM/FM STEREO/COMPACT DISC PLAYER WITH 45 SECOND DIGITAL ANTI-SHOCK PROTECTION MODEL: MD6886 BEFORE OPERATING THIS PRODUCT, PLEASE READ THESE INSTRUCTIONS COMPLETELY. OPERATING INSTRUCTIONS
MD6886.O/M.QXD 2/11/03 8:14 AM Page 19 PERSONAL AM/FM STEREO/COMPACT DISC PLAYER WITH 45 SECOND DIGITAL ANTI-SHOCK PROTECTION MODEL: MD6886 BEFORE OPERATING THIS PRODUCT, PLEASE READ THESE INSTRUCTIONS COMPLETELY. OPERATING INSTRUCTIONS
Operating Instructions
Page 2
.... Changes or modifications to persons. Lightning and power surges ARE NOT covered under warranty for AC connection. FCC WARNING: This equipment may be of sufficient magnitude to constitute a risk of important operating and maintenance (servicing) instructions in the instruction manual. REFER SERVICING TO QUALIFIED SERVICE PERSONNEL. NO USER-SERVICEABLE PARTS INSIDE. DANGEROUS VOLTAGE: The lightning flash with safety switches to operate this product. 1 ATTENTION...
.... Changes or modifications to persons. Lightning and power surges ARE NOT covered under warranty for AC connection. FCC WARNING: This equipment may be of sufficient magnitude to constitute a risk of important operating and maintenance (servicing) instructions in the instruction manual. REFER SERVICING TO QUALIFIED SERVICE PERSONNEL. NO USER-SERVICEABLE PARTS INSIDE. DANGEROUS VOLTAGE: The lightning flash with safety switches to operate this product. 1 ATTENTION...
Operating Instructions
Page 3
... or relocate the receiving antenna. • Increase the separation between the equipment and receiver. • Connect the equipment into an outlet on a circuit different from that to which the receiver is connected. • Consult the dealer or an experienced radio/TV technician for a Class B digital device, pursuant to Part 15 of other stereo equipment that interference will...
... or relocate the receiving antenna. • Increase the separation between the equipment and receiver. • Connect the equipment into an outlet on a circuit different from that to which the receiver is connected. • Consult the dealer or an experienced radio/TV technician for a Class B digital device, pursuant to Part 15 of other stereo equipment that interference will...
Operating Instructions
Page 4
...you listening for your hearing "comfort level" adapts to higher volumes of sound. Over time your protection. Guard against this by playing it comfortably and clearly, and without affecting your volume control at a safe level. This list of sound levels is included for a lifetime. To ...Used wisely, your musical enjoyment. Once you can actually be deceiving. OC 1924 IAT I O STRIES A So what sounds "normal" can maximize the fun and excitement your hearing. Now it's time to get the most importantly, without distortion. One that lets the sound come...
...you listening for your hearing "comfort level" adapts to higher volumes of sound. Over time your protection. Guard against this by playing it comfortably and clearly, and without affecting your volume control at a safe level. This list of sound levels is included for a lifetime. To ...Used wisely, your musical enjoyment. Once you can actually be deceiving. OC 1924 IAT I O STRIES A So what sounds "normal" can maximize the fun and excitement your hearing. Now it's time to get the most importantly, without distortion. One that lets the sound come...
Operating Instructions
Page 5
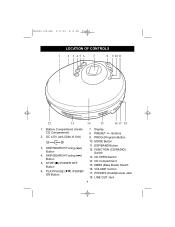
Display 8. PRESET +/- CD OPEN Switch 14. PHONES (Headphones) Jack 18. LINE OUT Jack 4 DC 4.5V Jack (Side of Unit) 7. PROG (Program) Button - + 3. FUNCTION (CD/RADIO) Switch 13. DBBS (Bass Boost) Switch 16. SKIP/SEARCH/Tuning ( ) Button 4. CD Compartment 15. MODE Button 11. Buttons 9. SKIP/SEARCH/Tuning ( ) Button 5. ESP/BAND Button 12. MD6886.O/M.QXD 2/11/03 8:14 AM Page 4 LOCATION OF CONTROLS 1 2 3 45 6 7 8 9 10 11 12 13 14 15 16 17 18 1. STOP (■)/ POWER OFF Button 6. Battery Compartment (Inside CD Compartment) 2. PLAY/PAUSE ( ) /...
Display 8. PRESET +/- CD OPEN Switch 14. PHONES (Headphones) Jack 18. LINE OUT Jack 4 DC 4.5V Jack (Side of Unit) 7. PROG (Program) Button - + 3. FUNCTION (CD/RADIO) Switch 13. DBBS (Bass Boost) Switch 16. SKIP/SEARCH/Tuning ( ) Button 4. CD Compartment 15. MODE Button 11. Buttons 9. SKIP/SEARCH/Tuning ( ) Button 5. ESP/BAND Button 12. MD6886.O/M.QXD 2/11/03 8:14 AM Page 4 LOCATION OF CONTROLS 1 2 3 45 6 7 8 9 10 11 12 13 14 15 16 17 18 1. STOP (■)/ POWER OFF Button 6. Battery Compartment (Inside CD Compartment) 2. PLAY/PAUSE ( ) /...
Operating Instructions
Page 6
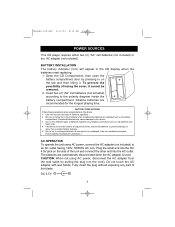
... 4.5V jack on -+ -+ -+ the tab and then lifting it cannot be used . BATTERY PRECAUTIONS Follow these precautions when using batteries in the CD display when the batteries need replacing. 1. Be sure to follow the correct polarity when installing the batteries as indicated next to the polarity diagram inside the -+ battery compartment. they can overheat and rupture. (Follow battery manufacturer's directions.) AC OPERATION To operate the unit using AC power, disconnect...
... 4.5V jack on -+ -+ -+ the tab and then lifting it cannot be used . BATTERY PRECAUTIONS Follow these precautions when using batteries in the CD display when the batteries need replacing. 1. Be sure to follow the correct polarity when installing the batteries as indicated next to the polarity diagram inside the -+ battery compartment. they can overheat and rupture. (Follow battery manufacturer's directions.) AC OPERATION To operate the unit using AC power, disconnect...
Operating Instructions
Page 7
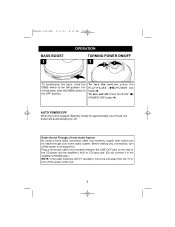
Radio Sound Through a Home Audio System By using a home audio connection cable (not included), superb radio sound can be heard through your home audio system. AUTO POWER OFF When the unit is stopped (Standby mode) for approximately one minute, the power will automatically turn unit off the power to the ON position. Plug a connection cable (not included) between the LINE OUT jack on , press the PLAY/PAUSE ( button ❶. )/POWER ON To turn off the power to the OFF position. To...
Radio Sound Through a Home Audio System By using a home audio connection cable (not included), superb radio sound can be heard through your home audio system. AUTO POWER OFF When the unit is stopped (Standby mode) for approximately one minute, the power will automatically turn unit off the power to the ON position. Plug a connection cable (not included) between the LINE OUT jack on , press the PLAY/PAUSE ( button ❶. )/POWER ON To turn off the power to the OFF position. To...
Operating Instructions
Page 8
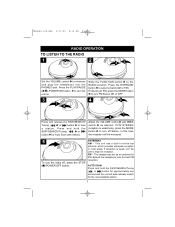
... turn the unit on. Extend the headphone wire for Auto Scan (see below). FM - AUTO SCAN Press and hold the SKIP/SEARCH/Tuning ❶ or button ❷ for best FM reception. Slide the FUNCTION switch ❶ to select a band (AM or FM). Adjust the VOLUME control ❶ and DBBS switch ❷ as an antenna for the next available station. 7 MD6886.O/M.QXD 2/11/03 8:14 AM Page 7 RADIO OPERATION...
... turn the unit on. Extend the headphone wire for Auto Scan (see below). FM - AUTO SCAN Press and hold the SKIP/SEARCH/Tuning ❶ or button ❷ for best FM reception. Slide the FUNCTION switch ❶ to select a band (AM or FM). Adjust the VOLUME control ❶ and DBBS switch ❷ as an antenna for the next available station. 7 MD6886.O/M.QXD 2/11/03 8:14 AM Page 7 RADIO OPERATION...
Operating Instructions
Page 9
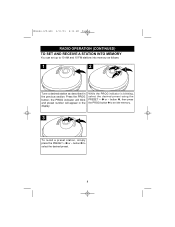
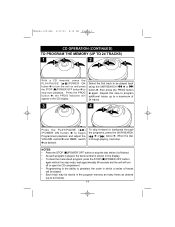
... will blink and preset number will appear in the previous section. button ❷ to 10 AM and 10 FM stations into memory as follows: 1 2 21 3 Tune a desired station as described in the display. button ❷, then press the PROG button ❸ to set up to select the desired preset. 8 MD6886.O/M.QXD 2/11/03 8:14 AM Page 8 RADIO OPERATION (CONTINUED) TO SET AND RECEIVE A STATION INTO MEMORY...
... will blink and preset number will appear in the previous section. button ❷ to 10 AM and 10 FM stations into memory as follows: 1 2 21 3 Tune a desired station as described in the display. button ❷, then press the PROG button ❸ to set up to select the desired preset. 8 MD6886.O/M.QXD 2/11/03 8:14 AM Page 8 RADIO OPERATION (CONTINUED) TO SET AND RECEIVE A STATION INTO MEMORY...
Operating Instructions
Page 10
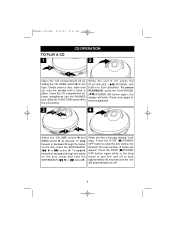
... and hold the SKIP/SEARCH ❸ or button ❹. Press the STOP (■)/POWER OFF button again while in place. Press once again to the right. the total number of tracks will stop mode to stop the disc before it locks in the stop . MD6886.O/M.QXD 2/11/03 8:14 AM Page 9 TO PLAY A CD 1 CD OPERATION 2 2 1 Open the CD compartment lid by sliding the CD OPEN switch ❶ to resume playback. 3 34 4 2 1 Adjust the VOLUME control...
... and hold the SKIP/SEARCH ❸ or button ❹. Press the STOP (■)/POWER OFF button again while in place. Press once again to the right. the total number of tracks will stop mode to stop the disc before it locks in the stop . MD6886.O/M.QXD 2/11/03 8:14 AM Page 9 TO PLAY A CD 1 CD OPERATION 2 2 1 Open the CD compartment lid by sliding the CD OPEN switch ❶ to resume playback. 3 34 4 2 1 Adjust the VOLUME control...
Operating Instructions
Page 11
... the FUNCTION switch ❷ to the right. Close the CD compartment lid. Insert headphones into the PHONES jack. With a CD inserted, press the PLAY/PAUSE ( )/POWER ON button to indicate music signals are shown in the display. • To remove the disc, open the CD Compartment, hold the edge of the CD and gently press the center pivot and lift the CD. • The maximum time of playing standard CDs...
... the FUNCTION switch ❷ to the right. Close the CD compartment lid. Insert headphones into the PHONES jack. With a CD inserted, press the PLAY/PAUSE ( )/POWER ON button to indicate music signals are shown in the display. • To remove the disc, open the CD Compartment, hold the edge of the CD and gently press the center pivot and lift the CD. • The maximum time of playing standard CDs...
Operating Instructions
Page 12
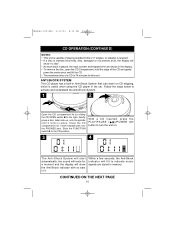
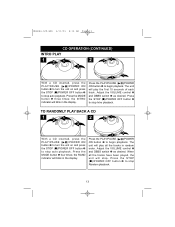
... the disc rotation speed will disappear one by pressing the ESP/BAND button. NOTES: • When the CD player is used in the memory until the CD player can read the music data properly from the disc. MD6886.O/M.QXD 2/11/03 8:14 AM Page 11 CD OPERATION (CONTINUED) 5 6 If the CD player is subject to vibration during playback, the bars will drop to save power consumption...
... the disc rotation speed will disappear one by pressing the ESP/BAND button. NOTES: • When the CD player is used in the memory until the CD player can read the music data properly from the disc. MD6886.O/M.QXD 2/11/03 8:14 AM Page 11 CD OPERATION (CONTINUED) 5 6 If the CD player is subject to vibration during playback, the bars will drop to save power consumption...
Operating Instructions
Page 13
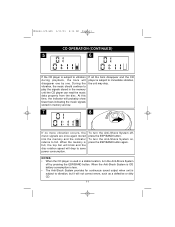
... Adjust the VOLUME control ❷ and DBBS switch ❸ as desired. TO CANCEL OR STOP REPEAT PLAYBACK • TO STOP REPEAT PLAYBACK, press the STOP (■)/POWER OFF button once. • TO CANCEL REPEAT PLAYBACK, press the MODE button four times if in Repeat 1 mode, or three times if in the display. Press the MODE button ❷ once; MD6886.O/M.QXD 2/11/03 8:14 AM Page 12 CD OPERATION (CONTINUED) TO REPEATEDLY PLAY BACK ONE TRACK 1 1 2 1 2 With a CD inserted, press the PLAY/PAUSE ( )/POWER...
... Adjust the VOLUME control ❷ and DBBS switch ❸ as desired. TO CANCEL OR STOP REPEAT PLAYBACK • TO STOP REPEAT PLAYBACK, press the STOP (■)/POWER OFF button once. • TO CANCEL REPEAT PLAYBACK, press the MODE button four times if in Repeat 1 mode, or three times if in the display. Press the MODE button ❷ once; MD6886.O/M.QXD 2/11/03 8:14 AM Page 12 CD OPERATION (CONTINUED) TO REPEATEDLY PLAY BACK ONE TRACK 1 1 2 1 2 With a CD inserted, press the PLAY/PAUSE ( )/POWER...
Operating Instructions
Page 14
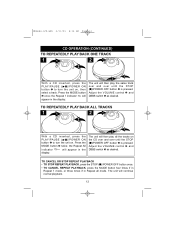
... CD OPERATION (CONTINUED) INTRO PLAY 121 2 3 41 2 3 With a CD inserted, press the PLAY/PAUSE ( )/POWER ON button ❶ to turn the unit on and press the STOP (■)/POWER OFF button ❷ to stop . Adjust the VOLUME control ❷ and DBBS switch ❸ as desired. Press the STOP (■)/POWER OFF button ❹ to stop auto playback. The unit will play the first 10 seconds of each track. Press the STOP (■)/POWER OFF button ❹ to stop...
... CD OPERATION (CONTINUED) INTRO PLAY 121 2 3 41 2 3 With a CD inserted, press the PLAY/PAUSE ( )/POWER ON button ❶ to turn the unit on and press the STOP (■)/POWER OFF button ❷ to stop . Adjust the VOLUME control ❷ and DBBS switch ❸ as desired. Press the STOP (■)/POWER OFF button ❹ to stop auto playback. The unit will play the first 10 seconds of each track. Press the STOP (■)/POWER OFF button ❹ to stop...
Operating Instructions
Page 15
...; Press the STOP (■)/POWER OFF button to stop the disc before it is finished. • As each program is played, the track number is shown in the display. • To clear the memorized program: press the STOP (■)/POWER OFF button again while in which a series of 24 tracks. 3 1 4 12 Press the PLAY/PAUSE ( ) /POWER ON button ❶ to begin Programmed playback and adjust the VOLUME control ❷ and DBBS switch ❸...
...; Press the STOP (■)/POWER OFF button to stop the disc before it is finished. • As each program is played, the track number is shown in the display. • To clear the memorized program: press the STOP (■)/POWER OFF button again while in which a series of 24 tracks. 3 1 4 12 Press the PLAY/PAUSE ( ) /POWER ON button ❶ to begin Programmed playback and adjust the VOLUME control ❷ and DBBS switch ❸...
Operating Instructions
Page 16
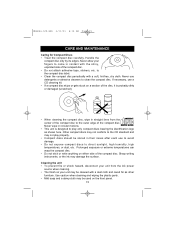
... from the center of the compact disc to play properly. • Compact discs should be used on either side of the compact disc. • Do not attach adhesive tape, stickers, etc. to clean the compact disc. If necessary, use detergents or abrasive cleaners to the compact disc label. • Clean the compact disc periodically with a dust cloth and cared for Compact Discs • Treat the compact disc carefully. MD6886.O/M.QXD 2/11/03 8:14...
... from the center of the compact disc to play properly. • Compact discs should be used on either side of the compact disc. • Do not attach adhesive tape, stickers, etc. to clean the compact disc. If necessary, use detergents or abrasive cleaners to the compact disc label. • Clean the compact disc periodically with a dust cloth and cared for Compact Discs • Treat the compact disc carefully. MD6886.O/M.QXD 2/11/03 8:14...
Operating Instructions
Page 17
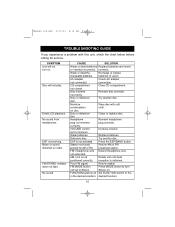
... Headphone wire. FUNCTION switch is not activated. desired function. 16 Erratic CD playback. Noise or sound distorted on . Weak or dead Re- batteries (if used). set to the in the desired position. ESP is not Set FUNCTION switch to Stereo. broadcast station. reception is not Rotate unit until best positioned correctly. FM STEREO indicator does not light. CD compartment Close CD compartment. Defective disc. FM MODE button Press MODE button to minimum. Stereo on radio. MD6886...
... Headphone wire. FUNCTION switch is not activated. desired function. 16 Erratic CD playback. Noise or sound distorted on . Weak or dead Re- batteries (if used). set to the in the desired position. ESP is not Set FUNCTION switch to Stereo. broadcast station. reception is not Rotate unit until best positioned correctly. FM STEREO indicator does not light. CD compartment Close CD compartment. Defective disc. FM MODE button Press MODE button to minimum. Stereo on radio. MD6886...
Operating Instructions
Page 18
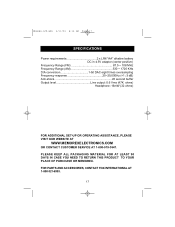
... Page 17 SPECIFICATIONS Power requirements 2 x LR6 "AA" alkaline battery DC in 4.5V adaptor (center positive) Frequency Range (FM 87.5 ~ 108 MHz Frequency Range (AM 530 ~ 1720 KHz D/A conversion 1-bit DAC eight times oversampling Frequency response 20~20,000Hz (+1,-3 dB) Anti-shock 45 second buffer Output level Line output: 0.6 Vms (47K ohms) Headphone: 16mW (32 ohms) FOR ADDITIONAL SET-UP OR OPERATING ASSISTANCE, PLEASE...
... Page 17 SPECIFICATIONS Power requirements 2 x LR6 "AA" alkaline battery DC in 4.5V adaptor (center positive) Frequency Range (FM 87.5 ~ 108 MHz Frequency Range (AM 530 ~ 1720 KHz D/A conversion 1-bit DAC eight times oversampling Frequency response 20~20,000Hz (+1,-3 dB) Anti-shock 45 second buffer Output level Line output: 0.6 Vms (47K ohms) Headphone: 16mW (32 ohms) FOR ADDITIONAL SET-UP OR OPERATING ASSISTANCE, PLEASE...
Operating Instructions
Page 19
Weston, FL Printed in Hong Kong Visit our website at www.memorexelectronics.com MD6886.O/M.QXD 2/11/03 8:14 AM Page 18 Memcorp, Inc.
Weston, FL Printed in Hong Kong Visit our website at www.memorexelectronics.com MD6886.O/M.QXD 2/11/03 8:14 AM Page 18 Memcorp, Inc.


