User Guide
Page 2
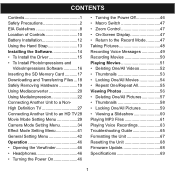
CONTENTS Contents 1 Safety Precautions 2 EIA Guidelines 8 Location of Controls 10 Battery Installation 12 Using the Hand Strap 13 Installing the Software 14 • To Install the Driver 15 • To Install PhotoImpressions and VideoImpressions Software 16 ...
CONTENTS Contents 1 Safety Precautions 2 EIA Guidelines 8 Location of Controls 10 Battery Installation 12 Using the Hand Strap 13 Installing the Software 14 • To Install the Driver 15 • To Install PhotoImpressions and VideoImpressions Software 16 ...

User Guide
Page 5
... so as to provide some protection pinched by items placed upon or against against voltage surges and built-up static them might be taken to battery power or other sources, refer to the keep from a lightning storm, or when it is that could result in fire or electric shock. will prevent...
... so as to provide some protection pinched by items placed upon or against against voltage surges and built-up static them might be taken to battery power or other sources, refer to the keep from a lightning storm, or when it is that could result in fire or electric shock. will prevent...

User Guide
Page 8
... POUSSER JUSQU'AU FOND. IMPORTANT: Do NOT use the unit while it is not used for long periods of time. • Dispose of rechargeable battery pack in a manner that complies with applicable laws. • Do not place the unit in unstable locations, such as a sloping surface or unstable...the unit or attempt your own repairs. Never use when it 's charging as a sealed vehicle or in direct sunlight. • Remove the rechargeable battery pack when the unit is raining or snowing. • Should foreign matter or water get wet. SAFETY PRECAUTIONS Be sure to observe the following precautions...
... POUSSER JUSQU'AU FOND. IMPORTANT: Do NOT use the unit while it is not used for long periods of time. • Dispose of rechargeable battery pack in a manner that complies with applicable laws. • Do not place the unit in unstable locations, such as a sloping surface or unstable...the unit or attempt your own repairs. Never use when it 's charging as a sealed vehicle or in direct sunlight. • Remove the rechargeable battery pack when the unit is raining or snowing. • Should foreign matter or water get wet. SAFETY PRECAUTIONS Be sure to observe the following precautions...

User Guide
Page 11
Light/Flash 4. Lens 3. Microphone 5. Display 6. LOCATION OF CONTROLS FRONT/SIDE 4 1 2 5 3 6 1. Power Button RECHARGEABLE BATTERY PART NO. 084-07042L-019* AC ADAPTER PART NO. 199A04220L-B09* *Consumer Replaceable Part (See page 70 to order.) 10 Macro ( / ) Switch (Side of Lens) 2.
Light/Flash 4. Lens 3. Microphone 5. Display 6. LOCATION OF CONTROLS FRONT/SIDE 4 1 2 5 3 6 1. Power Button RECHARGEABLE BATTERY PART NO. 084-07042L-019* AC ADAPTER PART NO. 199A04220L-B09* *Consumer Replaceable Part (See page 70 to order.) 10 Macro ( / ) Switch (Side of Lens) 2.

User Guide
Page 12
.../Wide/ Up/Down) Control 6 3. USB Port (USB CABLE PART NO. 0950A7356L-A02*) 6. Flash/Left Button 8. HDMI Out Jack 10. LOCATION OF CONTROLS (CONTINUED) REAR 1 2 3 4 1. Battery Compartment (BATTERY COVER PART NO. 6086A8321L-A04*) 8 11. HD/Right Button 4. Hand Strap Hook (HAND STRAP PART NO. 221- 9 04350L-B01*) 10 CD PART NO. 0970A8321L-A04H...
.../Wide/ Up/Down) Control 6 3. USB Port (USB CABLE PART NO. 0950A7356L-A02*) 6. Flash/Left Button 8. HDMI Out Jack 10. LOCATION OF CONTROLS (CONTINUED) REAR 1 2 3 4 1. Battery Compartment (BATTERY COVER PART NO. 6086A8321L-A04*) 8 11. HD/Right Button 4. Hand Strap Hook (HAND STRAP PART NO. 221- 9 04350L-B01*) 10 CD PART NO. 0970A8321L-A04H...
User Guide
Page 13
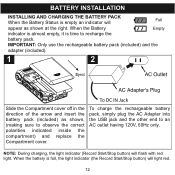
...end to observe the correct polarities indicated inside the compartment) and replace the Compartment cover. When the battery is empty an indicator will flash with red light. IMPORTANT: Only use the rechargeable battery pack (included) and the adapter (included). 1 2 Eject To DC IN Jack Slide the ...Compartment cover off in the direction of the arrow and insert the battery pack (included) as shown at the right. NOTE: During charging, the light indicator (Record Start/Stop button) will Full appear as shown, ...
...end to observe the correct polarities indicated inside the compartment) and replace the Compartment cover. When the battery is empty an indicator will flash with red light. IMPORTANT: Only use the rechargeable battery pack (included) and the adapter (included). 1 2 Eject To DC IN Jack Slide the ...Compartment cover off in the direction of the arrow and insert the battery pack (included) as shown at the right. NOTE: During charging, the light indicator (Record Start/Stop button) will Full appear as shown, ...

User Guide
Page 37
... the Navigation/Zoom/OK control, then press the Navigation/Zoom/OK control to set the flash. 36 The selected frame will be disabled when the battery is reset to select it . the Flash menu will appear. The flash will appear on all pictures taken until the unit is turned off or...
... the Navigation/Zoom/OK control, then press the Navigation/Zoom/OK control to set the flash. 36 The selected frame will be disabled when the battery is reset to select it . the Flash menu will appear. The flash will appear on all pictures taken until the unit is turned off or...

User Guide
Page 66
... 34. Set White Balance to the Down ( ) position. Rotate the Macro ( / ) switch to reflect the environment you experience a problem with a soft cloth. Recharge the battery pack. Poor lighting. Subject or unit moved as picture was Hold unit steady until picture is off. Possible Cause Power is taken. TROUBLESHOOTING GUIDE If... not turn on . Take picture in . 65 Clean lens with this unit, check the chart below before calling for one second to turn on . Battery pack is weak or dead. Images/pictures are in better lighting and/or adjust the EV setting.
... 34. Set White Balance to the Down ( ) position. Rotate the Macro ( / ) switch to reflect the environment you experience a problem with a soft cloth. Recharge the battery pack. Poor lighting. Subject or unit moved as picture was Hold unit steady until picture is off. Possible Cause Power is taken. TROUBLESHOOTING GUIDE If... not turn on . Take picture in . 65 Clean lens with this unit, check the chart below before calling for one second to turn on . Battery pack is weak or dead. Images/pictures are in better lighting and/or adjust the EV setting.

User Guide
Page 69
IMPORTANT NOTE: Before upgrading the firmware, please backup all of seconds and then reinserting. After upgrading, format the unit to check if there is new firmware available. FOR FIRMWARE UPGRADE Please visit our Web site at www.memorexelectronics.com to complete the upgrade procedure. 68 RESETTING THE UNIT If the unit acts erratically, reset the unit by removing the battery pack for a couple of your media files on your computer.
IMPORTANT NOTE: Before upgrading the firmware, please backup all of seconds and then reinserting. After upgrading, format the unit to check if there is new firmware available. FOR FIRMWARE UPGRADE Please visit our Web site at www.memorexelectronics.com to complete the upgrade procedure. 68 RESETTING THE UNIT If the unit acts erratically, reset the unit by removing the battery pack for a couple of your media files on your computer.

User Guide
Page 70
... 20cm (Macro)/200cm+ (Normal) Digital Zoom...8x Self-timer 10 seconds delay TV Out ...NTSC/PAL USB ...2.0 HDMI...1.3 Power Source DC-in(5v)/Li-ion battery/USB power Dimensions 4 (H) x 1.5 (W) x 2.5 (D) inches Weight ...0.26 lbs Specifications are subject to change without notice. 69
... 20cm (Macro)/200cm+ (Normal) Digital Zoom...8x Self-timer 10 seconds delay TV Out ...NTSC/PAL USB ...2.0 HDMI...1.3 Power Source DC-in(5v)/Li-ion battery/USB power Dimensions 4 (H) x 1.5 (W) x 2.5 (D) inches Weight ...0.26 lbs Specifications are subject to change without notice. 69

