
User Guide
Page 1
Video Camera Digital Let's Make Memories User Guide Please read these instructions completely, before operating this product. memorexelectronics.com MCC215
Video Camera Digital Let's Make Memories User Guide Please read these instructions completely, before operating this product. memorexelectronics.com MCC215
User Guide
Page 2
... Picture Resolution ....12 • Changing the White Balance (P) ....13 • Changing the EV Compensation (P)14 • Viewing the Pictures 15 • Recording a Video 16 • Changing the Video Resolution ......17 • Changing the White Balance (V) ....18 • Changing the EV Compensation (V) .19 • Viewing the... Videos 20 • Setting the Date and Time 21 • Setting the Date/Time Stamp..........22 • Formatting the SD/MMC Card ........23 ...
... Picture Resolution ....12 • Changing the White Balance (P) ....13 • Changing the EV Compensation (P)14 • Viewing the Pictures 15 • Recording a Video 16 • Changing the Video Resolution ......17 • Changing the White Balance (V) ....18 • Changing the EV Compensation (V) .19 • Viewing the... Videos 20 • Setting the Date and Time 21 • Setting the Date/Time Stamp..........22 • Formatting the SD/MMC Card ........23 ...
User Guide
Page 3
... to this equipment if an unauthorized change or modification is connected. • Consult the dealer or an experienced radio/TV technician for a Class B digital device, pursuant to Part 15 of the following measures: • Reorient or relocate the receiving antenna. • Increase the separation between the equipment and receiver... or more of the FCC Rules. Cet appareil numérique de la classe B est conforme à la norme NMB-003 du Canada. 2 This Class B digital apparatus complies with the instructions, may generate or use radio frequency energy.
... to this equipment if an unauthorized change or modification is connected. • Consult the dealer or an experienced radio/TV technician for a Class B digital device, pursuant to Part 15 of the following measures: • Reorient or relocate the receiving antenna. • Increase the separation between the equipment and receiver... or more of the FCC Rules. Cet appareil numérique de la classe B est conforme à la norme NMB-003 du Canada. 2 This Class B digital apparatus complies with the instructions, may generate or use radio frequency energy.

User Guide
Page 4
Always leave service to authorized repair facilities. • Keep the unit away from water and other liquids, and never let it is raining or snowing. • Should foreign matter or water get wet. Never use when it get into the unit, immediately turn the power off and contact your local authorized service center. • Physical damage and malfunction of data by transferring to a personal computer. • In an environment with electrostatic discharge, the user may fall. • Do not touch or press on the display or lens. 3 SAFETY PRECAUTIONS Be sure to observe the following ...
Always leave service to authorized repair facilities. • Keep the unit away from water and other liquids, and never let it is raining or snowing. • Should foreign matter or water get wet. Never use when it get into the unit, immediately turn the power off and contact your local authorized service center. • Physical damage and malfunction of data by transferring to a personal computer. • In an environment with electrostatic discharge, the user may fall. • Do not touch or press on the display or lens. 3 SAFETY PRECAUTIONS Be sure to observe the following ...

User Guide
Page 6
P337RBDV096C011*) 2. Speaker 3. LOCATION OF CONTROLS (CONTINUED) FRONT/SIDE 6 1 2 3 4 6 5 1. Microphone 6. K910RDV096C0001*) CD PART NO. K539RCD096C0001* *Consumer Replaceable Part (See page 46 to order.) 5 Lens 4. Battery Compartment (BATTERY COVER PART NO. Strap Holders (HANDSTRAP PART NO. SD/MMC Card Slot (Bottom of Unit) 5.
P337RBDV096C011*) 2. Speaker 3. LOCATION OF CONTROLS (CONTINUED) FRONT/SIDE 6 1 2 3 4 6 5 1. Microphone 6. K910RDV096C0001*) CD PART NO. K539RCD096C0001* *Consumer Replaceable Part (See page 46 to order.) 5 Lens 4. Battery Compartment (BATTERY COVER PART NO. Strap Holders (HANDSTRAP PART NO. SD/MMC Card Slot (Bottom of Unit) 5.

User Guide
Page 7
adjust the length of the Press the velcro ends onto the straps to fit your hand. 6 Adjust as shown. USING THE STRAP 1 2 Insert the Velcro straps into each of the straps as desired. 3 Fold over the Strap Flap and connect as desired to Strap Holders.
adjust the length of the Press the velcro ends onto the straps to fit your hand. 6 Adjust as shown. USING THE STRAP 1 2 Insert the Velcro straps into each of the straps as desired. 3 Fold over the Strap Flap and connect as desired to Strap Holders.

User Guide
Page 8
NOTE: When the batteries are low, the battery low indicator will blink in this device: 1. Reversed batteries may cause damage to be used for a long period of time, remove the batteries to follow the correct polarity when installing the batteries as shown. Insert three (3) AAA batteries into the battery compartment, observing the polarity marks (+/-) as indicated inside the battery compartment. Do not try to recharge batteries not intended to the device. 3. Slide the cover back on. BATTERY PRECAUTIONS Follow these precautions when using batteries in the display. Be sure ...
NOTE: When the batteries are low, the battery low indicator will blink in this device: 1. Reversed batteries may cause damage to be used for a long period of time, remove the batteries to follow the correct polarity when installing the batteries as shown. Insert three (3) AAA batteries into the battery compartment, observing the polarity marks (+/-) as indicated inside the battery compartment. Do not try to recharge batteries not intended to the device. 3. Slide the cover back on. BATTERY PRECAUTIONS Follow these precautions when using batteries in the display. Be sure ...

User Guide
Page 9
"Memorex" will appear briefly in the "Goodbye" appears in memory. 8 NOTE: To save the battery power, the unit will automatically turn the unit Press and hold the Power button until on. GETTING STARTED (CONTINUED) TURNING THE POWER ON AND OFF 1 2 Press the Power button to turn off after 60 seconds of inactivity, but the pictures will remain in the display display. (approximately one second).
"Memorex" will appear briefly in the "Goodbye" appears in memory. 8 NOTE: To save the battery power, the unit will automatically turn the unit Press and hold the Power button until on. GETTING STARTED (CONTINUED) TURNING THE POWER ON AND OFF 1 2 Press the Power button to turn off after 60 seconds of inactivity, but the pictures will remain in the display display. (approximately one second).

User Guide
Page 10
... SD/MMC MEMORY CARD (UP TO 2 GB) 1 Forof ncat rd An SD/MMC card must be inserted otherwise no video or picture can be stored on the card to take pictures/videos with the label side facing the display side of the camera as shown. When an SD/MMC card is inserted...
... SD/MMC MEMORY CARD (UP TO 2 GB) 1 Forof ncat rd An SD/MMC card must be inserted otherwise no video or picture can be stored on the card to take pictures/videos with the label side facing the display side of the camera as shown. When an SD/MMC card is inserted...

User Guide
Page 11
Press the Shutter button to the Picture Taking position. the picture's counter in or the Down † button 2 to zoom out as indicated, beginning on . OPERATION TAKING A SINGLE PICTURE 1 1 SET 2 SET V P 2 1 2 Press the Power button 1 to turn the unit on page 11. Press the Up π button 1 to zoom in the display will increase by one. 10 This zoom function works only for resolutions of 640 x 480 and 1280 x 1024. 3 NOTES: • Keep the object in the center of the display and an acceptable distance from the camera. • Set the desired picture settings as ...
Press the Shutter button to the Picture Taking position. the picture's counter in or the Down † button 2 to zoom out as indicated, beginning on . OPERATION TAKING A SINGLE PICTURE 1 1 SET 2 SET V P 2 1 2 Press the Power button 1 to turn the unit on page 11. Press the Up π button 1 to zoom in the display will increase by one. 10 This zoom function works only for resolutions of 640 x 480 and 1280 x 1024. 3 NOTES: • Keep the object in the center of the display and an acceptable distance from the camera. • Set the desired picture settings as ...

User Guide
Page 12
Rotate the Mode control 2 to confirm and exit. Press the MENU button and the settings will be used for the next pictures taken, until the camera is turned off or the Picture mode is changed. 11 Press the MENU button 3 to select the desired Picture Mode, and then press the OK button 4 to the Picture Taking position. The selected mode will appear. 3 41 23 Single Picture Continuous Three Pictures 10 Seconds Self-Timer 15 Seconds Self-Timer 20 Seconds Self-Timer Press the Up π button 1 or the Down † button 2 to turn the unit on. OPERATION (CONTINUED) CHANGING THE PICTURE ...
Rotate the Mode control 2 to confirm and exit. Press the MENU button and the settings will be used for the next pictures taken, until the camera is turned off or the Picture mode is changed. 11 Press the MENU button 3 to select the desired Picture Mode, and then press the OK button 4 to the Picture Taking position. The selected mode will appear. 3 41 23 Single Picture Continuous Three Pictures 10 Seconds Self-Timer 15 Seconds Self-Timer 20 Seconds Self-Timer Press the Up π button 1 or the Down † button 2 to turn the unit on. OPERATION (CONTINUED) CHANGING THE PICTURE ...

User Guide
Page 13
Press the MENU button and the settings will appear. 3 41 23 0.3 Mega Pixels 1.3 Mega Pixels 2.0 Mega Pixels (interpolated) 3.0 Mega Pixels (interpolated) Press the Up π button 1 or the Down † button 2 to confirm and exit. 12 Press the MENU button 3 to select the desired Resolution, and then press the OK button 4 to select the Resolution setting (see above). OPERATION (CONTINUED) CHANGING THE PICTURE RESOLUTION 1 1 2 SET V P 2 SET Press the Power button 1 to the Picture Taking position. Rotate the Mode control 2 to turn the unit on.
Press the MENU button and the settings will appear. 3 41 23 0.3 Mega Pixels 1.3 Mega Pixels 2.0 Mega Pixels (interpolated) 3.0 Mega Pixels (interpolated) Press the Up π button 1 or the Down † button 2 to confirm and exit. 12 Press the MENU button 3 to select the desired Resolution, and then press the OK button 4 to select the Resolution setting (see above). OPERATION (CONTINUED) CHANGING THE PICTURE RESOLUTION 1 1 2 SET V P 2 SET Press the Power button 1 to the Picture Taking position. Rotate the Mode control 2 to turn the unit on.
User Guide
Page 14
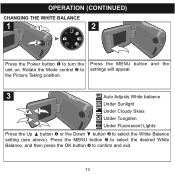
OPERATION (CONTINUED) CHANGING THE WHITE BALANCE 1 1 2 SET V P 2 SET Press the Power button 1 to confirm and exit. 13 Press the MENU button 3 to select the desired White Balance, and then press the OK button 4 to turn the unit on. Rotate the Mode control 2 to select the White Balance setting (see above). Press the MENU button and the settings will appear. 3 Auto Adjusts White balance 41 Under Sunlight Under Cloudy Skies 23 Under Tungsten Under Fluorescent Lights Press the Up π button 1 or the Down † button 2 to the Picture Taking position.
OPERATION (CONTINUED) CHANGING THE WHITE BALANCE 1 1 2 SET V P 2 SET Press the Power button 1 to confirm and exit. 13 Press the MENU button 3 to select the desired White Balance, and then press the OK button 4 to turn the unit on. Rotate the Mode control 2 to select the White Balance setting (see above). Press the MENU button and the settings will appear. 3 Auto Adjusts White balance 41 Under Sunlight Under Cloudy Skies 23 Under Tungsten Under Fluorescent Lights Press the Up π button 1 or the Down † button 2 to the Picture Taking position.
User Guide
Page 15
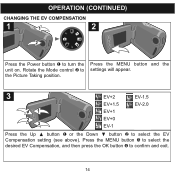
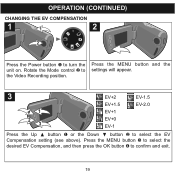
Rotate the Mode control 2 to confirm and exit. 14 Press the MENU button 3 to select the desired EV Compensation, and then press the OK button 4 to the Picture Taking position. OPERATION (CONTINUED) CHANGING THE EV COMPENSATION 1 1 2 SET V P 2 SET Press the Power button 1 to select the EV Compensation setting (see above). Press the MENU button and the settings will appear. 3 EV+2 EV-1.5 41 EV+1.5 EV+1 EV-2.0 23 EV+0 EV-1 Press the Up π button 1 or the Down † button 2 to turn the unit on.
Rotate the Mode control 2 to confirm and exit. 14 Press the MENU button 3 to select the desired EV Compensation, and then press the OK button 4 to the Picture Taking position. OPERATION (CONTINUED) CHANGING THE EV COMPENSATION 1 1 2 SET V P 2 SET Press the Power button 1 to select the EV Compensation setting (see above). Press the MENU button and the settings will appear. 3 EV+2 EV-1.5 41 EV+1.5 EV+1 EV-2.0 23 EV+0 EV-1 Press the Up π button 1 or the Down † button 2 to turn the unit on.
User Guide
Page 16
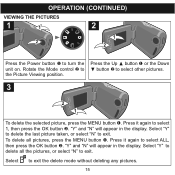
Press the Up π button 1 or the Down † button 2 to the Picture Viewing position. To delete all the pictures, or select "N" to select ALL, then press the OK button 2. Rotate the Mode control 2 to select other pictures. 3 2 1 To delete the selected picture, press the MENU button 1. Press it again to exit. "Y" and "N" will appear in the display. Select "Y" to delete the last picture taken, or select "N" to select 1, then press the OK button 2. Press it again to exit. "Y" and "N" will appear in the display. Select "Y" to delete all pictures, press the MENU ...
Press the Up π button 1 or the Down † button 2 to the Picture Viewing position. To delete all the pictures, or select "N" to select ALL, then press the OK button 2. Rotate the Mode control 2 to select other pictures. 3 2 1 To delete the selected picture, press the MENU button 1. Press it again to exit. "Y" and "N" will appear in the display. Select "Y" to delete the last picture taken, or select "N" to select 1, then press the OK button 2. Press it again to exit. "Y" and "N" will appear in the display. Select "Y" to delete all pictures, press the MENU ...
User Guide
Page 17
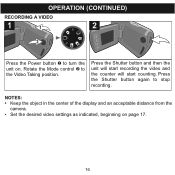
OPERATION (CONTINUED) RECORDING A VIDEO 1 1 2 SET 2 SET V P Press the Power button 1 to the Video Taking position. Rotate the Mode control 2 to turn the unit on page 17. 16 NOTES: • Keep the object in the center of the display and an acceptable distance from the camera. • Set the desired video settings as indicated, beginning on . Press the Shutter button again to stop recording. Press the Shutter button and then the unit will start recording the video and the counter will start counting.
OPERATION (CONTINUED) RECORDING A VIDEO 1 1 2 SET 2 SET V P Press the Power button 1 to the Video Taking position. Rotate the Mode control 2 to turn the unit on page 17. 16 NOTES: • Keep the object in the center of the display and an acceptable distance from the camera. • Set the desired video settings as indicated, beginning on . Press the Shutter button again to stop recording. Press the Shutter button and then the unit will start recording the video and the counter will start counting.
User Guide
Page 18
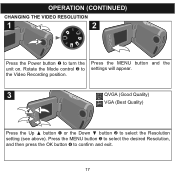
OPERATION (CONTINUED) CHANGING THE VIDEO RESOLUTION 1 1 2 SET 2 SET V P Press the Power button 1 to select the Resolution setting (see above). Press the MENU button and the settings will appear. 3 41 23 QVGA (Good Quality) VGA (Best Quality) Press the Up π button 1 or the Down † button 2 to turn the unit on. Press the MENU button 3 to select the desired Resolution, and then press the OK button 4 to the Video Recording position. Rotate the Mode control 2 to confirm and exit. 17
OPERATION (CONTINUED) CHANGING THE VIDEO RESOLUTION 1 1 2 SET 2 SET V P Press the Power button 1 to select the Resolution setting (see above). Press the MENU button and the settings will appear. 3 41 23 QVGA (Good Quality) VGA (Best Quality) Press the Up π button 1 or the Down † button 2 to turn the unit on. Press the MENU button 3 to select the desired Resolution, and then press the OK button 4 to the Video Recording position. Rotate the Mode control 2 to confirm and exit. 17

User Guide
Page 19
OPERATION (CONTINUED) CHANGING THE WHITE BALANCE 1 1 2 SET 2 SET V P Press the Power button 1 to confirm and exit. 18 Press the MENU button 3 to select the desired White Balance, and then press the OK button 4 to turn the unit on. Press the MENU button and the settings will appear. 3 Auto Adjusts White balance 41 Under Sunlight Under Cloudy Skies 23 Under Tungsten Under Fluorescent Lights Press the Up π button 1 or the Down † button 2 to the Video Recording position. Rotate the Mode control 2 to select the White Balance setting (see above).
OPERATION (CONTINUED) CHANGING THE WHITE BALANCE 1 1 2 SET 2 SET V P Press the Power button 1 to confirm and exit. 18 Press the MENU button 3 to select the desired White Balance, and then press the OK button 4 to turn the unit on. Press the MENU button and the settings will appear. 3 Auto Adjusts White balance 41 Under Sunlight Under Cloudy Skies 23 Under Tungsten Under Fluorescent Lights Press the Up π button 1 or the Down † button 2 to the Video Recording position. Rotate the Mode control 2 to select the White Balance setting (see above).
User Guide
Page 20
Press the MENU button 3 to select the desired EV Compensation, and then press the OK button 4 to settings will appear. Rotate the Mode control 2 to confirm and exit. 19 the Video Recording position. 3 41 EV+2 EV+1.5 EV+1 EV-1.5 EV-2.0 23 EV+0 EV-1 Press the Up π button 1 or the Down † button 2 to turn the Press the MENU button and the unit on. OPERATION (CONTINUED) CHANGING THE EV COMPENSATION 1 1 2 SET 2 SET V P Press the Power button 1 to select the EV Compensation setting (see above).
Press the MENU button 3 to select the desired EV Compensation, and then press the OK button 4 to settings will appear. Rotate the Mode control 2 to confirm and exit. 19 the Video Recording position. 3 41 EV+2 EV+1.5 EV+1 EV-1.5 EV-2.0 23 EV+0 EV-1 Press the Up π button 1 or the Down † button 2 to turn the Press the MENU button and the unit on. OPERATION (CONTINUED) CHANGING THE EV COMPENSATION 1 1 2 SET 2 SET V P Press the Power button 1 to select the EV Compensation setting (see above).
User Guide
Page 21
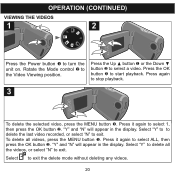
...Press the OK button 3 to the Video Viewing position. Press it again to delete all videos, press the MENU button 1. Select to exit. Select "Y" to to delete the last video recorded, or select "N" to exit the delete mode without deleting any videos. 20 Press the Up π...button 1 or the Down † button 2 to stop playback. 3 2 1 To delete the selected video, press the MENU button 1. Press again to select a video. Press it again to turn the unit on. OPERATION (CONTINUED) VIEWING THE VIDEOS 1 1 2 SET V 2 P SET 31 2 Press the Power button 1 to select 1, then ...
...Press the OK button 3 to the Video Viewing position. Press it again to delete all videos, press the MENU button 1. Select to exit. Select "Y" to to delete the last video recorded, or select "N" to exit the delete mode without deleting any videos. 20 Press the Up π...button 1 or the Down † button 2 to stop playback. 3 2 1 To delete the selected video, press the MENU button 1. Press again to select a video. Press it again to turn the unit on. OPERATION (CONTINUED) VIEWING THE VIDEOS 1 1 2 SET V 2 P SET 31 2 Press the Power button 1 to select 1, then ...