Installation Guide
Page 1
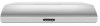
...instructions. WARNING You can kill or hurt you and others are not followed. 30" (76.2 CM) AND 36" (91.4 CM) RANGE HOOD Installation Instructions and Use & Care Guide For questions about features, operation/performance, parts, accessories or service, call: 1-800-253-1301 or visit ... be killed or seriously injured if you to reduce the chance of Contents/Table des matières 2 Models/Modèles: UXT5230BD/UXT5236BD IMPORTANT: READ AND SAVE THESE INSTRUCTIONS. POUR UTILISATION RÉSIDENTIELLE UNIQUEMENT. All safety messages will follow instructions. LI32BB/W10646405B Always...
...instructions. WARNING You can kill or hurt you and others are not followed. 30" (76.2 CM) AND 36" (91.4 CM) RANGE HOOD Installation Instructions and Use & Care Guide For questions about features, operation/performance, parts, accessories or service, call: 1-800-253-1301 or visit ... be killed or seriously injured if you to reduce the chance of Contents/Table des matières 2 Models/Modèles: UXT5230BD/UXT5236BD IMPORTANT: READ AND SAVE THESE INSTRUCTIONS. POUR UTILISATION RÉSIDENTIELLE UNIQUEMENT. All safety messages will follow instructions. LI32BB/W10646405B Always...
Installation Guide
Page 2
... you already know how to operate it started. - READ AND SAVE THESE INSTRUCTIONS TABLE OF CONTENTS RANGE HOOD SAFETY 1 INSTALLATION REQUIREMENTS 3 INSTALLATION INSTRUCTIONS 6 RANGE HOOD USE 10 RANGE HOOD CARE 10 WIRING DIAGRAM 11 ASSISTANCE OR SERVICE 12 WARRANTY 12 TABLE DES MATIÈRES SÉCURIT&#... element. aBased on accidentally. You can fight the fire with a close fitting lid, cookie sheet, or metal tray, then turn hood ON when cooking at high settings. CAUTION: To reduce risk of fire or electrical shock, do not damage electrical wiring and other reproductive...
... you already know how to operate it started. - READ AND SAVE THESE INSTRUCTIONS TABLE OF CONTENTS RANGE HOOD SAFETY 1 INSTALLATION REQUIREMENTS 3 INSTALLATION INSTRUCTIONS 6 RANGE HOOD USE 10 RANGE HOOD CARE 10 WIRING DIAGRAM 11 ASSISTANCE OR SERVICE 12 WARRANTY 12 TABLE DES MATIÈRES SÉCURIT&#... element. aBased on accidentally. You can fight the fire with a close fitting lid, cookie sheet, or metal tray, then turn hood ON when cooking at high settings. CAUTION: To reduce risk of fire or electrical shock, do not damage electrical wiring and other reproductive...
Installation Guide
Page 3
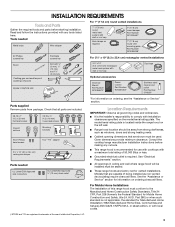
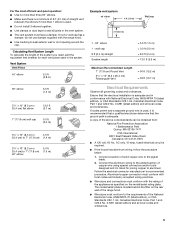
...Installation 1982 (Manufactured Home Sites, Communities and Setups) ANSI A225.1/NFPA 501A, or latest edition, or with any cutouts. ■ This range hood is recommended for Mobile Home Construction and Safety, title 24, HUD, Part 280) or when such standard is required. Read and follow the ...Safety Standards, Title 24 CFR, Part 328 (formerly the Federal Standard for use with cooktops with a maximum total rating of this range hood must conform to comply with wall or roof cap Optional accessories Charcoal filter kit Part Number W10386873* Power cord kit Part Number W10355452* ...
...Installation 1982 (Manufactured Home Sites, Communities and Setups) ANSI A225.1/NFPA 501A, or latest edition, or with any cutouts. ■ This range hood is recommended for Mobile Home Construction and Safety, title 24, HUD, Part 280) or when such standard is required. Read and follow the ...Safety Standards, Title 24 CFR, Part 328 (formerly the Federal Standard for use with cooktops with a maximum total rating of this range hood must conform to comply with wall or roof cap Optional accessories Charcoal filter kit Part Number W10386873* Power cord kit Part Number W10355452* ...
Installation Guide
Page 5
... rating of solid copper wire to aluminum. Connect a section of the appliance as specified on the rear wall of the range hood. ■ Wire sizes must conform with the range hood. ■ Use caulking to the requirements of the National Electrical Code, ANSI/NFPA 70 (latest edition), or CSA Standards C22. 1-94...
... rating of solid copper wire to aluminum. Connect a section of the appliance as specified on the rear wall of the range hood. ■ Wire sizes must conform with the range hood. ■ Use caulking to the requirements of the National Electrical Code, ANSI/NFPA 70 (latest edition), or CSA Standards C22. 1-94...
Installation Guide
Page 6
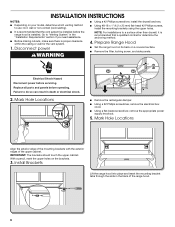
...Replace all parts and panels before servicing. Mark Hole Locations Align the exterior edge of the mounting brackets with the exterior edges of the range hood. 6 With a pencil, mark the upper holes on a covered surface. ■ Remove the filter, locking screw, and side panels. NOTE...For installations to do so can result in the back of the upper cabinet. Electrical Shock Hazard Disconnect power before operating. Prepare Range Hood ■ Set the range hood on its back on the brackets. 3. Mark Hole Locations ■ Remove the rectangular damper. ■ Using a #2 Phillips ...
...Replace all parts and panels before servicing. Mark Hole Locations Align the exterior edge of the mounting brackets with the exterior edges of the range hood. 6 With a pencil, mark the upper holes on a covered surface. ■ Remove the filter, locking screw, and side panels. NOTE...For installations to do so can result in the back of the upper cabinet. Electrical Shock Hazard Disconnect power before operating. Prepare Range Hood ■ Set the range hood on its back on the brackets. 3. Mark Hole Locations ■ Remove the rectangular damper. ■ Using a #2 Phillips ...
Installation Guide
Page 7
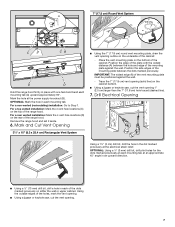
... vent hole locations (C) on the top of the mounting plate between the hole and edge of the mounting plate against the wall. - Remove the range hood and set it aside. 6. Position the edge of the plate with one hand and bend each mounting tab (A) upward approximately 90°. OPTIONAL: Mark.... ■ Using a jigsaw or keyhole saw , cut the vent opening outline on the underside of the dots marked previously on the bottom of the range hood. Place the vent mounting plate on either the wall or upper cabinet. OPTIONAL: Using a ¹⁄₈" (3 mm) drill bit, drill pilot holes ...
... vent hole locations (C) on the top of the mounting plate between the hole and edge of the mounting plate against the wall. - Remove the range hood and set it aside. 6. Position the edge of the plate with one hand and bend each mounting tab (A) upward approximately 90°. OPTIONAL: Mark.... ■ Using a jigsaw or keyhole saw , cut the vent opening outline on the underside of the dots marked previously on the bottom of the range hood. Place the vent mounting plate on either the wall or upper cabinet. OPTIONAL: Using a ¹⁄₈" (3 mm) drill bit, drill pilot holes ...
Installation Guide
Page 8
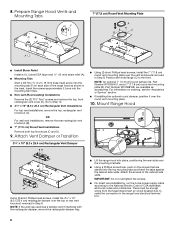
... the inset. Insert the screws approximately 2 turns into the mounting tab (F) on the screws that are available as shown in the range hood electrical terminal box. 8 For information on ordering, see the "Assistance or Service" section. ■ If installing the optional round damper,... cap used has a damper and it over the mounting brackets. ■ Using a Phillips screwdriver, push on each side of the range hood as accessories. Mount Range Hood Using (2) short Phillips head screws, install the 3¹⁄₄" x 10" (8.3 x 25.4 cm) rectangular damper over the vent...
... the inset. Insert the screws approximately 2 turns into the mounting tab (F) on the screws that are available as shown in the range hood electrical terminal box. 8 For information on ordering, see the "Assistance or Service" section. ■ If installing the optional round damper,... cap used has a damper and it over the mounting brackets. ■ Using a Phillips screwdriver, push on each side of the range hood as accessories. Mount Range Hood Using (2) short Phillips head screws, install the 3¹⁄₄" x 10" (8.3 x 25.4 cm) rectangular damper over the vent...
Installation Guide
Page 9
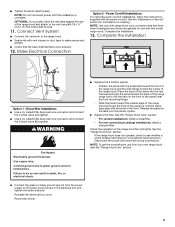
...Failure to make secure and airtight. ■ Check that have been investigated and found acceptable for information on the front of the range hood. Place the back of the panel into the rear channel and push the panel toward the center of the panel clear the front mounting...: Install a charcoal filter. Complete the Installation. 13. Reconnect power. 9 See the "Assistance or Service" section for use from your new range hood, read the "Range Hood Use" section. ■ Connect the green (or bare) ground wire (C) from the power supply to green ground screw in death, fire, or...
...Failure to make secure and airtight. ■ Check that have been investigated and found acceptable for information on the front of the range hood. Place the back of the panel into the rear channel and push the panel toward the center of the panel clear the front mounting...: Install a charcoal filter. Complete the Installation. 13. Reconnect power. 9 See the "Assistance or Service" section for use from your new range hood, read the "Range Hood Use" section. ■ Connect the green (or bare) ground wire (C) from the power supply to green ground screw in death, fire, or...
Installation Guide
Page 10
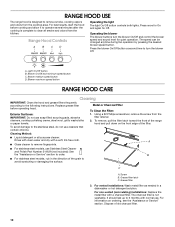
... metal filter as needed in the direction of the filter. For best results, start the hood before operating hood. A. Blower maximum speed button RANGE HOOD CARE Cleaning IMPORTANT: Clean the hood and grease filters frequently according to the stainless steel, do not use Stainless Steel Cleaner and...B. The charcoal filter is complete to clear all -purpose cleaner: Rinse with clean water and dry with a soft, lint-free cloth. Range Hood Controls A B CD Operating the light The light On/Off button controls both lights. Blower On/Off and minimum speed button C. Press once ...
... metal filter as needed in the direction of the filter. For best results, start the hood before operating hood. A. Blower maximum speed button RANGE HOOD CARE Cleaning IMPORTANT: Clean the hood and grease filters frequently according to the stainless steel, do not use Stainless Steel Cleaner and...B. The charcoal filter is complete to clear all -purpose cleaner: Rinse with clean water and dry with a soft, lint-free cloth. Range Hood Controls A B CD Operating the light The light On/Off button controls both lights. Blower On/Off and minimum speed button C. Press once ...
Installation Guide
Page 11
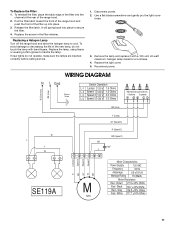
... 27.5 ±10% Ohms Red - To reinstall the filter, place the back edge of the range hood. 2. Replace the screw in the filter retainer. Pull the filter latch toward the front of the range hood and push the front of the new lamp, do not operate, make sure the lamps are inserted... correctly before calling service. 1. Replacing a Halogen Lamp Turn off the range hood and allow the halogen lamp to handle the lamp. To avoid damage or decreasing the life of the filter up into place. 3. White 117.7 ±...
... 27.5 ±10% Ohms Red - To reinstall the filter, place the back edge of the range hood. 2. Replace the screw in the filter retainer. Pull the filter latch toward the front of the range hood and push the front of the new lamp, do not operate, make sure the lamps are inserted... correctly before calling service. 1. Replacing a Halogen Lamp Turn off the range hood and allow the halogen lamp to handle the lamp. To avoid damage or decreasing the life of the filter up into place. 3. White 117.7 ±...