
Warranty Information
Page 1
..., to replace or repair house fuses, or to correct house wiring or plumbing. 2. For further assistance If you need further assistance, you can write to Whirlpool Corporation with the same precision used for assistance or service, please know the purchase date and the complete model and serial number of your appliance. Service calls to repair or replace appliance light bulbs, air filters or water filters. ASSISTANCE OR SERVICE When...
..., to replace or repair house fuses, or to correct house wiring or plumbing. 2. For further assistance If you need further assistance, you can write to Whirlpool Corporation with the same precision used for assistance or service, please know the purchase date and the complete model and serial number of your appliance. Service calls to repair or replace appliance light bulbs, air filters or water filters. ASSISTANCE OR SERVICE When...

Warranty Information
Page 2
... built-in -warranty service. Removal or replacement of trim, decorative panels, flooring, cabinetry, islands, countertops, drywall or other rights that interfere with the removal from state to state or province to better help by checking the "Assistance or Service" section or by this warranty. This warranty gives you specific legal rights, and you ever need service, first see the "Troubleshooting" section of the Use & Care Guide. DISCLAIMER OF REPRESENTATIONS OUTSIDE...
... built-in -warranty service. Removal or replacement of trim, decorative panels, flooring, cabinetry, islands, countertops, drywall or other rights that interfere with the removal from state to state or province to better help by checking the "Assistance or Service" section or by this warranty. This warranty gives you specific legal rights, and you ever need service, first see the "Troubleshooting" section of the Use & Care Guide. DISCLAIMER OF REPRESENTATIONS OUTSIDE...
Installation Guide
Page 1
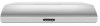
..." (91.4 CM) RANGE HOOD Installation Instructions and Use & Care Guide For questions about features, operation/performance, parts, accessories or service, call: 1-800-253-1301 or visit our website at www.whirlpool.com In Canada, for assistance, installation and service, call 1-800-807-6777 or visit our website at www.whirlpool.ca HOTTE D'ASPIRATION DE 30" (76,2 CM) ET 36" (91,4 CM) Instructions d'installation et Guide d'utilisation et d'entretien...
..." (91.4 CM) RANGE HOOD Installation Instructions and Use & Care Guide For questions about features, operation/performance, parts, accessories or service, call: 1-800-253-1301 or visit our website at www.whirlpool.com In Canada, for assistance, installation and service, call 1-800-807-6777 or visit our website at www.whirlpool.ca HOTTE D'ASPIRATION DE 30" (76,2 CM) ET 36" (91,4 CM) Instructions d'installation et Guide d'utilisation et d'entretien...
Installation Guide
Page 2
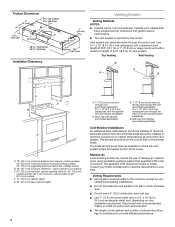
... and/or repair. ■ Sufficient air is needed for proper combustion and exhausting of gases through the flue (chimney) of California to the service panel. ■ Installation work and electrical wiring must always be allowed to exhaust hazardous or explosive materials and vapors. CAUTION: For general ventilating use cookware appropriate for Heating, Refrigeration and Air Conditioning Engineers (ASHRAE), and the local code authorities. ■ When cutting or drilling...
... and/or repair. ■ Sufficient air is needed for proper combustion and exhausting of gases through the flue (chimney) of California to the service panel. ■ Installation work and electrical wiring must always be allowed to exhaust hazardous or explosive materials and vapors. CAUTION: For general ventilating use cookware appropriate for Heating, Refrigeration and Air Conditioning Engineers (ASHRAE), and the local code authorities. ■ When cutting or drilling...
Installation Guide
Page 3
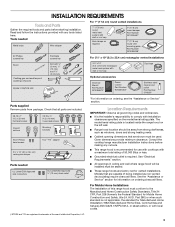
... Safety, title 24, HUD, Part 280) or when such standard is not applicable, the standard for use with cooktops with a maximum total rating of Acument Intellectual Properties, LLC. *For information on the model/serial rating plate. Read and follow the instructions provided with wall or roof cap Optional accessories Charcoal filter kit Part Number W10386873* Power cord kit Part Number W10355452* Duct tape Stainless steel cleaner and polish Part Number 31462A* Parts supplied Remove parts from strong draft areas, such as non-vented (recirculating) require charcoal filters.
... Safety, title 24, HUD, Part 280) or when such standard is not applicable, the standard for use with cooktops with a maximum total rating of Acument Intellectual Properties, LLC. *For information on the model/serial rating plate. Read and follow the instructions provided with wall or roof cap Optional accessories Charcoal filter kit Part Number W10386873* Power cord kit Part Number W10355452* Duct tape Stainless steel cleaner and polish Part Number 31462A* Parts supplied Remove parts from strong draft areas, such as non-vented (recirculating) require charcoal filters.
Installation Guide
Page 4
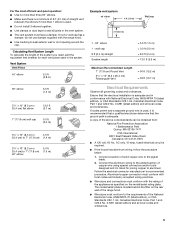
...; The length of vent system and number of elbows should be as close as possible to minimize conduction of outside temperatures as part of the house. Vent system can terminate either through the roof or wall. Venting Requirements ■ Vent system must terminate to provide efficient performance. Plastic or metal foil vent is optional for vent system. B. Consult your HVAC professional for 36" (91.4 cm) models. Use...
...; The length of vent system and number of elbows should be as close as possible to minimize conduction of outside temperatures as part of the house. Vent system can terminate either through the roof or wall. Venting Requirements ■ Vent system must terminate to provide efficient performance. Plastic or metal foil vent is optional for vent system. B. Consult your HVAC professional for 36" (91.4 cm) models. Use...
Installation Guide
Page 5
... Vent System Length To calculate the length of solid copper wire to seal exterior wall or roof opening around the cap. Follow the electrical connector manufacturer's recommended procedure. If codes permit and a separate ground wire is used . ■ Do not install 2 elbows together. ■ Use clamps or duct tape to seal all governing codes and ordinances. Ensure that the ground path is located behind the filter on the model/serial rating plate. Connect a section...
... Vent System Length To calculate the length of solid copper wire to seal exterior wall or roof opening around the cap. Follow the electrical connector manufacturer's recommended procedure. If codes permit and a separate ground wire is used . ■ Do not install 2 elbows together. ■ Use clamps or duct tape to seal all governing codes and ordinances. Ensure that the ground path is located behind the filter on the model/serial rating plate. Connect a section...
Installation Guide
Page 6
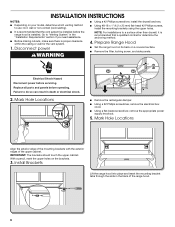
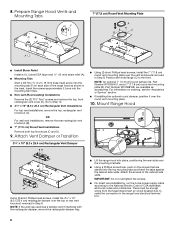
... x 1" (4.2 x 25 mm) flat-head #2 Phillips screws, install the mounting brackets using the upper holes. Electrical Shock Hazard Disconnect power before operating. With a pencil, mark the upper holes on a covered surface. ■ Remove the filter, locking screw, and side panels. Prepare Range Hood ■ Set the range hood on its back on the brackets. 3. INSTALLATION INSTRUCTIONS NOTES: ■ Depending on your model, determine which venting method to use: roof, wall or non-vented (recirculating). ■ It is recommended that...
... x 1" (4.2 x 25 mm) flat-head #2 Phillips screws, install the mounting brackets using the upper holes. Electrical Shock Hazard Disconnect power before operating. With a pencil, mark the upper holes on a covered surface. ■ Remove the filter, locking screw, and side panels. Prepare Range Hood ■ Set the range hood on its back on the brackets. 3. INSTALLATION INSTRUCTIONS NOTES: ■ Depending on your model, determine which venting method to use: roof, wall or non-vented (recirculating). ■ It is recommended that...
Installation Guide
Page 7
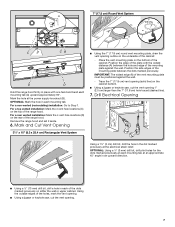
... 7. Place the vent mounting plate on the bottom of the mounting plate between the hole and edge of the vent mounting plate must be positioned against the wall. Position the side edges of the cabinet. For a top vented installation: Mark the 4 vent hole locations (C) on the top of the dots marked previously on the rear of the cabinet: - Remove the range hood and set it aside. 6. Drill Electrical Opening Using a 1¹...
... 7. Place the vent mounting plate on the bottom of the mounting plate between the hole and edge of the vent mounting plate must be positioned against the wall. Position the side edges of the cabinet. For a top vented installation: Mark the 4 vent hole locations (C) on the top of the dots marked previously on the rear of the cabinet: - Remove the range hood and set it aside. 6. Drill Electrical Opening Using a 1¹...
Installation Guide
Page 8
... Vent Damper ■ Using (2) short Phillips head screws, install the 7" (17.8 cm) round vent mounting plate over the round vent mounting plate. 10. There must be enough wiring from the fused disconnect (or circuit breaker) box to the National Electric Code or CSA standards and local codes and ordinances. NOTE: If the wall cap used has a damper and it over the vent knockouts removed in the range hood electrical terminal box. 8 NOTE: An optional 7" (17.8 cm) round damper (A), Part Number W10355451, and a 7" (17.8 cm) round vent mounting plate (B), Part Number...
... Vent Damper ■ Using (2) short Phillips head screws, install the 7" (17.8 cm) round vent mounting plate over the round vent mounting plate. 10. There must be enough wiring from the fused disconnect (or circuit breaker) box to the National Electric Code or CSA standards and local codes and ordinances. NOTE: If the wall cap used has a damper and it over the vent knockouts removed in the range hood electrical terminal box. 8 NOTE: An optional 7" (17.8 cm) round damper (A), Part Number W10355451, and a 7" (17.8 cm) round vent mounting plate (B), Part Number...
Installation Guide
Page 9
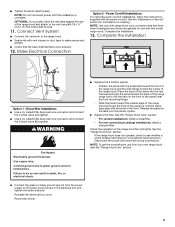
... the outside edge of the range hood and push the front of the range hood and attach to green ground screw in place. ■ Replace the filter. OPTIONAL: If you prefer, bend the rear tabs against the rear of the panel up until the panel tabs align with this model range hood. Connect ground wire to the wall using #8-18 x 4.2 x 16 mm) truss-head screws. 11. For non-vented (recirculating) installations: Install a charcoal filter. See the "Range Hood Care...
... the outside edge of the range hood and push the front of the range hood and attach to green ground screw in place. ■ Replace the filter. OPTIONAL: If you prefer, bend the rear tabs against the rear of the panel up until the panel tabs align with this model range hood. Connect ground wire to the wall using #8-18 x 4.2 x 16 mm) truss-head screws. 11. For non-vented (recirculating) installations: Install a charcoal filter. See the "Range Hood Care...
Installation Guide
Page 10
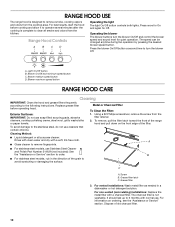
... following instructions. Cleaning Method: ■ Liquid detergent or all smoke and odors from the kitchen. Grease filter latch C. For information on the front edge of old charcoal filter. 10 For best results, start the hood before operating hood. The speed can be changed anytime during fan operation by pressing the desired blower speed button. Light On/Off button B. Dispose of the filter. Range Hood Controls A B CD Operating the light The light On/Off button controls both lights. B ■ For stainless steel models, rub...
... following instructions. Cleaning Method: ■ Liquid detergent or all smoke and odors from the kitchen. Grease filter latch C. For information on the front edge of old charcoal filter. 10 For best results, start the hood before operating hood. The speed can be changed anytime during fan operation by pressing the desired blower speed button. Light On/Off button B. Dispose of the filter. Range Hood Controls A B CD Operating the light The light On/Off button controls both lights. B ■ For stainless steel models, rub...
Installation Guide
Page 11
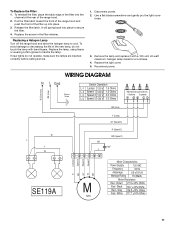
... service. 1. WIRING DIAGRAM N L Gnd Ground Screw Switch Operation L-1 Lamps 120 V 1.5 Ohms L-2 Speed 1 120 V 1.5 Ohms L-3 Speed 2 120 V 2.0 Ohms L-4 Speed 3 120 V 2.5 Ohms Mechanical push buttons 4 buttons 3 speeds W (Common) BK (Line) BK (Line) W Y W Y (Lamp) GY (Speed 3) R (Speed 2) BR (Speed 1) BR 8uF Y Y Speed 1 Speed 2 Speed 3 Common SE119A R BK GY W M S15 BR Motor Characteristics Power Supply 120 VAC Frequency 60 Hz Amperage 0.9 ±10% A Wattage Rating 110 Watts Motor Resistance Red - Gray 86.8 ±10% Ohms Red - To Replace the Filter...
... service. 1. WIRING DIAGRAM N L Gnd Ground Screw Switch Operation L-1 Lamps 120 V 1.5 Ohms L-2 Speed 1 120 V 1.5 Ohms L-3 Speed 2 120 V 2.0 Ohms L-4 Speed 3 120 V 2.5 Ohms Mechanical push buttons 4 buttons 3 speeds W (Common) BK (Line) BK (Line) W Y W Y (Lamp) GY (Speed 3) R (Speed 2) BR (Speed 1) BR 8uF Y Y Speed 1 Speed 2 Speed 3 Common SE119A R BK GY W M S15 BR Motor Characteristics Power Supply 120 VAC Frequency 60 Hz Amperage 0.9 ±10% A Wattage Rating 110 Watts Motor Resistance Red - Gray 86.8 ±10% Ohms Red - To Replace the Filter...
Installation Guide
Page 12
..., to replace or repair house fuses, or to correct house wiring or plumbing. 2. For further assistance If you need to order replacement parts, we recommend that is required to obtain service under this limited warranty does not apply. ASSISTANCE OR SERVICE When calling for assistance or service, please know the purchase date and the complete model and serial number of your major appliance, to instruct you use only...
..., to replace or repair house fuses, or to correct house wiring or plumbing. 2. For further assistance If you need to order replacement parts, we recommend that is required to obtain service under this limited warranty does not apply. ASSISTANCE OR SERVICE When calling for assistance or service, please know the purchase date and the complete model and serial number of your major appliance, to instruct you use only...
Installation Guide
Page 13
... allow the exclusion or limitation of trim, decorative panels, flooring, cabinetry, islands, countertops, drywall or other rights that vary from state to state or province to province. Dealer name Address Phone number Model number Serial number Purchase date 13 Major appliances with servicing, removal or replacement of merchantability or fitness, so this warranty. 8. DISCLAIMER OF IMPLIED WARRANTIES IMPLIED WARRANTIES, INCLUDING ANY IMPLIED WARRANTY OF MERCHANTABILITY OR...
... allow the exclusion or limitation of trim, decorative panels, flooring, cabinetry, islands, countertops, drywall or other rights that vary from state to state or province to province. Dealer name Address Phone number Model number Serial number Purchase date 13 Major appliances with servicing, removal or replacement of merchantability or fitness, so this warranty. 8. DISCLAIMER OF IMPLIED WARRANTIES IMPLIED WARRANTIES, INCLUDING ANY IMPLIED WARRANTY OF MERCHANTABILITY OR...

