Maytag UXL6036YSS Support and Manuals
Get Help and Manuals for this Maytag item
View All Support Options Below
Free Maytag UXL6036YSS manuals!
Problems with Maytag UXL6036YSS?
Ask a Question
Free Maytag UXL6036YSS manuals!
Problems with Maytag UXL6036YSS?
Ask a Question
Popular Maytag UXL6036YSS Manual Pages
Installation Guide - Page 2
... manual and on your appliance.
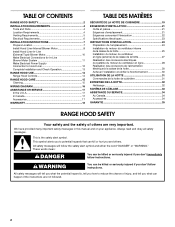
Always read and obey all safety messages. This is , tell you how to reduce the chance of others . TABLE OF CONTENTS
RANGE HOOD SAFETY 2
INSTALLATION REQUIREMENTS 4 Tools and Parts 4 Location Requirements 4 Venting Requirements 5 Electrical Requirements 6
INSTALLATION INSTRUCTIONS 7 Prepare Location 7 Install Hood Liner Internal Blower Motor 8 Install...
Installation Guide - Page 3
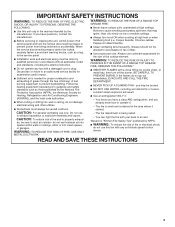
..., then turn hood ON when cooking at high settings. BE CAREFUL TO PREVENT BURNS. The fire is being switched on low or medium settings.
■ Always turn off at service panel and lock the service disconnecting means to operate it started.
- aBased on fan or filter.
■ Use proper pan size. IMPORTANT SAFETY INSTRUCTIONS
WARNING: TO...
Installation Guide - Page 4
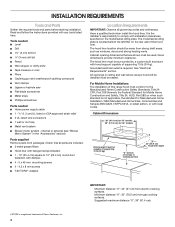
... Blower motor system - Have a qualified technician install the hood liner. Read and follow the instructions provided with local codes. Check that are included. ■ 3 metal grease filters ■ Hood liner with halogen lamps installed. ■ 1 - 10" (25.4 cm) square to comply with hood support capable of canopy to the Manufactured Home Construction Safety Standards, Title 24 CFR, Part...
Installation Guide - Page 5

... metal vent only. Venting Methods
Typical Internal Blower Motor System Venting Installations A 10" (25.4 cm) round vent system is not recommended. NOTE: Flexible vent is needed .
The damper should be kept to a minimum to provide efficient performance. Roof cap
A. 10" (25.4 cm) round vent B.
The specified CFM varies from locale to minimize backward cold...
Installation Guide - Page 7

...the "Install Range Hood Internal Blower Motor" section and the instructions supplied with damper to the wall. WARNING
A
B
C
G
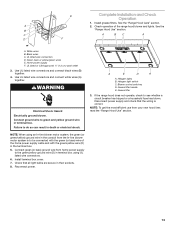
A. Complete Preparation
1. Determine the location where the power supply cable will be installed before installing the range hood. Remove terminal box cover and set aside.
7. Mark the cutout for the rectangular clearance hole for the upper hood liner housing...
Installation Guide - Page 8

... required for motor spring clip C. Motor spring clip (single motor assembly location) E. Install Range Hood Liner
B
The hood liner attaches to the inside top or back (alternate location on some models) of the hood liner at the proper location for the selected motor system. See "Blower Motor System" in the Use and Care Guide.
2.
DE C
A. 4.2 x 8 mm screws (3) for motor support bracket...
Installation Guide - Page 9
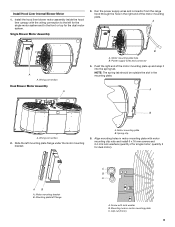
... front or top for the dual motor system. Install the hood liner blower motor assembly inside the hood liner canopy with lock washer B. Align mounting holes in the mounting plate. Motor mounting bracket B. Wiring connection
Dual Blower Motor Assembly A
B
A. Push the right end of the motor mounting plate. quantity 5 for single motor;
Single Blower Motor Assembly
3. Wiring connection...
Installation Guide - Page 10
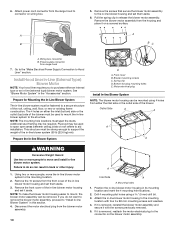
... to support the weight of the blower. Remove the front cover of the blower must be strong enough to move the in -line blower housing and set them aside.
3. Remove the screws that secure the blower motor assembly to the in -line blower motor system to mount the in -line blower motor housing and set them aside.
6. Pull the spring clip to Hood Liner...
Installation Guide - Page 11
...With the hood liner mounted (see the "Install Hood Liner" section), run the ¹⁄₂" (1.3 cm) wiring conduit between the in -line blower system and seal all joints with clamps. B C
D
E
F
A
G
H
I . Motor electrical plug cable
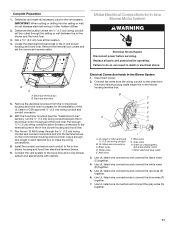
3. Make Electrical Connections for the vent system. Connect the vent system to make all parts and panels before servicing. Black wires...
Installation Guide - Page 12
...4. With the hood liner mounted (see the "Install Hood Liner"
section), locate the wiring cable connector inside the hood liner and install a ¹⁄...blower housing and secure it with the in -line blower terminal box cover and screw.
10.
Electrical Shock Hazard Disconnect power before operating. Replace all parts and panels before servicing. Locate terminal box inside the hood liner...
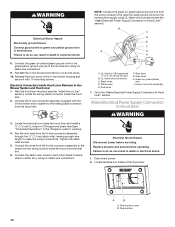
Installation Guide - Page 13
... hood liner, read the "Range Hood Use" section.
13 Blower control switches D. If the range hood does not operate, check to be connected with the green (or bare) wire of the range hood blower and lights.
A
2. White wires B.
Halogen light switch C. Connect ground wire to the green/yellow ground wire (D) in terminal box using an In-line blower motor...
Installation Guide - Page 17
...your request. In Canada
Call the Whirlpool Canada LP Customer eXperience Centre toll free: 1-800-807-6777.
For further assistance If you need to local dealers, repair parts distributors, and service companies. Use UXB1200DYS - 1200 CFM Internal Blower Motor System above a cooktop with the 48" hood liner.
600 CFM Internal Blower Motor System - Factory specified parts will help us or...
Installation Guide - Page 18
... with original model/serial numbers that have been removed, altered or cannot be repaired in the home and only in-home service is used in which it . This warranty is not installed in accordance with the product, Whirlpool Corporation or Whirlpool Canada LP (hereafter "Whirlpool") will need it was purchased. After checking "Troubleshooting," you ever need to instruct you need...
Warranty Information - Page 1

Service must provide proof of purchase or installation date for in accordance with published installation instructions.
11. Outside the 50 United States and Canada, this limited warranty. Consumable parts are excluded from the date of the Use & Care Guide. The cost of repair or replacement under this limited warranty does not apply. IMPLIED WARRANTIES, INCLUDING WARRANTIES OF ...
Dimension Guide - Page 1
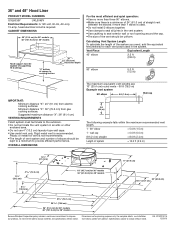
... equivalent vent lengths are for each vent piece used . Specifications subject to cooking surface
22" (55.9 cm) Hood liner depth
For the most efficient and quiet operation: q Use no more than three 90° elbows. q The size of the vent should be capable of supporting 75 lb (34 kg)
"X" bottom of the system you...
Maytag UXL6036YSS Reviews
We have not received any reviews for Maytag yet.