Installation Instructions
Page 2
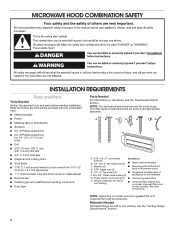
... User Instructions.) NOTE: Depending on reordering, see the "Replacement Parts" section. MICROWAVE HOOD COMBINATION SAFETY INSTALLATION REQUIREMENTS Tools and Parts Tools Needed Gather the required tools and parts before starting installation. Materials Needed Standard fittings for wood studs.... cm) drill bits ■■ 3/4" (1.9 cm) hole saw ■■ Caulking gun and weatherproof caulking compound ■■ Duct tape Parts Needed For information on model, aluminum grease filter and charcoal filter may not be sure to back of microwave oven) E. 1/4" x 2" lag screws...
... User Instructions.) NOTE: Depending on reordering, see the "Replacement Parts" section. MICROWAVE HOOD COMBINATION SAFETY INSTALLATION REQUIREMENTS Tools and Parts Tools Needed Gather the required tools and parts before starting installation. Materials Needed Standard fittings for wood studs.... cm) drill bits ■■ 3/4" (1.9 cm) hole saw ■■ Caulking gun and weatherproof caulking compound ■■ Duct tape Parts Needed For information on model, aluminum grease filter and charcoal filter may not be sure to back of microwave oven) E. 1/4" x 2" lag screws...
Installation Instructions
Page 3
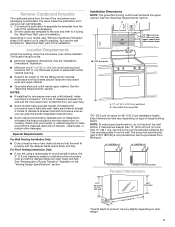
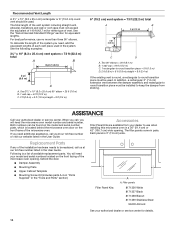
... microwave oven so that the vent fit properly and the damper blade opens freely and fully. But use the wall template for "Mark Rear Wall" part of installation. See the "Installation Dimensions" illustration. ■■ Minimum one 2" x 4" (5.1 x 10.2 cm) wood wall stud and minimum 3/8" ...oven so you are using a rectangular-to-round transition piece, the 3" (7.6 cm) clearance needs to it during the "Mark Rear Wall" part of the installation. See the "Electrical Requirements" section. Exact dimensions may vary depending on door design. 3 Remove Cardboard Template The cardboard piece...
... microwave oven so that the vent fit properly and the damper blade opens freely and fully. But use the wall template for "Mark Rear Wall" part of installation. See the "Installation Dimensions" illustration. ■■ Minimum one 2" x 4" (5.1 x 10.2 cm) wood wall stud and minimum 3/8" ...oven so you are using a rectangular-to-round transition piece, the 3" (7.6 cm) clearance needs to it during the "Mark Rear Wall" part of the installation. See the "Electrical Requirements" section. Exact dimensions may vary depending on door design. 3 Remove Cardboard Template The cardboard piece...
Installation Instructions
Page 10
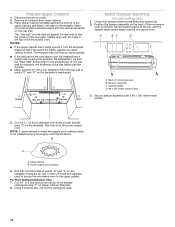
... cord bushing 6. Prepare Upper Cabinet 1. Damper assembly C. Install Damper Assembly (for two 1/4-20 x 3" bolts and washers used to secure the microwave oven to the thickest part of the shaded rectangular area "F" on the template. These are for wall venting only) 1. Secure damper assembly with the holes in the top of the...
... cord bushing 6. Prepare Upper Cabinet 1. Damper assembly C. Install Damper Assembly (for two 1/4-20 x 3" bolts and washers used to secure the microwave oven to the thickest part of the shaded rectangular area "F" on the template. These are for wall venting only) 1. Secure damper assembly with the holes in the top of the...
Installation Instructions
Page 14
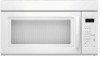
... used . Each panel is a list of the microwave oven. For best performance, use when installing this microwave oven in the "Tools and Parts" section) Filler Panel Kits: A A. Accessories Filler Panel Kits are available from sticking. You will need the microwave oven model number and serial... the door. ■■ Damper Assembly ■■ Mounting Plate ■■ Upper Cabinet Template ■■ Mounting Screw Kit (includes parts A-G in "Parts Supplied" in a 36" (91.4 cm) or 42" (106.7 cm) wide opening , behind the microwave oven door on the front frame of...
... used . Each panel is a list of the microwave oven. For best performance, use when installing this microwave oven in the "Tools and Parts" section) Filler Panel Kits: A A. Accessories Filler Panel Kits are available from sticking. You will need the microwave oven model number and serial... the door. ■■ Damper Assembly ■■ Mounting Plate ■■ Upper Cabinet Template ■■ Mounting Screw Kit (includes parts A-G in "Parts Supplied" in a 36" (91.4 cm) or 42" (106.7 cm) wide opening , behind the microwave oven door on the front frame of...


