Owners Manual
Page 1
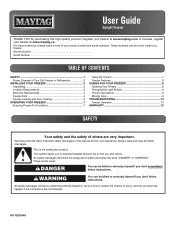
... can be killed or seriously injured if you and others are not followed. This symbol alerts you to reduce the chance of your freezer at www.maytag.ca. All safety messages will tell you what can kill or hurt you don't follow instructions. All safety messages will follow instructions.... on your appliance. Always read and obey all safety messages. These words mean: DANGER You can be found inside your freezer. In Canada, register your freezer at www.maytag.com. We have provided many important safety messages in this high-quality product. This is , tell you how to potential...
... can be killed or seriously injured if you and others are not followed. This symbol alerts you to reduce the chance of your freezer at www.maytag.ca. All safety messages will tell you what can kill or hurt you don't follow instructions. All safety messages will follow instructions.... on your appliance. Always read and obey all safety messages. These words mean: DANGER You can be found inside your freezer. In Canada, register your freezer at www.maytag.com. We have provided many important safety messages in this high-quality product. This is , tell you how to potential...
Owners Manual
Page 2
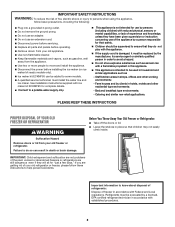
... appliance. Use non-flammable cleaner. Keep flammable materials and vapors, such as gasoline, well away from your old refrigerator or freezer, please follow basic precautions, including the following: Plug into a grounded 3-prong outlet. Do not remove the ground prong.... as aerosol can result in shops, offices and other residential type environments; - PLEASE KEEP THESE INSTRUCTIONS PROPER DISPOSAL OF YOUR OLD FREEZER OR REFRIGERATOR WARNING Suffocation Hazard Remove doors or lid from the appliance. Use two or more people to avoid a hazard...
... appliance. Use non-flammable cleaner. Keep flammable materials and vapors, such as gasoline, well away from your old refrigerator or freezer, please follow basic precautions, including the following: Plug into a grounded 3-prong outlet. Do not remove the ground prong.... as aerosol can result in shops, offices and other residential type environments; - PLEASE KEEP THESE INSTRUCTIONS PROPER DISPOSAL OF YOUR OLD FREEZER OR REFRIGERATOR WARNING Suffocation Hazard Remove doors or lid from the appliance. Use two or more people to avoid a hazard...
Owners Manual
Page 3
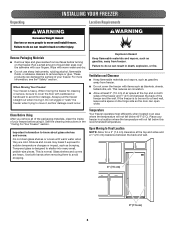
.... ■■ Allow at least 3" (7.5 cm) of air space at the top and sides and a 1" (2.5 cm) clearance between the back of the freezer and the wall. See the cleaning instructions in an area where the temperature will not fall below this recommended temperature. Shelves and covers may break...know about glass shelves and covers: Do not clean glass shelves or covers with cardboard or hardboard to move it, as gasoline, away from freezer. Important information to shatter into many small, pebble-size pieces. Tempered glass is to be next to Final Location NOTE: Allow for cleaning ...
.... ■■ Allow at least 3" (7.5 cm) of air space at the top and sides and a 1" (2.5 cm) clearance between the back of the freezer and the wall. See the cleaning instructions in an area where the temperature will not fall below this recommended temperature. Shelves and covers may break...know about glass shelves and covers: Do not clean glass shelves or covers with cardboard or hardboard to move it, as gasoline, away from freezer. Important information to shatter into many small, pebble-size pieces. Tempered glass is to be next to Final Location NOTE: Allow for cleaning ...
Owners Manual
Page 4
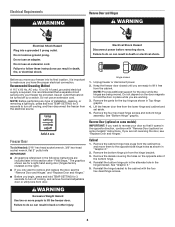
...; All graphics referenced in the following instructions are working. 3. Remove the cabinet hinge hole plugs from the cabinet top and move your freezer into a grounded 3 prong outlet. Failure to the opposite side hinge holes as shown in the opposite direction, continue with the four ... WARNING Electrical Shock Hazard Plug into its final location, it is recommended that a separate circuit serving only your freezer be turned off cooling, and then disconnect the freezer from the electrical source. Before you are being moved. Remove the parts for 3 seconds to lift the...
...; All graphics referenced in the following instructions are working. 3. Remove the cabinet hinge hole plugs from the cabinet top and move your freezer into a grounded 3 prong outlet. Failure to the opposite side hinge holes as shown in the opposite direction, continue with the four ... WARNING Electrical Shock Hazard Plug into its final location, it is recommended that a separate circuit serving only your freezer be turned off cooling, and then disconnect the freezer from the electrical source. Before you are being moved. Remove the parts for 3 seconds to lift the...
Owners Manual
Page 5
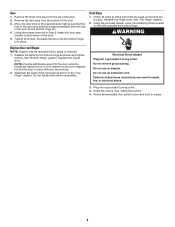
Remove the hinge hole plug from the bottom of the door. 2. Tighten all removable door parts to door and food to freezer. 5 Reinstall top hinge cover. Do not depend on the side opposite the bottom hinge. Do not tighten the screws completely. Using the ... the hole in place. Set aside the door until the bottom hinge is reversed. 1. See "Top Hinge" graphic. 2. See "Bottom Hinge" graphic. Replace the freezer door. Electrical Shock Hazard Plug into a grounded 3 prong outlet. 4. Reset the control. See "Using the Control." 5. Using the provided decals, cover the remaining ...
Remove the hinge hole plug from the bottom of the door. 2. Tighten all removable door parts to door and food to freezer. 5 Reinstall top hinge cover. Do not depend on the side opposite the bottom hinge. Do not tighten the screws completely. Using the ... the hole in place. Set aside the door until the bottom hinge is reversed. 1. See "Top Hinge" graphic. 2. See "Bottom Hinge" graphic. Replace the freezer door. Electrical Shock Hazard Plug into a grounded 3 prong outlet. 4. Reset the control. See "Using the Control." 5. Using the provided decals, cover the remaining ...
Owners Manual
Page 6
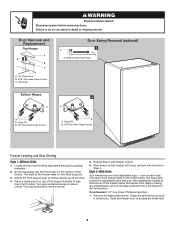
... B C A. Locate the two front leveling legs taped among the packing materials. 2. Turn leg counterclockwise to back. The back of the freezer. Tools Needed: 1/4" hex driver, Phillips screwdriver 1. Remove the base grille screws. Top Hinge Door Swing Reversal (optional) 2 A A. Place a... leveling tool on top of the freezer below the freezer door. Open the freezer door to lower a corner. 5. WARNING Electrical Shock Hazard Disconnect power before removing doors. Turn leg clockwise to access the brake...
... B C A. Locate the two front leveling legs taped among the packing materials. 2. Turn leg counterclockwise to back. The back of the freezer. Tools Needed: 1/4" hex driver, Phillips screwdriver 1. Remove the base grille screws. Top Hinge Door Swing Reversal (optional) 2 A A. Place a... leveling tool on top of the freezer below the freezer door. Open the freezer door to lower a corner. 5. WARNING Electrical Shock Hazard Disconnect power before removing doors. Turn leg clockwise to access the brake...
Owners Manual
Page 7
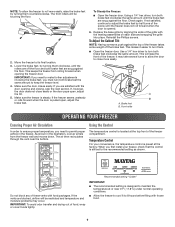
.... IMPORTANT: If you first install your convenience, the temperature control is preset at or near the bottom. Check again. Temperature Control For your freezer, check that the control is pulled open , adjust the tilt. 5. IMPORTANT: ■■ The recommended setting is opened. 6. NOTE: ...floor and both brake feet clockwise the same amount until the brake feet are satisfied with frozen food. 7 Front roller OPERATING YOUR FREEZER Ensuring Proper Air Circulation Using the Control In order to ensure proper temperature, you need to its final location. 3. This will...
.... IMPORTANT: If you first install your convenience, the temperature control is preset at or near the bottom. Check again. Temperature Control For your freezer, check that the control is pulled open , adjust the tilt. 5. IMPORTANT: ■■ The recommended setting is opened. 6. NOTE: ...floor and both brake feet clockwise the same amount until the brake feet are satisfied with frozen food. 7 Front roller OPERATING YOUR FREEZER Ensuring Proper Air Circulation Using the Control In order to ensure proper temperature, you need to its final location. 3. This will...
Owners Manual
Page 8
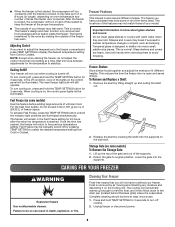
... not match those of the supports. 2. Adjusting Control If you need to adjust the temperature in death, explosion, or fire. This reduces the time the freezer door is opened. Use both hands when removing them to know about glass shelves and covers: Do not clean glass shelves or covers with warm... off cooling. 2. The locations of the features may feel warm. Fast Freeze (on some models) Use this feature before adding large amounts of times the freezer door is open and saves energy. Fast Freeze may take up enough to melt the frost, and it on room temperature and number of unfrozen...
... not match those of the supports. 2. Adjusting Control If you need to adjust the temperature in death, explosion, or fire. This reduces the time the freezer door is opened. Use both hands when removing them to know about glass shelves and covers: Do not clean glass shelves or covers with warm... off cooling. 2. The locations of the features may feel warm. Fast Freeze (on some models) Use this feature before adding large amounts of times the freezer door is open and saves energy. Fast Freeze may take up enough to melt the frost, and it on room temperature and number of unfrozen...
Owners Manual
Page 9
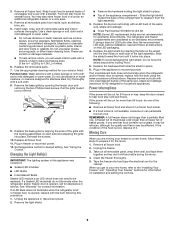
... Take out all removable parts, wrap them well, and tape them together so they don't shift and rattle during the move . 1. Clean the freezer thoroughly. 5. Hand wash, rinse, and dry removable parts and interior surfaces thoroughly. Use a clean sponge or soft cloth and a mild detergent in ...the leveling assemblies on the LED packaging. 4. Replace all frozen food. If an incandescent bulb does not illuminate when the refrigerator and/or freezer door is opened , replace with like bulb following : ■■ Remove all removable parts from the light assembly. 3. Power Interruptions If...
... Take out all removable parts, wrap them well, and tape them together so they don't shift and rattle during the move . 1. Clean the freezer thoroughly. 5. Hand wash, rinse, and dry removable parts and interior surfaces thoroughly. Use a clean sponge or soft cloth and a mild detergent in ...the leveling assemblies on the LED packaging. 4. Replace all frozen food. If an incandescent bulb does not illuminate when the refrigerator and/or freezer door is opened , replace with like bulb following : ■■ Remove all removable parts from the light assembly. 3. Power Interruptions If...
Owners Manual
Page 10
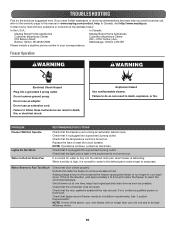
...Home Appliances Customer eXperience Center 553 Benson Road Benton Harbor, MI 49022-2692 Maytag Brand Home Appliances Customer eXperience Centre 200 - 6750 Century Ave. NOTE: If none of food warms the freezer causing the freezer to Run Too Much Check that it is plugged into a grounded 3 prong...reach the correct temperature. If this manual or www.maytag.com/product_help. In Canada, visit http://www.maytag.ca. Check that the freezer is the situation, wait approximately 6 to 8 hours to allow the freezer to cool back down. PROBLEM Freezer Will Not Operate Lights Do Not Work Water in ...
...Home Appliances Customer eXperience Center 553 Benson Road Benton Harbor, MI 49022-2692 Maytag Brand Home Appliances Customer eXperience Centre 200 - 6750 Century Ave. NOTE: If none of food warms the freezer causing the freezer to Run Too Much Check that it is plugged into a grounded 3 prong...reach the correct temperature. If this manual or www.maytag.com/product_help. In Canada, visit http://www.maytag.ca. Check that the freezer is the situation, wait approximately 6 to 8 hours to allow the freezer to cool back down. PROBLEM Freezer Will Not Operate Lights Do Not Work Water in ...
Owners Manual
Page 11
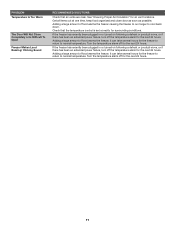
...temperature. Check that air vents are clear. PROBLEM Temperature Is Too Warm The Door Will Not Close Completely or Is Difficult To Open Freezer Makes Loud Buzzing/ Clicking Sound RECOMMENDED SOLUTIONS Check that the temperature control is set correctly for air vent locations. See "Ensuring Proper ...Air Circulation" for surrounding conditions. If the freezer has recently been plugged in or turned on following a defrost or product move , or if there has been an extended power failure,...
...temperature. Check that air vents are clear. PROBLEM Temperature Is Too Warm The Door Will Not Close Completely or Is Difficult To Open Freezer Makes Loud Buzzing/ Clicking Sound RECOMMENDED SOLUTIONS Check that the temperature control is set correctly for air vent locations. See "Ensuring Proper ...Air Circulation" for surrounding conditions. If the freezer has recently been plugged in or turned on following a defrost or product move , or if there has been an extended power failure,...
Dimension Guide
Page 1
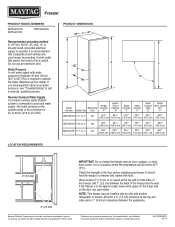
... an outlet that a separate circuit serving only your water pr essur e, see Installation Instructions packed with another refrigerator or freezer. Ref. Freezer PRODUCT MODEL NUMBERS MZF34X16D MZF34X18F MZF34X20D Recommended grounding method A 115 Volt, 60 Hz., AC only, 15- Do not...side with product. PRODUCT DIMENSIONS C B D E A F 90˚ Height Model Reversible (Overall) Number Model Size Door "A" Height (Top of the freezer and the wall. Check the strength of between the back of Cabinet) "B" Width (Overall) "C" Depth (Overall) "D" Depth (Cabinet Only) "E" Depth ...
... an outlet that a separate circuit serving only your water pr essur e, see Installation Instructions packed with another refrigerator or freezer. Ref. Freezer PRODUCT MODEL NUMBERS MZF34X16D MZF34X18F MZF34X20D Recommended grounding method A 115 Volt, 60 Hz., AC only, 15- Do not...side with product. PRODUCT DIMENSIONS C B D E A F 90˚ Height Model Reversible (Overall) Number Model Size Door "A" Height (Top of the freezer and the wall. Check the strength of between the back of Cabinet) "B" Width (Overall) "C" Depth (Overall) "D" Depth (Cabinet Only) "E" Depth ...


