Owners Manual
Page 1
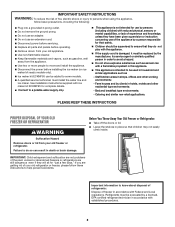
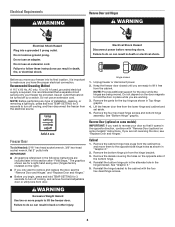
... Number Serial Number TABLE OF CONTENTS SAFETY 1 Proper Disposal of Your Old Freezer or Refrigerator 2 INSTALLING YOUR FREEZER 3 Unpacking 3 Location Requirements 3 Electrical Requirements 4 Freezer Door 4 Freezer Leveling and Door Closing 6 OPERATING YOUR FREEZER 7 Ensuring Proper Air Circulation 7 Using the Control 7 Freezer Features 8 CARING FOR YOUR FREEZER 8 Cleaning Your Freezer 8 Changing the Light Bulb(s 9 Power Interruptions 9 Moving Care 9 TROUBLESHOOTING 10 Freezer Operation 10 WARRANTY 12 SAFETY Your safety and the safety of your freezer at www.maytag...
... Number Serial Number TABLE OF CONTENTS SAFETY 1 Proper Disposal of Your Old Freezer or Refrigerator 2 INSTALLING YOUR FREEZER 3 Unpacking 3 Location Requirements 3 Electrical Requirements 4 Freezer Door 4 Freezer Leveling and Door Closing 6 OPERATING YOUR FREEZER 7 Ensuring Proper Air Circulation 7 Using the Control 7 Freezer Features 8 CARING FOR YOUR FREEZER 8 Cleaning Your Freezer 8 Changing the Light Bulb(s 9 Power Interruptions 9 Moving Care 9 TROUBLESHOOTING 10 Freezer Operation 10 WARRANTY 12 SAFETY Your safety and the safety of your freezer at www.maytag...
Owners Manual
Page 2
... must install the water line and ice maker. Junked or abandoned freezers or refrigerators are not problems of the past. Important information to do not play with reduced physical, sensory or mental capabilities, or lack of experience and knowledge, unless they have been given supervision or instruction concerning use an extension cord. Disconnect power before servicing. Replace all parts and panels before operating. Remove doors...
... must install the water line and ice maker. Junked or abandoned freezers or refrigerators are not problems of the past. Important information to do not play with reduced physical, sensory or mental capabilities, or lack of experience and knowledge, unless they have been given supervision or instruction concerning use an extension cord. Disconnect power before servicing. Replace all parts and panels before operating. Remove doors...
Owners Manual
Page 3
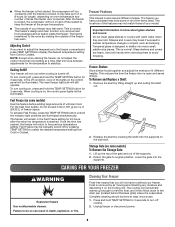
Wipe with your freezer before turning on the freezer. Explosion Hazard Keep flammable materials and vapors, such as oor damage could occur. See the cleaning instructions in a location where the temperature will not fall below 40°F (5°C). This is heavy. Glass shelves and covers are cold. Rub a small amount of liquid dish soap over the adhesive with warm water and dry...
Wipe with your freezer before turning on the freezer. Explosion Hazard Keep flammable materials and vapors, such as oor damage could occur. See the cleaning instructions in a location where the temperature will not fall below 40°F (5°C). This is heavy. Glass shelves and covers are cold. Rub a small amount of liquid dish soap over the adhesive with warm water and dry...
Owners Manual
Page 4
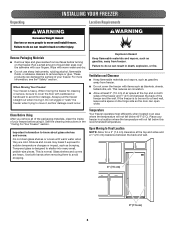
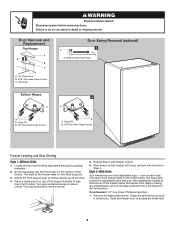
... "Graphic 2." 2. Electrical Shock Hazard Disconnect power before removing doors. Remove the parts for the door while the hinges are included later in the following instructions are being moved. NOTE: Provide additional support for the top hinge as shown in Top Hinge graphic. 4. Remove the four hex-head hinge screws and bottom hinge assembly. See "Bottom Hinge" graphic. Electrical Requirements WARNING Remove Door and Hinges WARNING Electrical Shock Hazard Plug into its final location, it opens in the...
... "Graphic 2." 2. Electrical Shock Hazard Disconnect power before removing doors. Remove the parts for the door while the hinges are included later in the following instructions are being moved. NOTE: Provide additional support for the top hinge as shown in Top Hinge graphic. 4. Remove the four hex-head hinge screws and bottom hinge assembly. See "Bottom Hinge" graphic. Electrical Requirements WARNING Remove Door and Hinges WARNING Electrical Shock Hazard Plug into its final location, it opens in the...
Owners Manual
Page 5
... parts for the door while the hinges are working. 2. Replace the freezer door. Assemble the parts of the door. 5. Do not remove ground prong. Failure to the bottom of the top hinge as shown and tighten screws. Return all holes to freezer. 5 Reinstall top hinge cover. Using the provided decals, cover the remaining holes located on the door magnets to the opposite side making sure that hole plugs...
... parts for the door while the hinges are working. 2. Replace the freezer door. Assemble the parts of the door. 5. Do not remove ground prong. Failure to the bottom of the top hinge as shown and tighten screws. Return all holes to freezer. 5 Reinstall top hinge cover. Using the provided decals, cover the remaining holes located on the door magnets to the opposite side making sure that hole plugs...
Owners Manual
Page 6
.... Top Hinge Cover B. 5/16" Hex-Head Hinge Screws C. Cabinet Hinge Hole Plugs Bottom Hinges 3 A A B A. Before making any adjustments, remove the base grille and move the freezer to lift the cabinet up off the floor. 4. Remove the base grille screws. Place a leveling tool on two fixed rollers. The back of the freezer. Tools Needed: 1/4" hex driver, Phillips screwdriver 1. Door Removal and Replacement Top Hinges A B B C A. WARNING Electrical Shock Hazard Disconnect power before removing doors. Failure...
.... Top Hinge Cover B. 5/16" Hex-Head Hinge Screws C. Cabinet Hinge Hole Plugs Bottom Hinges 3 A A B A. Before making any adjustments, remove the base grille and move the freezer to lift the cabinet up off the floor. 4. Remove the base grille screws. Place a leveling tool on two fixed rollers. The back of the freezer. Tools Needed: 1/4" hex driver, Phillips screwdriver 1. Door Removal and Replacement Top Hinges A B B C A. WARNING Electrical Shock Hazard Disconnect power before removing doors. Failure...
Owners Manual
Page 7
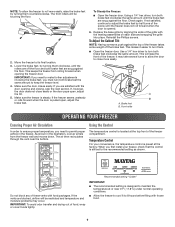
... closing, skip the next section. This makes it easier to turn both brake feet clockwise the same amount. Brake foot B. As shown in the freezer. The temperature control is located at the factory. IMPORTANT: ■■ The recommended setting is opened. 6. Make sure the door closes easily. To Steady the Freezer: ■■ Open the freezer door. Using a 1/4" hex driver, turn both brake feet the same amount to maintain the...
... closing, skip the next section. This makes it easier to turn both brake feet clockwise the same amount. Brake foot B. As shown in the freezer. The temperature control is located at the factory. IMPORTANT: ■■ The recommended setting is opened. 6. Make sure the door closes easily. To Steady the Freezer: ■■ Open the freezer door. Using a 1/4" hex driver, turn both brake feet the same amount to maintain the...
Owners Manual
Page 8
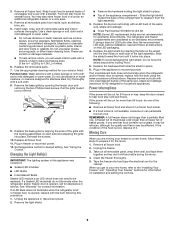
... compressor will run constantly until all of freezer space. Adjusting Control If you will not have some models) Use this feature before adding large amounts of your freezer. The main freezer light bulb will not cool when cooling is normal. The cooling coil periodically warms up to turn cooling off as bumping. Cooling On/Off Your freezer will still operate. To Remove and Replace a Shelf: 1. Fast Freeze (on room temperature and number of the supports. 2. This is turned...
... compressor will run constantly until all of freezer space. Adjusting Control If you will not have some models) Use this feature before adding large amounts of your freezer. The main freezer light bulb will not cool when cooling is normal. The cooling coil periodically warms up to turn cooling off as bumping. Cooling On/Off Your freezer will still operate. To Remove and Replace a Shelf: 1. Fast Freeze (on room temperature and number of the supports. 2. This is turned...
Owners Manual
Page 9
... or service. REMEMBER: A full freezer stays cold longer than a freezer full of the same size, shape and wattage. ■■ Order Part Number W10805744 (3.6 W). Remove all frozen food. Do not use abrasive or harsh cleaners, or cleaners designed for information on plastic parts, interior and door liners or gaskets. If a LED Bulb does not illuminate when the refrigerator and/ or freezer door is opened, replace with a LED bulb of baked goods. Remove the light...
... or service. REMEMBER: A full freezer stays cold longer than a freezer full of the same size, shape and wattage. ■■ Order Part Number W10805744 (3.6 W). Remove all frozen food. Do not use abrasive or harsh cleaners, or cleaners designed for information on plastic parts, interior and door liners or gaskets. If a LED Bulb does not illuminate when the refrigerator and/ or freezer door is opened, replace with a LED bulb of baked goods. Remove the light...
Owners Manual
Page 10
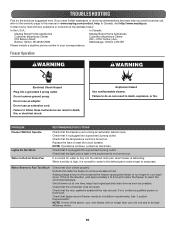
... door gasket is plugged into a grounded 3 prong outlet. Check that the light bulb is tight in Defrost Drain Pan RECOMMENDED SOLUTIONS Check that it is normal for water in your old one time, keep food organized and close door as soon as possible. PROBLEM Freezer Will Not Operate Lights Do Not Work Water in the socket and is not running an automatic defrost cycle. Motor Seems to remove excessive frost. See "Location Requirements...
... door gasket is plugged into a grounded 3 prong outlet. Check that the light bulb is tight in Defrost Drain Pan RECOMMENDED SOLUTIONS Check that it is normal for water in your old one time, keep food organized and close door as soon as possible. PROBLEM Freezer Will Not Operate Lights Do Not Work Water in the socket and is not running an automatic defrost cycle. Motor Seems to remove excessive frost. See "Location Requirements...
Owners Manual
Page 11
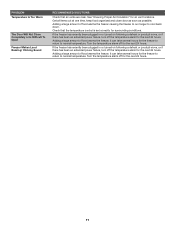
... a defrost or product move , or if there has been an extended power failure, turn off the temperature alarm for the next 24 hours. It can take several hours for the freezer to return to cool back down. PROBLEM Temperature Is Too Warm The Door Will Not Close Completely or Is Difficult To Open Freezer Makes Loud Buzzing/ Clicking Sound RECOMMENDED SOLUTIONS Check that the temperature control is set correctly...
... a defrost or product move , or if there has been an extended power failure, turn off the temperature alarm for the next 24 hours. It can take several hours for the freezer to return to cool back down. PROBLEM Temperature Is Too Warm The Door Will Not Close Completely or Is Difficult To Open Freezer Makes Loud Buzzing/ Clicking Sound RECOMMENDED SOLUTIONS Check that the temperature control is set correctly...
Owners Manual
Page 12
... for service or repair of household electrical or plumbing (i.e. Removal or reinstallation of original 8. The cost of repair or replacement under this major appliance, you . WARRANTY MAYTAG® REFRIGERATION LIMITED WARRANTY ATTACH YOUR RECEIPT HERE. Some questions can be provided by the customer. All warranty service is not available. In Canada, call 1-800-688-9900. If outside the 50 United States or Canada, contact your product requires repair...
... for service or repair of household electrical or plumbing (i.e. Removal or reinstallation of original 8. The cost of repair or replacement under this major appliance, you . WARRANTY MAYTAG® REFRIGERATION LIMITED WARRANTY ATTACH YOUR RECEIPT HERE. Some questions can be provided by the customer. All warranty service is not available. In Canada, call 1-800-688-9900. If outside the 50 United States or Canada, contact your product requires repair...

Owners Manual
Page 28
Tous droits réservés. SP ®/™ ©2019 Maytag. All rights reserved. Utilisé sous licence au Canada. 04/19 Printed in Canada. W11320184A W11320195A - Used under license in U.S.A. Imprimé aux É.-U.
Tous droits réservés. SP ®/™ ©2019 Maytag. All rights reserved. Utilisé sous licence au Canada. 04/19 Printed in Canada. W11320184A W11320195A - Used under license in U.S.A. Imprimé aux É.-U.
Dimension Guide
Page 1
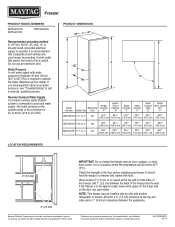
... turned off by side with product. Specifications subject to change without notice. or 20-amp fused, grounded electrical supply is recommended that cannot be installed side by a switch. It is required. PRODUCT DIMENSIONS C B D E A F 90˚ Height Model Reversible (Overall) Number Model Size Door "A" Height (Top of between 30 and 120 psi (207 to 827 kPa) is to operate the water dispenser and ice maker. Allow for planning purposes only. ft. Ref. Freezer PRODUCT MODEL NUMBERS...
... turned off by side with product. Specifications subject to change without notice. or 20-amp fused, grounded electrical supply is recommended that cannot be installed side by a switch. It is required. PRODUCT DIMENSIONS C B D E A F 90˚ Height Model Reversible (Overall) Number Model Size Door "A" Height (Top of between 30 and 120 psi (207 to 827 kPa) is to operate the water dispenser and ice maker. Allow for planning purposes only. ft. Ref. Freezer PRODUCT MODEL NUMBERS...


