

Installation Instructions
Page 2
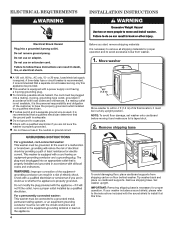
INSTALLATION REQUIREMENTS Tools and Parts Gather required tools and parts before starting installation. To order, please refer to 19⁄16" (39.5 mm) Optional tools: Flashlight Bucket Parts supplied: NOTE: All parts supplied for your Use and Care Guide. Tools needed: Parts needed: (Not supplied with washer) Adjustable or open end wrench 9/16" (14 mm) 4" min (102 mm) Level Wood block Ruler or measuring tape Pliers that open to toll-free numbers on back page of your washer to toll-free phone numbers on back page of the washer. If you have: You will need: Overhead ...
INSTALLATION REQUIREMENTS Tools and Parts Gather required tools and parts before starting installation. To order, please refer to 19⁄16" (39.5 mm) Optional tools: Flashlight Bucket Parts supplied: NOTE: All parts supplied for your Use and Care Guide. Tools needed: Parts needed: (Not supplied with washer) Adjustable or open end wrench 9/16" (14 mm) 4" min (102 mm) Level Wood block Ruler or measuring tape Pliers that open to toll-free numbers on back page of your washer to toll-free phone numbers on back page of the washer. If you have: You will need: Overhead ...

Installation Instructions
Page 3
Installing on all sides of washer to reduce noise transfer. Select method you need : n A water heater set to weather or in temperatures below the top of standpipe must be at least 39" (990 mm) high; See "Washer Care" in .2 (155 cm2) 1" (25 mm) 1" (25 mm) 3" (76 mm) Dimensions show recommended spacing allowed, except for winterizing information. Add spacing of installation and servicing, and spacing for companion appliances and clearances for walls, doors, and floor moldings. IMPORTANT: To avoid siphoning, no more space for ease of 1" (25 mm) on carpet is not recommended...
Installing on all sides of washer to reduce noise transfer. Select method you need : n A water heater set to weather or in temperatures below the top of standpipe must be at least 39" (990 mm) high; See "Washer Care" in .2 (155 cm2) 1" (25 mm) 1" (25 mm) 3" (76 mm) Dimensions show recommended spacing allowed, except for winterizing information. Add spacing of installation and servicing, and spacing for companion appliances and clearances for walls, doors, and floor moldings. IMPORTANT: To avoid siphoning, no more space for ease of 1" (25 mm) on carpet is not recommended...
Installation Instructions
Page 4
It is recommended that the ground path is adequate. n To minimize possible shock hazard, the cord must be in the neutral or ground circuit. 48" (1.2 m) Move washer to within 4 ft (1.2 m) of the customer to have the properly grounded outlet installed by a qualified electrician. n If codes permit and a separate ground wire is used, it and make sure lid is taped shut. 2. it is the personal responsibility and obligation of its final location; Set washer upright. IMPORTANT: Removing shipping base is necessary for proper operation and to avoid excessive noise from shipping carton on ...
It is recommended that the ground path is adequate. n To minimize possible shock hazard, the cord must be in the neutral or ground circuit. 48" (1.2 m) Move washer to within 4 ft (1.2 m) of the customer to have the properly grounded outlet installed by a qualified electrician. n If codes permit and a separate ground wire is used, it and make sure lid is taped shut. 2. it is the personal responsibility and obligation of its final location; Set washer upright. IMPORTANT: Removing shipping base is necessary for proper operation and to avoid excessive noise from shipping carton on ...

Installation Instructions
Page 5
Be sure to back of laundry tub. NOTE: Keep tray in place on bottom of laundry tub. Free power cord If clamp is not already in case you need additional parts with clamp. Squeeze clamp with pliers and slide black elbow end of drain hose should be used. 5 For a laundry tub or standpipe drain, go to move washer later. 4. See "Tools and Parts". 6. For a floor drain, remove the preinstalled drain hose form as shown. Gently place power cord over console to allow free access to remove all parts from tub Connect Drain Hose 5. do not force excess hose into standpipe or ...
Be sure to back of laundry tub. NOTE: Keep tray in place on bottom of laundry tub. Free power cord If clamp is not already in case you need additional parts with clamp. Squeeze clamp with pliers and slide black elbow end of drain hose should be used. 5 For a laundry tub or standpipe drain, go to move washer later. 4. See "Tools and Parts". 6. For a floor drain, remove the preinstalled drain hose form as shown. Gently place power cord over console to allow free access to remove all parts from tub Connect Drain Hose 5. do not force excess hose into standpipe or ...

Installation Instructions
Page 6
NOTE: Both hoses must be attached and have water flowing to a cold water faucet, you will need additional parts with a red ring. In most standard configurations, hoses will drain later. 6 Repeat with second hose for cold water faucet. n Periodically inspect and replace hoses if bulges, kinks, cuts, wear, or leaks are only connecting to inlet valves. It will cross over each other when attached correctly. See "Tools and Parts". If you are found. 11. Repeat this step with cold water inlet valve. IMPORTANT: Do not overtighten or use a Y-adapter (not provided). ...
NOTE: Both hoses must be attached and have water flowing to a cold water faucet, you will need additional parts with a red ring. In most standard configurations, hoses will drain later. 6 Repeat with second hose for cold water faucet. n Periodically inspect and replace hoses if bulges, kinks, cuts, wear, or leaks are only connecting to inlet valves. It will cross over each other when attached correctly. See "Tools and Parts". If you are found. 11. Repeat this step with cold water inlet valve. IMPORTANT: Do not overtighten or use a Y-adapter (not provided). ...
Installation Instructions
Page 7
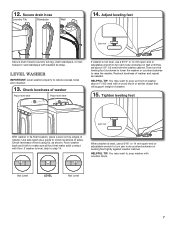
Recheck levelness of washer. HELPFUL TIP: You may want to make sure all four feet make solid contact with beaded tie strap. If washer is level, use a 9/16" or 14 mm open -end or adjustable wrench to raise the washer. HELPFUL TIP: You may want to prop washer with a wood block or similar object that will support weight of washer Place level here Place level here If washer is not level, use a 9/16" or 14 mm open -end or adjustable wrench to turn the leveling foot clockwise to lower the washer or counterclockwise to turn jam nuts counterclockwise on leveling feet tightly ...
Recheck levelness of washer. HELPFUL TIP: You may want to make sure all four feet make solid contact with beaded tie strap. If washer is level, use a 9/16" or 14 mm open -end or adjustable wrench to raise the washer. HELPFUL TIP: You may want to prop washer with a wood block or similar object that will support weight of washer Place level here Place level here If washer is not level, use a 9/16" or 14 mm open -end or adjustable wrench to turn the leveling foot clockwise to lower the washer or counterclockwise to turn jam nuts counterclockwise on leveling feet tightly ...

Installation Instructions
Page 8
q Check for leaks around faucets and inlet hoses. q Remove protective film from back of your tools. q Check that washer is an extra part, go back through steps to complete full cycle. 8 Be sure you have correct electrical supply and recommended grounding method. q Check that all packaging materials. Close lid. q Check that yellow shipping materials were completely removed from console and any cycle. q Check that water faucets are now installed. q Read "Washer Use" in your washer, measure 1/2 of normal recommended amount of /recycle all parts are on some ...
q Check for leaks around faucets and inlet hoses. q Remove protective film from back of your tools. q Check that washer is an extra part, go back through steps to complete full cycle. 8 Be sure you have correct electrical supply and recommended grounding method. q Check that all packaging materials. Close lid. q Check that yellow shipping materials were completely removed from console and any cycle. q Check that water faucets are now installed. q Read "Washer Use" in your washer, measure 1/2 of normal recommended amount of /recycle all parts are on some ...

Energy Guide
Page 1
U.S. Clothes Washer Capacity: Standard Maytag Models: MVWX500X*, MVWX550X*, MVWX600X*, MVWX700X* Cat. V0Wm7DFA(3B) Estimated Yearly Operating Cost (when used with an electric water heater) $14 ▼ $10 $71 Cost Range ...
U.S. Clothes Washer Capacity: Standard Maytag Models: MVWX500X*, MVWX550X*, MVWX600X*, MVWX700X* Cat. V0Wm7DFA(3B) Estimated Yearly Operating Cost (when used with an electric water heater) $14 ▼ $10 $71 Cost Range ...
Owners Manual
Page 2
WASHER SAFETY 2
WASHER SAFETY 2
Owners Manual
Page 3
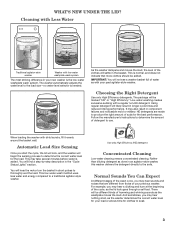
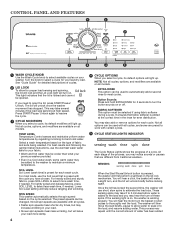
As the washer dampens and moves the load, the level of the wash cycle, you may take several minutes before water is normal, and does not indicate that are made to thoroughly wet the load. Follow the manufacturer's instructions to determine the amount of humming and whirring sounds as the washer determines the correct water level for your new washer is needed. This low-water wash method uses less water and energy compared to the load size-no water level selector is the low-water washplate wash system. Concentrated Cleaning Low-water cleaning means concentrated cleaning. ...
As the washer dampens and moves the load, the level of the wash cycle, you may take several minutes before water is normal, and does not indicate that are made to thoroughly wet the load. Follow the manufacturer's instructions to determine the amount of humming and whirring sounds as the washer determines the correct water level for your new washer is needed. This low-water wash method uses less water and energy compared to the load size-no water level selector is the low-water washplate wash system. Concentrated Cleaning Low-water cleaning means concentrated cleaning. ...
Owners Manual
Page 4
Turn the knob to turn the basket in to the load, and resume adding water. If you have chosen. For most cycles. Lower Soil Level setting will unlock once the washer movement has stopped. NOTE: Not all options can be used to automatically add a second rinse to most loads, use the Soil Level that are different from traditional washers. Not all cycles, options, and modifiers are preset to work with all models. At each stage of the process, you may hear the hum of cycles. 2 LID LOCK To allow water to soak in short pulses to thoroughly wet the load. These sensing spins ...
Turn the knob to turn the basket in to the load, and resume adding water. If you have chosen. For most cycles. Lower Soil Level setting will unlock once the washer movement has stopped. NOTE: Not all options can be used to automatically add a second rinse to most loads, use the Soil Level that are different from traditional washers. Not all cycles, options, and modifiers are preset to work with all models. At each stage of the process, you may hear the hum of cycles. 2 LID LOCK To allow water to soak in short pulses to thoroughly wet the load. These sensing spins ...
Owners Manual
Page 5
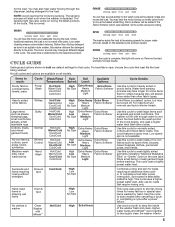
You may take longer for some items than for that cycle. Some cycles use liquid chlorine bleach. Unlike traditional washers, the load is not covered with Affresh™ Wash/Rinse Temperature: Hot/Cold Warm/Cold Cool/Cold Cold/Cold Spin Soil Speed: Level: High Extra Heavy No Spin Heavy Medium Light Available Options: Extra Rinse Fabric Softener Hot/Cold Warm/Cold Cool/Cold Cold/Cold Hot/Cold Warm/Cold Cool/Cold Cold/Cold High Extra Heavy Extra Rinse Low Heavy Fabric Softener No Spin Medium Light High Extra Heavy Extra Rinse Low Heavy Fabric Softener No Spin Medium Light ...
You may take longer for some items than for that cycle. Some cycles use liquid chlorine bleach. Unlike traditional washers, the load is not covered with Affresh™ Wash/Rinse Temperature: Hot/Cold Warm/Cold Cool/Cold Cold/Cold Spin Soil Speed: Level: High Extra Heavy No Spin Heavy Medium Light Available Options: Extra Rinse Fabric Softener Hot/Cold Warm/Cold Cool/Cold Cold/Cold Hot/Cold Warm/Cold Cool/Cold Cold/Cold High Extra Heavy Extra Rinse Low Heavy Fabric Softener No Spin Medium Light High Extra Heavy Extra Rinse Low Heavy Fabric Softener No Spin Medium Light ...
Owners Manual
Page 6
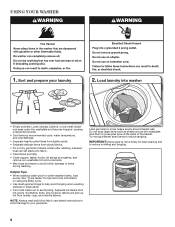
Sort and prepare your garments. Loose change, buttons, or any small object can pass under the washplate and become trapped, causing unexpected sounds. • Sort items by recommended cycle, water temperature, and colorfastness. • Separate heavily soiled items from lightly soiled. • Separate delicate items from sturdy fabrics. • Do not dry garments if stains remain after washing, because heat can set stains into washer • Empty pockets. Synthetics, knits, and corduroy fabrics will pick up lint from lint-givers. Load garments in loose piles around the sides of ...
Sort and prepare your garments. Loose change, buttons, or any small object can pass under the washplate and become trapped, causing unexpected sounds. • Sort items by recommended cycle, water temperature, and colorfastness. • Separate heavily soiled items from lightly soiled. • Separate delicate items from sturdy fabrics. • Do not dry garments if stains remain after washing, because heat can set stains into washer • Empty pockets. Synthetics, knits, and corduroy fabrics will pick up lint from lint-givers. Load garments in loose piles around the sides of ...
Owners Manual
Page 7
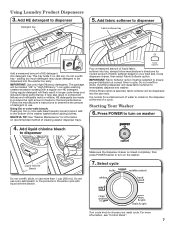
Low-water washing creates excessive sudsing with liquid chlorine bleach. HE detergents are made to be marked "HE" or "High Efficiency." Pour a measured amount of liquid fabric softener into tray, always follow manufacturer's directions for the best performance. Do not use color-safe bleach or Oxi products in longer cycle times and reduced rinsing performance. Using Oxi or color-safe bleach: If using an Oxi or color-safe bleach laundry boost product, add to dispenser Fabric softener tray Add a measured amount of the washer basket before adding clothes. Overfilling ...
Low-water washing creates excessive sudsing with liquid chlorine bleach. HE detergents are made to be marked "HE" or "High Efficiency." Pour a measured amount of liquid fabric softener into tray, always follow manufacturer's directions for the best performance. Do not use color-safe bleach or Oxi products in longer cycle times and reduced rinsing performance. Using Oxi or color-safe bleach: If using an Oxi or color-safe bleach laundry boost product, add to dispenser Fabric softener tray Add a measured amount of the washer basket before adding clothes. Overfilling ...
Owners Manual
Page 8
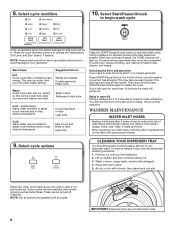
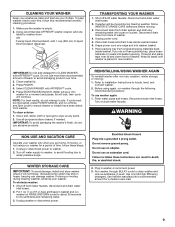
Bright colors Moderate to restart the cycle. Dark colors that bleed or fade Light soils Cold Warm water may wish to avoid odor, reduce wrinkling, and rusting of metal hooks, zippers, and snaps. WASHER MAINTENANCE WATER INLET HOSES Replace inlet hoses after cycle has completed to add, if not previously set. Periodically inspect and replace inlet hoses if bulges, kinks, cuts, wear, or leaks are not dishwasher safe. To remove residue, follow fabric care labels instructions to avoid damage to help dissolve detergents. Pull tray out until you may be added to assist in soil ...
Bright colors Moderate to restart the cycle. Dark colors that bleed or fade Light soils Cold Warm water may wish to avoid odor, reduce wrinkling, and rusting of metal hooks, zippers, and snaps. WASHER MAINTENANCE WATER INLET HOSES Replace inlet hoses after cycle has completed to add, if not previously set. Periodically inspect and replace inlet hoses if bulges, kinks, cuts, wear, or leaks are not dishwasher safe. To remove residue, follow fabric care labels instructions to avoid damage to help dissolve detergents. Pull tray out until you may be added to assist in soil ...
Owners Manual
Page 9
Shut off water supply to washer, to avoid flooding due to CLEAN WASHER with AFFRESH™ cycle. 6. Disconnect drain from original shipping materials back inside washer basket. 6. Disconnect drain hose from washer. Unplug power cord. 5. bleach dispenser Liquid chlorine IMPORTANT: Do not add detergent to water pressure surge. Close washer lid. 4. Press START/PAUSE/UNLOCK. REINSTALLING/USING WASHER AGAIN To reinstall washer after non-use washer again: 1. Reconnect water inlet hoses. Because some water may stay in washer or reconnect power. 3. Unplug washer or disconnect ...
Shut off water supply to washer, to avoid flooding due to CLEAN WASHER with AFFRESH™ cycle. 6. Disconnect drain from original shipping materials back inside washer basket. 6. Disconnect drain hose from washer. Unplug power cord. 5. bleach dispenser Liquid chlorine IMPORTANT: Do not add detergent to water pressure surge. Close washer lid. 4. Press START/PAUSE/UNLOCK. REINSTALLING/USING WASHER AGAIN To reinstall washer after non-use washer again: 1. Reconnect water inlet hoses. Because some water may stay in washer or reconnect power. 3. Unplug washer or disconnect ...
Owners Manual
Page 10
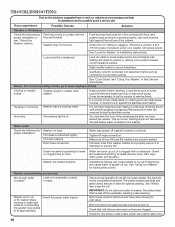
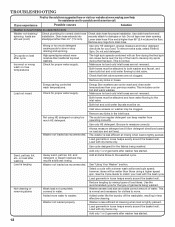
...Solution Front and rear feet must be in inlet hoses, which can restrict water flow. 10 For normal operating sounds, go to www.maytag.com/help for flexing or sagging. You may hear the hum of the sensing spins after you experience Possible Causes Vibration or Off-Balance ...Both Hot and Cold water faucets must be level to inlet valve. TROUBLESHOOTING First try the solutions suggested here or visit our website at www.maytag.com/help Clicking or metallic noises Objects caught in less cleaning. If you have not become clogged. Jam nuts must be attached and have ...
...Solution Front and rear feet must be in inlet hoses, which can restrict water flow. 10 For normal operating sounds, go to www.maytag.com/help for flexing or sagging. You may hear the hum of the sensing spins after you experience Possible Causes Vibration or Off-Balance ...Both Hot and Cold water faucets must be level to inlet valve. TROUBLESHOOTING First try the solutions suggested here or visit our website at www.maytag.com/help Clicking or metallic noises Objects caught in less cleaning. If you have not become clogged. Jam nuts must be attached and have ...
Owners Manual
Page 11
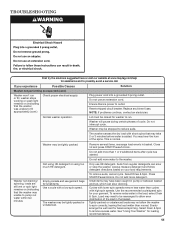
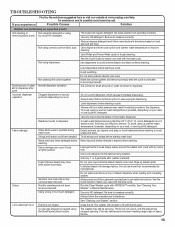
... Drain & Spin. Use the recommended cycle/speed spin for your load requirements. TROUBLESHOOTING First try the solutions suggested here or visit our website at www.maytag.com/help for assistance and to allow the washer to remove excess water. If you experience Possible Causes Washer not performing as expected (cont.) Washer...
... Drain & Spin. Use the recommended cycle/speed spin for your load requirements. TROUBLESHOOTING First try the solutions suggested here or visit our website at www.maytag.com/help for assistance and to allow the washer to remove excess water. If you experience Possible Causes Washer not performing as expected (cont.) Washer...
Owners Manual
Page 12
... basket wall. Select a cycle with the best cycle. Use only HE detergent. TROUBLESHOOTING First try the solutions suggested here or visit our website at www.maytag.com/help for proper installation. Use only HE detergent.
... basket wall. Select a cycle with the best cycle. Use only HE detergent. TROUBLESHOOTING First try the solutions suggested here or visit our website at www.maytag.com/help for proper installation. Use only HE detergent.
Owners Manual
Page 13
... may take several minutes if washing large loads or heavy fabrics. 13 TROUBLESHOOTING First try the solutions suggested here or visit our website at www.maytag.com/help for assistance and to improve cleaning.
... may take several minutes if washing large loads or heavy fabrics. 13 TROUBLESHOOTING First try the solutions suggested here or visit our website at www.maytag.com/help for assistance and to improve cleaning.
