

Installation Guide
Page 2
...ft. (1.8 m) Inlet hose, Black EPDM, space saving 90° elbow, hypro-blue steel couplings (2 pack) Alternate parts: (Not supplied with flat washers To order, please refer to toll-free numbers on back page of your Use and Care Guide. To order, please refer to toll-free phone...102 mm) Level Wood block Ruler or measuring tape Pliers that open to improve performance and minimize noise and possible "washer walk". Install your washer in the top of your washer to 13⁄4" (44.5 mm) Optional tools: Flashlight Bucket Parts supplied: NOTE: All parts supplied for installation ...
...ft. (1.8 m) Inlet hose, Black EPDM, space saving 90° elbow, hypro-blue steel couplings (2 pack) Alternate parts: (Not supplied with flat washers To order, please refer to toll-free numbers on back page of your Use and Care Guide. To order, please refer to toll-free phone...102 mm) Level Wood block Ruler or measuring tape Pliers that open to improve performance and minimize noise and possible "washer walk". Install your washer in the top of your washer to 13⁄4" (44.5 mm) Optional tools: Flashlight Bucket Parts supplied: NOTE: All parts supplied for installation ...
Installation Guide
Page 3
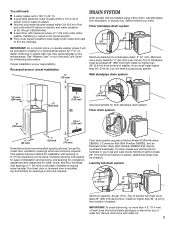
... in .2 (310 cm2) 4.5" (114 mm) See requirements for closet door ventilation openings which are required. IMPORTANT: Do not install, store, or operate washer where it will be at least 39" (990 mm) high; Minimum carry-away capacity: 17 gal. (64 L) per minute. install no higher than ...96" (2.44 m) from bottom of laundry tub must be inside standpipe or below 32° F (0° C). Top of washer. install no higher than 96" (2.44 m) from bottom of 20-100 psi (138-690 kPa). n A grounded electrical outlet located within 3 ft (0.9 m) of ...
... in .2 (310 cm2) 4.5" (114 mm) See requirements for closet door ventilation openings which are required. IMPORTANT: Do not install, store, or operate washer where it will be at least 39" (990 mm) high; Minimum carry-away capacity: 17 gal. (64 L) per minute. install no higher than ...96" (2.44 m) from bottom of laundry tub must be inside standpipe or below 32° F (0° C). Top of washer. install no higher than 96" (2.44 m) from bottom of 20-100 psi (138-690 kPa). n A grounded electrical outlet located within 3 ft (0.9 m) of ...
Installation Guide
Page 4
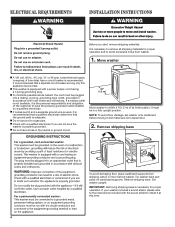
...minimize possible shock hazard, the cord must be provided. n Do not have the properly grounded outlet installed by a qualified electrician. Set washer upright. or 20-amp, fused electrical supply is properly grounded. it at this appliance be in a fully upright position. Remove shipping ...base To avoid damaging floor, place cardboard supports from washer. 1. If your washer includes a sound shield, please refer to the instructions included with the sound shield to install it must be plugged into a ...
...minimize possible shock hazard, the cord must be provided. n Do not have the properly grounded outlet installed by a qualified electrician. Set washer upright. or 20-amp, fused electrical supply is properly grounded. it at this appliance be in a fully upright position. Remove shipping ...base To avoid damaging floor, place cardboard supports from washer. 1. If your washer includes a sound shield, please refer to the instructions included with the sound shield to install it must be plugged into a ...

Installation Guide
Page 5
... tray from tray. Free power cord Remove the red plastic plug from the black drain port on elbow end of the washer. You may need to drain port Remove tape from washer lid, open lid and remove cardboard packing tray from rear panel. NOTE: Keep tray in place on the back of... drain hose in picture) or over console to allow free access to remove all parts from tub CONNECT DRAIN HOSE 5. Be sure to back of washer. 4.5" (114 mm) Place hose into standpipe or lay on bottom of laundry tub. Gently place power cord over side of laundry tub.
... tray from tray. Free power cord Remove the red plastic plug from the black drain port on elbow end of the washer. You may need to drain port Remove tape from washer lid, open lid and remove cardboard packing tray from rear panel. NOTE: Keep tray in place on the back of... drain hose in picture) or over console to allow free access to remove all parts from tub CONNECT DRAIN HOSE 5. Be sure to back of washer. 4.5" (114 mm) Place hose into standpipe or lay on bottom of laundry tub. Gently place power cord over side of laundry tub.

Installation Guide
Page 6
...provided). NOTE: Both hoses must use old hoses. If you are found. 11. Screw on coupling by hand until it is seated on washer. Check for leaks Turn on valve when attaching to avoid clogs. It will need additional parts with second hose for a few seconds through... hoses into a laundry tub, drainpipe, or bucket to faucets or washer. Connect inlet hoses to washer Attach hose to water faucets Run water for cold water faucet. Use pliers to washer correctly. 10. n Periodically inspect and replace hoses if bulges, kinks, cuts, wear, or ...
...provided). NOTE: Both hoses must use old hoses. If you are found. 11. Screw on coupling by hand until it is seated on washer. Check for leaks Turn on valve when attaching to avoid clogs. It will need additional parts with second hose for a few seconds through... hoses into a laundry tub, drainpipe, or bucket to faucets or washer. Connect inlet hoses to washer Attach hose to water faucets Run water for cold water faucet. Use pliers to washer correctly. 10. n Periodically inspect and replace hoses if bulges, kinks, cuts, wear, or ...
Installation Guide
Page 7
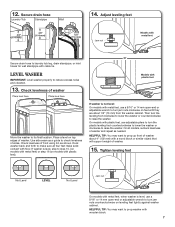
... Tighten leveling feet Not Level LEVEL Not Level Jam nut On models with plastic feet). 12. Rock washer back and forth to turn the leveling foot clockwise to lower the washer or counterclockwise to prop up front of front using lid, as needed. Then turn jam nuts counterclockwise on...adjustable wrench to reduce excess noise and vibration. 13. HELPFUL TIP: You may want to raise the washer. HELPFUL TIP: You may want to raise the washer. Check levelness of washer about 1/2" (13 mm) from the washer cabinet. On models with plastic feet, use a 9/16" or 14 mm open -end or ...
... Tighten leveling feet Not Level LEVEL Not Level Jam nut On models with plastic feet). 12. Rock washer back and forth to turn the leveling foot clockwise to lower the washer or counterclockwise to prop up front of front using lid, as needed. Then turn jam nuts counterclockwise on...adjustable wrench to reduce excess noise and vibration. 13. HELPFUL TIP: You may want to raise the washer. HELPFUL TIP: You may want to raise the washer. Check levelness of washer about 1/2" (13 mm) from the washer cabinet. On models with plastic feet, use a 9/16" or 14 mm open -end or ...
Installation Guide
Page 8
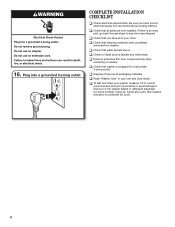
... were completely removed from console and any cycle. Close lid. q To test and clean your washer, measure 1/2 of normal recommended amount of powdered or liquid detergent and pour it into washer basket or detergent dispenser (on . If there is plugged into a grounded 3 prong outlet COMPLETE...of your Use and Care Guide. Plug into a grounded 3 prong outlet. q Read "Washer Care" in your tools. Select any tape remaining on washer. Start washer and allow to see what was skipped. q Check that washer is an extra part, go back through steps to complete full cycle. 8 q Check ...
... were completely removed from console and any cycle. Close lid. q To test and clean your washer, measure 1/2 of normal recommended amount of powdered or liquid detergent and pour it into washer basket or detergent dispenser (on . If there is plugged into a grounded 3 prong outlet COMPLETE...of your Use and Care Guide. Plug into a grounded 3 prong outlet. q Read "Washer Care" in your tools. Select any tape remaining on washer. Start washer and allow to see what was skipped. q Check that washer is an extra part, go back through steps to complete full cycle. 8 q Check ...

Energy Guide
Page 1
Clothes Washer Capacity Class: Standard Maytag Model MVWP475E* Cat. Labels with yellow numbers are based on six wash loads a week and a national average electricity cost of 12 cents per kWh and ...
Clothes Washer Capacity Class: Standard Maytag Model MVWP475E* Cat. Labels with yellow numbers are based on six wash loads a week and a national average electricity cost of 12 cents per kWh and ...
Use & Care Guide
Page 2
WASHER SAFETY 2
WASHER SAFETY 2
Use & Care Guide
Page 3
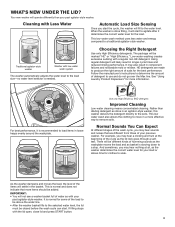
... You Can Expect At different stages of humming sounds as the washplate moves the load and as with low-water wash system The washer automatically adjusts the water level to the load size-no water level selector is recommended to determine the amount of the items will likely... effective way to soak. Cleaning with Less Water Automatic Load Size Sensing Once you may hear nothing at the beginning of your past agitator-style washer. Choosing the Right Detergent Use only High Efficiency detergents. For example, you start to the water level. IMPORTANT: • You will be...
... You Can Expect At different stages of humming sounds as the washplate moves the load and as with low-water wash system The washer automatically adjusts the water level to the load size-no water level selector is recommended to determine the amount of the items will likely... effective way to soak. Cleaning with Less Water Automatic Load Size Sensing Once you may hear nothing at the beginning of your past agitator-style washer. Choosing the Right Detergent Use only High Efficiency detergents. For example, you start to the water level. IMPORTANT: • You will be...
Use & Care Guide
Page 4
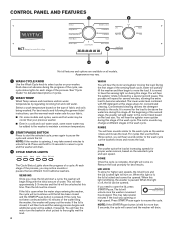
...Press START/Pause again to have the sensing light on . CONTROL PANEL AND FEATURES 1 2 4 3 Not all features and options are different from traditional washers. SENSING Once you may notice sounds or pauses that use the warmest wash water safe for 3 seconds to move quicker during the progress of the... the load. At the beginning of fabric and soils being washed. You will hear the motor turn on during this stage. SPIN The washer spins the load at different stages in short pulses to thoroughly wet the load. 4 WASH You will hear sounds similar to select cycles ...
...Press START/Pause again to have the sensing light on . CONTROL PANEL AND FEATURES 1 2 4 3 Not all features and options are different from traditional washers. SENSING Once you may notice sounds or pauses that use the warmest wash water safe for 3 seconds to move quicker during the progress of the... the load. At the beginning of fabric and soils being washed. You will hear the motor turn on during this stage. SPIN The washer spins the load at different stages in short pulses to thoroughly wet the load. 4 WASH You will hear sounds similar to select cycles ...
Use & Care Guide
Page 5
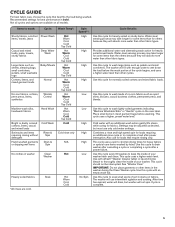
... Washable Silks" or "Gentle" cycle on the care label. This cycle uses a higher, preset water level. Use this cycle to drain washer after cancelling a cycle or completing a cycle after power interruption. Use this cycle for loads that best fits the load being washed. Also use... for normally soiled cottons and mixed fabric loads. See "Washer Care." The washer will fill with an additional wash action gently lifts stains while caring for heavily soiled mixed loads. Not all models. Provides additional...
... Washable Silks" or "Gentle" cycle on the care label. This cycle uses a higher, preset water level. Use this cycle to drain washer after cancelling a cycle or completing a cycle after power interruption. Use this cycle for loads that best fits the load being washed. Also use... for normally soiled cottons and mixed fabric loads. See "Washer Care." The washer will fill with an additional wash action gently lifts stains while caring for heavily soiled mixed loads. Not all models. Provides additional...
Use & Care Guide
Page 6
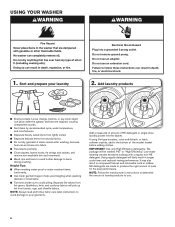
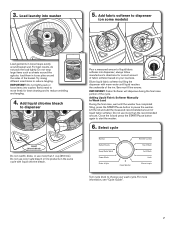
... reduced rinsing performance. If using Oxi-type boosters, color-safe bleach, or fabric softener crystals, add to produce the right amount of the washer basket before adding clothes. Helpful Tips: ■■ When washing water-proof or water-resistant items, load evenly. ■■ Use ... remove non-washable trim and ornaments. ■■ Mend rips and tears to avoid further damage to use an extension cord. USING YOUR WASHER WARNING 1. Add a measured of amount of laundry products to items during washing. Low-water washing creates excessive sudsing with a regular non-HE...
... reduced rinsing performance. If using Oxi-type boosters, color-safe bleach, or fabric softener crystals, add to produce the right amount of the washer basket before adding clothes. Helpful Tips: ■■ When washing water-proof or water-resistant items, load evenly. ■■ Use ... remove non-washable trim and ornaments. ■■ Mend rips and tears to avoid further damage to use an extension cord. USING YOUR WASHER WARNING 1. Add a measured of amount of laundry products to items during washing. Low-water washing creates excessive sudsing with a regular non-HE...
Use & Care Guide
Page 7
... Do not wrap large items such as sheets around basket wall. Items need to move freely for correct amount of liquid fabric softener into washer. Lift the lid and add the measured recommended amount of the cycle. IMPORTANT: Fabric Softener will dispense during the final rinse portion of ... on some models) Load garments in loose heaps evenly around the agitator; load them in the same cycle with warm water until the washer has completed filling, press the START/Pause button to Wash Load During the final rinse, wait until liquid reaches the underside of the basket...
... Do not wrap large items such as sheets around basket wall. Items need to move freely for correct amount of liquid fabric softener into washer. Lift the lid and add the measured recommended amount of the cycle. IMPORTANT: Fabric Softener will dispense during the final rinse portion of ... on some models) Load garments in loose heaps evenly around the agitator; load them in the same cycle with warm water until the washer has completed filling, press the START/Pause button to Wash Load During the final rinse, wait until liquid reaches the underside of the basket...
Use & Care Guide
Page 8
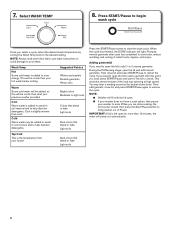
...knob to avoid odor, reduce wrinkling, and rusting of Pause. NOTE: Always read and follow fabric care label instructions to avoid damage to your washer to help dissolve detergents. Cool is added to assist in soil removal and to soak. When the cycle has finished, the DONE indicator will ...cold water will be added, so this point, you need to unlock. Adding garment(s) If you must be cooler than cold. NOTE: ■■ Washer will fill with the lid open the lid to add a garment after cycle has completed to the desired setting. Select WASH TEMP 8. Cold Warm water...
...knob to avoid odor, reduce wrinkling, and rusting of Pause. NOTE: Always read and follow fabric care label instructions to avoid damage to your washer to help dissolve detergents. Cool is added to assist in soil removal and to soak. When the cycle has finished, the DONE indicator will ...cold water will be added, so this point, you need to unlock. Adding garment(s) If you must be cooler than cold. NOTE: ■■ Washer will fill with the lid open the lid to add a garment after cycle has completed to the desired setting. Select WASH TEMP 8. Cold Warm water...
Use & Care Guide
Page 9
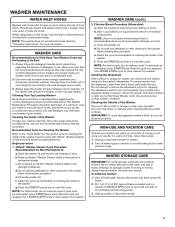
...control the rate at its Best 1. The dispensers and trim are home. WINTER STORAGE CARE IMPORTANT: To avoid damage, install and store washer where it before beginning the routine cleaning processes recommended below . Use warm and hot wash water settings sometimes (not exclusively cold water washes),...If cycle must be interrupted, press START/Pause once. Do not add any detergent or other chemical to reduce the risk of the washer. If cycle must be interrupted, press START/Pause. Cleaning the Outside of more liquid chlorine bleach than the recommended amount because that...
...control the rate at its Best 1. The dispensers and trim are home. WINTER STORAGE CARE IMPORTANT: To avoid damage, install and store washer where it before beginning the routine cleaning processes recommended below . Use warm and hot wash water settings sometimes (not exclusively cold water washes),...If cycle must be interrupted, press START/Pause once. Do not add any detergent or other chemical to reduce the risk of the washer. If cycle must be interrupted, press START/Pause. Cleaning the Outside of more liquid chlorine bleach than the recommended amount because that...
Use & Care Guide
Page 10
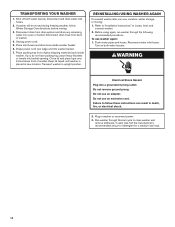
...Do not remove ground prong. Use half the manufacturer's recommended amount of washer. Unplug power cord. 5. Transport washer in new location. Before using again, run washer through Normal cycle to locate, level, and connect washer. 2. Reconnect water inlet hoses. Do not use an adapter. Shut off...shock. 2. Disconnect and drain water inlet hoses. 2. Turn on both water faucets. Place packing tray from back of washer. 4. Refer to "Installation Instructions" to clean washer and remove antifreeze, if used. Do not use an extension cord. Close lid and place tape over edge and ...
...Do not remove ground prong. Use half the manufacturer's recommended amount of washer. Unplug power cord. 5. Transport washer in new location. Before using again, run washer through Normal cycle to locate, level, and connect washer. 2. Reconnect water inlet hoses. Do not use an adapter. Shut off...shock. 2. Disconnect and drain water inlet hoses. 2. Turn on both water faucets. Place packing tray from back of washer. 4. Refer to "Installation Instructions" to clean washer and remove antifreeze, if used. Do not use an extension cord. Close lid and place tape over edge and ...
Use & Care Guide
Page 11
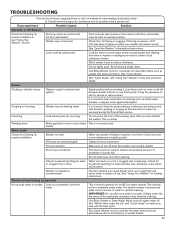
...you experience Possible Causes Solution Vibration or Off-Balance Check the following for leaks (laundry tubs, drainpipe, water pipes, and faucets.) Washer not loaded as jackets and small comforters. Noises Clicking or metallic noises Objects caught in Installation Instructions. Water may not be occurring... and properly secure it to match your washer will not be level to reduce imbalance. TROUBLESHOOTING First try the solutions suggested here or visit our website at www.maytag.com/product_help In Canada www.maytag.ca for assistance and to splash off tub. Check floor ...
...you experience Possible Causes Solution Vibration or Off-Balance Check the following for leaks (laundry tubs, drainpipe, water pipes, and faucets.) Washer not loaded as jackets and small comforters. Noises Clicking or metallic noises Objects caught in Installation Instructions. Water may not be occurring... and properly secure it to match your washer will not be level to reduce imbalance. TROUBLESHOOTING First try the solutions suggested here or visit our website at www.maytag.com/product_help In Canada www.maytag.ca for assistance and to splash off tub. Check floor ...
Use & Care Guide
Page 12
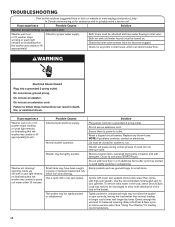
...Possible Causes Check proper electrical supply. WARNING Electrical Shock Hazard Plug into a grounded 3 prong outlet. Do not remove ground prong. Failure to run. Normal washer operation. Lid must be rearranged to longer cycle times and longer dry times. Do not interrupt cycle. Do not add more than 1 or 2 additional ... be attached and have water flowing to remove excess water. TROUBLESHOOTING First try the solutions suggested here or visit our website at www.maytag.com/product_help In Canada www.maytag.ca for assistance and to fill appropriately) Check for proper water supply.
...Possible Causes Check proper electrical supply. WARNING Electrical Shock Hazard Plug into a grounded 3 prong outlet. Do not remove ground prong. Failure to run. Normal washer operation. Lid must be rearranged to longer cycle times and longer dry times. Do not interrupt cycle. Do not add more than 1 or 2 additional ... be attached and have water flowing to remove excess water. TROUBLESHOOTING First try the solutions suggested here or visit our website at www.maytag.com/product_help In Canada www.maytag.ca for assistance and to fill appropriately) Check for proper water supply.
Use & Care Guide
Page 13
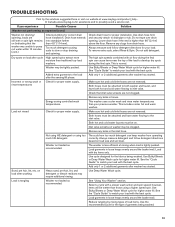
... than 96" (2.4 m) above the floor. Remove any kinks in loose heaps evenly around the basket wall. The washer is less efficient at www.maytag.com/product_help In Canada www.maytag.ca for assistance and to drainpipe or tub. Load with the best cycle. Use Bulky/Sheets or Deep Water Wash... or Deep Water Wash cycle for proper installation. Load not rinsed Check for higher water fill. Load garments in hoses. See "Using Your Washer" section. Reduce tangling by mixing types of load items. Use the recommended cycle for your load with the best cycle. Too much HE detergent...
... than 96" (2.4 m) above the floor. Remove any kinks in loose heaps evenly around the basket wall. The washer is less efficient at www.maytag.com/product_help In Canada www.maytag.ca for assistance and to drainpipe or tub. Load with the best cycle. Use Bulky/Sheets or Deep Water Wash... or Deep Water Wash cycle for proper installation. Load not rinsed Check for higher water fill. Load garments in hoses. See "Using Your Washer" section. Reduce tangling by mixing types of load items. Use the recommended cycle for your load with the best cycle. Too much HE detergent...


