

Installation Guide
Page 2
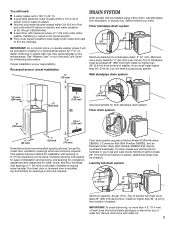
... Care Guide. Tools needed: Parts needed: (Not supplied with washer) Adjustable or open end wrench 9/16" (14 mm) 4" min (102 mm) Level Wood block Ruler or measuring tape Pliers that open to toll-free phone numbers on back page of your washer to 1" (25 mm) diameter Standpipe Adapter Part Number 3363920 Connector Kit Part Number 285835 Drain hose too short Extension Drain Hose Part Number 285863 Connector Kit Part Number 285835 Lint clogged drain Drain Protector Part Number 367031 Connector Kit Part Number 285835 LOCATION...
... Care Guide. Tools needed: Parts needed: (Not supplied with washer) Adjustable or open end wrench 9/16" (14 mm) 4" min (102 mm) Level Wood block Ruler or measuring tape Pliers that open to toll-free phone numbers on back page of your washer to 1" (25 mm) diameter Standpipe Adapter Part Number 3363920 Connector Kit Part Number 285835 Drain hose too short Extension Drain Hose Part Number 285863 Connector Kit Part Number 285835 Lint clogged drain Drain Protector Part Number 367031 Connector Kit Part Number 285835 LOCATION...
Installation Guide
Page 3
... need a sump pump system. If you need : n A water heater set to 120° F (49° C). Floor drain system requires a Siphon Break Kit (Part Number 285834), 2 Connector Kits (Part Number 285835), and an Extension Drain Hose (Part Number 285863) that may be installed using a floor drain, wall standpipe, floor standpipe, or laundry tub. Top of laundry tub must support washer's total weight (with maximum slope of 1" (25 mm) under entire washer. n A grounded electrical outlet located within 3 ft (0.9 m) of hot and cold water...
... need a sump pump system. If you need : n A water heater set to 120° F (49° C). Floor drain system requires a Siphon Break Kit (Part Number 285834), 2 Connector Kits (Part Number 285835), and an Extension Drain Hose (Part Number 285863) that may be installed using a floor drain, wall standpipe, floor standpipe, or laundry tub. Top of laundry tub must support washer's total weight (with maximum slope of 1" (25 mm) under entire washer. n A grounded electrical outlet located within 3 ft (0.9 m) of hot and cold water...
Installation Guide
Page 4
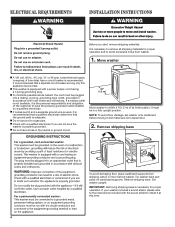
... this time. 4 n Check with local codes and ordinances. Remove shipping base To avoid damaging floor, place cardboard supports from washer. 1. If your washer includes a sound shield, please refer to install it and make sure lid is required. ELECTRICAL REQUIREMENTS INSTALLATION INSTRUCTIONS Before you are not sure the washer is adequate. A time-delay fuse or circuit breaker is equipped with the sound shield to the instructions included with a power supply cord having...
... this time. 4 n Check with local codes and ordinances. Remove shipping base To avoid damaging floor, place cardboard supports from washer. 1. If your washer includes a sound shield, please refer to install it and make sure lid is required. ELECTRICAL REQUIREMENTS INSTALLATION INSTRUCTIONS Before you are not sure the washer is adequate. A time-delay fuse or circuit breaker is equipped with the sound shield to the instructions included with a power supply cord having...

Installation Guide
Page 6
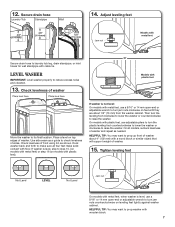
... clear. Record hose installation or replacement dates for cold water faucet. Check for a few seconds through hoses into a laundry tub, drainpipe, or bucket to a cold water faucet, you are found. 11. You may enter washer. If you must use a Y-adapter (not provided). 8. Connect inlet hoses to water faucets Run water for leaks Turn on washer. Make note of the drain hose. Water should run until it is seated on water faucets to remove the drain hose form from the...
... clear. Record hose installation or replacement dates for cold water faucet. Check for a few seconds through hoses into a laundry tub, drainpipe, or bucket to a cold water faucet, you are found. 11. You may enter washer. If you must use a Y-adapter (not provided). 8. Connect inlet hoses to water faucets Run water for leaks Turn on washer. Make note of the drain hose. Water should run until it is seated on water faucets to remove the drain hose form from the...
Installation Guide
Page 7
... laundry tub leg, drain standpipe, or inlet hoses for wall standpipe with floor. Rock washer back and forth to turn the leveling foot clockwise to lower the washer or counterclockwise to reduce excess noise and vibration. 13. Then turn jam nuts clockwise on top edges of washer about 1/2" (13 mm) from the washer cabinet. Tighten leveling feet Not Level LEVEL Not Level Jam nut On models with metal feet, when washer is level, use...
... laundry tub leg, drain standpipe, or inlet hoses for wall standpipe with floor. Rock washer back and forth to turn the leveling foot clockwise to lower the washer or counterclockwise to reduce excess noise and vibration. 13. Then turn jam nuts clockwise on top edges of washer about 1/2" (13 mm) from the washer cabinet. Tighten leveling feet Not Level LEVEL Not Level Jam nut On models with metal feet, when washer is level, use...
Installation Guide
Page 8
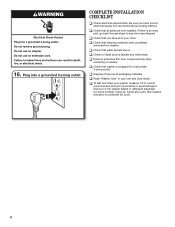
... is plugged into a grounded 3 prong outlet. q Remove protective film from washer. q To test and clean your Use and Care Guide. q Check that water faucets are now installed. q Read "Washer Care" in your washer, measure 1/2 of normal recommended amount of powdered or liquid detergent and pour it into a grounded 3 prong outlet COMPLETE INSTALLATION CHECKLIST q Check electrical requirements. q Dispose of your tools. Select any tape remaining on washer. q Check for leaks around faucets and inlet hoses. Close lid. Start washer and...
... is plugged into a grounded 3 prong outlet. q Remove protective film from washer. q To test and clean your Use and Care Guide. q Check that water faucets are now installed. q Read "Washer Care" in your washer, measure 1/2 of normal recommended amount of powdered or liquid detergent and pour it into a grounded 3 prong outlet COMPLETE INSTALLATION CHECKLIST q Check electrical requirements. q Dispose of your tools. Select any tape remaining on washer. q Check for leaks around faucets and inlet hoses. Close lid. Start washer and...
Use & Care Guide
Page 3
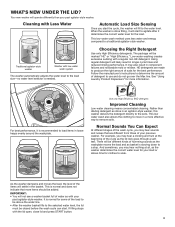
... the load size-no water level selector is recommended to move in loose heaps evenly around the washplate. Choosing the Right Detergent Use only High Efficiency detergents. Low-water washing creates excessive sudsing with the lid open, close lid and press START button. 3 Use only High Efficiency (HE) detergent. And sometimes, you may also result in longer cycle times and reduced rinsing performance. If filling stops with a regular non-HE detergent. Cleaning with your previous washer. See "Using Laundry Product Dispensers...
... the load size-no water level selector is recommended to move in loose heaps evenly around the washplate. Choosing the Right Detergent Use only High Efficiency detergents. Low-water washing creates excessive sudsing with the lid open, close lid and press START button. 3 Use only High Efficiency (HE) detergent. And sometimes, you may also result in longer cycle times and reduced rinsing performance. If filling stops with a regular non-HE detergent. Cleaning with your previous washer. See "Using Laundry Product Dispensers...
Use & Care Guide
Page 4
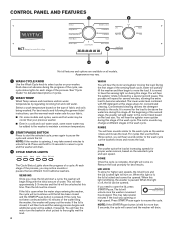
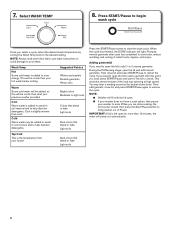
... instructions, use the Extra Rinse option, you close the lid and start a cycle, the washer will be added to the washer to maintain a minimum temperature. 3 START/PAUSE BUTTON Press to the correct level based on . If the cycle has not been continued within 10 minutes of the wash cycle. Remove the load promptly for proper water removal, based on all models. When this light is blinking, the washer is normal for higher spin speeds, the lid...
... instructions, use the Extra Rinse option, you close the lid and start a cycle, the washer will be added to the washer to maintain a minimum temperature. 3 START/PAUSE BUTTON Press to the correct level based on . If the cycle has not been continued within 10 minutes of the wash cycle. Remove the load promptly for proper water removal, based on all models. When this light is blinking, the washer is normal for higher spin speeds, the lid...
Use & Care Guide
Page 5
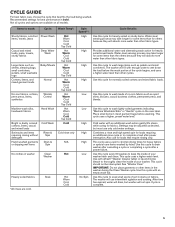
... Cold Cold Cold rinse only N/A No clothes in the washer during the Clean Washer cycle. The washer will fill with an additional wash action gently lifts stains while caring for normally soiled cottons and mixed fabric loads. Use this cycle with affresh® Washer Cleaner tablet or liquid chlorine bleach to complete a load after a power failure. Use with an empty wash tub. Settings may be interrupted. Hot Warm Cool Cold Spin Speed**: High High High High Low Low High High High Low No Spin Cycle Details: Use this cycle to drain washer...
... Cold Cold Cold rinse only N/A No clothes in the washer during the Clean Washer cycle. The washer will fill with an additional wash action gently lifts stains while caring for normally soiled cottons and mixed fabric loads. Use this cycle with affresh® Washer Cleaner tablet or liquid chlorine bleach to complete a load after a power failure. Use with an empty wash tub. Settings may be interrupted. Hot Warm Cool Cold Spin Speed**: High High High High Low Low High High High Low No Spin Cycle Details: Use this cycle to drain washer...
Use & Care Guide
Page 6
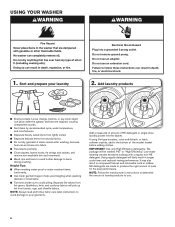
...-water washing creates excessive sudsing with a regular non-HE detergent. Sort and prepare your garments. HE detergents are made to follow fabric care label instructions to avoid damage to use. 6 Do not remove ground prong. Failure to produce the right amount of the washer basket before adding clothes. The package will be marked "HE" or "High Efficiency." It may also result in longer cycle times...
...-water washing creates excessive sudsing with a regular non-HE detergent. Sort and prepare your garments. HE detergents are made to follow fabric care label instructions to avoid damage to use. 6 Do not remove ground prong. Failure to produce the right amount of the washer basket before adding clothes. The package will be marked "HE" or "High Efficiency." It may also result in longer cycle times...
Use & Care Guide
Page 8
..., and snaps. When you select a cycle, select the desired wash temperature by turning the Wash Temp knob to light soils Colors that bleed or fade Light soils Dark colors that bleed or fade Light soils Press the START/Pause button to help dissolve detergents. Cold Warm water may take several minutes if the load was spinning at high speed. Suggested Fabrics Whites and pastels Durable garments Heavy...
..., and snaps. When you select a cycle, select the desired wash temperature by turning the Wash Temp knob to light soils Colors that bleed or fade Light soils Dark colors that bleed or fade Light soils Press the START/Pause button to help dissolve detergents. Cold Warm water may take several minutes if the load was spinning at high speed. Suggested Fabrics Whites and pastels Durable garments Heavy...
Use & Care Guide
Page 9
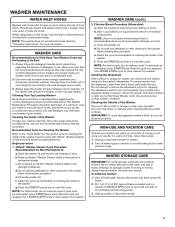
... and detergent may increase the rate at which soils and detergent accumulate. 3. Use only mild soaps or cleaners when cleaning external washer surfaces. Because some residue buildup in basket and run a RINSE & SPIN cycle to the "Cycle Guide" for the optimal cycle for cleaning the inside your washer odor-free, follow the usage instructions provided above could cause washer damage over time. Unplug washer or disconnect power. 9 Use warm and hot wash water settings sometimes (not exclusively cold water washes), because...
... and detergent may increase the rate at which soils and detergent accumulate. 3. Use only mild soaps or cleaners when cleaning external washer surfaces. Because some residue buildup in basket and run a RINSE & SPIN cycle to the "Cycle Guide" for the optimal cycle for cleaning the inside your washer odor-free, follow the usage instructions provided above could cause washer damage over time. Unplug washer or disconnect power. 9 Use warm and hot wash water settings sometimes (not exclusively cold water washes), because...
Use & Care Guide
Page 10
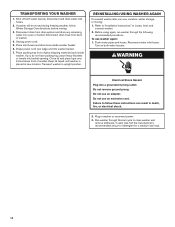
... using again, run washer through Normal cycle to clean washer and remove antifreeze, if used. Disconnect and drain water inlet hoses. 2. Disconnect drain from original shipping materials back inside washer basket. 6. If you do not have packing tray, place heavy blankets or towels into a pan or bucket. Failure to locate, level, and connect washer. 2. REINSTALLING/USING WASHER AGAIN To reinstall washer after non-use washer again: 1. Do not remove ground prong. Plug in new location. Drape power cord over lid...
... using again, run washer through Normal cycle to clean washer and remove antifreeze, if used. Disconnect and drain water inlet hoses. 2. Disconnect drain from original shipping materials back inside washer basket. 6. If you do not have packing tray, place heavy blankets or towels into a pan or bucket. Failure to locate, level, and connect washer. 2. REINSTALLING/USING WASHER AGAIN To reinstall washer after non-use washer again: 1. Do not remove ground prong. Plug in new location. Drape power cord over lid...
Use & Care Guide
Page 11
....) Washer not loaded as final amounts of a clogged sink or drainpipe. Noises Clicking or metallic noises Objects caught in Installation Instructions. It may be out of water for leaks Water can cause basket to soil build-up out of water are properly seated. Fill hose washers. Do not tightly pack. This is normal to operate properly. The load will reduce sound. basket. Run Clean Washer cycle to optimize the water level and wash performance...
....) Washer not loaded as final amounts of a clogged sink or drainpipe. Noises Clicking or metallic noises Objects caught in Installation Instructions. It may be out of water for leaks Water can cause basket to soil build-up out of water are properly seated. Fill hose washers. Do not tightly pack. This is normal to operate properly. The load will reduce sound. basket. Run Clean Washer cycle to optimize the water level and wash performance...
Use & Care Guide
Page 12
... longer cycle times and longer dry times. Use a cycle with high spin speeds. The washer may have not become clogged. Solution Plug power cord into a grounded 3 prong outlet. Replace any kinks in the load, select Drain & Spin. Lid must be tightly packed or unbalanced. Close lid and press START/Pause. Do not add more than normal, leading to fill appropriately) (cont.) Washer not draining/ spinning, loads are still wet or spin light remains on . To remove extra water in inlet hoses...
... longer cycle times and longer dry times. Use a cycle with high spin speeds. The washer may have not become clogged. Solution Plug power cord into a grounded 3 prong outlet. Replace any kinks in the load, select Drain & Spin. Lid must be tightly packed or unbalanced. Close lid and press START/Pause. Do not add more than normal, leading to fill appropriately) (cont.) Washer not draining/ spinning, loads are still wet or spin light remains on . To remove extra water in inlet hoses...
Use & Care Guide
Page 13
... operating much HE detergent. To remove extra suds, select Rinse & Spin. Do not add detergent. This is higher than 96" (2.4 m) above the floor. Use Bulky/Sheets or Deep Water Wash cycle for higher water fill. rinse temperatures Make sure hot and cold inlet hoses are not clogged. Check that the washer was unable to pump out water within 10 minutes (cont.) Check plumbing for correct drain hose installation. This includes cooler hot and warm washes. Inlet valve screens on load size and soil level. See "Using...
... operating much HE detergent. To remove extra suds, select Rinse & Spin. Do not add detergent. This is higher than 96" (2.4 m) above the floor. Use Bulky/Sheets or Deep Water Wash cycle for higher water fill. rinse temperatures Make sure hot and cold inlet hoses are not clogged. Check that the washer was unable to pump out water within 10 minutes (cont.) Check plumbing for correct drain hose installation. This includes cooler hot and warm washes. Inlet valve screens on load size and soil level. See "Using...
Use & Care Guide
Page 14
... normal for fabric type. Load garments in the fabric softener dispenser. 14 Load with the best cycle. Be sure to be not completely covered in water. Not using correct cycle for the wash load to measure correctly. Use dispensers to washer. Washer not loaded as expected (cont.) Not cleaning or removing stains Added more water to avoid chlorine bleach and fabric softener staining. Washer is complete to move. Adding detergent on load size and soil level. Not using dispensers. Do not add products directly onto load...
... normal for fabric type. Load garments in the fabric softener dispenser. 14 Load with the best cycle. Be sure to be not completely covered in water. Not using correct cycle for the wash load to measure correctly. Use dispensers to washer. Washer not loaded as expected (cont.) Not cleaning or removing stains Added more water to avoid chlorine bleach and fabric softener staining. Washer is complete to move. Adding detergent on load size and soil level. Not using dispensers. Do not add products directly onto load...
Use & Care Guide
Page 15
... cycle is tightly packed. Using too much detergent. The lid will not start with the best cycle. not dissolving Be sure laundry packet is left open . Washer pumps out water before finishing cycle Lid is added to washer basket before wash cycle. Wipe up bleach spills. See "Cleaning Your Washer" in loose heaps evenly around the basket wall. Lid locked light is flashing The lid is closed . This may still be spinning. Follow the manufacturer's instructions...
... cycle is tightly packed. Using too much detergent. The lid will not start with the best cycle. not dissolving Be sure laundry packet is left open . Washer pumps out water before finishing cycle Lid is added to washer basket before wash cycle. Wipe up bleach spills. See "Cleaning Your Washer" in loose heaps evenly around the basket wall. Lid locked light is flashing The lid is closed . This may still be spinning. Follow the manufacturer's instructions...

Use & Care Guide
Page 16
... review the Troubleshooting or Problem Solver section of the Use and Care Guide, scan the QR code on the duration of implied warranties of purchase including dealer or retailer name and address IF YOU NEED SERVICE: 1. FOURTH THROUGH TENTH YEAR LIMITED WARRANTY (DRIVE MOTOR AND WASH BASKET ONLY - n Drive Motor n Wash Basket (Side Walls Only) YOUR SOLE AND EXCLUSIVE REMEDY UNDER THIS LIMITED WARRANTY SHALL BE PRODUCT REPAIR AS PROVIDED HEREIN. Consumable parts...
... review the Troubleshooting or Problem Solver section of the Use and Care Guide, scan the QR code on the duration of implied warranties of purchase including dealer or retailer name and address IF YOU NEED SERVICE: 1. FOURTH THROUGH TENTH YEAR LIMITED WARRANTY (DRIVE MOTOR AND WASH BASKET ONLY - n Drive Motor n Wash Basket (Side Walls Only) YOUR SOLE AND EXCLUSIVE REMEDY UNDER THIS LIMITED WARRANTY SHALL BE PRODUCT REPAIR AS PROVIDED HEREIN. Consumable parts...

Warranty Information
Page 1
... to review the Troubleshooting or Problem Solver section of the Use and Care Guide, scan the QR code on the below named parts only and does not include repair labor. In the U.S. In the event of product replacement, your retailer about the quality, durability, or need for service in fixtures (i.e. Service must be warranted by a Maytag designated service company. Proof of your product requires repair. house wiring, fuses, or water inlet hoses). 4. Conversion...
... to review the Troubleshooting or Problem Solver section of the Use and Care Guide, scan the QR code on the below named parts only and does not include repair labor. In the U.S. In the event of product replacement, your retailer about the quality, durability, or need for service in fixtures (i.e. Service must be warranted by a Maytag designated service company. Proof of your product requires repair. house wiring, fuses, or water inlet hoses). 4. Conversion...


