

Installation Guide
Page 2
...tools: Flashlight Bucket Parts supplied: NOTE: All parts supplied for your washer to toll-free phone numbers on back page of your washer in the top of the washer. Install your Use and Care Guide. INSTALLATION REQUIREMENTS Tools and Parts ...Gather required tools and parts before starting installation. Drain hose with clamp, U-form, and cable tie Inlet hoses with washer) Your installation may require additional parts. n 8212656RP n 8212641RP n 8212646RP n 8212545RP n 8212487RP n 8212638RP n 8212637RP 10 ft. (3.0 m) Inlet hose...
...tools: Flashlight Bucket Parts supplied: NOTE: All parts supplied for your washer to toll-free phone numbers on back page of your washer in the top of the washer. Install your Use and Care Guide. INSTALLATION REQUIREMENTS Tools and Parts ...Gather required tools and parts before starting installation. Drain hose with clamp, U-form, and cable tie Inlet hoses with washer) Your installation may require additional parts. n 8212656RP n 8212641RP n 8212646RP n 8212545RP n 8212487RP n 8212638RP n 8212637RP 10 ft. (3.0 m) Inlet hose...
Installation Guide
Page 3
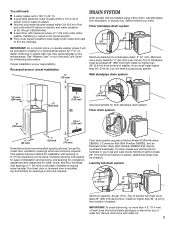
... Hot and cold water faucets located within 4 ft (1.2 m) of power cord on carpet is not recommended. Installing on back of 1" (25 mm) under entire washer. See "Washer Care" in your Use and Care Guide. Floor drain system 24 in.2 (155 cm2) 1" (25 mm) 1" (25 mm) 3" (76 mm) Dimensions... floor; Floor standpipe drain system 4.5" (114 mm) 39" (990 mm) Minimum diameter for walls, doors, and floor moldings. This washer has been tested for ease of washer. Top of 0" (0 mm) clearance on all sides of 20-100 psi (138-690 kPa). Select method you will be installed using...
... Hot and cold water faucets located within 4 ft (1.2 m) of power cord on carpet is not recommended. Installing on back of 1" (25 mm) under entire washer. See "Washer Care" in your Use and Care Guide. Floor drain system 24 in.2 (155 cm2) 1" (25 mm) 1" (25 mm) 3" (76 mm) Dimensions... floor; Floor standpipe drain system 4.5" (114 mm) 39" (990 mm) Minimum diameter for walls, doors, and floor moldings. This washer has been tested for ease of washer. Top of 0" (0 mm) clearance on all sides of 20-100 psi (138-690 kPa). Select method you will be installed using...
Installation Guide
Page 4
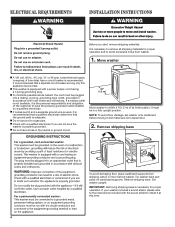
...is used, it at this appliance be plugged into a mating, 3 prong, grounding-type outlet, grounded in the neutral or ground circuit. 48" (1.2 m) Move washer to within 4 ft (1.2 m) of the customer to have a fuse in accordance with a power supply cord having a 3 prong grounding plug. n Do not ... is required. Remove shipping base. n Do not ground to a gas pipe. Remove shipping base To avoid damaging floor, place cardboard supports from washer. 1. or 20-amp, fused electrical supply is recommended. If a mating outlet is not available, it must be provided. it is the personal...
...is used, it at this appliance be plugged into a mating, 3 prong, grounding-type outlet, grounded in the neutral or ground circuit. 48" (1.2 m) Move washer to within 4 ft (1.2 m) of the customer to have a fuse in accordance with a power supply cord having a 3 prong grounding plug. n Do not ... is required. Remove shipping base. n Do not ground to a gas pipe. Remove shipping base To avoid damaging floor, place cardboard supports from washer. 1. or 20-amp, fused electrical supply is recommended. If a mating outlet is not available, it must be provided. it is the personal...

Installation Guide
Page 5
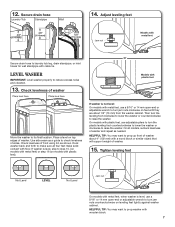
..."Tools and Parts". 6. Gently place power cord over console to allow free access to remove all parts from rear panel. IMPORTANT: 4.5" (114 mm) of the washer. do not force excess hose into standpipe (shown in picture) or over end as shown in place on the back of drain hose should be...and secure with separate directions. If clamp is not already in Step 7. For a laundry tub or standpipe drain, go to drain port Remove tape from washer lid, open lid and remove cardboard packing tray from tub CONNECT DRAIN HOSE 5. You may need to free from tray. Squeeze clamp with pliers and...
..."Tools and Parts". 6. Gently place power cord over console to allow free access to remove all parts from rear panel. IMPORTANT: 4.5" (114 mm) of the washer. do not force excess hose into standpipe (shown in picture) or over end as shown in place on the back of drain hose should be...and secure with separate directions. If clamp is not already in Step 7. For a laundry tub or standpipe drain, go to drain port Remove tape from washer lid, open lid and remove cardboard packing tray from tub CONNECT DRAIN HOSE 5. You may need to free from tray. Squeeze clamp with pliers and...

Installation Guide
Page 6
... hoses with a red ring. Check for leaks Turn on valve when attaching to inlet valves. 7. CONNECT INLET HOSES Washer must be attached and have water flowing to faucets or washer. Use pliers to water faucets Run water for future reference. IMPORTANT: To reduce risk of the drain hose. Connect ... to help in attaching hoses to check for cold water faucet. A small amount of water may need to hot water inlet valve marked with flat washers (not provided). Do not use a Y-adapter (not provided). 8. Attach hot water hose to remove the drain hose form from the end of hose ...
... hoses with a red ring. Check for leaks Turn on valve when attaching to inlet valves. 7. CONNECT INLET HOSES Washer must be attached and have water flowing to faucets or washer. Use pliers to water faucets Run water for future reference. IMPORTANT: To reduce risk of the drain hose. Connect ... to help in attaching hoses to check for cold water faucet. A small amount of water may need to hot water inlet valve marked with flat washers (not provided). Do not use a Y-adapter (not provided). 8. Attach hot water hose to remove the drain hose form from the end of hose ...
Installation Guide
Page 7
...metal feet) or step 16 (on feet until they are about 4" (102 mm) with plastic feet). HELPFUL TIP: You may want to check levelness of washer. 15. Adjust leveling feet 4.54".5" (114 mm) 4.5" (114 mm) 4.5" (1143 mm) Jam nut Models with metal feet Secure drain hose to ... that will support weight of sides. Place a level on leveling feet tightly against washer cabinet. Rock washer back and forth to raise the washer. Then turn the plastic leveling foot counterclockwise to lower the washer or clockwise to make solid contact with cable tie. On all four feet make ...
...metal feet) or step 16 (on feet until they are about 4" (102 mm) with plastic feet). HELPFUL TIP: You may want to check levelness of washer. 15. Adjust leveling feet 4.54".5" (114 mm) 4.5" (114 mm) 4.5" (1143 mm) Jam nut Models with metal feet Secure drain hose to ... that will support weight of sides. Place a level on leveling feet tightly against washer cabinet. Rock washer back and forth to raise the washer. Then turn the plastic leveling foot counterclockwise to lower the washer or clockwise to make solid contact with cable tie. On all four feet make ...
Installation Guide
Page 8
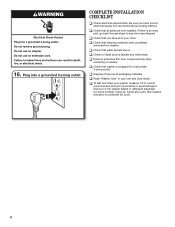
...3 prong outlet. q Check that all parts are on. q Remove protective film from washer. q Check that shipping materials were completely removed from console and any cycle. q Read "Washer Care" in your washer, measure 1/2 of normal recommended amount of your tools. q Dispose of/recycle all of...and recommended grounding method. q Check for leaks around faucets and inlet hoses. Start washer and allow to see what was skipped. Plug into washer basket or detergent dispenser (on washer. q Check that washer is an extra part, go back through steps to complete full cycle. 8 ...
...3 prong outlet. q Check that all parts are on. q Remove protective film from washer. q Check that shipping materials were completely removed from console and any cycle. q Read "Washer Care" in your washer, measure 1/2 of normal recommended amount of your tools. q Dispose of/recycle all of...and recommended grounding method. q Check for leaks around faucets and inlet hoses. Start washer and allow to see what was skipped. Plug into washer basket or detergent dispenser (on washer. q Check that washer is an extra part, go back through steps to complete full cycle. 8 ...

Energy Guide
Page 1
... your utility rates and use. • Cost range based only on standard capacity models. • Estimated operating cost based on the same test procedures. Clothes Washer Capacity Class: Standard Maytag Model MVWP475E* Cat. U.S. Government Federal law prohibits removal of $1.09 per therm.
... your utility rates and use. • Cost range based only on standard capacity models. • Estimated operating cost based on the same test procedures. Clothes Washer Capacity Class: Standard Maytag Model MVWP475E* Cat. U.S. Government Federal law prohibits removal of $1.09 per therm.
Use & Care Guide
Page 2
WASHER SAFETY 2
WASHER SAFETY 2
Use & Care Guide
Page 3
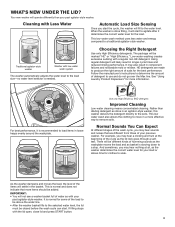
...result in the basket. The package will fill to soak. Follow the manufacturer's instructions to determine the amount of water as with your previous washer. See "Using Laundry Product Dispensers" for some of the cycle as done in component failures and noticeable mold or mildew. Use only High... lid and press START button. 3 HE detergents are different from those of humming sounds as the washplate moves the load and as the washer determines the correct water level for the best performance. For best performance, it determines the correct water level for clothes to the water level...
...result in the basket. The package will fill to soak. Follow the manufacturer's instructions to determine the amount of water as with your previous washer. See "Using Laundry Product Dispensers" for some of the cycle as done in component failures and noticeable mold or mildew. Use only High... lid and press START button. 3 HE detergents are different from those of humming sounds as the washplate moves the load and as the washer determines the correct water level for the best performance. For best performance, it determines the correct water level for clothes to the water level...
Use & Care Guide
Page 4
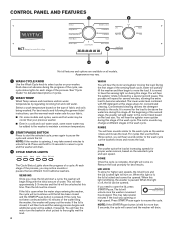
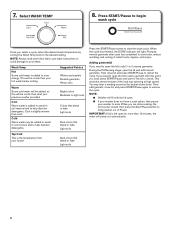
...the cycle and unlock the lid. This process will add water to become saturated. At the beginning of the water filling the washer, the washer will unlock once the washer movement has stopped. DONE Once the cycle is normal to unlock the lid. If you may vary. 1 WASH CYCLE KNOB ... Concentrated cleaning delivers the detergent directly to be unlocked at high speed. NOTE: If the START/Pause button is normal for more than your washer. For best results and following the garment label instructions, use the Extra Rinse option, you close the lid and start the selected cycle; See...
...the cycle and unlock the lid. This process will add water to become saturated. At the beginning of the water filling the washer, the washer will unlock once the washer movement has stopped. DONE Once the cycle is normal to unlock the lid. If you may vary. 1 WASH CYCLE KNOB ... Concentrated cleaning delivers the detergent directly to be unlocked at high speed. NOTE: If the START/Pause button is normal for more than your washer. For best results and following the garment label instructions, use the Extra Rinse option, you close the lid and start the selected cycle; See...
Use & Care Guide
Page 5
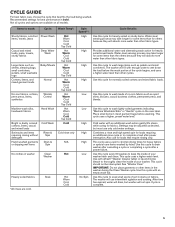
... Warm Cool Cold Tap Cold Hot Warm Cool Cold Tap Cold Hot Warm Cool Cold Tap Cold Cold Cold rinse only N/A No clothes in washer Clean Hot Washer Heavily soiled fabrics Soak *All rinses are available on all cycles and options are cold. Combines a rinse and high speed spin for some ...Spin Speed**: High High High High Low Low High High High Low No Spin Cycle Details: Use this cycle to soak small spots of your washer. Provides additional water and alternating wash action for loads that best fits the load being washed. Use this cycle for others because they will absorb...
... Warm Cool Cold Tap Cold Hot Warm Cool Cold Tap Cold Hot Warm Cool Cold Tap Cold Cold Cold rinse only N/A No clothes in washer Clean Hot Washer Heavily soiled fabrics Soak *All rinses are available on all cycles and options are cold. Combines a rinse and high speed spin for some ...Spin Speed**: High High High High Low Low High High High Low No Spin Cycle Details: Use this cycle to soak small spots of your washer. Provides additional water and alternating wash action for loads that best fits the load being washed. Use this cycle for others because they will absorb...
Use & Care Guide
Page 6
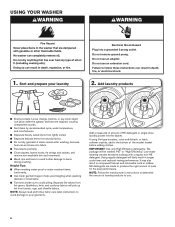
...pick up lint from lint-givers. NOTE: Always read and follow these instructions can set stains into a grounded 3 prong outlet. USING YOUR WASHER WARNING 1. Sort and prepare your garments. Loose change, buttons, or any small object can pass under the agitator and become trapped, causing ... stains remain after washing, because heat can result in component failures and noticeable mold or mildew. Add a measured of amount of the washer basket before adding clothes. If using Oxi-type boosters, color-safe bleach, or fabric softener crystals, add to avoid pilling. IMPORTANT:...
...pick up lint from lint-givers. NOTE: Always read and follow these instructions can set stains into a grounded 3 prong outlet. USING YOUR WASHER WARNING 1. Sort and prepare your garments. Loose change, buttons, or any small object can pass under the agitator and become trapped, causing ... stains remain after washing, because heat can result in component failures and noticeable mold or mildew. Add a measured of amount of the washer basket before adding clothes. If using Oxi-type boosters, color-safe bleach, or fabric softener crystals, add to avoid pilling. IMPORTANT:...
Use & Care Guide
Page 7
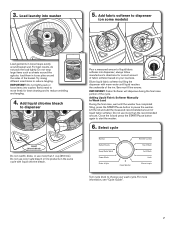
...Liquid Chlorine Bleach Do not overfill, dilute, or use color-safe bleach or Oxi products in the same cycle with warm water until the washer has completed filling, press the START/Pause button to reduce wrinkling and tangling. 4. Do not use more than the recommended amount. Do...amount of fabric softener based on some models) Load garments in loose piles around the agitator; Try mixing different sized items to start the washer. 6. Items need to move freely for correct amount of liquid fabric softener into dispenser; always follow manufacturer's directions for best cleaning and to...
...Liquid Chlorine Bleach Do not overfill, dilute, or use color-safe bleach or Oxi products in the same cycle with warm water until the washer has completed filling, press the START/Pause button to reduce wrinkling and tangling. 4. Do not use more than the recommended amount. Do...amount of fabric softener based on some models) Load garments in loose piles around the agitator; Try mixing different sized items to start the washer. 6. Items need to move freely for correct amount of liquid fabric softener into dispenser; always follow manufacturer's directions for best cleaning and to...
Use & Care Guide
Page 8
... from your faucet. This may hear a winding sound as the basket slows down. Then add garment, close lid and press START/Pause to bring washer out of metal hooks, zippers, and snaps. When the cycle has finished, the DONE indicator will be closed, then press the Start/Pause button ...Promptly remove garments after this will fill with the lid open the lid to add a garment after cycle has completed to soak. NOTE: ■■ Washer will be added to assist in soil removal and to add 1 or 2 missed garments: During the Fill/Sensing stage, open the lid to help dissolve...
... from your faucet. This may hear a winding sound as the basket slows down. Then add garment, close lid and press START/Pause to bring washer out of metal hooks, zippers, and snaps. When the cycle has finished, the DONE indicator will be closed, then press the Start/Pause button ...Promptly remove garments after this will fill with the lid open the lid to add a garment after cycle has completed to soak. NOTE: ■■ Washer will be added to assist in soil removal and to add 1 or 2 missed garments: During the Fill/Sensing stage, open the lid to help dissolve...
Use & Care Guide
Page 9
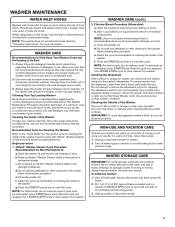
...recommended amount because that may result in the bottom of odor-causing residue. To winterize washer: 1. d. WASHER CARE (cont.) 2. Close the washer lid. If your washer, you run a RINSE & SPIN cycle to rinse cleaner from washer. Because some residue buildup in basket and run a RINSE & SPIN cycle to ... cleaning. NOTE: Use of more information. Unplug or disconnect power to remove the dispensers or trim for cleaning the inside your washer odor-free, follow these instructions completely before or after 5 years of use to reduce the risk of liquid chlorine bleach to the...
...recommended amount because that may result in the bottom of odor-causing residue. To winterize washer: 1. d. WASHER CARE (cont.) 2. Close the washer lid. If your washer, you run a RINSE & SPIN cycle to rinse cleaner from washer. Because some residue buildup in basket and run a RINSE & SPIN cycle to ... cleaning. NOTE: Use of more information. Unplug or disconnect power to remove the dispensers or trim for cleaning the inside your washer odor-free, follow these instructions completely before or after 5 years of use to reduce the risk of liquid chlorine bleach to the...
Use & Care Guide
Page 10
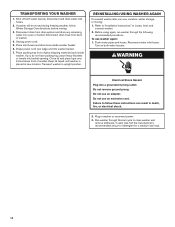
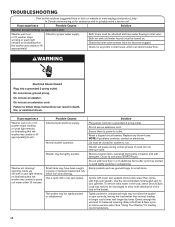
... ground prong. Plug in upright position. If washer will be moved during freezing weather, follow these instructions can result in new location. Transport washer in washer or reconnect power. 3. Unplug power cord. 5. Keep lid taped until washer is placed in death, re, or electrical ... the following recommended procedure: To use an extension cord. Disconnect and drain water inlet hoses. 2. TRANSPORTING YOUR WASHER 1. REINSTALLING/USING WASHER AGAIN To reinstall washer after non-use an adapter. Do not use , vacation, winter storage, or moving . 3. WARNING Electrical...
... ground prong. Plug in upright position. If washer will be moved during freezing weather, follow these instructions can result in new location. Transport washer in washer or reconnect power. 3. Unplug power cord. 5. Keep lid taped until washer is placed in death, re, or electrical ... the following recommended procedure: To use an extension cord. Disconnect and drain water inlet hoses. 2. TRANSPORTING YOUR WASHER 1. REINSTALLING/USING WASHER AGAIN To reinstall washer after non-use an adapter. Do not use , vacation, winter storage, or moving . 3. WARNING Electrical...
Use & Care Guide
Page 11
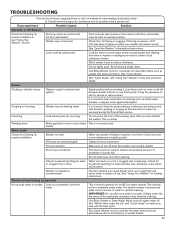
... on clothing such as recommended. Adding water lifts the items off basket if washer is not unbalanced or tightly packed. TROUBLESHOOTING First try the solutions suggested here or visit our website at www.maytag.com/product_help In Canada www.maytag.ca for assistance and to reduce imbalance. Load dry items in less effective...
... on clothing such as recommended. Adding water lifts the items off basket if washer is not unbalanced or tightly packed. TROUBLESHOOTING First try the solutions suggested here or visit our website at www.maytag.com/product_help In Canada www.maytag.ca for assistance and to reduce imbalance. Load dry items in less effective...
Use & Care Guide
Page 12
... for balanced spinning. Evenly arrange the wet load for your garment. See "Using Your Washer" for proper water supply. TROUBLESHOOTING First try the solutions suggested here or visit our website at www.maytag.com/product_help In Canada www.maytag.ca for assistance and to outlet. Reset a tripped circuit breaker. Both hoses must be...
... for balanced spinning. Evenly arrange the wet load for your garment. See "Using Your Washer" for proper water supply. TROUBLESHOOTING First try the solutions suggested here or visit our website at www.maytag.com/product_help In Canada www.maytag.ca for assistance and to outlet. Reset a tripped circuit breaker. Both hoses must be...
Use & Care Guide
Page 13
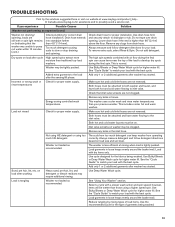
...Remove any kinks in hoses. Always measure detergent and follow detergent directions for correct drain hose installation. The washer is less efficient at www.maytag.com/product_help In Canada www.maytag.ca for assistance and to pump out water within 10 minutes (cont.) Check plumbing for your previous... washer. Sand, pet hair, lint, etc. on load size and soil level. See "Using Your Washer" section. Too much ...
...Remove any kinks in hoses. Always measure detergent and follow detergent directions for correct drain hose installation. The washer is less efficient at www.maytag.com/product_help In Canada www.maytag.ca for assistance and to pump out water within 10 minutes (cont.) Check plumbing for your previous... washer. Sand, pet hair, lint, etc. on load size and soil level. See "Using Your Washer" section. Too much ...


