

Use and Care Guide
Page 3
WASHER SAFETY Your safety and the safety of injury, and tell you what the potential hazard is the safety alert symbol. WARNING You can happen if ...
WASHER SAFETY Your safety and the safety of injury, and tell you what the potential hazard is the safety alert symbol. WARNING You can happen if ...

Use and Care Guide
Page 4
... the gas is used ■ Do not repair or replace any part of fire, electric shock, or injury to persons when using the washer, follow basic precautions, including the following: ■ Read all hot water faucets and let the water flow from service or discarded, substances as... they give off vapors that has not been used near children. IMPORTANT SAFETY INSTRUCTIONS WARNING: To reduce the risk of the washer or attempt any accumulated hydrogen gas. HYDROGEN GAS IS servicing unless specifically recommended in this time. machine, turn on or in a hot ...
... the gas is used ■ Do not repair or replace any part of fire, electric shock, or injury to persons when using the washer, follow basic precautions, including the following: ■ Read all hot water faucets and let the water flow from service or discarded, substances as... they give off vapors that has not been used near children. IMPORTANT SAFETY INSTRUCTIONS WARNING: To reduce the risk of the washer or attempt any accumulated hydrogen gas. HYDROGEN GAS IS servicing unless specifically recommended in this time. machine, turn on or in a hot ...
Use and Care Guide
Page 5
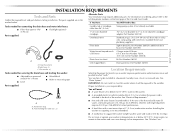
...numbers on carpeting is not recommended. ■ A sturdy floor to the back of where the power cord is your washer in the washer basket. Flat washer (4) Drain hose too short Lint clogged drain Kit Part Number 280131 Drain protector, Part Number 367031 Location Requirements Tools needed...location for best performance. ■ A level floor with nuts (2) ■ Hot and cold water faucets located within 4 ft (1.2 m) of the washer. Your washer can cause damage in a basement, laundry room, closet, or recessed area. Front leveling feet with a maximum slope of 315 lbs (143 kgs)....
...numbers on carpeting is not recommended. ■ A sturdy floor to the back of where the power cord is your washer in the washer basket. Flat washer (4) Drain hose too short Lint clogged drain Kit Part Number 280131 Drain protector, Part Number 367031 Location Requirements Tools needed...location for best performance. ■ A level floor with nuts (2) ■ Hot and cold water faucets located within 4 ft (1.2 m) of the washer. Your washer can cause damage in a basement, laundry room, closet, or recessed area. Front leveling feet with a maximum slope of 315 lbs (143 kgs)....

Use and Care Guide
Page 6
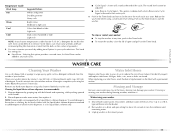
... in the top and bottom are acceptable. ■ Companion appliance spacing should be a minimum of 28" (71 cm) from the bottom of the washer. Standpipe drain system-wall or floor (views A & B) The standpipe drain requires a minimum diameter standpipe of the laundry tub must be inside the standpipe.... The siphon break must be purchased separately. Secure drain hose with beaded tie strap. 39" (99 cm) 0" 27" 0" 1" 25¹⁄₂" (0 cm) (68.6 cm) (0 cm) (2.5 cm) (64.8 cm) A B 2 24 in the top and bottom of the door...
... in the top and bottom are acceptable. ■ Companion appliance spacing should be a minimum of 28" (71 cm) from the bottom of the washer. Standpipe drain system-wall or floor (views A & B) The standpipe drain requires a minimum diameter standpipe of the laundry tub must be inside the standpipe.... The siphon break must be purchased separately. Secure drain hose with beaded tie strap. 39" (99 cm) 0" 27" 0" 1" 25¹⁄₂" (0 cm) (68.6 cm) (0 cm) (2.5 cm) (64.8 cm) A B 2 24 in the top and bottom of the door...

Use and Care Guide
Page 7
... only, 15- Do not use an adapter. It is recommended that is properly grounded. GROUNDING INSTRUCTIONS For a grounded, cord-connected washer: This washer must be plugged into an appropriate outlet that a separate circuit serving only this appliance be plugged into a grounded 3 prong outlet. ...cord having a 3 prong grounding plug. ■ To minimize possible shock hazard, the cord must be grounded. For a permanently connected washer: This washer must be connected to the equipment-grounding terminal or lead on the appliance. 7 Do not modify the plug provided with the circuit ...
... only, 15- Do not use an adapter. It is recommended that is properly grounded. GROUNDING INSTRUCTIONS For a grounded, cord-connected washer: This washer must be plugged into an appropriate outlet that a separate circuit serving only this appliance be plugged into a grounded 3 prong outlet. ...cord having a 3 prong grounding plug. ■ To minimize possible shock hazard, the cord must be grounded. For a permanently connected washer: This washer must be connected to the equipment-grounding terminal or lead on the appliance. 7 Do not modify the plug provided with the circuit ...

Use and Care Guide
Page 8
...cord and cord restraint or the looped power cord version. Locate the yellow shipping materials on the rear of its final location. 2. Move the washer to completely remove the power cord, cord restraint, and pin from the rear panel. 3. Pin 4. INSTALLATION INSTRUCTIONS Before You Start 1. Remove ... upright position and not tilted before moving across floor. Remove Shipping Materials Removing the shipping material is not removed, the washer will make excessive noise. 1. Straight power cord A B A. WARNING Excessive Weight Hazard Use two or more people to move and install...
...cord and cord restraint or the looped power cord version. Locate the yellow shipping materials on the rear of its final location. 2. Move the washer to completely remove the power cord, cord restraint, and pin from the rear panel. 3. Pin 4. INSTALLATION INSTRUCTIONS Before You Start 1. Remove ... upright position and not tilted before moving across floor. Remove Shipping Materials Removing the shipping material is not removed, the washer will make excessive noise. 1. Straight power cord A B A. WARNING Excessive Weight Hazard Use two or more people to move and install...

Use and Care Guide
Page 9
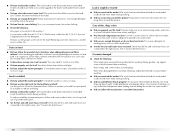
...A. Laundry tub drain or standpipe drain Connecting the drain hose form to your floors from going back into the washer: ■ Do not force excess drain hose into the rear of the washer. Place end of drain hose form into the other end of the form. Looped power cord 1. Feed end... of drain hose into one end of form. Remove drain hose from washer cabinet Gently pull the corrugated drain hose out of the washer from washer. 2. Hose should be secure but loose enough to pull the hose until both ends are completely removed from the...
...A. Laundry tub drain or standpipe drain Connecting the drain hose form to your floors from going back into the washer: ■ Do not force excess drain hose into the rear of the washer. Place end of drain hose form into the other end of the form. Looped power cord 1. Feed end... of drain hose into one end of form. Remove drain hose from washer cabinet Gently pull the corrugated drain hose out of the washer from washer. 2. Hose should be secure but loose enough to pull the hose until both ends are completely removed from the...

Use and Care Guide
Page 10
...the couplings. ■ Check the temperature of the inlet hoses. Using pliers, tighten the couplings with pliers. 3. Cold water inlet valve B. Damage to the washer A B A. A B A. Screw on coupling by hand until it easier to the water faucets using the new inlet hoses. Connect the inlet hoses to... the valves can result. Do not use tape or sealants on the washer. 2. Hot water inlet valve 1. Attaching the hot water coupling first makes it is connected to the corrugated drain hose. Connect the ...
...the couplings. ■ Check the temperature of the inlet hoses. Using pliers, tighten the couplings with pliers. 3. Cold water inlet valve B. Damage to the washer A B A. A B A. Screw on coupling by hand until it easier to the water faucets using the new inlet hoses. Connect the inlet hoses to... the valves can result. Do not use tape or sealants on the washer. 2. Hot water inlet valve 1. Attaching the hot water coupling first makes it is connected to the corrugated drain hose. Connect the ...

Use and Care Guide
Page 11
... port. ■ Periodically inspect and replace hoses if bulges, kinks, cuts, wear, or leaks are recessed, put the formed end of the washer. Using pliers, tighten the couplings with an additional two-thirds turn . Screw on coupling by hand until it is seated on the valve. Record...up the front of hose failure. The block needs to the valves can result. 3. A B C If the washer faucets and the drain standpipe are found. Damage to reduce the risk of the washer about 4" (10.2 cm) with the beaded tie strap. Check for leaks. Tightly wrap the tie strap around ...
... port. ■ Periodically inspect and replace hoses if bulges, kinks, cuts, wear, or leaks are recessed, put the formed end of the washer. Using pliers, tighten the couplings with an additional two-thirds turn . Screw on coupling by hand until it is seated on the valve. Record...up the front of hose failure. The block needs to the valves can result. 3. A B C If the washer faucets and the drain standpipe are found. Damage to reduce the risk of the washer about 4" (10.2 cm) with the beaded tie strap. Check for leaks. Tightly wrap the tie strap around ...

Use and Care Guide
Page 12
... or down as necessary by placing a level on the top edges of your tools. 4. IMPORTANT: If the nuts are not tight against the washer cabinet. Steps in its final location. 2. See "Electrical Requirements." 2. If there is an extra part, go back through 4 until the rear of the...4. Check that the yellow shipping materials were completely removed from the lower back of /recycle all parts are on the feet tightly against the washer cabinet, the washer may hear the self-adjusting rear feet click into the threaded holes at least 4" (10.2 cm) off the floor. Check the levelness ...
... or down as necessary by placing a level on the top edges of your tools. 4. IMPORTANT: If the nuts are not tight against the washer cabinet. Steps in its final location. 2. See "Electrical Requirements." 2. If there is an extra part, go back through 4 until the rear of the...4. Check that the yellow shipping materials were completely removed from the lower back of /recycle all parts are on the feet tightly against the washer cabinet, the washer may hear the self-adjusting rear feet click into the threaded holes at least 4" (10.2 cm) off the floor. Check the levelness ...

Use and Care Guide
Page 13
...anything that are dampened with gasoline or other flammable fluids. Do not use an adapter. Do not use an adapter. WARNING WASHER USE Starting Your Washer WARNING Fire Hazard Never place items in death, fire, or electrical shock. 1. WARNING: To reduce the risk of powdered ... remove ground prong. Failure to persons, read the IMPORTANT SAFETY INSTRUCTIONS before operating this appliance. Measure detergent and pour it into your washer, measure ¹⁄₂ of the normal recommended amount of fire, electric shock, or injury to follow these instructions can result in...
...anything that are dampened with gasoline or other flammable fluids. Do not use an adapter. Do not use an adapter. WARNING WASHER USE Starting Your Washer WARNING Fire Hazard Never place items in death, fire, or electrical shock. 1. WARNING: To reduce the risk of powdered ... remove ground prong. Failure to persons, read the IMPORTANT SAFETY INSTRUCTIONS before operating this appliance. Measure detergent and pour it into your washer, measure ¹⁄₂ of the normal recommended amount of fire, electric shock, or injury to follow these instructions can result in...

Use and Care Guide
Page 14
...drip, or run down into the wash cycle for optimal performance, ensuring the cleanest and brightest loads. Bleach is immediately fed into the washer to desired setting. 7. Select a Wash Temperature based on the type of the cycle. ■ Dispensers on some warm water is ... some models) ■ Use only liquid fabric softener in this dispenser. If this dispenser to add powdered chlorine or color-safe bleach to maintain washer balance. The damage appears as shown. Do not use this happens, do not use . HLOLRIQINUEIDBLEACH C Style 1 Liquid chlorine bleach dispenser (on...
...drip, or run down into the wash cycle for optimal performance, ensuring the cleanest and brightest loads. Bleach is immediately fed into the washer to desired setting. 7. Select a Wash Temperature based on the type of the cycle. ■ Dispensers on some warm water is ... some models) ■ Use only liquid fabric softener in this dispenser. If this dispenser to add powdered chlorine or color-safe bleach to maintain washer balance. The damage appears as shown. Do not use this happens, do not use . HLOLRIQINUEIDBLEACH C Style 1 Liquid chlorine bleach dispenser (on...
Use and Care Guide
Page 15
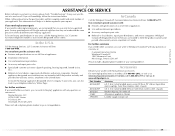
... replace inlet hoses if bulges, kinks, cuts, wear or leaks are equipped with thumbs. 2. Pour 1 qt (1 L) of the cycle. Unplug washer or disconnect power. 15 Temperature Guide Wash Temp Hot Warm Cool Cold Suggested Fabrics Whites and pastels Durable garments Heavy soils Bright colors Moderate to... detergent or bleach from the outside of garments). 8. NOTE: Some models are found. If storing or moving your washer. Selecting this process if necessary. WASHER CARE Cleaning Your Washer Use a soft, damp cloth or sponge to reduce the risk of the wash cycle. 9. Pour this dispenser; ...
... replace inlet hoses if bulges, kinks, cuts, wear or leaks are equipped with thumbs. 2. Pour 1 qt (1 L) of the cycle. Unplug washer or disconnect power. 15 Temperature Guide Wash Temp Hot Warm Cool Cold Suggested Fabrics Whites and pastels Durable garments Heavy soils Bright colors Moderate to... detergent or bleach from the outside of garments). 8. NOTE: Some models are found. If storing or moving your washer. Selecting this process if necessary. WASHER CARE Cleaning Your Washer Use a soft, damp cloth or sponge to reduce the risk of the wash cycle. 9. Pour this dispenser; ...

Use and Care Guide
Page 16
... be balanced and not overloaded. Reset the rear leveling legs (if needed ). Plug in death, fire, or electrical shock. 2. www.maytag.com/help In Canada www.maytag.ca Washer and Components Noisy ■ Is the sink or drain clogged? See "Remove Shipping Materials." ■ Is water deflecting off the load. Center the tub...
... be balanced and not overloaded. Reset the rear leveling legs (if needed ). Plug in death, fire, or electrical shock. 2. www.maytag.com/help In Canada www.maytag.ca Washer and Components Noisy ■ Is the sink or drain clogged? See "Remove Shipping Materials." ■ Is water deflecting off the load. Center the tub...

Use and Care Guide
Page 17
... on the water. ■ Is the water inlet hose kinked? Some cycles feature periods of drain hose lower than the water level in washer? Always measure detergent. Washer continues to start. ■ Are the water inlet valve screens clogged? cycle seems stuck ■ Is the top of agitation and soak...Do not seal the drain hose with tape. Wash/Rinse temperature not what I selected ■ Are the hot and cold water inlet hoses reversed? Washer Operation Washer won 't drain or spin ■ Is the drain hose clogged, or the end of the agitator is normal. Remove any accumulated film or ...
... on the water. ■ Is the water inlet hose kinked? Some cycles feature periods of drain hose lower than the water level in washer? Always measure detergent. Washer continues to start. ■ Are the water inlet valve screens clogged? cycle seems stuck ■ Is the top of agitation and soak...Do not seal the drain hose with tape. Wash/Rinse temperature not what I selected ■ Are the hot and cold water inlet hoses reversed? Washer Operation Washer won 't drain or spin ■ Is the drain hose clogged, or the end of the agitator is normal. Remove any accumulated film or ...
Use and Care Guide
Page 18
...fabric softener on the clothing. ■ Check the following : Were sharp items removed from pockets before washing. ■ Did you unload the washer promptly? Sort dark clothes from whites and lights. ■ Was the wash temperature too low? To reduce wrinkling of permanent press clothes and... some models). ■ Did you overload the washer? Transfer of a cycle only. Mend rips and broken threads in the load if overloaded. If so, you can expect some lint on clothes...
...fabric softener on the clothing. ■ Check the following : Were sharp items removed from pockets before washing. ■ Did you unload the washer promptly? Sort dark clothes from whites and lights. ■ Was the wash temperature too low? To reduce wrinkling of permanent press clothes and... some models). ■ Did you overload the washer? Transfer of a cycle only. Mend rips and broken threads in the load if overloaded. If so, you can expect some lint on clothes...
Use and Care Guide
Page 19
...8212487RP 8212526 31682 1903WH Accessory 6 ft (1.8 m) nylon braided space-saving fill hose, 90° elbow, hypro-blue steel couplings. To locate the Maytag® appliances designated service company in your area, you the cost of appliances. ■ Installation information. ■ Use and maintenance procedures. ■...800-807-6777. It may save you can write to fulfill the product warranty and provide after -warranty service, anywhere in your washer with any questions or concerns at www.whirlpoolparts.ca. If you need replacement parts If you need help us at : Customer ...
...8212487RP 8212526 31682 1903WH Accessory 6 ft (1.8 m) nylon braided space-saving fill hose, 90° elbow, hypro-blue steel couplings. To locate the Maytag® appliances designated service company in your area, you the cost of appliances. ■ Installation information. ■ Use and maintenance procedures. ■...800-807-6777. It may save you can write to fulfill the product warranty and provide after -warranty service, anywhere in your washer with any questions or concerns at www.whirlpoolparts.ca. If you need replacement parts If you need help us at : Customer ...


