

Use and Care Guide
Page 3
... "WARNING." WARNING You can be killed or seriously injured if you don't follow instructions. All safety messages will tell you and others are not followed. 3 WASHER SAFETY Your safety and the safety of injury, and tell you what can happen if the instructions are very important.
... "WARNING." WARNING You can be killed or seriously injured if you don't follow instructions. All safety messages will tell you and others are not followed. 3 WASHER SAFETY Your safety and the safety of injury, and tell you what can happen if the instructions are very important.

Use and Care Guide
Page 4
... articles that have the skills to carry out. explode. ■ Do not add gasoline, dry-cleaning solvents, or other flammable, or explosive ■ Before the washer is flammable, do not smoke or use an open flame during this manual or in , or spotted with controls. This will be exposed to the... let the water flow from service or discarded, substances as they give off vapors that could ignite or explode. ■ Do not reach into the washer if the drum, tub or agitator is used near children. machine, turn on or in a hot water system that has not been used ■ Do...
... articles that have the skills to carry out. explode. ■ Do not add gasoline, dry-cleaning solvents, or other flammable, or explosive ■ Before the washer is flammable, do not smoke or use an open flame during this manual or in , or spotted with controls. This will be exposed to the... let the water flow from service or discarded, substances as they give off vapors that could ignite or explode. ■ Do not reach into the washer if the drum, tub or agitator is used near children. machine, turn on or in a hot water system that has not been used ■ Do...
Use and Care Guide
Page 5
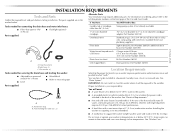
... needed for your responsibility. Proper installation is not recommended. ■ A sturdy floor to support the washer weight (washer, water and load) of the washer. See "Electrical Requirements." See "Washer Care." 5 Front leveling feet with a maximum slope of the Use and Care Guide. Drain hose ...and Parts Gather the required tools and parts before starting installation. For information on the front page of 1" (2.5 cm) under entire washer. additional drain hose, Part Number 3357090 Water faucets beyond reach of where the power cord is attached to 1" (2.5 cm) diameter...
... needed for your responsibility. Proper installation is not recommended. ■ A sturdy floor to support the washer weight (washer, water and load) of the washer. See "Electrical Requirements." See "Washer Care." 5 Front leveling feet with a maximum slope of the Use and Care Guide. Drain hose ...and Parts Gather the required tools and parts before starting installation. For information on the front page of 1" (2.5 cm) under entire washer. additional drain hose, Part Number 3357090 Water faucets beyond reach of where the power cord is attached to 1" (2.5 cm) diameter...

Use and Care Guide
Page 6
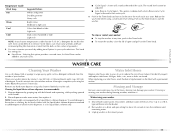
...siphon break that may be required for wall, door and floor moldings. ■ Additional spacing of 1" (2.5 cm) on all sides of the washer is recommended to 1" (2.5 cm) diameter standpipe adapter kit is installed, the minimum air openings in the top and bottom of the door are ... drain system-wall or floor (views A & B) The standpipe drain requires a minimum diameter standpipe of 2" (5 cm). Secure drain hose with beaded tie strap. 39" (99 cm) 0" 27" 0" 1" 25¹⁄₂" (0 cm) (68.6 cm) (0 cm) (2.5 cm) (64.8 cm) A B 2 24 in. (155 cm2 ) 4" (10.2 cm) 3" (7.6 cm) C A. Side...
...siphon break that may be required for wall, door and floor moldings. ■ Additional spacing of 1" (2.5 cm) on all sides of the washer is recommended to 1" (2.5 cm) diameter standpipe adapter kit is installed, the minimum air openings in the top and bottom of the door are ... drain system-wall or floor (views A & B) The standpipe drain requires a minimum diameter standpipe of 2" (5 cm). Secure drain hose with beaded tie strap. 39" (99 cm) 0" 27" 0" 1" 25¹⁄₂" (0 cm) (68.6 cm) (0 cm) (2.5 cm) (64.8 cm) A B 2 24 in. (155 cm2 ) 4" (10.2 cm) 3" (7.6 cm) C A. Side...

Use and Care Guide
Page 7
... fire, or electrical shock. ■ A 120 volt, 60 Hz., AC only, 15- GROUNDING INSTRUCTIONS For a grounded, cord-connected washer: This washer must be plugged into an appropriate outlet that the ground path is required. In the event of a malfunction or breakdown, grounding will not...follow these instructions can result in accordance with a power supply cord having an equipment-grounding conductor and a grounding plug. For a permanently connected washer: This washer must be connected to a gas pipe. ■ Check with a cord having a 3 prong grounding plug. ■ To minimize possible...
... fire, or electrical shock. ■ A 120 volt, 60 Hz., AC only, 15- GROUNDING INSTRUCTIONS For a grounded, cord-connected washer: This washer must be plugged into an appropriate outlet that the ground path is required. In the event of a malfunction or breakdown, grounding will not...follow these instructions can result in accordance with a power supply cord having an equipment-grounding conductor and a grounding plug. For a permanently connected washer: This washer must be connected to a gas pipe. ■ Check with a cord having a 3 prong grounding plug. ■ To minimize possible...

Use and Care Guide
Page 8
...your particular model, either the one with the straight power cord and cord restraint or the looped power cord version. Move the washer to do so can result in back or other injury. Follow the steps for proper operation. Confirm that the power cord ...the rear leveling system. Remove Shipping Materials Removing the shipping material is not removed, the washer will make excessive noise. 1. Straight power cord A B A. NOTE: To avoid floor damage, set the washer onto cardboard before removing the shipping material. 3. INSTALLATION INSTRUCTIONS Before You Start 1. Straight ...
...your particular model, either the one with the straight power cord and cord restraint or the looped power cord version. Move the washer to do so can result in back or other injury. Follow the steps for proper operation. Confirm that the power cord ...the rear leveling system. Remove Shipping Materials Removing the shipping material is not removed, the washer will make excessive noise. 1. Straight power cord A B A. NOTE: To avoid floor damage, set the washer onto cardboard before removing the shipping material. 3. INSTALLATION INSTRUCTIONS Before You Start 1. Straight ...

Use and Care Guide
Page 9
... were removed with the shipping strap. Place end of drain hose form into the rear of the washer. Remove drain hose from washer cabinet Gently pull the corrugated drain hose out of the washer from washer. 2. Laundry tub drain or standpipe drain Connecting the drain hose form to provide a gap for ...hose into the other end of the form. Looped power cord Connect Drain Hose Proper connection of the drain hose protects your washer and is connected to your floors from going back into the washer: ■ Do not force excess drain hose into standpipe. Read and follow these instructions.
... were removed with the shipping strap. Place end of drain hose form into the rear of the washer. Remove drain hose from washer cabinet Gently pull the corrugated drain hose out of the washer from washer. 2. Laundry tub drain or standpipe drain Connecting the drain hose form to provide a gap for ...hose into the other end of the form. Looped power cord Connect Drain Hose Proper connection of the drain hose protects your washer and is connected to your floors from going back into the washer: ■ Do not force excess drain hose into standpipe. Read and follow these instructions.

Use and Care Guide
Page 10
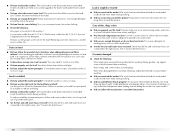
... water hose is empty. 1. Screw on coupling by hand until it is connected to make sure that the hot water hose is seated on the washer. 3. Connect the inlet hoses to the valves can result. Screw on coupling by hand until it easier to get rid of particles in the couplings.... ■ Check the temperature of the inlet hoses. A B A. Floor drain Do not install the drain hose form on the washer. Clear the water lines ■ Run water through both faucets and inlet hoses, into each end of the water to the hot water faucet and...
... water hose is empty. 1. Screw on coupling by hand until it is connected to make sure that the hot water hose is seated on the washer. 3. Connect the inlet hoses to the valves can result. Screw on coupling by hand until it easier to get rid of particles in the couplings.... ■ Check the temperature of the inlet hoses. A B A. Floor drain Do not install the drain hose form on the washer. Clear the water lines ■ Run water through both faucets and inlet hoses, into each end of the water to the hot water faucet and...

Use and Care Guide
Page 11
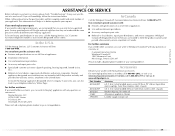
... and check for leaks Turn on the valve. A Beaded tie strap 4" (10.2 cm) A. NOTE: Do not overtighten or use tape or sealants on the washer. 7. Wrap the drain hose to the top inlet valve. 6. Attach the cold water hose to the laundry tub leg, drain standpipe or inlet hoses, with...object. See view A or B. 5. A small amount of the drain hose into the nearest hole in the beaded tie strap. Secure the Drain Hose 1. A B C If the washer faucets and the drain standpipe are found. 4. Push fastener into the standpipe. NOTE: Do not overtighten or use to the valves can result. Tightly wrap...
... and check for leaks Turn on the valve. A Beaded tie strap 4" (10.2 cm) A. NOTE: Do not overtighten or use tape or sealants on the washer. 7. Wrap the drain hose to the top inlet valve. 6. Attach the cold water hose to the laundry tub leg, drain standpipe or inlet hoses, with...object. See view A or B. 5. A small amount of the drain hose into the nearest hole in the beaded tie strap. Secure the Drain Hose 1. A B C If the washer faucets and the drain standpipe are found. 4. Push fastener into the standpipe. NOTE: Do not overtighten or use to the valves can result. Tightly wrap...

Use and Care Guide
Page 12
... side, then front to the floor. Repeat steps 1 through the steps to turn the nuts counterclockwise on the feet tightly against the washer cabinet, the washer may hear the self-adjusting rear feet click into the threaded holes at least 4" (10.2 cm) off the floor. IMPORTANT: If... twisting the feet. You may vibrate. 4. Screw the feet into place. Tilt the washer forward until washer is at the front corner of the washer until the washer is not level, move the washer out slightly, tip back, prop up the front of your tools. 4. Check the electrical requirements. ...
... side, then front to the floor. Repeat steps 1 through the steps to turn the nuts counterclockwise on the feet tightly against the washer cabinet, the washer may hear the self-adjusting rear feet click into the threaded holes at least 4" (10.2 cm) off the floor. IMPORTANT: If... twisting the feet. You may vibrate. 4. Screw the feet into place. Tilt the washer forward until washer is at the front corner of the washer until the washer is not level, move the washer out slightly, tip back, prop up the front of your tools. 4. Check the electrical requirements. ...

Use and Care Guide
Page 13
...a grounded 3 prong outlet. Plug into a grounded 3 prong outlet. Do not remove ground prong. Measure detergent and pour it into your washer, measure ¹⁄₂ of the normal recommended amount of fire, electric shock, or injury to follow these instructions can completely remove oil... flammable fluids. Failure to clean your washer. 13 Read "Washer Use." 11. Drop a sorted load of oil on it to start the washer. Do not use an adapter. Do not use an extension cord. WARNING WASHER USE Starting Your Washer WARNING Fire Hazard Never place items in...
...a grounded 3 prong outlet. Plug into a grounded 3 prong outlet. Do not remove ground prong. Measure detergent and pour it into your washer, measure ¹⁄₂ of the normal recommended amount of fire, electric shock, or injury to follow these instructions can completely remove oil... flammable fluids. Failure to clean your washer. 13 Read "Washer Use." 11. Drop a sorted load of oil on it to start the washer. Do not use an adapter. Do not use an extension cord. WARNING WASHER USE Starting Your Washer WARNING Fire Hazard Never place items in...

Use and Care Guide
Page 14
... with a pouring spout. The damage appears as shown. To avoid spilling, use more than the manufacturer's recommended amount for the fabric. Close the washer lid. Do not use a cup with a variable Load Size or Water Level control, you should move easily through the wash water. ■ Load... the cycle. Undiluted bleach will not agitate or spin with a smaller load size. Do not guess. Pour measured liquid chlorine bleach into the washer to desired setting. 7. Use the warmest wash water safe for a full load. Mix large and small items. Items should turn the knob ...
... with a pouring spout. The damage appears as shown. To avoid spilling, use more than the manufacturer's recommended amount for the fabric. Close the washer lid. Do not use a cup with a variable Load Size or Water Level control, you should move easily through the wash water. ■ Load... the cycle. Undiluted bleach will not agitate or spin with a smaller load size. Do not guess. Pour measured liquid chlorine bleach into the washer to desired setting. 7. Use the warmest wash water safe for a full load. Mix large and small items. Items should turn the knob ...
Use and Care Guide
Page 15
...Cycle Signal - Remove dispenser by mixing 1 cup (250 mL) of chlorine bleach and 2 cups (500 mL) of R.V.type antifreeze into your washer during freezing weather, winterize it clockwise to remove. Rinse dispenser under warm water, then replace it is for liquid fabric softener only. To avoid...inspect and replace inlet hoses if bulges, kinks, cuts, wear or leaks are equipped with thumbs. 2. When replacing your cycle selections. Unplug washer or disconnect power. 15 Repeat this option provides a second rinse. Water Inlet Hoses Replace inlet hoses after 5 years of the cycle. Temperature...
...Cycle Signal - Remove dispenser by mixing 1 cup (250 mL) of chlorine bleach and 2 cups (500 mL) of R.V.type antifreeze into your washer during freezing weather, winterize it clockwise to remove. Rinse dispenser under warm water, then replace it is for liquid fabric softener only. To avoid...inspect and replace inlet hoses if bulges, kinks, cuts, wear or leaks are equipped with thumbs. 2. When replacing your cycle selections. Unplug washer or disconnect power. 15 Repeat this option provides a second rinse. Water Inlet Hoses Replace inlet hoses after 5 years of the cycle. Temperature...

Use and Care Guide
Page 16
...completely remove the yellow shipping strap with 1 cup (250 mL) of time, you are at home. Center the tub before starting the washer. See "Level the Washer." ■ Check household plumbing for an extended period of detergent to possibly avoid the cost of a service call In U.S.A. Turn on... starting wash. ■ Check the following: Are the fill hoses tight? ■ Is the load balanced and the washer level? www.maytag.com/help In Canada www.maytag.ca Washer and Components Noisy ■ Is the sink or drain clogged? Reset the rear leveling legs (if needed ). Reset the...
...completely remove the yellow shipping strap with 1 cup (250 mL) of time, you are at home. Center the tub before starting the washer. See "Level the Washer." ■ Check household plumbing for an extended period of detergent to possibly avoid the cost of a service call In U.S.A. Turn on... starting wash. ■ Check the following: Are the fill hoses tight? ■ Is the load balanced and the washer level? www.maytag.com/help In Canada www.maytag.ca Washer and Components Noisy ■ Is the sink or drain clogged? Reset the rear leveling legs (if needed ). Reset the...

Use and Care Guide
Page 17
...lid open . Follow manufacturer's directions. Do not seal the drain hose with a higher spin speed (if available). ■ Did you use less detergent. Washer Operation Washer won 't drain or spin ■ Is the drain hose clogged, or the end of drain hose. ■ Is the lid open . ■ Is...the lid open ? Cold rinses leave loads wetter than 96" (244 cm) above the floor? Sort lint givers (towels, chenille) from the washer. washer stops WARNING Electrical Shock Hazard Plug into the dispensers. Do not use an extension cord. This is normal. Do not remove ground prong. Plug ...
...lid open . Follow manufacturer's directions. Do not seal the drain hose with a higher spin speed (if available). ■ Did you use less detergent. Washer Operation Washer won 't drain or spin ■ Is the drain hose clogged, or the end of drain hose. ■ Is the lid open . ■ Is...the lid open ? Cold rinses leave loads wetter than 96" (244 cm) above the floor? Sort lint givers (towels, chenille) from the washer. washer stops WARNING Electrical Shock Hazard Plug into the dispensers. Do not use an extension cord. This is normal. Do not remove ground prong. Plug ...
Use and Care Guide
Page 18
... the manufacturer's directions when adding detergent and fabric softener? Reducing wash time (duration) is tangled or twisted ■ Did you unload the washer promptly? Load is adequate to provide a hot water wash. ■ Did you use the proper cycle time for Casual or Permanent Press ... water colder than 60°F (15.6°C)? Stains on clothes. ■ Is there above average iron (rust) in a load. Unload the washer as soon as it stops. Sort dark clothes from pockets before washing. ■ Did you properly sort the load? Follow manufacturer's directions. Use ...
... the manufacturer's directions when adding detergent and fabric softener? Reducing wash time (duration) is tangled or twisted ■ Did you unload the washer promptly? Load is adequate to provide a hot water wash. ■ Did you use the proper cycle time for Casual or Permanent Press ... water colder than 60°F (15.6°C)? Stains on clothes. ■ Is there above average iron (rust) in a load. Unload the washer as soon as it stops. Sort dark clothes from pockets before washing. ■ Did you properly sort the load? Follow manufacturer's directions. Use ...
Use and Care Guide
Page 19
...: ■ Features and specifications on our full line of your washer with any questions or concerns at : Maytag Services, LLC ATTN: CAIR® Center P.O. Safer than stainless steel. (2-pack) Washer drip tray, fits under all All purpose appliance cleaner Laundry supply storage... cart Please include a daytime phone number in Canada. Call the Maytag Services, LLC Customer Assistance toll free: 1-800-688-9900. In...
...: ■ Features and specifications on our full line of your washer with any questions or concerns at : Maytag Services, LLC ATTN: CAIR® Center P.O. Safer than stainless steel. (2-pack) Washer drip tray, fits under all All purpose appliance cleaner Laundry supply storage... cart Please include a daytime phone number in Canada. Call the Maytag Services, LLC Customer Assistance toll free: 1-800-688-9900. In...


