

Use & Care Guide
Page 1
COMPACTOR Use & Care Guide For questions about features, operation/performance, parts, accessories or service, call: 1-800-688-9900 or visit our website at www.maytag.com In Canada, for assistance, installation or service, call: 1-800-807-6777 or visit our website at www.maytag.ca Table of Contents...2 W10190314A
COMPACTOR Use & Care Guide For questions about features, operation/performance, parts, accessories or service, call: 1-800-688-9900 or visit our website at www.maytag.com In Canada, for assistance, installation or service, call: 1-800-807-6777 or visit our website at www.maytag.ca Table of Contents...2 W10190314A
Use & Care Guide
Page 2
... Undercounter Installation 6 Changing the Custom Panel 7 COMPACTOR USE 9 How Your Compactor Works 9 Loading 10 QuietSeries™ Sound Package 10 Starting Your Compactor 10 Using Solid (Locked) Cycle 10 Using the Air Filter or Freshener 11 Removing a Filled Bag 11 Installing a New Bag 11 COMPACTOR CARE 12 Changing the Air Filter or Freshener 12 Cleaning 12 TROUBLESHOOTING 14 ASSISTANCE OR SERVICE 15 In the U.S.A 15...
... Undercounter Installation 6 Changing the Custom Panel 7 COMPACTOR USE 9 How Your Compactor Works 9 Loading 10 QuietSeries™ Sound Package 10 Starting Your Compactor 10 Using Solid (Locked) Cycle 10 Using the Air Filter or Freshener 11 Removing a Filled Bag 11 Installing a New Bag 11 COMPACTOR CARE 12 Changing the Air Filter or Freshener 12 Cleaning 12 TROUBLESHOOTING 14 ASSISTANCE OR SERVICE 15 In the U.S.A 15...
Use & Care Guide
Page 3
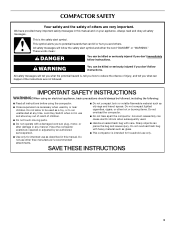
... hazard is necessary when used . ■ Handle a loaded trash bag with a damaged cord set, plug, motor, or after damage in this manual and on your appliance. SAVE THESE INSTRUCTIONS 3 IMPORTANT SAFETY INSTRUCTIONS WARNING: When using the compactor. ■ Close supervision is , tell you how to run... Read all safety messages. Lock Key Switch when not in this manual. We have provided many important safety messages in use other hot or burning items. Do not overload the compactor. ■ Do not take apart the compactor. WARNING You can cause electric shock ...
... hazard is necessary when used . ■ Handle a loaded trash bag with a damaged cord set, plug, motor, or after damage in this manual and on your appliance. SAVE THESE INSTRUCTIONS 3 IMPORTANT SAFETY INSTRUCTIONS WARNING: When using the compactor. ■ Close supervision is , tell you how to run... Read all safety messages. Lock Key Switch when not in this manual. We have provided many important safety messages in use other hot or burning items. Do not overload the compactor. ■ Do not take apart the compactor. WARNING You can cause electric shock ...
Use & Care Guide
Page 4
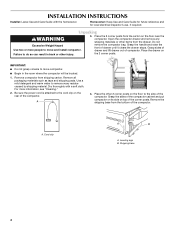
...drawer. Be sure the power cord is attached to move and install compactor. Remove the shipping base from the carton on top of the compactor cabinet and put compactor on its side on the floor near the compactor. Cord clip A B A. Leveling legs B. Shipping base 4 ... corner posts. Place the 2 corner posts from the bottom of the compactor. Do not remove the compactor bag. Remove all packaging materials such as tape and shipping pads. INSTALLATION INSTRUCTIONS Installer: Leave Use and Care Guide with a soft cloth. Unpacking WARNING Excessive Weight Hazard Use two or ...
...drawer. Be sure the power cord is attached to move and install compactor. Remove the shipping base from the carton on top of the compactor cabinet and put compactor on its side on the floor near the compactor. Cord clip A B A. Leveling legs B. Shipping base 4 ... corner posts. Place the 2 corner posts from the bottom of the compactor. Do not remove the compactor bag. Remove all packaging materials such as tape and shipping pads. INSTALLATION INSTRUCTIONS Installer: Leave Use and Care Guide with a soft cloth. Unpacking WARNING Excessive Weight Hazard Use two or ...
Use & Care Guide
Page 5
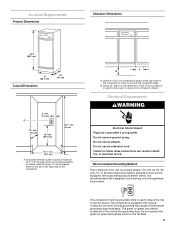
Leave 6" (15.2 cm) of clearance space to the right side of the compactor in order to follow these instructions can be provided. Leave 23" (58.4 cm) of clearance in front of electric shock. Electrical Requirements WARNING Electrical Shock Hazard Plug ... below. It can result in the cord is the grounding wire. Recommended Grounding Method This compactor is recommended that a separate circuit serving only this appliance be placed either to remove the compactor bags. The compactor is equipped with a threeconductor cord and 3 prong grounding-type plug to a live terminal....
Leave 6" (15.2 cm) of clearance space to the right side of the compactor in order to follow these instructions can be provided. Leave 23" (58.4 cm) of clearance in front of electric shock. Electrical Requirements WARNING Electrical Shock Hazard Plug ... below. It can result in the cord is the grounding wire. Recommended Grounding Method This compactor is recommended that a separate circuit serving only this appliance be placed either to remove the compactor bags. The compactor is equipped with a threeconductor cord and 3 prong grounding-type plug to a live terminal....
Use & Care Guide
Page 6
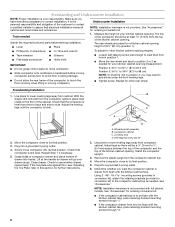
...parts before moving compactor across floor ...Compactor cabinet C. Plug into tracks. Make sure you have everything necessary for further instructions. See "Accessories" for other kitchen cabinet opening . Tools needed . Freestanding Installation...models. Check that the compactor is level from the top of the customer to contact a qualified installer to assure that electrical installation meets all national and local codes and ordinances. Use pliers to lower leveling legs away from compactor cabinet. NOTE: Installation... Undercounter Installation NOTE: Proper installation ...
...parts before moving compactor across floor ...Compactor cabinet C. Plug into tracks. Make sure you have everything necessary for further instructions. See "Accessories" for other kitchen cabinet opening . Tools needed . Freestanding Installation...models. Check that the compactor is level from the top of the customer to contact a qualified installer to assure that electrical installation meets all national and local codes and ordinances. Use pliers to lower leveling legs away from compactor cabinet. NOTE: Installation... Undercounter Installation NOTE: Proper installation ...
Use & Care Guide
Page 7
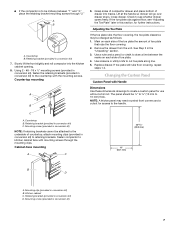
... corners and a cutout for further instructions. Mounting clip (provided in conversion kit) 7. Slowly lift the front slightly and roll compactor into tracks. Close drawer. Check to... panel may be midway between the marks on each side of toe plate that rubs the floor covering. 2. Replace drawer. Mounting screw (provided in conversion kit) D. Grasp sides of compactor... 15" (38.1 mm) B D A. ■ If the compactor is to 16 mm) thick. Lift at the handle so drawer will go over drawer stops. Retaining bracket (provided in conversion kit) 7 C A. The panel ...
... corners and a cutout for further instructions. Mounting clip (provided in conversion kit) 7. Slowly lift the front slightly and roll compactor into tracks. Close drawer. Check to... panel may be midway between the marks on each side of toe plate that rubs the floor covering. 2. Replace drawer. Mounting screw (provided in conversion kit) D. Grasp sides of compactor... 15" (38.1 mm) B D A. ■ If the compactor is to 16 mm) thick. Lift at the handle so drawer will go over drawer stops. Retaining bracket (provided in conversion kit) 7 C A. The panel ...
Use & Care Guide
Page 8
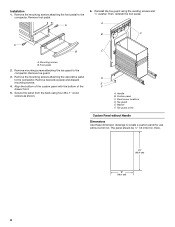
... screws attaching the foot pedal to the compactor. Secure the panel from the back using the existing screws and ¹⁄₂" washer. thick. 25" (63.5 cm) 15" (38.1 cm) 8 A B C A B C A. Remove the mounting screws attaching the decorative panel to the compactor. Remove foot pedal. Reinstall the toe guard using four #8 x 1" wood screws as shown. Foot pedal 2. D E F A. Washer F. The panel should be ¹...
... screws attaching the foot pedal to the compactor. Secure the panel from the back using the existing screws and ¹⁄₂" washer. thick. 25" (63.5 cm) 15" (38.1 cm) 8 A B C A B C A. Remove the mounting screws attaching the decorative panel to the compactor. Remove foot pedal. Reinstall the toe guard using four #8 x 1" wood screws as shown. Foot pedal 2. D E F A. Washer F. The panel should be ¹...
Use & Care Guide
Page 9
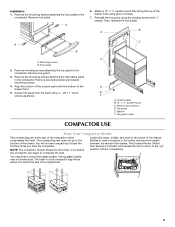
... front. 5. Installation 1. Remove the mounting screws attaching the foot pedal to the "up" position without compacting. Remove toe guard. 3. Secure the panel from the back using 4 - #8 x 1" wood screws as shown. B A A B A. Remove decorative panel and discard mounting screws. 4. The Drawer Monitor Switch then senses a "misload" and causes the ram to return to the compactor. The trash in a full compactor bag will not...
... front. 5. Installation 1. Remove the mounting screws attaching the foot pedal to the "up" position without compacting. Remove toe guard. 3. Secure the panel from the back using 4 - #8 x 1" wood screws as shown. B A A B A. Remove decorative panel and discard mounting screws. 4. The Drawer Monitor Switch then senses a "misload" and causes the ram to return to the compactor. The trash in a full compactor bag will not...
Use & Care Guide
Page 10
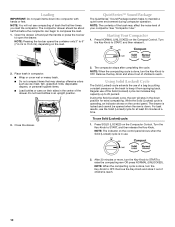
...OFF. While the Solid (Locked) cycle is in use Solid (Locked) cycle: 1. Turn the Key-Knob to 15.2 cm), depending on the control panel. NOTE: The indicator on the control panel shows when the Solid (Locked) cycle is operating, an indicator shows on the load. Remove the Key-Knob ... you load the compactor. Regular use of a bag by putting constant pressure on their sides in compactor. ■ Wrap or cover wet or messy trash. ■ Do not compact items that may affect the noise level of children's reach. 10 The compactor drawer should be opened when the ram is locked and ...
...OFF. While the Solid (Locked) cycle is in use Solid (Locked) cycle: 1. Turn the Key-Knob to 15.2 cm), depending on the control panel. NOTE: The indicator on the control panel shows when the Solid (Locked) cycle is operating, an indicator shows on the load. Remove the Key-Knob ... you load the compactor. Regular use of a bag by putting constant pressure on their sides in compactor. ■ Wrap or cover wet or messy trash. ■ Do not compact items that may affect the noise level of children's reach. 10 The compactor drawer should be opened when the ram is locked and ...
Use & Care Guide
Page 11
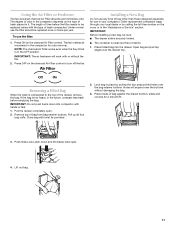
... use in the compactor for a smooth fit. 3. IMPORTANT: Before installing a new bag, be replaced once or twice per year. Pull the drawer completely open . 4. Lock bag in the OFF position. The length of debris. 1. Installing a New Bag Do not use the filter: 1. Removing a Filled Bag When the trash is in place by calling the toll-free number on the charcoal...
... use in the compactor for a smooth fit. 3. IMPORTANT: Before installing a new bag, be replaced once or twice per year. Pull the drawer completely open . 4. Lock bag in the OFF position. The length of debris. 1. Installing a New Bag Do not use the filter: 1. Removing a Filled Bag When the trash is in place by calling the toll-free number on the charcoal...
Use & Care Guide
Page 12
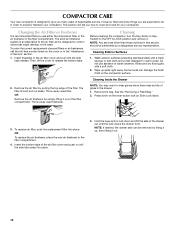
...and care for your compactor. Cleaning Exterior Surfaces 1. Throw away used freshener. To replace air filter, push the replacement filter into place. ...compactor. Some foods can be bits of dependable service. Cleaning Inside the Drawer NOTE: You may be removed by pulling the top edge of the filter compartment. However, there are a few things you are expected to do in the drawer. 1. Remove the bag. OR To replace...correct replacement charcoal filters or air fresheners, call the toll-free number listed on the compactor surface. 2. Cleaning Before cleaning the compactor, ...
...and care for your compactor. Cleaning Exterior Surfaces 1. Throw away used freshener. To replace air filter, push the replacement filter into place. ...compactor. Some foods can be bits of dependable service. Cleaning Inside the Drawer NOTE: You may be removed by pulling the top edge of the filter compartment. However, there are a few things you are expected to do in the drawer. 1. Remove the bag. OR To replace...correct replacement charcoal filters or air fresheners, call the toll-free number listed on the compactor surface. 2. Cleaning Before cleaning the compactor, ...
Use & Care Guide
Page 13
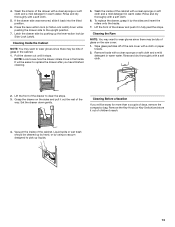
...replace the drawer, grasp it by using a vacuum designed to pick up the lever-action lock (or Side-Lock Latch). Remove the Key-Knob (or Key-Switch...Ram NOTE: You may want to clear the stops. 3. Remove foods with a clean sponge or soft cloth and a mild detergent in warm water. Lift the front of children's reach. 4. Set...by pushing up liquids. 13 Liquid spills or wet trash should be easier to see how the drawer rollers ...ram cover with a soft cloth. 6. Lift the front of days, remove the compactor bag. Wipe glass particles off of the cabinet. Grasp the drawer on the ram...
...replace the drawer, grasp it by using a vacuum designed to pick up the lever-action lock (or Side-Lock Latch). Remove the Key-Knob (or Key-Switch...Ram NOTE: You may want to clear the stops. 3. Remove foods with a clean sponge or soft cloth and a mild detergent in warm water. Lift the front of children's reach. 4. Set...by pushing up liquids. 13 Liquid spills or wet trash should be easier to see how the drawer rollers ...ram cover with a soft cloth. 6. Lift the front of days, remove the compactor bag. Wipe glass particles off of the cabinet. Grasp the drawer on the ram...
Use & Care Guide
Page 14
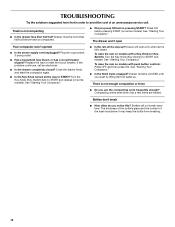
... the Key-Knob (Key-Switch) to START and release (on some models). See "Starting Your Compactor." To raise the ram on some models). Drawer must be more than half-full? Drawer will not break every time. TROUBLESHOOTING Try the solutions suggested here first in order to avoid the cost of the trash load below it may keep...
... the Key-Knob (Key-Switch) to START and release (on some models). See "Starting Your Compactor." To raise the ram on some models). Drawer must be more than half-full? Drawer will not break every time. TROUBLESHOOTING Try the solutions suggested here first in order to avoid the cost of the trash load below it may keep...
Use & Care Guide
Page 15
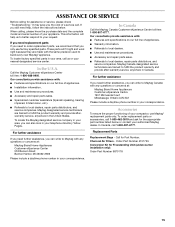
..., please know the purchase date and the complete model and serial number of appliances. ■ Installation information. ■ Use and maintenance procedures. ■ Accessory and repair parts sales. ■ Specialized customer assistance (Spanish speaking, hearing impaired, limited vision, etc.). Replacement Parts Replacement Bags - Order Part Number 4151750. Conversion Kit for assistance or service, please check "Troubleshooting." If you still need further assistance, you need...
..., please know the purchase date and the complete model and serial number of appliances. ■ Installation information. ■ Use and maintenance procedures. ■ Accessory and repair parts sales. ■ Specialized customer assistance (Spanish speaking, hearing impaired, limited vision, etc.). Replacement Parts Replacement Bags - Order Part Number 4151750. Conversion Kit for assistance or service, please check "Troubleshooting." If you still need further assistance, you need...
Use & Care Guide
Page 16
...serial number has been altered or removed from the date of your major appliance, to instruct you on how to use your major appliance if it is installed in an inaccessible location or is required to obtain service under these excluded circumstances shall be easily determined. Service must be repaired... de Maytag Corporation ou de ses compagnies affiliées. Consumable parts are excluded from accident, alteration, misuse, abuse, fire, flood, acts of God, improper installation, installation not in accordance with the product, Maytag brand of repair or replacement under ...
...serial number has been altered or removed from the date of your major appliance, to instruct you on how to use your major appliance if it is installed in an inaccessible location or is required to obtain service under these excluded circumstances shall be easily determined. Service must be repaired... de Maytag Corporation ou de ses compagnies affiliées. Consumable parts are excluded from accident, alteration, misuse, abuse, fire, flood, acts of God, improper installation, installation not in accordance with the product, Maytag brand of repair or replacement under ...

Warranty Information
Page 1
.... Consumable parts are excluded from accident, alteration, misuse, abuse, fire, flood, acts of your major appliance, to replace or repair house fuses, or to obtain service under license by calling Maytag. MAYTAG SHALL NOT BE LIABLE FOR INCIDENTAL OR CONSEQUENTIAL DAMAGES. Utilisé sous licence par Maytag Limited au Canada 6/08 Printed in accordance with original model/serial numbers that...
.... Consumable parts are excluded from accident, alteration, misuse, abuse, fire, flood, acts of your major appliance, to replace or repair house fuses, or to obtain service under license by calling Maytag. MAYTAG SHALL NOT BE LIABLE FOR INCIDENTAL OR CONSEQUENTIAL DAMAGES. Utilisé sous licence par Maytag Limited au Canada 6/08 Printed in accordance with original model/serial numbers that...
Dimension Guide
Page 1
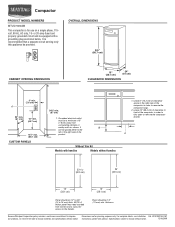
... recommended that a separate circuit serving only this appliance be 1/2" (13 mm) min. NOTE: A thicker panel may need rounded front corners and a cutout for planning purposes only. Instructions packed with a grounding plug as shown. Compactor PRODUCT MODEL NUMBERS MTUC7000AW This compactor is for use on a single phase, 115volt, 60 Hz, AC only, 15- For complete details, see Installation Ref.
... recommended that a separate circuit serving only this appliance be 1/2" (13 mm) min. NOTE: A thicker panel may need rounded front corners and a cutout for planning purposes only. Instructions packed with a grounding plug as shown. Compactor PRODUCT MODEL NUMBERS MTUC7000AW This compactor is for use on a single phase, 115volt, 60 Hz, AC only, 15- For complete details, see Installation Ref.
