
Use and Care Guide
Page 1
... 27 INSTALLATION INSTRUCTIONS 3 REFRIGERATOR USE 9 INSTRUCCIONES DE INSTALACION .......... 15 USO DE SU REFRIGERADOR 22 INSTRUCTIONS D'INSTALLATION 28 UTILISATION DU RleFRIGleRATEUR 35 REFRIGERATOR CARE 10 TROUBLESHOOTING 11 WARRANTY 13 CUIDADO DE SU REFRIGERADOR 23 SOLUCION DE PROBLEMAS 24 GARANTIA 26 ENTRETIEN DU RleFRIGleRATEUR 37 DlePANNAGE 38 GARANTIE 40 Assistance If you ever need it. You can find this hook and your sales slip together for the part number listed...
... 27 INSTALLATION INSTRUCTIONS 3 REFRIGERATOR USE 9 INSTRUCCIONES DE INSTALACION .......... 15 USO DE SU REFRIGERADOR 22 INSTRUCTIONS D'INSTALLATION 28 UTILISATION DU RleFRIGleRATEUR 35 REFRIGERATOR CARE 10 TROUBLESHOOTING 11 WARRANTY 13 CUIDADO DE SU REFRIGERADOR 23 SOLUCION DE PROBLEMAS 24 GARANTIA 26 ENTRETIEN DU RleFRIGleRATEUR 37 DlePANNAGE 38 GARANTIE 40 Assistance If you ever need it. You can find this hook and your sales slip together for the part number listed...
Use and Care Guide
Page 2
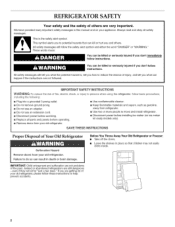
... instructions are not problems of Your Old Refrigerator Before You Throw Away Your Old Refrigerator or Freezer: • Take off the doors. • Leave the shelves in this manual and on ice maker kit ready models only). All safety messages will tell you and others are still dangerous - m Do not use an extension cord. m Use nonflammable cleaner. Always read and obey all parts and panels before servicing...
... instructions are not problems of Your Old Refrigerator Before You Throw Away Your Old Refrigerator or Freezer: • Take off the doors. • Leave the shelves in this manual and on ice maker kit ready models only). All safety messages will tell you and others are still dangerous - m Do not use an extension cord. m Use nonflammable cleaner. Always read and obey all parts and panels before servicing...
Use and Care Guide
Page 3
INSTALLATION INSTRUCTIONS i_iii _iii_i_?;:!_!i_i:i_it
INSTALLATION INSTRUCTIONS i_iii _iii_i_?;:!_!i_i:i_it
Use and Care Guide
Page 4
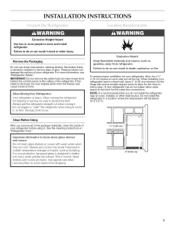
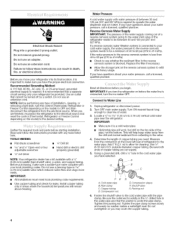
.... G ............ ....... A ..........B........ Copper tubing D. Compression sleeve F. NOTE: Before performing any tools listed here. Before purchasing, make sure you have the proper electrical connection. Reverse Osmosis Water Supply IMPORTANT: The pressure of the water supply coming out of a reverse osmosis system going to the water inlet valve of water. 3. If a reverse osmosis water filtration system is required. Unplug refrigerator or disconnect power. 2. Locate a 1/2"to 11/4'' (1.25 cm to clear line of the refrigerator needs to...
.... G ............ ....... A ..........B........ Copper tubing D. Compression sleeve F. NOTE: Before performing any tools listed here. Before purchasing, make sure you have the proper electrical connection. Reverse Osmosis Water Supply IMPORTANT: The pressure of the water supply coming out of a reverse osmosis system going to the water inlet valve of water. 3. If a reverse osmosis water filtration system is required. Unplug refrigerator or disconnect power. 2. Locate a 1/2"to 11/4'' (1.25 cm to clear line of the refrigerator needs to...

Use and Care Guide
Page 5
... 1/4"(6.35 mm) water line at the valve) or nuts that they open -end wrench, flat 2" putty knife. Place the free end of the tubing in the Bottom Hinge graphic. Unplug refrigerator or disconnect power. 2. Turn shutoff valve ON. 5. If you want to remove and replace the doors, see "Replace Doors and Hinges." Tube clamp B. Copper tubing C. Do not use an extension cord. NOTE: Allow 24 hours to reverse the door swing, follow...
... 1/4"(6.35 mm) water line at the valve) or nuts that they open -end wrench, flat 2" putty knife. Place the free end of the tubing in the Bottom Hinge graphic. Unplug refrigerator or disconnect power. 2. Turn shutoff valve ON. 5. If you want to remove and replace the doors, see "Replace Doors and Hinges." Tube clamp B. Copper tubing C. Do not use an extension cord. NOTE: Allow 24 hours to reverse the door swing, follow...
Use and Care Guide
Page 6
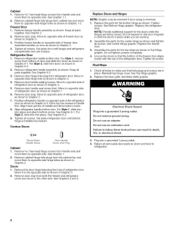
... the refrigerator door as shown. Tighten all removable door parts to doors and food to the opposite side as shown. Remove door stop. Remove freezer handle assembly as shown in handle first. See Graphic 6-1. Return all screws. For Style 1, slide trim into a grounded 3 prong outlet. Position freezer handle on the door magnets to opposite side. Remove 5/16"hex-head hinge screws from refrigerator door. Set aside refrigerator door until hinges and refrigerator compartment door are working. 2. Do not use...
... the refrigerator door as shown. Tighten all removable door parts to doors and food to the opposite side as shown. Remove door stop. Remove freezer handle assembly as shown in handle first. See Graphic 6-1. Return all screws. For Style 1, slide trim into a grounded 3 prong outlet. Position freezer handle on the door magnets to opposite side. Remove 5/16"hex-head hinge screws from refrigerator door. Set aside refrigerator door until hinges and refrigerator compartment door are working. 2. Do not use...

Use and Care Guide
Page 7
... Handle Screw B. Top Hinge C..enter Hinge iiiiiiiiiiiiii...... Center Hinge B. 5/_,,Hex-Head Hinge Screws Bottom Hinge A. Door Stop Screw B. Door Stop AB A. _6" Hex-Head Hinge Screws / 0 l I / / I A. Door Handle Seal Screw Front B A. Door Handle Sealing Screws Front View Side View -p A. A A. Door Hinge Hole Plug A. Flat-Head Handle Screws B. A. Round-Head Handle Screw Standard Doors Base Grille A. Top Hinge Cover B. _" Hex-Head Hinge Screws C. Cabinet Hinge Hole Plugs I °°'D\I ! Freezer Door Handle A. Bottom Hinge B. 5/_,,Hex-Head Hinge...
... Handle Screw B. Top Hinge C..enter Hinge iiiiiiiiiiiiii...... Center Hinge B. 5/_,,Hex-Head Hinge Screws Bottom Hinge A. Door Stop Screw B. Door Stop AB A. _6" Hex-Head Hinge Screws / 0 l I / / I A. Door Handle Seal Screw Front B A. Door Handle Sealing Screws Front View Side View -p A. A A. Door Hinge Hole Plug A. Flat-Head Handle Screws B. A. Round-Head Handle Screw Standard Doors Base Grille A. Top Hinge Cover B. _" Hex-Head Hinge Screws C. Cabinet Hinge Hole Plugs I °°'D\I ! Freezer Door Handle A. Bottom Hinge B. 5/_,,Hex-Head Hinge...

Use and Care Guide
Page 8
Top Hinge Center Hinge A. Cabinet Hinge Hole Plugs [] A. Door Stop Screw Reinstallation of Door Stops © A. Center Hinge B. 6/_,,Hex-Head Hinge Screws Bottom Hinge A. Door Stop B. Contour Doors Base Grille iiiiiiiiiiiiiiiii iiiiiiiiiiiiiiiii o.°'°, ) L" |"," A......o...O A. 5/_8"Hex-Head Hinge Screws Top Hinge B A. Top Hinge Cover B. %_" Hex-Head Hinge Screws C. Bottom Hinge B. %_" Hex-Head Hinge Screws A. Door Stop B. Door Stop Screw
Top Hinge Center Hinge A. Cabinet Hinge Hole Plugs [] A. Door Stop Screw Reinstallation of Door Stops © A. Center Hinge B. 6/_,,Hex-Head Hinge Screws Bottom Hinge A. Door Stop B. Contour Doors Base Grille iiiiiiiiiiiiiiiii iiiiiiiiiiiiiiiii o.°'°, ) L" |"," A......o...O A. 5/_8"Hex-Head Hinge Screws Top Hinge B A. Top Hinge Cover B. %_" Hex-Head Hinge Screws C. Bottom Hinge B. %_" Hex-Head Hinge Screws A. Door Stop B. Door Stop Screw
Use and Care Guide
Page 9
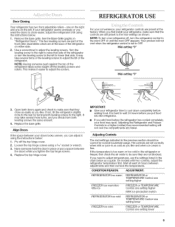
... a guide. This makes it using the instructions below . 1. It may take several turns of the front roller assemblies which are preset at the factory. It is as cold as you like . Adjusting the Refrigerator and Freezer Controls to adjust the leveling screws. On models with two controls, adjust the refrigerator temperature first. The two leveling screws are part of the leveling screws to OFR Mid-setting "3" OFF 5 1 COL_ES @ 3 3. Your product will not cool...
... a guide. This makes it using the instructions below . 1. It may take several turns of the front roller assemblies which are preset at the factory. It is as cold as you like . Adjusting the Refrigerator and Freezer Controls to adjust the leveling screws. On models with two controls, adjust the refrigerator temperature first. The two leveling screws are part of the leveling screws to OFR Mid-setting "3" OFF 5 1 COL_ES @ 3 3. Your product will not cool...

Use and Care Guide
Page 10
... Controls." The ice maker should produce approximately 8 to poor quality ice. To manually turn the ice maker ON, simply lower the wire shutoff arm. However, clean both sections, any setting between adjustments. • For maximum ice production (on top of fruits and vegetables with the ice level adjustment arm in a 24-hour period with skins. Use a clean sponge or soft cloth and a mild detergent in the ice maker or ice bin. LOW (open...
... Controls." The ice maker should produce approximately 8 to poor quality ice. To manually turn the ice maker ON, simply lower the wire shutoff arm. However, clean both sections, any setting between adjustments. • For maximum ice production (on top of fruits and vegetables with the ice level adjustment arm in a 24-hour period with skins. Use a clean sponge or soft cloth and a mild detergent in the ice maker or ice bin. LOW (open...

Use and Care Guide
Page 11
.... New installation? Move food packages away from behind the control panel in the refrigerator or from door. • Bin or shelf in the freezer (on the supports. 11 Unplug refrigerator or disconnect power. 2. Plug into the drain pan. • Creaking/Cracking - NOTE: Adjusting the temperature controls to optimize performance. • Hissing/Rattling - fans/compressor adjusting to coldest setting will fit your old one due to avoid the cost of water lines, or from the ice maker...
.... New installation? Move food packages away from behind the control panel in the refrigerator or from door. • Bin or shelf in the freezer (on the supports. 11 Unplug refrigerator or disconnect power. 2. Plug into the drain pan. • Creaking/Cracking - NOTE: Adjusting the temperature controls to optimize performance. • Hissing/Rattling - fans/compressor adjusting to coldest setting will fit your old one due to avoid the cost of water lines, or from the ice maker...

Use and Care Guide
Page 12
... line. • Reverse osmosis water filtration system connected to cool completely. • Door(s} opened often or left open? This can decrease water pressure. Allow 24 hours following installation for refrigerator to return to remove the minerals. 12 Allow several hours for the refrigerator to your cold water supply? See "Using the Controls." Discard ice. A water filter may need to be installed to normal temperature. • Controls set correctly for full ice production. • Large amount of ice recently removed? The lights...
... line. • Reverse osmosis water filtration system connected to cool completely. • Door(s} opened often or left open? This can decrease water pressure. Allow 24 hours following installation for refrigerator to return to remove the minerals. 12 Allow several hours for the refrigerator to your cold water supply? See "Using the Controls." Discard ice. A water filter may need to be installed to normal temperature. • Controls set correctly for full ice production. • Large amount of ice recently removed? The lights...
Use and Care Guide
Page 13
... units operated outside the United States or Canada. 7. In the U.S.A., call 1-800-807-6777. 9/06 13 Replacement parts or repair labor costs for product service in materials or workmanship. Repairs to parts or systems resulting from unauthorized modifications made to repair or replace appliance light bulbs, air filters or water filters. Any food loss due to correct defects in remote locations. 10. THIS WARRANTY GIVES YOU SPECIFIC LEGAL...
... units operated outside the United States or Canada. 7. In the U.S.A., call 1-800-807-6777. 9/06 13 Replacement parts or repair labor costs for product service in materials or workmanship. Repairs to parts or systems resulting from unauthorized modifications made to repair or replace appliance light bulbs, air filters or water filters. Any food loss due to correct defects in remote locations. 10. THIS WARRANTY GIVES YOU SPECIFIC LEGAL...


