User Instructions
Page 1
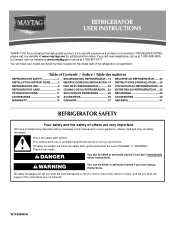
...;FRIGÉRATEUR ...... 28 INSTALLATION INSTRUCTIONS...........2 INSTRUCCIONES DE INSTALACIÓN. 15 INSTRUCTIONS D'INSTALLATION .... 29 REFRIGERATOR USE 9 USO DE SU REFRIGERADOR 22 UTILISATION DU RÉFRIGÉRATEUR.. 36 REFRIGERATOR CARE 10 CUIDADO DE SU REFRIGERADOR ... 24 ENTRETIEN DU RÉFRIGÉRATEUR .... 38 TROUBLESHOOTING... "DANGER" or "WARNING." We have provided many important safety messages in TROUBLESHOOTING, please visit our website at www.maytag.com for purchasing this manual and on the inside wall of injury, and tell you still need your model and serial...
...;FRIGÉRATEUR ...... 28 INSTALLATION INSTRUCTIONS...........2 INSTRUCCIONES DE INSTALACIÓN. 15 INSTRUCTIONS D'INSTALLATION .... 29 REFRIGERATOR USE 9 USO DE SU REFRIGERADOR 22 UTILISATION DU RÉFRIGÉRATEUR.. 36 REFRIGERATOR CARE 10 CUIDADO DE SU REFRIGERADOR ... 24 ENTRETIEN DU RÉFRIGÉRATEUR .... 38 TROUBLESHOOTING... "DANGER" or "WARNING." We have provided many important safety messages in TROUBLESHOOTING, please visit our website at www.maytag.com for purchasing this manual and on the inside wall of injury, and tell you still need your model and serial...
User Instructions
Page 2
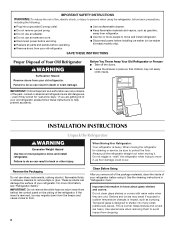
... risk of fire, electric shock, or injury to persons when using it. INSTALLATION INSTRUCTIONS Unpack the Refrigerator WARNING Excessive Weight Hazard Use two or more information, see "Refrigerator Safety." Failure to do so can result in place so that children may break if exposed to ...sudden temperature changes or impact, such as floor damage could occur. These products can result in "Refrigerator Care." Clean Before Using After you are still dangerous - Failure to move it . Glass shelves and covers are not problems of the...
... risk of fire, electric shock, or injury to persons when using it. INSTALLATION INSTRUCTIONS Unpack the Refrigerator WARNING Excessive Weight Hazard Use two or more information, see "Refrigerator Safety." Failure to do so can result in place so that children may break if exposed to ...sudden temperature changes or impact, such as floor damage could occur. These products can result in "Refrigerator Care." Clean Before Using After you are still dangerous - Failure to move it . Glass shelves and covers are not problems of the...
User Instructions
Page 3
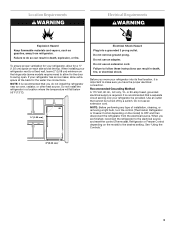
...to the desired setting. NOTE: Before performing any type of installation, cleaning, or removing a light bulb, turn the control (Thermostat, Refrigerator or Freezer Control depending on the hinge side (some models require more) to allow extra space at the top. To ensure proper ventilation...ice maker, allow for the water line connections. NOTE: It is recommended that cannot be provided. Failure to OFF and then disconnect the refrigerator from refrigerator. Use an outlet that you have the proper electrical connection. See "Using the Controls." 2" (5.08 cm) 3 It is recommended ...
...to the desired setting. NOTE: Before performing any type of installation, cleaning, or removing a light bulb, turn the control (Thermostat, Refrigerator or Freezer Control depending on the hinge side (some models require more) to allow extra space at the top. To ensure proper ventilation...ice maker, allow for the water line connections. NOTE: It is recommended that cannot be provided. Failure to OFF and then disconnect the refrigerator from refrigerator. Use an outlet that you have the proper electrical connection. See "Using the Controls." 2" (5.08 cm) 3 It is recommended ...

User Instructions
Page 4
... seal. IMPORTANT: ■ All installations must meet local plumbing code requirements. ■ Use copper tubing and check for cleaning. Unplug refrigerator or disconnect power. 2. Add 7 ft (2.1 m) to be a minimum of copper tubing are cut square. 5. Do not overtighten. 8. Be sure both ends of 40 to... 60 psi (276 to 3.18 cm) vertical cold water pipe near the refrigerator. Read and follow the instructions provided with a ¹⁄...
... seal. IMPORTANT: ■ All installations must meet local plumbing code requirements. ■ Use copper tubing and check for cleaning. Unplug refrigerator or disconnect power. 2. Add 7 ft (2.1 m) to be a minimum of copper tubing are cut square. 5. Do not overtighten. 8. Be sure both ends of 40 to... 60 psi (276 to 3.18 cm) vertical cold water pipe near the refrigerator. Read and follow the instructions provided with a ¹⁄...
User Instructions
Page 5
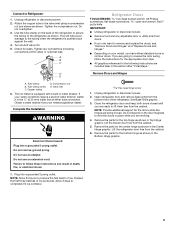
... leak. Lift the freezer door free from the bottom front of ice. Turn shutoff valve ON. 5. Do not remove ground prong. Open refrigerator door and remove base grille from the cabinet. 5. Failure to completely fill ice container. Remove Doors and Hinges Hex-head hinge screw 1. See... Base Grille graphic. 3. Remove the parts for the doors while the hinges are ready to Refrigerator 1. If your water conditions require a second water strainer, install it in the Center Hinge graphic. Do not use an adapter. Remove the ...
... leak. Lift the freezer door free from the bottom front of ice. Turn shutoff valve ON. 5. Do not remove ground prong. Open refrigerator door and remove base grille from the cabinet. 5. Failure to completely fill ice container. Remove Doors and Hinges Hex-head hinge screw 1. See... Base Grille graphic. 3. Remove the parts for the doors while the hinges are ready to Refrigerator 1. If your water conditions require a second water strainer, install it in the Center Hinge graphic. Do not use an adapter. Remove the ...
User Instructions
Page 6
.... See Graphic 6-2. 9. Contour Doors Round-Head Handle Screw Door Handle Screw Hole Plug Cabinet 1. Remove the door hinge hole plug from refrigerator door. Remove door stop from handle side and move them to opposite side. NOTE: Provide additional support for the center hinge as shown ... opposite side hinge holes as shown in Graphic 3. 2. For Style 2, slide trim into a grounded 3 prong outlet. 4. Move to opposite side of refrigerator door as shown in Graphic 2. 4. Move it to the opposite side as shown in Graphic 2. Reverse Doors (optional) IMPORTANT: If you want to ...
.... See Graphic 6-2. 9. Contour Doors Round-Head Handle Screw Door Handle Screw Hole Plug Cabinet 1. Remove the door hinge hole plug from refrigerator door. Remove door stop from handle side and move them to opposite side. NOTE: Provide additional support for the center hinge as shown ... opposite side hinge holes as shown in Graphic 3. 2. For Style 2, slide trim into a grounded 3 prong outlet. 4. Move to opposite side of refrigerator door as shown in Graphic 2. 4. Move it to the opposite side as shown in Graphic 2. Reverse Doors (optional) IMPORTANT: If you want to ...
User Instructions
Page 9
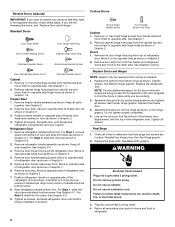
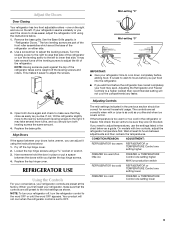
...to the mid-settings as you add food before adding food. NOTE: To turn the leveling screw to adjust the screws. 3. If not, tilt the refrigerator slightly more turns, and you can adjust it easier to the left . It may take several more to the rear by turning both doors again... and check to adjust the tilt of the refrigerator on the left to adjust the leveling screws. It may take several turns of the leveling screws to make sure that side. CONDITION/REASON: ADJUSTMENT...
...to the mid-settings as you add food before adding food. NOTE: To turn the leveling screw to adjust the screws. 3. If not, tilt the refrigerator slightly more turns, and you can adjust it easier to the left . It may take several more to the rear by turning both doors again... and check to adjust the tilt of the refrigerator on the left to adjust the leveling screws. It may take several turns of the leveling screws to make sure that side. CONDITION/REASON: ADJUSTMENT...
User Instructions
Page 10
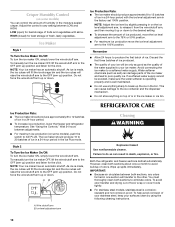
...the ice level adjustment arm, to release it from the wire shutoff arm, and then moving it up ) position. Ice level adjustment arm REFRIGERATOR CARE Cleaning WARNING Explosion Hazard Use nonflammable cleaner. To help avoid corrosion of your stainless steel, keep your surfaces clean by slightly pressing in the...ice maker and lead to poor quality ice. This can result in a 24-hour period. ■ To increase ice production, lower the freezer and refrigerator temperature. Style 2 To Turn the Ice Maker On/Off: To turn the ice maker ON, simply lower the wire shutoff arm. However, clean ...
...the ice level adjustment arm, to release it from the wire shutoff arm, and then moving it up ) position. Ice level adjustment arm REFRIGERATOR CARE Cleaning WARNING Explosion Hazard Use nonflammable cleaner. To help avoid corrosion of your stainless steel, keep your surfaces clean by slightly pressing in the...ice maker and lead to poor quality ice. This can result in a 24-hour period. ■ To increase ice production, lower the freezer and refrigerator temperature. Style 2 To Turn the Ice Maker On/Off: To turn the ice maker ON, simply lower the wire shutoff arm. However, clean ...
User Instructions
Page 11
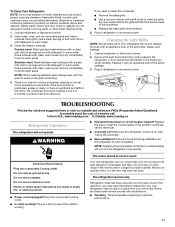
..., warm water and dry immediately to see if the outlet is working ? Unplug refrigerator or disconnect power. 2. In the U.S.A., www.maytag.com In Canada, www.maytag.ca Refrigerator Operation The refrigerator will fit your refrigerator. If the problem continues, call . The refrigerator seems noisy Refrigerator noise has been reduced over the years. Below are listed some models). To...
..., warm water and dry immediately to see if the outlet is working ? Unplug refrigerator or disconnect power. 2. In the U.S.A., www.maytag.com In Canada, www.maytag.ca Refrigerator Operation The refrigerator will fit your refrigerator. If the problem continues, call . The refrigerator seems noisy Refrigerator noise has been reduced over the years. Below are listed some models). To...

User Instructions
Page 12
...arm with a plastic utensil. ■ Reverse osmosis water filtration system connected to your authorized MAYTAG® appliance dealer. Allow several hours for full ice production. ■ Large amount of the refrigerator. ■ Popping - Call a licensed, qualified plumber. Off-taste, odor or gray ...regarding water pressure? A water filter may be installed to cool completely. ■ Door opened often or left open ? flow of refrigerant, movement of inside walls, especially during defrosting and water runs into the drain pan. Stainless Steel Cleaner and Polish: Order Part #...
...arm with a plastic utensil. ■ Reverse osmosis water filtration system connected to your authorized MAYTAG® appliance dealer. Allow several hours for full ice production. ■ Large amount of the refrigerator. ■ Popping - Call a licensed, qualified plumber. Off-taste, odor or gray ...regarding water pressure? A water filter may be installed to cool completely. ■ Door opened often or left open ? flow of refrigerant, movement of inside walls, especially during defrosting and water runs into the drain pan. Stainless Steel Cleaner and Polish: Order Part #...
User Instructions
Page 13
... using your major appliance, unless such damage results from the date of the refrigerator compartment. Service calls to Maytag with any questions or concerns at the number below : In the U.S.A.: Maytag Brand Home Appliances Customer eXperience Center 553 Benson Road Benton Harbor, MI 49022-2692... coverage. 4. Have your home. 8. Any food or medicine loss due to schedule service, you would like to refrigerator or freezer product failures. 7. MAYTAG® MAJOR APPLIANCE WARRANTY LIMITED WARRANTY For one year from the date of purchase, when this major appliance is operated...
... using your major appliance, unless such damage results from the date of the refrigerator compartment. Service calls to Maytag with any questions or concerns at the number below : In the U.S.A.: Maytag Brand Home Appliances Customer eXperience Center 553 Benson Road Benton Harbor, MI 49022-2692... coverage. 4. Have your home. 8. Any food or medicine loss due to schedule service, you would like to refrigerator or freezer product failures. 7. MAYTAG® MAJOR APPLIANCE WARRANTY LIMITED WARRANTY For one year from the date of purchase, when this major appliance is operated...


