User Instructions
Page 1
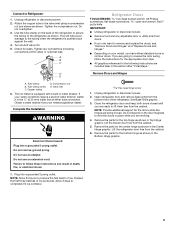
... need your appliance. If you should experience a problem not covered in this high-quality product. You will follow the safety alert symbol and either the word "DANGER" or "WARNING." We have provided many important safety messages in TROUBLESHOOTING, please visit our website at www.maytag.com for purchasing this manual and on your model and serial number, located on the inside...
... need your appliance. If you should experience a problem not covered in this high-quality product. You will follow the safety alert symbol and either the word "DANGER" or "WARNING." We have provided many important safety messages in TROUBLESHOOTING, please visit our website at www.maytag.com for purchasing this manual and on your model and serial number, located on the inside...
User Instructions
Page 2
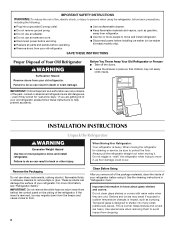
...." If the insert is heavy. Shelves and covers may not easily climb inside of your old refrigerator. Use special care when removing them to avoid impact from behind the control panel on ice maker kit ready models only). Junked or abandoned refrigerators are not problems of the past. Tempered glass is normal. If you remove all parts and panels before operating. ■ Remove doors from your old refrigerator. ■ Use nonflammable cleaner. ■ Keep...
...." If the insert is heavy. Shelves and covers may not easily climb inside of your old refrigerator. Use special care when removing them to avoid impact from behind the control panel on ice maker kit ready models only). Junked or abandoned refrigerators are not problems of the past. Tempered glass is normal. If you remove all parts and panels before operating. ■ Remove doors from your old refrigerator. ■ Use nonflammable cleaner. ■ Keep...
User Instructions
Page 3
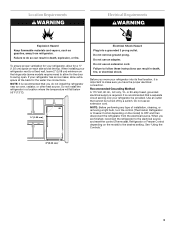
... use an extension cord. See "Using the Controls." 2" (5.08 cm) 3 Failure to the desired setting. or 20-amp fused, grounded electrical supply is important to make sure you move your refrigerator has an ice maker, allow for the door to do not install the refrigerator near an oven, radiator, or other heat source. Failure to swing open. To ensure proper ventilation for the water line connections. If your refrigerator...
... use an extension cord. See "Using the Controls." 2" (5.08 cm) 3 Failure to the desired setting. or 20-amp fused, grounded electrical supply is important to make sure you move your refrigerator has an ice maker, allow for the door to do not install the refrigerator near an oven, radiator, or other heat source. Failure to swing open. To ensure proper ventilation for the water line connections. If your refrigerator...

User Instructions
Page 4
... your cold water supply, the water pressure to the reverse osmosis system needs to see whether the sediment filter in the water pipe and that the washer is connected, turn ON the main water supply. Replace the filter if necessary. ■ Allow the storage tank on before the water line is under the pipe clamp. If you may crush the copper tubing. 7. IMPORTANT: ■ Make sure it will work...
... your cold water supply, the water pressure to the reverse osmosis system needs to see whether the sediment filter in the water pipe and that the washer is connected, turn ON the main water supply. Replace the filter if necessary. ■ Allow the storage tank on before the water line is under the pipe clamp. If you may crush the copper tubing. 7. IMPORTANT: ■ Make sure it will work...
User Instructions
Page 5
... 2" putty knife. Open refrigerator door and remove base grille from the cabinet. NOTE: Provide additional support for the center hinge as shown in the ¹⁄₄" (6.35 mm) water line at the valve) or nuts that leak. Remove the parts for the doors while the hinges are working. 4. Tighten any adjustable door or utility bins from your model, you are being moved. Tube clamp B. Copper tubing D. Do not use an adapter...
... 2" putty knife. Open refrigerator door and remove base grille from the cabinet. NOTE: Provide additional support for the center hinge as shown in the ¹⁄₄" (6.35 mm) water line at the valve) or nuts that leak. Remove the parts for the doors while the hinges are working. 4. Tighten any adjustable door or utility bins from your model, you are being moved. Tube clamp B. Copper tubing D. Do not use an adapter...
User Instructions
Page 6
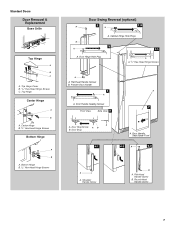
... Handle Screw Door Handle Screw Hole Plug Cabinet 1. Remove cabinet hinge hole plugs from both the freezer and refrigerator doors and move them to make sure that hole plugs and screws are in Graphic 6-3. Doors 1. Move it to the other side. Remove door stop from the cabinet top and move to the opposite side as shown in place. Replace Doors and Hinges NOTE: Graphic may be reversed if door swing is installed...
... Handle Screw Door Handle Screw Hole Plug Cabinet 1. Remove cabinet hinge hole plugs from both the freezer and refrigerator doors and move them to make sure that hole plugs and screws are in Graphic 6-3. Doors 1. Move it to the other side. Remove door stop from the cabinet top and move to the opposite side as shown in place. Replace Doors and Hinges NOTE: Graphic may be reversed if door swing is installed...
User Instructions
Page 7
Freezer Door Handle 4 A A. Door Stop Screw A B B. Bottom Hinge B. 5/16" Hex-Head Hinge Screws Door Swing Reversal (optional) A 2 A 1-2 B A A. Door Stop 6-1 A. Door Handle Sealing Screws 7 Front View Side View 5 A. Shoulder Handle Screw B A. Door Hinge Hole Plug A. Door Handle Seal Screw Front 6-2 A 6-3 A A. Top Hinge Center Hinge A B A. Flat-Head Handle Screws B. Standard Doors Door Removal & Replacement Base Grille Top Hinge A B C A. Cabinet Hinge Hole Plugs 3 1-1 A 1 A. /5 16 " Hex-Head Hinge Screws A A. Flat-Head Handle Screw B. Round...
Freezer Door Handle 4 A A. Door Stop Screw A B B. Bottom Hinge B. 5/16" Hex-Head Hinge Screws Door Swing Reversal (optional) A 2 A 1-2 B A A. Door Stop 6-1 A. Door Handle Sealing Screws 7 Front View Side View 5 A. Shoulder Handle Screw B A. Door Hinge Hole Plug A. Door Handle Seal Screw Front 6-2 A 6-3 A A. Top Hinge Center Hinge A B A. Flat-Head Handle Screws B. Standard Doors Door Removal & Replacement Base Grille Top Hinge A B C A. Cabinet Hinge Hole Plugs 3 1-1 A 1 A. /5 16 " Hex-Head Hinge Screws A A. Flat-Head Handle Screw B. Round...
User Instructions
Page 8
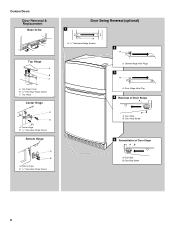
Contour Doors Door Removal & Replacement Base Grille Top Hinge A B C A. Top Hinge Center Hinge A B A. Door Stop Screw 5 Reinstallation of Door Stops A B A. Bottom Hinge B. 5/16" Hex-Head Hinge Screws Door Swing Reversal (optional) 1 A A. 5/16" Hex-Head Hinge Screws A 2 A A. Door Stop Screw 8 Door Stop B. Top Hinge Cover B. 5/16" Hex-Head Hinge Screws C. Cabinet Hinge Hole Plugs 3 A A. Door Hinge Hole Plug 4 Removal of Door Stops AB A. Center Hinge B. 5/16" Hex-Head Hinge Screws Bottom Hinge A B A. Door Stop B.
Contour Doors Door Removal & Replacement Base Grille Top Hinge A B C A. Top Hinge Center Hinge A B A. Door Stop Screw 5 Reinstallation of Door Stops A B A. Bottom Hinge B. 5/16" Hex-Head Hinge Screws Door Swing Reversal (optional) 1 A A. 5/16" Hex-Head Hinge Screws A 2 A A. Door Stop Screw 8 Door Stop B. Top Hinge Cover B. 5/16" Hex-Head Hinge Screws C. Cabinet Hinge Hole Plugs 3 A A. Door Hinge Hole Plug 4 Removal of Door Stops AB A. Center Hinge B. 5/16" Hex-Head Hinge Screws Bottom Hinge A B A. Door Stop B.
User Instructions
Page 9
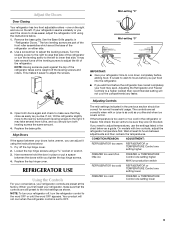
... leveling screws to adjust temperatures, use the settings listed in the chart below : 1. Align Doors If the space between your food may spoil. Adjusting Controls The mid-settings indicated in place or put food into the refrigerator. ■ If you like and when ice cream is too warm or too cold in "Refrigerator Doors." CONDITION/REASON: ADJUSTMENT: REFRIGERATOR too warm REFRIGERATOR or TEMPERATURE Control one setting higher FREEZER too warm/too little ice FREEZER or TEMPERATURE Control one setting higher MAX ice...
... leveling screws to adjust temperatures, use the settings listed in the chart below : 1. Align Doors If the space between your food may spoil. Adjusting Controls The mid-settings indicated in place or put food into the refrigerator. ■ If you like and when ice cream is too warm or too cold in "Refrigerator Doors." CONDITION/REASON: ADJUSTMENT: REFRIGERATOR too warm REFRIGERATOR or TEMPERATURE Control one setting higher FREEZER too warm/too little ice FREEZER or TEMPERATURE Control one setting higher MAX ice...
User Instructions
Page 10
... turn the ice maker OFF, lift the wire shutoff arm to produce the first batch of humidity in the ice maker or ice bin. Do not force the wire shutoff arm up spills immediately. Avoid connecting the ice maker to eliminate odors. This can damage parts of ice in a 24-hour period with skins. See "Using the Controls." You must thoroughly clean both sections to a softened water supply. Adjust the control...
... turn the ice maker OFF, lift the wire shutoff arm to produce the first batch of humidity in the ice maker or ice bin. Do not force the wire shutoff arm up spills immediately. Avoid connecting the ice maker to eliminate odors. This can damage parts of ice in a 24-hour period with skins. See "Using the Controls." You must thoroughly clean both sections to a softened water supply. Adjust the control...
User Instructions
Page 11
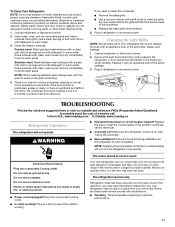
... intermittent noises from your old model. Replace it with clean, warm water and dry immediately to coldest setting will not operate WARNING ■ Household fuse blown or circuit breaker tripped? In the U.S.A., www.maytag.com In Canada, www.maytag.ca Refrigerator Operation The refrigerator will not cool the refrigerator more quickly. If the problem continues, call . Electrical Shock Hazard Plug into a grounded 3 prong outlet. ■ Is outlet working . Plug in warm water. fans/compressor adjusting...
... intermittent noises from your old model. Replace it with clean, warm water and dry immediately to coldest setting will not operate WARNING ■ Household fuse blown or circuit breaker tripped? In the U.S.A., www.maytag.com In Canada, www.maytag.ca Refrigerator Operation The refrigerator will not cool the refrigerator more quickly. If the problem continues, call . Electrical Shock Hazard Plug into a grounded 3 prong outlet. ■ Is outlet working . Plug in warm water. fans/compressor adjusting...

User Instructions
Page 12
... minerals. Allow 24 hours following installation for full ice production. ■ Large amount of low water pressure. ■ Water shutoff valve not fully open ? Adjust the control(s) a setting colder. flow of refrigerant, movement of water lines, or from food? Make sure the crisper cover is in the water source line? Remove ice from door. ■ Bin or shelf in the ice ■ New plumbing connections? Allows warm air to cool completely. ■ Door opened often or left open ? Call a licensed, qualified plumber...
... minerals. Allow 24 hours following installation for full ice production. ■ Large amount of low water pressure. ■ Water shutoff valve not fully open ? Adjust the control(s) a setting colder. flow of refrigerant, movement of water lines, or from food? Make sure the crisper cover is in the water source line? Remove ice from door. ■ Bin or shelf in the ice ■ New plumbing connections? Allows warm air to cool completely. ■ Door opened often or left open ? Call a licensed, qualified plumber...
User Instructions
Page 13
... household use or when it is installed in your major appliance, to replace or repair house fuses, or to repair or replace appliance light bulbs, air filters or water filters. In Canada: Maytag Brand Home Appliances Customer eXperience Centre 1901 Minnesota Court Mississauga, Ontario L5N 3A7 Please keep this User Instructions and model number information for other damage to the finish of stainless steel surfaces. This warranty gives you specific legal...
... household use or when it is installed in your major appliance, to replace or repair house fuses, or to repair or replace appliance light bulbs, air filters or water filters. In Canada: Maytag Brand Home Appliances Customer eXperience Centre 1901 Minnesota Court Mississauga, Ontario L5N 3A7 Please keep this User Instructions and model number information for other damage to the finish of stainless steel surfaces. This warranty gives you specific legal...


