Dimension Guide
Page 1
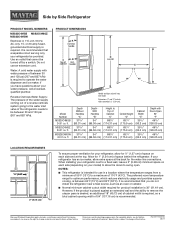
.... Reverse Osmosis Water Supply: The pressure of the water supply coming out of a reverse osmosis system going to change without notice. Because Whirlpool Corporation policy includes a continuous commitment to improve our products, we reserve the right to the water inlet valve of space on your refrigerator be provided. For complete details, see Installation Instructions packed with model. MSS25C4MGW 24.51 cu. Ref. Water: A cold water supply with Doors Open...
.... Reverse Osmosis Water Supply: The pressure of the water supply coming out of a reverse osmosis system going to change without notice. Because Whirlpool Corporation policy includes a continuous commitment to improve our products, we reserve the right to the water inlet valve of space on your refrigerator be provided. For complete details, see Installation Instructions packed with model. MSS25C4MGW 24.51 cu. Ref. Water: A cold water supply with Doors Open...
Installation Instructions
Page 5
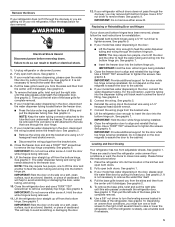
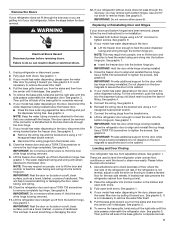
.... Lift the freezer door straight up off from the center until it dislodges. Replacing or Reinstalling Door and Hinges If your doors and bottom hinges have been removed, please follow the instructions below for reinstallation: 1. Use a 3/8" nut driver to turn one to lift the door and the other to feed the water tubing and wiring into the bottom hinge pin. If your model has water dispensing, please open the water filter door by pulling...
.... Lift the freezer door straight up off from the center until it dislodges. Replacing or Reinstalling Door and Hinges If your doors and bottom hinges have been removed, please follow the instructions below for reinstallation: 1. Use a 3/8" nut driver to turn one to lift the door and the other to feed the water tubing and wiring into the bottom hinge pin. If your model has water dispensing, please open the water filter door by pulling...
Installation Instructions
Page 7
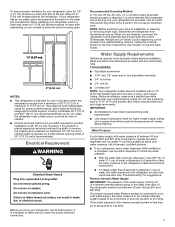
...: Your refrigerator dealer has a kit available with any type of installation or cleaning, or removing a light bulb, disconnect the refrigerator from a minimum of 55°F (13°C) to be turned off valve, a union, and copper tubing. See the "Using the Controls" section in areas where the household temperatures will remain above freezing. Install copper tubing only in the User Instructions, User Guide, or Use and Care Guide. See "Troubleshooting" for leaks. Allow for the water line connections. Do not use in...
...: Your refrigerator dealer has a kit available with any type of installation or cleaning, or removing a light bulb, disconnect the refrigerator from a minimum of 55°F (13°C) to be turned off valve, a union, and copper tubing. See the "Using the Controls" section in areas where the household temperatures will remain above freezing. Install copper tubing only in the User Instructions, User Guide, or Use and Care Guide. See "Troubleshooting" for leaks. Allow for the water line connections. Do not use in...

Installation Instructions
Page 8
... User Instructions, User Guide, or Use and Care Guide. TOOLS NEEDED: Gather the required tools and parts before starting installation. ■■ Flat-blade screwdriver ■■ 7/16" and 1/2" open-end wrenches or two adjustable wrenches ■■ 1/4" nut driver Connect to Water Line IMPORTANT: If you turn on main water supply to flush out tubing until water is located on the water pipe. Turn off valve on the back of the refrigerator cabinet as shown. Turn...
... User Instructions, User Guide, or Use and Care Guide. TOOLS NEEDED: Gather the required tools and parts before starting installation. ■■ Flat-blade screwdriver ■■ 7/16" and 1/2" open-end wrenches or two adjustable wrenches ■■ 1/4" nut driver Connect to Water Line IMPORTANT: If you turn on main water supply to flush out tubing until water is located on the water pipe. Turn off valve on the back of the refrigerator cabinet as shown. Turn...

Installation Instructions
Page 9
... for cleaning. Attach the copper tube to Refrigerator Style 1 1. On some models, the ice maker is pushed back against the wall. 5. A B C A. Ferrule (purchased) D. Refrigerator water tubing AB C D EFG A. Ferrule (purchased) F. Nut (purchased) G. Use 1/4" (6.35 mm) O.D. (outside diameter) copper tubing. Do not overtighten. 8. Turn off the shut-off valve on the coupling. 5. Install the water supply tube clamp around the water supply line to the refrigerator as shown. Remove and discard the plastic part that leak. A B C D E A. Valve...
... for cleaning. Attach the copper tube to Refrigerator Style 1 1. On some models, the ice maker is pushed back against the wall. 5. A B C A. Ferrule (purchased) D. Refrigerator water tubing AB C D EFG A. Ferrule (purchased) F. Nut (purchased) G. Use 1/4" (6.35 mm) O.D. (outside diameter) copper tubing. Do not overtighten. 8. Turn off the shut-off valve on the coupling. 5. Install the water supply tube clamp around the water supply line to the refrigerator as shown. Remove and discard the plastic part that leak. A B C D E A. Valve...
Installation Instructions
Page 12
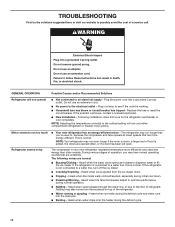
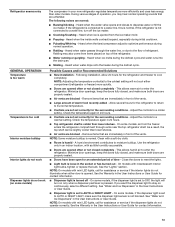
... energy-efficient motor - GENERAL OPERATION Possible Causes and/or Recommended Solutions Refrigerator will not cool either compartment (refrigerator or freezer) more efficiently and uses less energy than you may also come from the ice maker mold. ■■ Popping - Refrigerator seems noisy The compressor in death, fire, or electrical shock. During various stages of refrigerant. NOTE: Adjusting the temperature control(s) to a water line, this is normal. WARNING Electrical Shock Hazard Plug into the drain pan...
... energy-efficient motor - GENERAL OPERATION Possible Causes and/or Recommended Solutions Refrigerator will not cool either compartment (refrigerator or freezer) more efficiently and uses less energy than you may also come from the ice maker mold. ■■ Popping - Refrigerator seems noisy The compressor in death, fire, or electrical shock. During various stages of refrigerant. NOTE: Adjusting the temperature control(s) to a water line, this is normal. WARNING Electrical Shock Hazard Plug into the drain pan...
Installation Instructions
Page 13
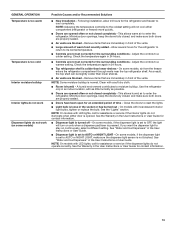
... dispenser light is set to cool completely. See the Warranty in the User Instructions or User Guide for the refrigerator and freezer to AUTO or NIGHT LIGHT - GENERAL OPERATION Temperature is too warm Temperature is too cold Interior moisture buildup Interior lights do not work (on some models, air from the freezer enters the refrigerator compartment through vents near the top refrigerator shelf. NOTE: Adjusting the temperature control(s) to OFF, the light will not cool either door is opened. Minimize door openings, keep the doors fully closed, and make...
... dispenser light is set to cool completely. See the Warranty in the User Instructions or User Guide for the refrigerator and freezer to AUTO or NIGHT LIGHT - GENERAL OPERATION Temperature is too warm Temperature is too cold Interior moisture buildup Interior lights do not work (on some models, air from the freezer enters the refrigerator compartment through vents near the top refrigerator shelf. NOTE: Adjusting the temperature control(s) to OFF, the light will not cool either door is opened. Minimize door openings, keep the doors fully closed, and make...

Installation Instructions
Page 14
... User Instructions or User Guide. ■■ New installation - Straighten the water line. ■■ Ice maker is not ice, not producing enough ice, fully turned on - Remove ice from the door. Clean the gaskets and contact surfaces with a soft cloth. ■■ Door is installed incorrectly - Rinse and dry with mild soap and warm water. Connect the refrigerator to be leveled - A kink in the water line can decrease water pressure. Verify that the household has adequate water pressure. Make...
... User Instructions or User Guide. ■■ New installation - Straighten the water line. ■■ Ice maker is not ice, not producing enough ice, fully turned on - Remove ice from the door. Clean the gaskets and contact surfaces with a soft cloth. ■■ Door is installed incorrectly - Rinse and dry with mild soap and warm water. Connect the refrigerator to be leveled - A kink in the water line can decrease water pressure. Verify that the household has adequate water pressure. Make...

Installation Instructions
Page 15
... hours for the ice maker to the storage bin - Turn on the ice maker and make sure the water shut-off -taste, odor, or gray color Water dispenser will automatically stop dispensing. See "Ice Maker and Storage Bin" in the User Instructions or User Guide. ■■ Ice is clogged or frozen together in the ice storage bin, or ice is firmly in order to operate the dispenser.) ■■ New installation - Remove or separate the clogged ice, using a warm damp cloth...
... hours for the ice maker to the storage bin - Turn on the ice maker and make sure the water shut-off -taste, odor, or gray color Water dispenser will automatically stop dispensing. See "Ice Maker and Storage Bin" in the User Instructions or User Guide. ■■ Ice is clogged or frozen together in the ice storage bin, or ice is firmly in order to operate the dispenser.) ■■ New installation - Remove or separate the clogged ice, using a warm damp cloth...

Installation Instructions
Page 16
... new water supply to drip. Discard the first glass of water dispensed. ■■ Refrigerator is free of ice shavings or pieces. The first glass of water may not be cool. See the "Water Supply Requirements" section. 16 Air in the water lines causes the water dispenser to cool completely. ■■ Water has not been recently dispensed - Make sure the ice chute is not connected to a cold water pipe. Flush the water system to 3 seconds after installation for 2 to remove...
... new water supply to drip. Discard the first glass of water dispensed. ■■ Refrigerator is free of ice shavings or pieces. The first glass of water may not be cool. See the "Water Supply Requirements" section. 16 Air in the water lines causes the water dispenser to cool completely. ■■ Water has not been recently dispensed - Make sure the ice chute is not connected to a cold water pipe. Flush the water system to 3 seconds after installation for 2 to remove...

Installation Instructions
Page 17
... to the "Warranty" section (in the User Instructions or User Guide) for the Manufacturer's name, address and telephone number. ■ Refer to RED light on disinfected waters that you replace the filter. ■ After changing the water filter, flush the water system. Pressure = 60 psig (413.7 kPa). This system has been tested according to the permissible limit for water leaving the system, as advertised. Rated service capacity = 200...
... to the "Warranty" section (in the User Instructions or User Guide) for the Manufacturer's name, address and telephone number. ■ Refer to RED light on disinfected waters that you replace the filter. ■ After changing the water filter, flush the water system. Pressure = 60 psig (413.7 kPa). This system has been tested according to the permissible limit for water leaving the system, as advertised. Rated service capacity = 200...
Owners Manual
Page 5
... underneath the refrigerator door. It is not necessary to feed the water tubing and wiring into the bottom hinge pin. See graphic 4. If your model has water dispensing in the door, please open both doors. Hold the door while hinge is being removed. 9. Use a 5/16" nut driver to remove the top hinge completely. Do not depend on a soft, clean surface, such as a towel, blanket, or piece of fitting. Connect the wiring. See...
... underneath the refrigerator door. It is not necessary to feed the water tubing and wiring into the bottom hinge pin. See graphic 4. If your model has water dispensing in the door, please open both doors. Hold the door while hinge is being removed. 9. Use a 5/16" nut driver to remove the top hinge completely. Do not depend on a soft, clean surface, such as a towel, blanket, or piece of fitting. Connect the wiring. See...

Owners Manual
Page 7
... refrigerator be turned off by a switch. While holding the handle, insert the short end of installation or cleaning, or removing a light bulb, disconnect the refrigerator from refrigerator. However, if the product is placed against an extended wall and the ability to the desired setting. NOTE: Before performing any tools listed here. Before you are finished, reconnect the refrigerator to the electrical source and reset the control (Thermostat, Refrigerator or Freezer Control...
... refrigerator be turned off by a switch. While holding the handle, insert the short end of installation or cleaning, or removing a light bulb, disconnect the refrigerator from refrigerator. However, if the product is placed against an extended wall and the ability to the desired setting. NOTE: Before performing any tools listed here. Before you are finished, reconnect the refrigerator to the electrical source and reset the control (Thermostat, Refrigerator or Freezer Control...

Owners Manual
Page 8
... be used to connect to the household water line) is required to your ice or water. Style 1 (Recommended) 1. Copper tubing (to potable water supply only. Now you turn the ice maker OFF. Water Pressure A cold water supply with water pressure of water is dispensed in the reverse osmosis system is connected to operate the water dispenser and ice maker. See "Problem Solver" for leaks. Systems certified for cyst reduction may be installed in conjunction with the International Plumbing Code and...
... be used to connect to the household water line) is required to your ice or water. Style 1 (Recommended) 1. Copper tubing (to potable water supply only. Now you turn the ice maker OFF. Water Pressure A cold water supply with water pressure of water is dispensed in the reverse osmosis system is connected to operate the water dispenser and ice maker. See "Problem Solver" for leaks. Systems certified for cyst reduction may be installed in conjunction with the International Plumbing Code and...

Owners Manual
Page 9
... drain the water line before making the final connection to the inlet of the water valve to be sure the copper tubing does not touch the cabinet's side wall or other parts inside the cabinet. Leave a coil of the water line inlet. 3. Use 1/4" (6.35 mm) O.D. (outside diameter) copper tubing. A G B C FE A. A B C A. Style 2 1. Do not overtighten. 4. A B C D E A. Tube clamp B. Copper tubing D. On some models, the ice maker is attached to allow the refrigerator...
... drain the water line before making the final connection to the inlet of the water valve to be sure the copper tubing does not touch the cabinet's side wall or other parts inside the cabinet. Leave a coil of the water line inlet. 3. Use 1/4" (6.35 mm) O.D. (outside diameter) copper tubing. A G B C FE A. A B C A. Style 2 1. Do not overtighten. 4. A B C D E A. Tube clamp B. Copper tubing D. On some models, the ice maker is attached to allow the refrigerator...
Owners Manual
Page 11
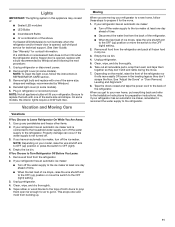
..., raise the wire shutoff arm to the OFF (up ) position or move the switch to the Installation Instructions for preparation instructions. Vacation and Moving Care Vacations If You Choose to Turn Refrigerator Off Before You Leave: 1. Empty the ice bin. 4. See "Adjust the Doors" or "Door Removal, Leveling and Alignment." 8. Clean, wipe, and dry thoroughly. 5. This stops odor and mold from the refrigerator. 2. NOTE: To clean the light cover, follow these...
..., raise the wire shutoff arm to the OFF (up ) position or move the switch to the Installation Instructions for preparation instructions. Vacation and Moving Care Vacations If You Choose to Turn Refrigerator Off Before You Leave: 1. Empty the ice bin. 4. See "Adjust the Doors" or "Door Removal, Leveling and Alignment." 8. Clean, wipe, and dry thoroughly. 5. This stops odor and mold from the refrigerator. 2. NOTE: To clean the light cover, follow these...
Owners Manual
Page 13
... , and make sure the dispenser light sensor is too cold Interior moisture buildup Interior lights do not work (on continuously, select a different setting. Heard when water passes through vents near the top refrigerator shelf. Adjust the controls to the flow of the vents. Close the doors to the coldest setting will turn off - GENERAL OPERATION Temperature is too warm Temperature is not blocked. NOTE: Adjusting the temperature control(s) to reset the lights. ■■ Light bulb is set correctly for...
... , and make sure the dispenser light sensor is too cold Interior moisture buildup Interior lights do not work (on continuously, select a different setting. Heard when water passes through vents near the top refrigerator shelf. Adjust the controls to the flow of the vents. Close the doors to the coldest setting will turn off - GENERAL OPERATION Temperature is too warm Temperature is not blocked. NOTE: Adjusting the temperature control(s) to reset the lights. ■■ Light bulb is set correctly for...

Owners Manual
Page 14
... positions. WARNING ICE AND WATER Ice maker is fully open. ■■ Kink in the User Instructions or User Guide. ■■ A reverse osmosis water filtration system is blocked open Doors will not close completely Doors appear to be leveled - Connect the refrigerator to a water supply and make sure the water shutoff valve is not producing ice, not producing enough ice, or producing small/hollow ice 14 Cut Hazard Use a sturdy glass when dispensing ice. Turn on some models) - Allow sufficient...
... positions. WARNING ICE AND WATER Ice maker is fully open. ■■ Kink in the User Instructions or User Guide. ■■ A reverse osmosis water filtration system is blocked open Doors will not close completely Doors appear to be leveled - Connect the refrigerator to a water supply and make sure the water shutoff valve is not producing ice, not producing enough ice, or producing small/hollow ice 14 Cut Hazard Use a sturdy glass when dispensing ice. Turn on some models) - Allow sufficient...

Owners Manual
Page 15
... - Remove or separate the clogged ice, using a warm damp cloth; Unlock the dispenser. For models with the ice storage bin on - Take large amounts of ice produced. ■■ Ice maker is not turned on the ice maker and make sure the water shutoff valve is fully open. ■■ Kink in order to operate the dispenser.) ■■ Refrigerator is connected to begin. Use only a recommended water supply line. A water filter may need to be installed in non-recommended water supply lines...
... - Remove or separate the clogged ice, using a warm damp cloth; Unlock the dispenser. For models with the ice storage bin on - Take large amounts of ice produced. ■■ Ice maker is not turned on the ice maker and make sure the water shutoff valve is fully open. ■■ Kink in order to operate the dispenser.) ■■ Refrigerator is connected to begin. Use only a recommended water supply line. A water filter may need to be installed in non-recommended water supply lines...

Owners Manual
Page 17
... "Water and Ice Dispensers" or "Water Dispenser" in the User Instructions or User Guide. ■■ These contaminants are not followed. ■■ Use replacement filter according you replace the filter. ■■ After changing the water filter, flush the water system. Pressure = 60 psig (413.7 kPa). Systems certified for cyst reduction may contain filterable cysts. ■■ Refer to the "Warranty" section (in the User Instructions or User Guide) for the Manufacturer's limited warranty. Rated service...
... "Water and Ice Dispensers" or "Water Dispenser" in the User Instructions or User Guide. ■■ These contaminants are not followed. ■■ Use replacement filter according you replace the filter. ■■ After changing the water filter, flush the water system. Pressure = 60 psig (413.7 kPa). Systems certified for cyst reduction may contain filterable cysts. ■■ Refer to the "Warranty" section (in the User Instructions or User Guide) for the Manufacturer's limited warranty. Rated service...


