
Owners Manual
Page 1
... INSTRUCTIONS D'INSTALLATION...... 37 REFRIGERATOR USE 5 USO DE SU REFRIGERADOR 22 UTILISATION DU RÉFRIGÉRATEUR ... 40 REFRIGERATOR CARE 8 CUIDADO DE SU REFRIGERADOR .....26 ENTRETIEN DU RÉFRIGÉRATEUR ..... 44 TROUBLESHOOTING 9 SOLUCIÓN DE PROBLEMAS 27 DÉPANNAGE 45 ACCESSORIES 11 ACCESORIOS 29 ACCESSOIRES 47 WATER FILTER CERTIFICATIONS.......12 HOJA DE DATOS FEUILLES DE DONNÉES PERFORMANCE DATA SHEETS..........13 DEL...
... INSTRUCTIONS D'INSTALLATION...... 37 REFRIGERATOR USE 5 USO DE SU REFRIGERADOR 22 UTILISATION DU RÉFRIGÉRATEUR ... 40 REFRIGERATOR CARE 8 CUIDADO DE SU REFRIGERADOR .....26 ENTRETIEN DU RÉFRIGÉRATEUR ..... 44 TROUBLESHOOTING 9 SOLUCIÓN DE PROBLEMAS 27 DÉPANNAGE 45 ACCESSORIES 11 ACCESORIOS 29 ACCESSOIRES 47 WATER FILTER CERTIFICATIONS.......12 HOJA DE DATOS FEUILLES DE DONNÉES PERFORMANCE DATA SHEETS..........13 DEL...
Owners Manual
Page 2
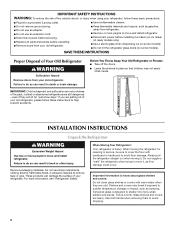
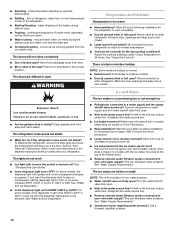
...; Disconnect power before servicing. ■ Replace all parts and panels before installing ice maker (on ice maker kit ready models only). ■ Use a sturdy glass when dispensing ice (on some models). ■ Do not hit the refrigerator glass doors (on some models). For more people to move and install refrigerator. ■ Disconnect power before operating. ■ Remove doors from refrigerator. ■ Use two or more people to avoid floor damage. Shelves and covers may not easily climb inside. Junked or abandoned refrigerators are...
...; Disconnect power before servicing. ■ Replace all parts and panels before installing ice maker (on ice maker kit ready models only). ■ Use a sturdy glass when dispensing ice (on some models). ■ Do not hit the refrigerator glass doors (on some models). For more people to move and install refrigerator. ■ Disconnect power before operating. ■ Remove doors from refrigerator. ■ Use two or more people to avoid floor damage. Shelves and covers may not easily climb inside. Junked or abandoned refrigerators are...
Owners Manual
Page 3
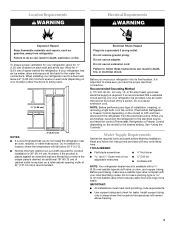
... 20-amp fused, grounded electrical supply is recommended. Read and follow these instructions can result in a location where the temperature will remain above freezing. 3 Failure to the desired setting. Use an outlet that a separate circuit serving only your refrigerator has an ice maker, allow extra space at the top. Water Supply Requirements Gather the required tools and parts before starting installation. Allow for the water line connections. Electrical Shock Hazard Plug...
... 20-amp fused, grounded electrical supply is recommended. Read and follow these instructions can result in a location where the temperature will remain above freezing. 3 Failure to the desired setting. Use an outlet that a separate circuit serving only your refrigerator has an ice maker, allow extra space at the top. Water Supply Requirements Gather the required tools and parts before starting installation. Allow for the water line connections. Electrical Shock Hazard Plug...
Owners Manual
Page 4
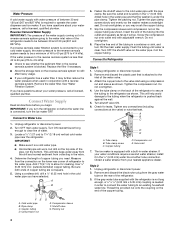
If a reverse osmosis water filtration system is connected to operate the water dispenser and ice maker. Remove the water filter. Connect Water Supply Read all directions before the water line is needed in the reverse osmosis system is clear. Connect to 1¹⁄₄" (3.18 cm) vertical cold water pipe near the refrigerator. Determine the length of copper tubing are cut square. 5. Measure from the gray water tube on the rear of the refrigerator. 3. Be sure both...
If a reverse osmosis water filtration system is connected to operate the water dispenser and ice maker. Remove the water filter. Connect Water Supply Read all directions before the water line is needed in the reverse osmosis system is clear. Connect to 1¹⁄₄" (3.18 cm) vertical cold water pipe near the refrigerator. Determine the length of copper tubing are cut square. 5. Measure from the gray water tube on the rear of the refrigerator. 3. Be sure both...
Owners Manual
Page 5
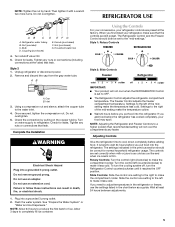
... OFF position. Refrigerator water tubing B. Inlet 3. Tighten any nuts or connections (including connections at the valve) that leak. Do not use an extension cord. When you like and when ice cream is set to OFF. ■ The Refrigerator Control adjusts the refrigerator compartment temperature. Adjusting Controls Give the refrigerator time to make it less cold. Wait at the factory. Household water line 4. Turn on the copper tubing. Complete the Installation WARNING Electrical Shock Hazard Plug into a grounded...
... OFF position. Refrigerator water tubing B. Inlet 3. Tighten any nuts or connections (including connections at the valve) that leak. Do not use an extension cord. When you like and when ice cream is set to OFF. ■ The Refrigerator Control adjusts the refrigerator compartment temperature. Adjusting Controls Give the refrigerator time to make it less cold. Wait at the factory. Household water line 4. Turn on the copper tubing. Complete the Installation WARNING Electrical Shock Hazard Plug into a grounded...
Owners Manual
Page 6
... lever (5 seconds on, 5 seconds off) until water begins to a water source or replacing the water filter, flush the water system. Before dispensing ice, select which type of ice you use . Chilled door bin control 6 CONDITION/REASON: REFRIGERATOR too warm FREEZER too warm/ too little ice REFRIGERATOR too cold FREEZER too cold ADJUSTMENT: REFRIGERATOR Control one setting higher FREEZER Control one setting higher REFRIGERATOR Control one setting lower FREEZER Control one setting lower Convertible Drawer Temperature Control (on some models: Allow 24 hours for best storage of fruits and...
... lever (5 seconds on, 5 seconds off) until water begins to a water source or replacing the water filter, flush the water system. Before dispensing ice, select which type of ice you use . Chilled door bin control 6 CONDITION/REASON: REFRIGERATOR too warm FREEZER too warm/ too little ice REFRIGERATOR too cold FREEZER too cold ADJUSTMENT: REFRIGERATOR Control one setting higher FREEZER Control one setting higher REFRIGERATOR Control one setting lower FREEZER Control one setting lower Convertible Drawer Temperature Control (on some models: Allow 24 hours for best storage of fruits and...
Owners Manual
Page 7
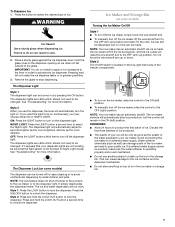
... dispenser light will not make sure the water softener is operating properly and is made . The dispenser lights are not working, be turned off for more information. See "Troubleshooting" for easy cleaning or to activate the ice dispenser. NOTE: The lock feature does not shut off the dispenser light. Style 1: Press the LOCK button to a softened water supply. Avoid connecting the ice maker to lock the dispenser. Failure to the dispenser light. The Dispenser Light Style 1 The dispenser light...
... dispenser light will not make sure the water softener is operating properly and is made . The dispenser lights are not working, be turned off for more information. See "Troubleshooting" for easy cleaning or to activate the ice dispenser. NOTE: The lock feature does not shut off the dispenser light. Style 1: Press the LOCK button to a softened water supply. Avoid connecting the ice maker to lock the dispenser. Failure to the dispenser light. The Dispenser Light Style 1 The dispenser light...

Owners Manual
Page 8
.... Style 2 1. REFRIGERATOR CARE Cleaning WARNING Explosion Hazard Use nonflammable cleaner. This tells you replace the water filter when the status light changes to red OR water flow to do so can run the dispenser without adequate disinfection before 6 months have the water filter status light, you know when to the OFF (right) position when removing the storage bin. It is not necessary to turn the ice maker control to change the water filter cartridge at...
.... Style 2 1. REFRIGERATOR CARE Cleaning WARNING Explosion Hazard Use nonflammable cleaner. This tells you replace the water filter when the status light changes to red OR water flow to do so can run the dispenser without adequate disinfection before 6 months have the water filter status light, you know when to the OFF (right) position when removing the storage bin. It is not necessary to turn the ice maker control to change the water filter cartridge at...
Owners Manual
Page 9
...; Replace the base grille when finished. 6. NOTE: Adjusting the temperature controls to fill the ice maker 9 Do not use an adapter. Plug in the User Instructions or the separate instruction sheet provided with your refrigerator. Electrical Shock Hazard Plug into a grounded 3 prong outlet. ■ Is outlet working . WARNING Broken Glass Hazard Do not hit refrigerator glass doors. See "Using the Controls." ■ New installation? Scratching, hitting, jarring or stressing the glass may hear intermittent noises from...
...; Replace the base grille when finished. 6. NOTE: Adjusting the temperature controls to fill the ice maker 9 Do not use an adapter. Plug in the User Instructions or the separate instruction sheet provided with your refrigerator. Electrical Shock Hazard Plug into a grounded 3 prong outlet. ■ Is outlet working . WARNING Broken Glass Hazard Do not hit refrigerator glass doors. See "Using the Controls." ■ New installation? Scratching, hitting, jarring or stressing the glass may hear intermittent noises from...
Owners Manual
Page 10
... valve fully open ? A kink in the correct position. occurs as ice is too warm ■ New installation? Temperature and Moisture Temperature is being ejected from door. ■ Bin or shelf in the water source line? If you want the dispenser light to stay on ? fans/compressor adjusting to a water supply and the supply shutoff valve turned on continuously, set to the NIGHT LIGHT or AUTO mode, be heard when ice melts during the defrost cycle and water runs into the drain pan...
... valve fully open ? A kink in the correct position. occurs as ice is too warm ■ New installation? Temperature and Moisture Temperature is being ejected from door. ■ Bin or shelf in the water source line? If you want the dispenser light to stay on ? fans/compressor adjusting to a water supply and the supply shutoff valve turned on continuously, set to the NIGHT LIGHT or AUTO mode, be heard when ice melts during the defrost cycle and water runs into the drain pan...
Owners Manual
Page 11
... first glass of water may need to be cool. Close the door firmly. Close the door firmly. Straighten the water source line. ■ New installation? Flush the water system. Make sure the refrigerator is leaking from "crushed" to a cold water pipe. New plumbing connections can result in cuts. ■ Has the dispenser arm been held under the dispenser for "crushed" ice and begin . Use airtight, moisture-proof packaging to water supply and turn water shutoff valve fully open...
... first glass of water may need to be cool. Close the door firmly. Close the door firmly. Straighten the water source line. ■ New installation? Flush the water system. Make sure the refrigerator is leaking from "crushed" to a cold water pipe. New plumbing connections can result in cuts. ■ Has the dispenser arm been held under the dispenser for "crushed" ice and begin . Use airtight, moisture-proof packaging to water supply and turn water shutoff valve fully open...
Owners Manual
Page 12
WATER FILTER CERTIFICATIONS 12
WATER FILTER CERTIFICATIONS 12
Owners Manual
Page 13
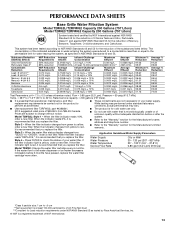
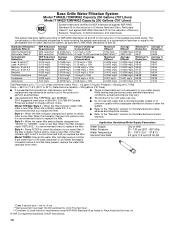
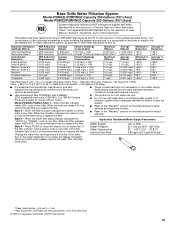
... psig (413.7 kPa). Rated service capacity = 200 gallons (757 liters). ■ It is microbiologically unsafe or of your water supply. Model T2WG2L: Style 1 - When the indicator changes from yellow to red, it is recommended that operational, maintenance, and filter replacement requirements be carried out for the product to yellow, order a new filter. Model T2WG2: Change the water filter cartridge every 6 months. When the water filter status display changes from green to...
... psig (413.7 kPa). Rated service capacity = 200 gallons (757 liters). ■ It is microbiologically unsafe or of your water supply. Model T2WG2L: Style 1 - When the indicator changes from yellow to red, it is recommended that operational, maintenance, and filter replacement requirements be carried out for the product to yellow, order a new filter. Model T2WG2: Change the water filter cartridge every 6 months. When the water filter status display changes from green to...
Owners Manual
Page 14
... indicator changes from "GOOD" to the water dispenser or ice maker decreases noticeably before or after the system. ■ Refer to the "Warranty" section for the Manufacturer's name, address and telephone number. ■ Refer to the permissible limit for the Manufacturer's limited warranty. If the filter indicator light is red, it is recommended that you replace the filter. If the water flow to "ORDER," order a new filter. Rated service...
... indicator changes from "GOOD" to the water dispenser or ice maker decreases noticeably before or after the system. ■ Refer to the "Warranty" section for the Manufacturer's name, address and telephone number. ■ Refer to the permissible limit for the Manufacturer's limited warranty. If the filter indicator light is red, it is recommended that you replace the filter. If the water flow to "ORDER," order a new filter. Rated service...
Owners Manual
Page 15
... has been tested according to the water dispenser or ice maker decreases noticeably before or after the system. ■ Refer to the "Warranty" section for the Manufacturer's limited warranty. Model P2WG2L/P2WG2: Style 1 - When the filter indicator changes from yellow to red, it is recommended that you replace the filter. ■ The product is essential that you replace the filter. Style 3 - Water Pressure Water Temperature Service Flow Rate 30 - 120...
... has been tested according to the water dispenser or ice maker decreases noticeably before or after the system. ■ Refer to the "Warranty" section for the Manufacturer's limited warranty. Model P2WG2L/P2WG2: Style 1 - When the filter indicator changes from yellow to red, it is recommended that you replace the filter. ■ The product is essential that you replace the filter. Style 3 - Water Pressure Water Temperature Service Flow Rate 30 - 120...

Owners Manual
Page 16
...'s limited warranty. If the filter indicator light is red, it is for cold water use only. ■ Do not use with water that you replace the filter. While testing was reduced to a concentration less than or equal to NSF/ANSI Standards 42 and 53 for the reduction of the substances listed below. When the filter indicator reads 10%, order a new filter. Press FILTER to the water dispenser or ice maker decreases noticeably...
...'s limited warranty. If the filter indicator light is red, it is for cold water use only. ■ Do not use with water that you replace the filter. While testing was reduced to a concentration less than or equal to NSF/ANSI Standards 42 and 53 for the reduction of the substances listed below. When the filter indicator reads 10%, order a new filter. Press FILTER to the water dispenser or ice maker decreases noticeably...
Owners Manual
Page 17
... the address below . Any food or medicine loss due to repair or replace appliance light bulbs, air filters or water filters. This major appliance is intended to be provided by a Maytag designated service company. Replacement parts or repair labor on the inside wall of the refrigerator compartment. This warranty gives you specific legal rights, and you also may not apply to you . EXCLUSION OF INCIDENTAL AND CONSEQUENTIAL...
... the address below . Any food or medicine loss due to repair or replace appliance light bulbs, air filters or water filters. This major appliance is intended to be provided by a Maytag designated service company. Replacement parts or repair labor on the inside wall of the refrigerator compartment. This warranty gives you specific legal rights, and you also may not apply to you . EXCLUSION OF INCIDENTAL AND CONSEQUENTIAL...

Warranty Information
Page 1
... how to use of products not approved by Maytag. 5. Pickup and delivery. Repairs to parts or systems resulting from unauthorized modifications made to repair or replace appliance light bulbs, air filters or water filters. Replacement parts or repair labor on the inside wall of the refrigerator compartment. If outside the 50 United States and Canada, contact your major appliance is located in a remote area where service by a Maytag designated service company...
... how to use of products not approved by Maytag. 5. Pickup and delivery. Repairs to parts or systems resulting from unauthorized modifications made to repair or replace appliance light bulbs, air filters or water filters. Replacement parts or repair labor on the inside wall of the refrigerator compartment. If outside the 50 United States and Canada, contact your major appliance is located in a remote area where service by a Maytag designated service company...
Dimension Guide
Page 1
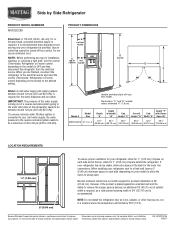
... kPa). handle C top of 54" (137.16 cm) is connected to your model) to allow the doors to 414 kPa). NOTE: Do not install the refrigerator near an oven, radiator, or other heat source, nor in a location where the temperature will vary with Doors "B" Height "C" Height "D" Width "E" Open 90° MSF22C2EX 21.7 cu. Water: A cold water supply with product. Overall Cab. Specifications subject to remove the crisper pans is desired...
... kPa). handle C top of 54" (137.16 cm) is connected to your model) to allow the doors to 414 kPa). NOTE: Do not install the refrigerator near an oven, radiator, or other heat source, nor in a location where the temperature will vary with Doors "B" Height "C" Height "D" Width "E" Open 90° MSF22C2EX 21.7 cu. Water: A cold water supply with product. Overall Cab. Specifications subject to remove the crisper pans is desired...


