
Use and Care Manual
Page 2
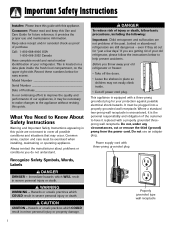
...the manufacturer about problems or conditions you throw away your protection against possible electrical shock hazards. even if they sit out for your old refrigerator or freezer: • Take off the doors. • Leave the shelves in severe personal injury or death. Recognize Safety Symbols,...of the customer to the appliance without revising this guide. Keep sales receipt and/or canceled check as proof of your old refrigerator, please follow basic precautions, including the following: Important: Child entrapment and suffocation are not meant to improve the quality and ...
...the manufacturer about problems or conditions you throw away your protection against possible electrical shock hazards. even if they sit out for your old refrigerator or freezer: • Take off the doors. • Leave the shelves in severe personal injury or death. Recognize Safety Symbols,...of the customer to the appliance without revising this guide. Keep sales receipt and/or canceled check as proof of your old refrigerator, please follow basic precautions, including the following: Important: Child entrapment and suffocation are not meant to improve the quality and ...
Use and Care Manual
Page 3
...Do not ground to malfunction or leak. Do not modify plug on a separate 115 volt, 15 amp., 60 cycle line. 8. Install refrigerator according to a gas line. 6. Do not ground to Installation Instructions. All connections for items being stored in Use and Care Guide or ... Always read and follow grounding instructions. 4. Observe all instructions before attempting any service. If plug does not fit wall receptacle, have refrigerator checked by qualified service technician. 16. If damage occurs, have proper receptacle installed by licensed personnel when required. 15. Clean up spills...
...Do not ground to malfunction or leak. Do not modify plug on a separate 115 volt, 15 amp., 60 cycle line. 8. Install refrigerator according to a gas line. 6. Do not ground to Installation Instructions. All connections for items being stored in Use and Care Guide or ... Always read and follow grounding instructions. 4. Observe all instructions before attempting any service. If plug does not fit wall receptacle, have refrigerator checked by qualified service technician. 16. If damage occurs, have proper receptacle installed by licensed personnel when required. 15. Clean up spills...

Use and Care Manual
Page 4
... Tape decorative panels (select models) securely into place before plugging it in immediately may want to final location. Transporting Your Refrigerator • NEVER transport refrigerator on the tube as possible. Do not over-tighten. CAUTION To avoid property damage, observe the following : • ...8260;8" into a recess where the top of hinge cap to be any shorter than anticipated. Installation Location • Do not install refrigerator near oven, radiator or other protective material prior to sit upright for full insertion. • If tube end is damaged, cut ...
... Tape decorative panels (select models) securely into place before plugging it in immediately may want to final location. Transporting Your Refrigerator • NEVER transport refrigerator on the tube as possible. Do not over-tighten. CAUTION To avoid property damage, observe the following : • ...8260;8" into a recess where the top of hinge cap to be any shorter than anticipated. Installation Location • Do not install refrigerator near oven, radiator or other protective material prior to sit upright for full insertion. • If tube end is damaged, cut ...
Use and Care Manual
Page 5
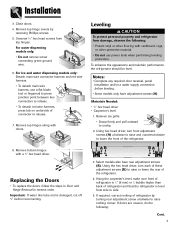
...8226; Grasp firmly and pull outward to release. 7. Using the carpenter's level, make sure front of refrigerator is 1⁄4" (6 mm) or 1⁄2 bubble higher than back of refrigerator by removing Phillips screws. 5. Unscrew 5⁄16" hex head screws from damage, observe the following ...Complete any required door reversal, panel installation and/or a water supply connection before reconnecting. Using hex head driver, turn each of the refrigerator. 4. If doors are uneven, do the following : • Protect vinyl or other flooring with cardboard, rugs, or other protective ...
...8226; Grasp firmly and pull outward to release. 7. Using the carpenter's level, make sure front of refrigerator is 1⁄4" (6 mm) or 1⁄2 bubble higher than back of refrigerator by removing Phillips screws. 5. Unscrew 5⁄16" hex head screws from damage, observe the following ...Complete any required door reversal, panel installation and/or a water supply connection before reconnecting. Using hex head driver, turn each of the refrigerator. 4. If doors are uneven, do the following : • Protect vinyl or other flooring with cardboard, rugs, or other protective ...
Use and Care Manual
Page 6
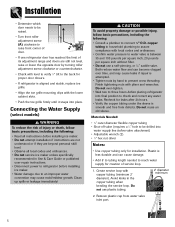
...minimum 2' diameter). Plastic is less durable and can become clogged over -tighten. • Wait two to three hours before placing refrigerator into final position to check and correct any water leaks. Remove plastic cap from defects. copper tubing to household plumbing to assure ...use plastic tubing. 2' diameter minimum 2. Avoid kinks in Use & Care Guide or published user-repair instructions. • Disconnect power to refrigerator before installing ice maker. • Water damage due to reach water supply for creation of its adjustment range and doors are beyond personal ...
...minimum 2' diameter). Plastic is less durable and can become clogged over -tighten. • Wait two to three hours before placing refrigerator into final position to check and correct any water leaks. Remove plastic cap from defects. copper tubing to household plumbing to assure ...use plastic tubing. 2' diameter minimum 2. Avoid kinks in Use & Care Guide or published user-repair instructions. • Disconnect power to refrigerator before installing ice maker. • Water damage due to reach water supply for creation of its adjustment range and doors are beyond personal ...
Use and Care Manual
Page 7
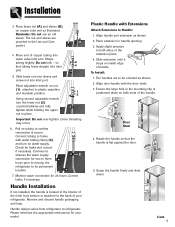
..., the handle is flat against the door. 5. Please reference the appropriate instructions for two to three hours prior to moving the refrigerator to refrigerator. Align handle and extension as illustrated. Cont. 6 Place brass nut (A) and sleeve (B) on inside edge of handle. Place .... Check for 24 hours. Monitor water connection for leaks and correct if necessary. Correct leaks, if necessary. Handle design varies from refrigerator to its permanent location. 7. Apply slight pressure to Handle: 1. To Install: 1. Align door handle with Extensions Attach Extensions to...
..., the handle is flat against the door. 5. Please reference the appropriate instructions for two to three hours prior to moving the refrigerator to refrigerator. Align handle and extension as illustrated. Cont. 6 Place brass nut (A) and sleeve (B) on inside edge of handle. Place .... Check for 24 hours. Monitor water connection for leaks and correct if necessary. Correct leaks, if necessary. Handle design varies from refrigerator to its permanent location. 7. Apply slight pressure to Handle: 1. To Install: 1. Align door handle with Extensions Attach Extensions to...
Use and Care Manual
Page 9
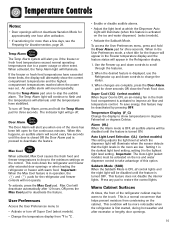
...at least 8 to OFF. This is a normal occurrence that helps prevent moisture from condensing on checking compartment temperature. • Except when starting the refrigerator, do not change either control more than one number at a time. • Allow 24 hours for temperatures to stabilize. • Changing either ... will be warm to the touch. See page 22 for instructions on the cabinet. Freezer too warm Turn the Freezer control to the refrigerator. It does not shut off power to next higher number. This is a normal occurrence that one or both compartments should be warm...
...at least 8 to OFF. This is a normal occurrence that helps prevent moisture from condensing on checking compartment temperature. • Except when starting the refrigerator, do not change either control more than one number at a time. • Allow 24 hours for temperatures to stabilize. • Changing either ... will be warm to the touch. See page 22 for instructions on the cabinet. Freezer too warm Turn the Freezer control to the refrigerator. It does not shut off power to next higher number. This is a normal occurrence that one or both compartments should be warm...

Use and Care Manual
Page 10
...of water has passed through the filter OR 11 months have elapsed since the filter has been installed. Temperature Control Guide Refrigerator too cold Set the Refrigerator control to next higher number by pressing the pad. Reset Filter (select models) When a water filter has been ... volume of water for temperatures to next higher number by pressing the pad. Freezer too cold Set the Freezer control to stabilize. Turn refrigerator OFF Press the Freezer pad until a dash "-" appears in the Temperature Control Guide. • The first touch of the fresh food...
...of water has passed through the filter OR 11 months have elapsed since the filter has been installed. Temperature Control Guide Refrigerator too cold Set the Refrigerator control to next higher number by pressing the pad. Reset Filter (select models) When a water filter has been ... volume of water for temperatures to next higher number by pressing the pad. Freezer too cold Set the Freezer control to stabilize. Turn refrigerator OFF Press the Freezer pad until a dash "-" appears in the Temperature Control Guide. • The first touch of the fresh food...
Use and Care Manual
Page 11
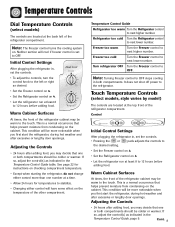
... the feature. Setting 1 is the darkest light level setting, setting 9 is in the fresh food compartment is displayed, use the Refrigerator up and down controls to take advantage of this feature may be disabled until the temperatures have exceeded these limits, the display will sound...deactivate the feature. When the desired feature is activated to change the status. 3. Warm Cabinet Surfaces At times, the front of the refrigerator cabinet may be activated on the ice and water dispenser) (select models). • Activate the Sabbath Mode. User Preferences Access the User...
... the feature. Setting 1 is the darkest light level setting, setting 9 is in the fresh food compartment is displayed, use the Refrigerator up and down controls to take advantage of this feature may be disabled until the temperatures have exceeded these limits, the display will sound...deactivate the feature. When the desired feature is activated to change the status. 3. Warm Cabinet Surfaces At times, the front of the refrigerator cabinet may be activated on the ice and water dispenser) (select models). • Activate the Sabbath Mode. User Preferences Access the User...
Use and Care Manual
Page 12
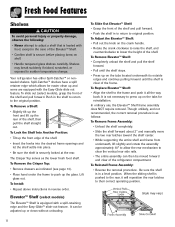
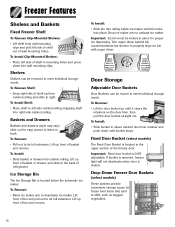
Your refrigerator has either Spill-Catcher™ or nonsealed shelves. To Lock the Shelf Into Another Position: • Tilt up the front edge of the shelf. • ... it will reposition the rear latches to clear the vertical rear side rails. • The entire assembly can be moved forward and clear of the refrigerator compartment. It can then be adjusted up the glass. To Replace Elevator™ Shelf: • Align the shelf to the original position. To Reinstall Frame...
Your refrigerator has either Spill-Catcher™ or nonsealed shelves. To Lock the Shelf Into Another Position: • Tilt up the front edge of the shelf. • ... it will reposition the rear latches to clear the vertical rear side rails. • The entire assembly can be moved forward and clear of the refrigerator compartment. It can then be adjusted up the glass. To Replace Elevator™ Shelf: • Align the shelf to the original position. To Reinstall Frame...
Use and Care Manual
Page 13
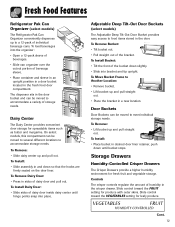
... humidity environment for spreadable items such as butter and margarine. To Remove: • Lift bucket up and pull out. Fresh Food Features Refrigerator Pak Can Organizer (select models) The Refrigerator Pak Can Organizer conveniently dispenses up to food items stored in the door. Controls The crisper controls regulate the amount of individual...
... humidity environment for spreadable items such as butter and margarine. To Remove: • Lift bucket up and pull out. Fresh Food Features Refrigerator Pak Can Organizer (select models) The Refrigerator Pak Can Organizer conveniently dispenses up to food items stored in the door. Controls The crisper controls regulate the amount of individual...
Use and Care Manual
Page 14
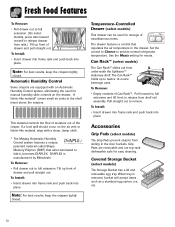
.... To Install: • Insert drawer into frame rails and push back into place. Grip Pads are removable and are equipped with a clean, damp cloth. * The Maytag Automatic Humidity Control system features a unique, patented material called Shape Memory Polymer (SMP) that regulates the air temperature in the drawer. Tilt up to twelve... air vent or fabric-like material* covers small air vents in the door buckets. Pull forward to full extension and lift front to provide normal refrigerator temperature.
.... To Install: • Insert drawer into frame rails and push back into place. Grip Pads are removable and are equipped with a clean, damp cloth. * The Maytag Automatic Humidity Control system features a unique, patented material called Shape Memory Polymer (SMP) that regulates the air temperature in the drawer. Tilt up to twelve... air vent or fabric-like material* covers small air vents in the door buckets. Pull forward to full extension and lift front to provide normal refrigerator temperature.
Use and Care Manual
Page 15
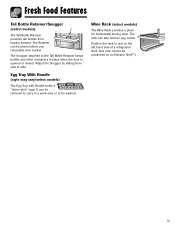
... (style may vary/select models) The Egg Tray with Handle holds a "dozen-plus" eggs. The Snugger attached to rest on the left hand side of a refrigerator shelf (this rack cannot be positioned on an Elevator Shelf™). 14 Position the rack to the Tall Bottle Retainer keeps bottles and other containers...
... (style may vary/select models) The Egg Tray with Handle holds a "dozen-plus" eggs. The Snugger attached to rest on the left hand side of a refrigerator shelf (this rack cannot be positioned on an Elevator Shelf™). 14 Position the rack to the Tall Bottle Retainer keeps bottles and other containers...
Use and Care Manual
Page 16
... door bucket straight out. Lift up from wall mounting clips and pull left side cabinet railing snapping shelf into cabinet railing. Lift up front of refrigerator. Ice Storage Bin The Ice Storage Bin is located in left side of shelf out of the freezer door. Lift up front of basket or...
... door bucket straight out. Lift up from wall mounting clips and pull left side cabinet railing snapping shelf into cabinet railing. Lift up front of refrigerator. Ice Storage Bin The Ice Storage Bin is located in left side of shelf out of the freezer door. Lift up front of basket or...
Use and Care Manual
Page 17
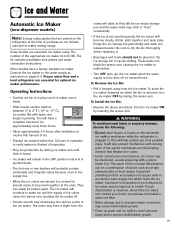
...; to 2° F (-18° to -17° C), ice maker fills with water and begins operating. Proper water flow and a level refrigerator are posted on pages 5-6. Be sure to dry the bin thoroughly before replacing it forward, away from possible injury. To Install the Ice Bin: •... injury or property damage, observe the following: • Do not place fingers or hands on the automatic ice making mechanism while the refrigerator is normal for optimal ice maker performance. It will become cloudy, shrink, stick together and taste stale. The kit contains installation instructions ...
...; to 2° F (-18° to -17° C), ice maker fills with water and begins operating. Proper water flow and a level refrigerator are posted on pages 5-6. Be sure to dry the bin thoroughly before replacing it forward, away from possible injury. To Install the Ice Bin: •... injury or property damage, observe the following: • Do not place fingers or hands on the automatic ice making mechanism while the refrigerator is normal for optimal ice maker performance. It will become cloudy, shrink, stick together and taste stale. The kit contains installation instructions ...
Use and Care Manual
Page 18
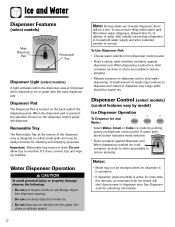
... into dispenser opening. • Do not use of water dispenser, there will be wiped dry. Discard first 10-14 glasses of water after initially connecting refrigerator to break ice. • Do not dispense ice directly into thin glass, fine china or delicate crystal. Large spills should be a one- Dispenser Control (select...
... into dispenser opening. • Do not use of water dispenser, there will be wiped dry. Discard first 10-14 glasses of water after initially connecting refrigerator to break ice. • Do not dispense ice directly into thin glass, fine china or delicate crystal. Large spills should be a one- Dispenser Control (select...
Use and Care Manual
Page 20
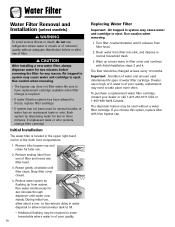
... the filter for two to eject. Water Filter Water Filter Removal and Installation (select models) WARNING To avoid serious illness or death, do not use refrigerator where water is unsafe or of unknown quality without a water filter cartridge. Use caution when removing. • The bypass cap does not filter water. Remove...
... the filter for two to eject. Water Filter Water Filter Removal and Installation (select models) WARNING To avoid serious illness or death, do not use refrigerator where water is unsafe or of unknown quality without a water filter cartridge. Use caution when removing. • The bypass cap does not filter water. Remove...
Use and Care Manual
Page 21
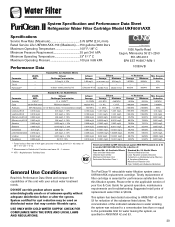
...% Reduction 107 108 fibers/L; Standard No. 42: Aesthetic Effects Influent Challenge Concentration 2.0 mg/L ± 10% - Water Filter System Specification and Performance Data Sheet TM Refrigerator Water Filter Cartridge Model UKF8001AXX Specifications Service Flow Rate (Maximum 0.78 GPM (2.9 L/min) Rated Service Life UKF8001AXX-750 (Maximum) ......750 gallons /2838 liters Maximum Operating...+ 10% Mercury at pH 6.5 0.002 mg/L .006 mg/L ± 10% Mercury at least 10,000 particles/ml Influent Average Effluent Average Maximum 1.88 mg / L 97.26% 96.84% - - 99.52% 98.94% Min.
...% Reduction 107 108 fibers/L; Standard No. 42: Aesthetic Effects Influent Challenge Concentration 2.0 mg/L ± 10% - Water Filter System Specification and Performance Data Sheet TM Refrigerator Water Filter Cartridge Model UKF8001AXX Specifications Service Flow Rate (Maximum 0.78 GPM (2.9 L/min) Rated Service Life UKF8001AXX-750 (Maximum) ......750 gallons /2838 liters Maximum Operating...+ 10% Mercury at pH 6.5 0.002 mg/L .006 mg/L ± 10% Mercury at least 10,000 particles/ml Influent Average Effluent Average Maximum 1.88 mg / L 97.26% 96.84% - - 99.52% 98.94% Min.
Use and Care Manual
Page 23
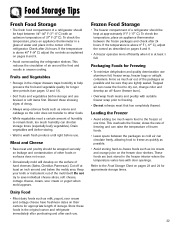
... have freshness dates on the freezer door shelves. Keep your knife or instrument out of a refrigerator should be kept at least an inch around the food and results in the original carton and refrigerate immediately after purchasing and after each use . Frozen Food Storage • The freezer compartment of...and orange juice on their cartons for approximate storage times. 22 Food Storage Tips Fresh Food Storage • The fresh food compartment of a refrigerator should be kept between 34°-40° F (1°-4° C) with door openings. This reduces the circulation of the...
... have freshness dates on the freezer door shelves. Keep your knife or instrument out of a refrigerator should be kept at least an inch around the food and results in the original carton and refrigerate immediately after purchasing and after each use . Frozen Food Storage • The freezer compartment of...and orange juice on their cartons for approximate storage times. 22 Food Storage Tips Fresh Food Storage • The fresh food compartment of a refrigerator should be kept between 34°-40° F (1°-4° C) with door openings. This reduces the circulation of the...
Use and Care Manual
Page 24
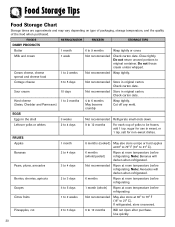
...cream 1 week Not recommended Check carton date. Pears, plums, avocados 3 to 4 days 6 months (whole/peeled) Ripen at room temperature before refrigerating. Cream cheese, cheese spread and cheese food 1 to 12 months Will not ripen after purchase. Bananas 2 to 4 days Not recommended Ripen at... on type of packaging, storage temperature, and the quality of yolks to 2 weeks Not recommended May also store at room temperature before refrigerating. Close tightly. Do not return unused portions to 5 days Not recommended Store in sweet, or 1 tsp. Cottage cheese 3 to ...
...cream 1 week Not recommended Check carton date. Pears, plums, avocados 3 to 4 days 6 months (whole/peeled) Ripen at room temperature before refrigerating. Cream cheese, cheese spread and cheese food 1 to 12 months Will not ripen after purchase. Bananas 2 to 4 days Not recommended Ripen at... on type of packaging, storage temperature, and the quality of yolks to 2 weeks Not recommended May also store at room temperature before refrigerating. Close tightly. Do not return unused portions to 5 days Not recommended Store in sweet, or 1 tsp. Cottage cheese 3 to ...


