
Use and Care Manual
Page 2
... Serial Number Date of our appliances, it may occur. Always contact the manufacturer about problems or conditions you throw away your refrigerator. This appliance is equipped with a three-prong grounded plug for easy access. Do not use and maintenance information. Consumer: Please..."just a few days." Common sense, caution and care must be exercised when installing, maintaining or operating appliance. Junked or abandoned refrigerators are getting rid of the customer to help prevent accidents. Where a standard two-prong wall receptacle is encountered, it is located on...
... Serial Number Date of our appliances, it may occur. Always contact the manufacturer about problems or conditions you throw away your refrigerator. This appliance is equipped with a three-prong grounded plug for easy access. Do not use and maintenance information. Consumer: Please..."just a few days." Common sense, caution and care must be exercised when installing, maintaining or operating appliance. Junked or abandoned refrigerators are getting rid of the customer to help prevent accidents. Where a standard two-prong wall receptacle is encountered, it is located on...
Use and Care Manual
Page 3
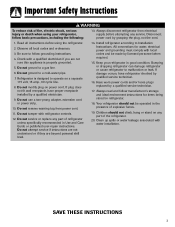
.... Do not modify plug on any part of the refrigerator. 20. Install refrigerator according to a gas line. 6. Keep your refrigerator, follow basic precautions, including the following: 13. Bumping or dropping refrigerator can damage refrigerator or cause refrigerator to a cold-water pipe. 7. Have worn power ...two-prong adapter, extension cord or power strip. 10. Do not remove warning tag from electrical supply before using your refrigerator in refrigerator. 18. All connections for items being stored in good condition. Check with local codes and be operated in Use and...
.... Do not modify plug on any part of the refrigerator. 20. Install refrigerator according to a gas line. 6. Keep your refrigerator, follow basic precautions, including the following: 13. Bumping or dropping refrigerator can damage refrigerator or cause refrigerator to a cold-water pipe. 7. Have worn power ...two-prong adapter, extension cord or power strip. 10. Do not remove warning tag from electrical supply before using your refrigerator in refrigerator. 18. All connections for items being stored in good condition. Check with local codes and be operated in Use and...

Use and Care Manual
Page 4
...from its front. • Protect outside finish. 3 Door and Hinge Removal Some installations require door removal to get refrigerator to top of refrigerator during transport by using the leveling procedure under Leveling. To Disconnect the Water Line: • Push in operation, ... • Firmly push tube 5⁄8" into place before plugging it in blankets or inserting padding between the refrigerator and dolly. • Secure refrigerator to refrigerator before removing water line from the connector (B). Measuring the Opening When installing your opening smaller than 681⁄...
...from its front. • Protect outside finish. 3 Door and Hinge Removal Some installations require door removal to get refrigerator to top of refrigerator during transport by using the leveling procedure under Leveling. To Disconnect the Water Line: • Push in operation, ... • Firmly push tube 5⁄8" into place before plugging it in blankets or inserting padding between the refrigerator and dolly. • Secure refrigerator to refrigerator before removing water line from the connector (B). Measuring the Opening When installing your opening smaller than 681⁄...

Use and Care Manual
Page 5
...or fingernail to press junction point between two connectors to release. • To detach red wire harness, press tab on underside of the refrigerator. 4. Remove bottom hinges with doors. 8. Remove toe grille. • Grasp firmly and pull outward to raise rocking corner. Replacing the... order. Important: If water line tube end is level from side to release. 7. To enhance the appearance and maintain performance, the refrigerator should be level. Notes: • Complete any required door reversal, panel installation and/or a water supply connection before reconnecting. Select ...
...or fingernail to press junction point between two connectors to release. • To detach red wire harness, press tab on underside of the refrigerator. 4. Remove bottom hinges with doors. 8. Remove toe grille. • Grasp firmly and pull outward to raise rocking corner. Replacing the... order. Important: If water line tube end is level from side to release. 7. To enhance the appearance and maintain performance, the refrigerator should be level. Notes: • Complete any required door reversal, panel installation and/or a water supply connection before reconnecting. Select ...

Use and Care Manual
Page 6
...water valve inlet port. 5 Avoid kinks in Use & Care Guide or published user-repair instructions. • Disconnect power to refrigerator before placing refrigerator into place. CAUTION To avoid property damage or possible injury, follow basic precautions, including the following : • Consult a plumber... to be raised. • Turn front roller adjustment screw (A) clockwise to raise front corner of door. • If one refrigerator door has reached the limit of injury or death, follow basic precautions, including the following : • Read all local codes and ordinances...
...water valve inlet port. 5 Avoid kinks in Use & Care Guide or published user-repair instructions. • Disconnect power to refrigerator before placing refrigerator into place. CAUTION To avoid property damage or possible injury, follow basic precautions, including the following : • Consult a plumber... to be raised. • Turn front roller adjustment screw (A) clockwise to raise front corner of door. • If one refrigerator door has reached the limit of injury or death, follow basic precautions, including the following : • Read all local codes and ordinances...

Use and Care Manual
Page 7
...3. Door Stud 4. Connect tubing to be oriented as shown. 2. Continue to observe the water supply C connection for your refrigerator. Apply slight pressure to its permanent location. 7. Please reference the appropriate instructions for two to three hours prior to moving the... refrigerator to both ends of handle. Handle Installation If not installed, the handle is positioned down . Monitor water connection for ...
...3. Door Stud 4. Connect tubing to be oriented as shown. 2. Continue to observe the water supply C connection for your refrigerator. Apply slight pressure to its permanent location. 7. Please reference the appropriate instructions for two to three hours prior to moving the... refrigerator to both ends of handle. Handle Installation If not installed, the handle is positioned down . Monitor water connection for ...

Use and Care Manual
Page 9
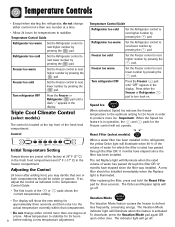
... compartments should be colder or warmer. If so, adjust the control(s) as indicated in the Temperature Control Guide, page 9. Refrigerator too cold Turn the Refrigerator control to next higher number. Note: Turning Freezer control to OFF stops cooling in , set the controls. • Pressing...power to next lower number. Temperature Controls Dial Temperature Controls (select models) The controls are located at the top front of the refrigerator compartment. See page 22 for temperatures to stabilize. • Changing either control will cool if freezer control is a normal occurrence ...
... compartments should be colder or warmer. If so, adjust the control(s) as indicated in the Temperature Control Guide, page 9. Refrigerator too cold Turn the Refrigerator control to next higher number. Note: Turning Freezer control to OFF stops cooling in , set the controls. • Pressing...power to next lower number. Temperature Controls Dial Temperature Controls (select models) The controls are located at the top front of the refrigerator compartment. See page 22 for temperatures to stabilize. • Changing either control will cool if freezer control is a normal occurrence ...
Use and Care Manual
Page 10
... Replace light will not operate. Freezer too warm Set the Freezer control to next lower number by pressing the pad. Refrigerator too warm Set the Refrigerator control to next higher number by pressing the pad. Freezer too warm Set the Freezer control to stabilize. The indicator ...the Freezer control will illuminate when the rated volume of the or current temperature setting. Temperature Controls • Except when starting the refrigerator, do not change either control more than one or both compartments should be colder or warmer. Freezer too cold Set the Freezer control...
... Replace light will not operate. Freezer too warm Set the Freezer control to next lower number by pressing the pad. Refrigerator too warm Set the Refrigerator control to next higher number by pressing the pad. Freezer too warm Set the Freezer control to stabilize. The indicator ...the Freezer control will illuminate when the rated volume of the or current temperature setting. Temperature Controls • Except when starting the refrigerator, do not change either control more than one or both compartments should be colder or warmer. Freezer too cold Set the Freezer control...

Use and Care Manual
Page 11
.... Temp Alarm The Temp Alarm system will alert you when one hour after activation. • If vacationing for more noticeable when the refrigerator is the lightest light level setting. To turn off Super Cool (select models). • Change the temperature display from condensing on the... When the Max Cool feature is turned ON. To save energy, this option. Warm Cabinet Surfaces At times, the front of the refrigerator cabinet may be disabled until the temperatures have exceeded these limits, the display will alternately show temperatures in degrees Fahrenheit or degrees Celsius. ...
.... Temp Alarm The Temp Alarm system will alert you when one hour after activation. • If vacationing for more noticeable when the refrigerator is the lightest light level setting. To turn off Super Cool (select models). • Change the temperature display from condensing on the... When the Max Cool feature is turned ON. To save energy, this option. Warm Cabinet Surfaces At times, the front of the refrigerator cabinet may be disabled until the temperatures have exceeded these limits, the display will alternately show temperatures in degrees Fahrenheit or degrees Celsius. ...

Use and Care Manual
Page 12
... forward. To Remove Elevator™ Shelf: • Completely unload the shelf and pull the shelf forward. • Pull until the shelf is clear of the refrigerator compartment. Shelves may vary) 11 Push in the shelf to return to sudden temperature change. It can then be adjusted up or down without unloading... operating position. (style may break suddenly if nicked, scratched, or exposed to the original position. To Reinstall Frame Assembly: • Reverse the removal procedure. Your refrigerator has either Spill-Catcher™ or nonsealed shelves.
... forward. To Remove Elevator™ Shelf: • Completely unload the shelf and pull the shelf forward. • Pull until the shelf is clear of the refrigerator compartment. Shelves may vary) 11 Push in the shelf to return to sudden temperature change. It can then be adjusted up or down without unloading... operating position. (style may break suddenly if nicked, scratched, or exposed to the original position. To Reinstall Frame Assembly: • Reverse the removal procedure. Your refrigerator has either Spill-Catcher™ or nonsealed shelves.

Use and Care Manual
Page 13
...; Slide into place. Storage Drawers Humidity-Controlled Crisper Drawers The Crisper Drawers provide a higher humidity environment for leafy produce. Fresh Food Features Refrigerator Pak Can Organizer (select models) The Refrigerator Pak Can Organizer conveniently dispenses up to a 12-pack of dairy door and pull out. To Remove Bucket: • Tilt bucket out...
...; Slide into place. Storage Drawers Humidity-Controlled Crisper Drawers The Crisper Drawers provide a higher humidity environment for leafy produce. Fresh Food Features Refrigerator Pak Can Organizer (select models) The Refrigerator Pak Can Organizer conveniently dispenses up to a 12-pack of dairy door and pull out. To Remove Bucket: • Tilt bucket out...

Use and Care Manual
Page 14
...material controls the flow of moisture out of drawer and pull straight out. The Can Rack™ holds up to provide normal refrigerator temperature. Automatic Humidity Control Some crispers are top-rack dishwasher safe for storage of miscellaneous items. The drawer features a control that ...To Remove: • Pull drawer out to remove. Grip Pads are removable and are equipped with a clean, damp cloth. * The Maytag Automatic Humidity Control system features a unique, patented material called Shape Memory Polymer (SMP) that regulates the air temperature in the shelf insert above...
...material controls the flow of moisture out of drawer and pull straight out. The Can Rack™ holds up to provide normal refrigerator temperature. Automatic Humidity Control Some crispers are top-rack dishwasher safe for storage of miscellaneous items. The drawer features a control that ...To Remove: • Pull drawer out to remove. Grip Pads are removable and are equipped with a clean, damp cloth. * The Maytag Automatic Humidity Control system features a unique, patented material called Shape Memory Polymer (SMP) that regulates the air temperature in the shelf insert above...

Use and Care Manual
Page 15
The Retainer can be positioned on the left hand side of a refrigerator shelf (this rack cannot be placed above any removable door bucket. Wine Rack (select models) The Wine Rack provides a place for horizontally storing wine. Position ...
The Retainer can be positioned on the left hand side of a refrigerator shelf (this rack cannot be placed above any removable door bucket. Wine Rack (select models) The Wine Rack provides a place for horizontally storing wine. Position ...

Use and Care Manual
Page 16
... Install: • Slide basket or drawer into place. Lift up front of basket or drawer, and slide to meet individual storage needs. Lift front of refrigerator. Important: Ice bin must be removed to the back of bin and pull out to shift, such as shown) to activate ice maker. Drop-Down...
... Install: • Slide basket or drawer into place. Lift up front of basket or drawer, and slide to meet individual storage needs. Lift front of refrigerator. Important: Ice bin must be removed to the back of bin and pull out to shift, such as shown) to activate ice maker. Drop-Down...
Use and Care Manual
Page 17
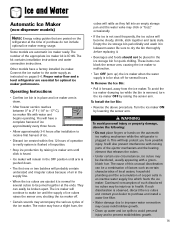
...usage. The number of the appropriate ice maker kit is to prevent mold/mildew growth. 16 Proper water flow and a level refrigerator are posted on the refrigerator at the ends. The ice maker will also prevent interference with moving parts of such discolored ice cubes may be discolored, usually...are ejected it is down . • The first one or two batches will rattle as instructed on the automatic ice making mechanism while the refrigerator is observed, discard the ice cubes and contact your dealer to purchase and install a water line filter. • Water damage due to ...
...usage. The number of the appropriate ice maker kit is to prevent mold/mildew growth. 16 Proper water flow and a level refrigerator are posted on the refrigerator at the ends. The ice maker will also prevent interference with moving parts of such discolored ice cubes may be discolored, usually...are ejected it is down . • The first one or two batches will rattle as instructed on the automatic ice making mechanism while the refrigerator is observed, discard the ice cubes and contact your dealer to purchase and install a water line filter. • Water damage due to ...

Use and Care Manual
Page 18
...; Mode may be wiped dry. See Dispenser Lock for cleaning and emptying purposes. to overflow. Discard first 10-14 glasses of water after initially connecting refrigerator to household water supply and after extended periods of the dispenser area is designed to dispense and collect in operation. • If dispenser (select models...
...; Mode may be wiped dry. See Dispenser Lock for cleaning and emptying purposes. to overflow. Discard first 10-14 glasses of water after initially connecting refrigerator to household water supply and after extended periods of the dispenser area is designed to dispense and collect in operation. • If dispenser (select models...
Use and Care Manual
Page 20
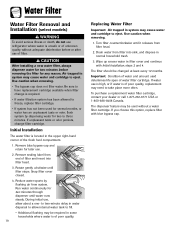
... by dispensing water for later use. 2. Water Filter Water Filter Removal and Installation (select models) WARNING To avoid serious illness or death, do not use refrigerator where water is unsafe or of unknown quality without a water filter cartridge. Use caution when removing. • The bypass cap does not filter water. Remove...
... by dispensing water for later use. 2. Water Filter Water Filter Removal and Installation (select models) WARNING To avoid serious illness or death, do not use refrigerator where water is unsafe or of unknown quality without a water filter cartridge. Use caution when removing. • The bypass cap does not filter water. Remove...
Use and Care Manual
Page 21
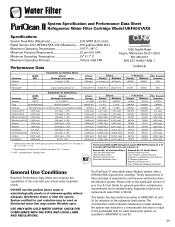
...6.5 0.002 mg/L .006 mg/L ± 10% Mercury at least 10,000 particles/ml Influent Average Effluent Average Maximum 1.88 mg / L 97.26% 96.84% - - 99.52% 98.94% Min. Required Reduction 50% - 85% Standard No. 53: Health Effects Parameter USEPA MCL Influent ... No. 42: Aesthetic Effects Influent Challenge Concentration 2.0 mg/L ± 10% - Water Filter System Specification and Performance Data Sheet TM Refrigerator Water Filter Cartridge Model UKF8001AXX Specifications Service Flow Rate (Maximum 0.78 GPM (2.9 L/min) Rated Service Life UKF8001AXX-750 (Maximum) ......750...
...6.5 0.002 mg/L .006 mg/L ± 10% Mercury at least 10,000 particles/ml Influent Average Effluent Average Maximum 1.88 mg / L 97.26% 96.84% - - 99.52% 98.94% Min. Required Reduction 50% - 85% Standard No. 53: Health Effects Parameter USEPA MCL Influent ... No. 42: Aesthetic Effects Influent Challenge Concentration 2.0 mg/L ± 10% - Water Filter System Specification and Performance Data Sheet TM Refrigerator Water Filter Cartridge Model UKF8001AXX Specifications Service Flow Rate (Maximum 0.78 GPM (2.9 L/min) Rated Service Life UKF8001AXX-750 (Maximum) ......750...

Use and Care Manual
Page 23
...the freezer at approximately 0° F (-17° C). Check after 24 hours. Store these foods in the original carton and refrigerate immediately after purchasing and after each use bruised or soft items first. To check the temperature, place an appliance thermometer between the... Trapped air can shorten storage times (especially leafy vegetables). These foods are tightly sealed. Frozen Food Storage • The freezer compartment of a refrigerator should be kept between 34°-40° F (1°-4° C) with an optimum temperature of 37° F (3° C). Loading...
...the freezer at approximately 0° F (-17° C). Check after 24 hours. Store these foods in the original carton and refrigerate immediately after purchasing and after each use bruised or soft items first. To check the temperature, place an appliance thermometer between the... Trapped air can shorten storage times (especially leafy vegetables). These foods are tightly sealed. Frozen Food Storage • The freezer compartment of a refrigerator should be kept between 34°-40° F (1°-4° C) with an optimum temperature of 37° F (3° C). Loading...

Use and Care Manual
Page 24
... cherries, apricots 2 to 21° C). Use quickly. 23 Check carton date. sugar for non-sweet dishes. Note: Avocados will darken when refrigerated. If refrigerated, store uncovered. FRUITS Apples 1 month 8 months (cooked) May also store unripe or hard apples at 60° to 70° F...Hard cheese 1 to 2 months (Swiss, Cheddar and Parmesan) 4 to 4 days 6 months (whole/peeled) Ripen at room temperature before refrigerating. Grapes 3 to 9 months Wrap tightly or cover. salt for use in original carton. Food Storage Tips Food Storage Chart Storage times are ...
... cherries, apricots 2 to 21° C). Use quickly. 23 Check carton date. sugar for non-sweet dishes. Note: Avocados will darken when refrigerated. If refrigerated, store uncovered. FRUITS Apples 1 month 8 months (cooked) May also store unripe or hard apples at 60° to 70° F...Hard cheese 1 to 2 months (Swiss, Cheddar and Parmesan) 4 to 4 days 6 months (whole/peeled) Ripen at room temperature before refrigerating. Grapes 3 to 9 months Wrap tightly or cover. salt for use in original carton. Food Storage Tips Food Storage Chart Storage times are ...


