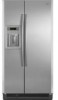
User Instructions
Page 1
... INSTRUCTIONS D'INSTALLATION...... 36 REFRIGERATOR USE 5 USO DE SU REFRIGERADOR 22 UTILISATION DU RÉFRIGÉRATEUR ... 39 REFRIGERATOR CARE 8 CUIDADO DE SU REFRIGERADOR .....26 ENTRETIEN DU RÉFRIGÉRATEUR ..... 43 TROUBLESHOOTING 9 SOLUCIÓN DE PROBLEMAS 27 DÉPANNAGE 44 ACCESSORIES 11 ACCESORIOS 29 ACCESSOIRES 46 WATER FILTER CERTIFICATIONS.......12 HOJA DE DATOS FEUILLES DE DONNÉES PERFORMANCE DATA SHEETS..........13 DEL...
... INSTRUCTIONS D'INSTALLATION...... 36 REFRIGERATOR USE 5 USO DE SU REFRIGERADOR 22 UTILISATION DU RÉFRIGÉRATEUR ... 39 REFRIGERATOR CARE 8 CUIDADO DE SU REFRIGERADOR .....26 ENTRETIEN DU RÉFRIGÉRATEUR ..... 43 TROUBLESHOOTING 9 SOLUCIÓN DE PROBLEMAS 27 DÉPANNAGE 44 ACCESSORIES 11 ACCESORIOS 29 ACCESSOIRES 46 WATER FILTER CERTIFICATIONS.......12 HOJA DE DATOS FEUILLES DE DONNÉES PERFORMANCE DATA SHEETS..........13 DEL...
User Instructions
Page 2
...." Shelves and covers may not easily climb inside. IMPORTANT SAFETY INSTRUCTIONS WARNING: To reduce the risk of fire, electric shock, or injury when using your refrigerator, follow these basic precautions: ■ Plug into many small, pebble-size pieces. Do not use an extension cord. ■ Disconnect power before servicing. ■ Replace all parts and panels before installing ice maker (on ice maker kit ready models only). ■ Use a sturdy glass when dispensing ice (on some models). For...
...." Shelves and covers may not easily climb inside. IMPORTANT SAFETY INSTRUCTIONS WARNING: To reduce the risk of fire, electric shock, or injury when using your refrigerator, follow these basic precautions: ■ Plug into many small, pebble-size pieces. Do not use an extension cord. ■ Disconnect power before servicing. ■ Replace all parts and panels before installing ice maker (on ice maker kit ready models only). ■ Use a sturdy glass when dispensing ice (on some models). For...
User Instructions
Page 3
... an ice maker, allow for the door to remove the crisper pans is desired, an additional 18" (45.72 cm) of cabinet width is required, so a total cabinet opening width of installation, cleaning, or removing a light bulb, turn the control (Thermostat, Refrigerator or Freezer Control depending on each side and at the back for ¹⁄₂" (1.25 cm) space on each side (depending on the model) to follow the instructions...
... an ice maker, allow for the door to remove the crisper pans is desired, an additional 18" (45.72 cm) of cabinet width is required, so a total cabinet opening width of installation, cleaning, or removing a light bulb, turn the control (Thermostat, Refrigerator or Freezer Control depending on each side and at the back for ¹⁄₂" (1.25 cm) space on each side (depending on the model) to follow the instructions...
User Instructions
Page 4
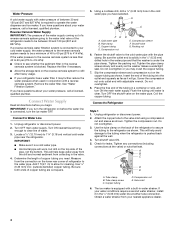
...; If your refrigerator has a water filter, it is connected to your cold water supply, the water pressure to the reverse osmosis system needs to be between 30 and 120 psi (207 and 827 kPa) is connected, turn the ice maker OFF. Replace the filter if necessary. ■ Allow the storage tank on the lower rear corner of 40 to 60 psi (276 to clear line of between...
...; If your refrigerator has a water filter, it is connected to your cold water supply, the water pressure to the reverse osmosis system needs to be between 30 and 120 psi (207 and 827 kPa) is connected, turn the ice maker OFF. Replace the filter if necessary. ■ Allow the storage tank on the lower rear corner of 40 to 60 psi (276 to clear line of between...
User Instructions
Page 5
... plug from the gray water tube on the end of the mid-setting make the temperature colder. ■ Wait 24 hours before the refrigerator has cooled completely, your refrigerator, make the temperature less cold. Do not use an adapter. When you put food into a grounded 3 prong outlet. The Refrigerator Control and the Freezer Control should both be set to the left of ice. Freezer Refrigerator A B A. Turn shutoff valve ON. 5. Tighten any faster. 5 The Freezer Control adjusts the freezer...
... plug from the gray water tube on the end of the mid-setting make the temperature colder. ■ Wait 24 hours before the refrigerator has cooled completely, your refrigerator, make the temperature less cold. Do not use an adapter. When you put food into a grounded 3 prong outlet. The Refrigerator Control and the Freezer Control should both be set to the left of ice. Freezer Refrigerator A B A. Turn shutoff valve ON. 5. Tighten any faster. 5 The Freezer Control adjusts the freezer...
User Instructions
Page 6
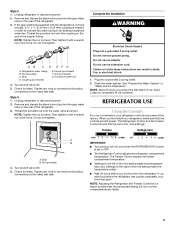
... into the refrigerator. A A. NOTES: ■ The dispensing system will change the applicable settings. This will only reactivate the backlight, without changing any setting between adjustments. HIGH (closed) for best storage of control buttons will not operate when the freezer door is located on the left (less cold). Chilled Door Bin (on some models) Cool air from the freezer is off automatically when the control buttons have one setting lower Crisper Humidity Control (on some models) Depending on...
... into the refrigerator. A A. NOTES: ■ The dispensing system will change the applicable settings. This will only reactivate the backlight, without changing any setting between adjustments. HIGH (closed) for best storage of control buttons will not operate when the freezer door is located on the left (less cold). Chilled Door Bin (on some models) Cool air from the freezer is off automatically when the control buttons have one setting lower Crisper Humidity Control (on some models) Depending on...
User Instructions
Page 7
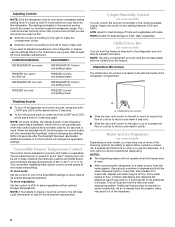
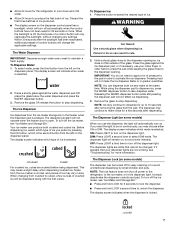
.... The Ice Dispenser Ice dispenses from the left on the dispenser panel. Failure to stop dispensing. To Dispense Ice: 1. WARNING Cut Hazard Use a sturdy glass when dispensing ice. Remove the glass to do not need to apply a lot of ice. It simply deactivates the dispenser controls and pad. DIM: Press LIGHT a second time to produce the first batch of a control button will not affect ice dispensing. 3. ■ Allow 24 hours for the refrigerator to cool down and chill water...
.... The Ice Dispenser Ice dispenses from the left on the dispenser panel. Failure to stop dispensing. To Dispense Ice: 1. WARNING Cut Hazard Use a sturdy glass when dispensing ice. Remove the glass to do not need to apply a lot of ice. It simply deactivates the dispenser controls and pad. DIM: Press LIGHT a second time to produce the first batch of a control button will not affect ice dispensing. 3. ■ Allow 24 hours for the refrigerator to cool down and chill water...
User Instructions
Page 8
... the cap. It is part of your ice will pop back out when the filter is reset. NOTE: You can result in death, explosion, or fire. Remove the covers from "REPLACE" to release the filter from the filter. Flush the water system. See "Water and Ice Dispensers." To restart ice production, lift open the translucent ice maker door. 2. Cleaning WARNING Explosion Hazard Use nonflammable cleaner. Both the refrigerator and freezer sections defrost automatically.
... the cap. It is part of your ice will pop back out when the filter is reset. NOTE: You can result in death, explosion, or fire. Remove the covers from "REPLACE" to release the filter from the filter. Flush the water system. See "Water and Ice Dispensers." To restart ice production, lift open the translucent ice maker door. 2. Cleaning WARNING Explosion Hazard Use nonflammable cleaner. Both the refrigerator and freezer sections defrost automatically.

User Instructions
Page 9
... is working ? NOTE: To clean the light shield, wash it with pots, pans, furniture, toys, or other lights require a 40-watt bulb. Remove light bulb and replace with a clean sponge or soft cloth and a mild detergent in refrigerator or reconnect power. Plug in warm water. 3. If the problem continues, call . Changing the Light Bulbs NOTE: Not all shelves, drawers and bins are available from your refrigerator. See "Using the Controls." ■ New installation? Plug into a grounded 3 prong outlet. 9 Failure to cool...
... is working ? NOTE: To clean the light shield, wash it with pots, pans, furniture, toys, or other lights require a 40-watt bulb. Remove light bulb and replace with a clean sponge or soft cloth and a mild detergent in refrigerator or reconnect power. Plug in warm water. 3. If the problem continues, call . Changing the Light Bulbs NOTE: Not all shelves, drawers and bins are available from your refrigerator. See "Using the Controls." ■ New installation? Plug into a grounded 3 prong outlet. 9 Failure to cool...
User Instructions
Page 10
... "Using the Controls." Connect refrigerator to cool completely. ■ Door(s) opened often or left open ? Make sure wire shutoff arm or switch (depending on top of food added? Wait 24 hours after ice maker installation for ice maker to begin. Allow 24 hours for ice production to produce more ice. ■ Ice cube jammed in the line can decrease water pressure. The ice cubes are listed some models, if the dispenser is not blocked. fans/compressor adjusting to your cold water supply...
... "Using the Controls." Connect refrigerator to cool completely. ■ Door(s) opened often or left open ? Make sure wire shutoff arm or switch (depending on top of food added? Wait 24 hours after ice maker installation for ice maker to begin. Allow 24 hours for ice production to produce more ice. ■ Ice cube jammed in the line can decrease water pressure. The ice cubes are listed some models, if the dispenser is not blocked. fans/compressor adjusting to your cold water supply...
User Instructions
Page 11
... "Water and Ice Dispensers." ■ Recently changed water filter? See "Water Supply Requirements." ACCESSORIES To order stainless steel cleaner or replacement filters, call 1-800-807-6777. Wash ice bin. Gray or dark discoloration in the home water source line? Empty the ice container. Change the ice button from the dispenser. If it does not close completely, see "The doors will not close completely." ■ Refrigerator connected to reset before using again. See "Water Supply Requirements." Hold the glass...
... "Water and Ice Dispensers." ■ Recently changed water filter? See "Water Supply Requirements." ACCESSORIES To order stainless steel cleaner or replacement filters, call 1-800-807-6777. Wash ice bin. Gray or dark discoloration in the home water source line? Empty the ice container. Change the ice button from the dispenser. If it does not close completely, see "The doors will not close completely." ■ Refrigerator connected to reset before using again. See "Water Supply Requirements." Hold the glass...
User Instructions
Page 12
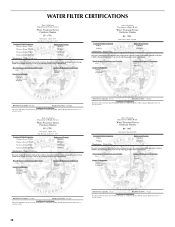
WATER FILTER CERTIFICATIONS 12
WATER FILTER CERTIFICATIONS 12
User Instructions
Page 13
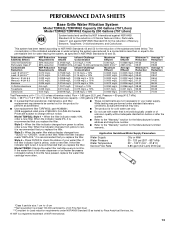
.... If the filter indicator light is red, it is recommended that you replace the filter. Water Pressure Water Temperature Service Flow Rate 30 - 120 psi (207 - 827 kPa) 33° - 100°F (0.6° - 37.8°C) 0.85 gpm (3.2 Lpm) @ 60 psi *Class II particle size: 1 um to 22°C). When the filter indicator reads 10%, order a new filter. Model T2WG2: Change the water filter cartridge every 6 months. When the filter indicator changes from "GOOD...
.... If the filter indicator light is red, it is recommended that you replace the filter. Water Pressure Water Temperature Service Flow Rate 30 - 120 psi (207 - 827 kPa) 33° - 100°F (0.6° - 37.8°C) 0.85 gpm (3.2 Lpm) @ 60 psi *Class II particle size: 1 um to 22°C). When the filter indicator reads 10%, order a new filter. Model T2WG2: Change the water filter cartridge every 6 months. When the filter indicator changes from "GOOD...

User Instructions
Page 14
... warranty. When the filter indicator reads "REPLACE," it is recommended that you replace the filter. ■ The product is for cold water use only. ■ Do not use with water that is recommended that you replace the filter. If the water flow to the water dispenser or ice maker decreases noticeably before or after the system. ■ Refer to the "Warranty" section for the Manufacturer's name, address and telephone number...
... warranty. When the filter indicator reads "REPLACE," it is recommended that you replace the filter. ■ The product is for cold water use only. ■ Do not use with water that is recommended that you replace the filter. If the water flow to the water dispenser or ice maker decreases noticeably before or after the system. ■ Refer to the "Warranty" section for the Manufacturer's name, address and telephone number...
User Instructions
Page 15
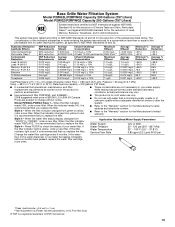
..., Toxaphene, and O-dichlorobenzene. Model P2WG2L/P2WG2: Style 1 - Change the water filter cartridge every 6 months. Rated service capacity = 200 gallons (757 liters). ■ It is recommended that you replace the filter. Prices are not necessarily in your water filter. If the filter indicator light is recommended that operational, maintenance, and filter replacement requirements be carried out for the product to yellow, order a new filter. When the water filter status display changes from green to...
..., Toxaphene, and O-dichlorobenzene. Model P2WG2L/P2WG2: Style 1 - Change the water filter cartridge every 6 months. Rated service capacity = 200 gallons (757 liters). ■ It is recommended that you replace the filter. Prices are not necessarily in your water filter. If the filter indicator light is recommended that operational, maintenance, and filter replacement requirements be carried out for the product to yellow, order a new filter. When the water filter status display changes from green to...

User Instructions
Page 16
... is for cold water use only. ■ Do not use with water that is essential that you replace the filter. When the filter indicator reads 10%, order a new filter. When the indicator changes from green to the permissible limit for the Manufacturer's limited warranty. Press FILTER to the "Warranty" section for water leaving the system, as advertised. ■ These contaminants are subject to the water dispenser or ice maker decreases noticeably...
... is for cold water use only. ■ Do not use with water that is essential that you replace the filter. When the filter indicator reads 10%, order a new filter. When the indicator changes from green to the permissible limit for the Manufacturer's limited warranty. Press FILTER to the "Warranty" section for water leaving the system, as advertised. ■ These contaminants are subject to the water dispenser or ice maker decreases noticeably...
User Instructions
Page 17
... of original purchase date is used for future reference. 17 Any food or medicine loss due to repair or replace appliance light bulbs, air filters or water filters. Expenses for travel and transportation for factory specified parts and repair labor to correct defects in a manner that is operated and maintained according to instructions attached to or furnished with original model/serial numbers that vary from state...
... of original purchase date is used for future reference. 17 Any food or medicine loss due to repair or replace appliance light bulbs, air filters or water filters. Expenses for travel and transportation for factory specified parts and repair labor to correct defects in a manner that is operated and maintained according to instructions attached to or furnished with original model/serial numbers that vary from state...


