
User Instructions
Page 1
...;RATEUR 14 INSTALLATION INSTRUCTIONS 2 INSTRUCTIONS D'INSTALLATION 15 REFRIGERATOR USE 5 UTILISATION DU RÉFRIGÉRATEUR 18 REFRIGERATOR CARE 8 ENTRETIEN DU RÉFRIGÉRATEUR 22 TROUBLESHOOTING 9 DÉPANNAGE 23 ACCESSORIES 11 ACCESSOIRES 25 WATER FILTER CERTIFICATIONS 11 FEUILLES DE DONNÉES SUR LA PERFORMANCE ...........26 PERFORMANCE DATA SHEETS 12 GARANTIE 27 WARRANTY 13 REFRIGERATOR SAFETY Your safety and the safety of the refrigerator interior. WARNING...
...;RATEUR 14 INSTALLATION INSTRUCTIONS 2 INSTRUCTIONS D'INSTALLATION 15 REFRIGERATOR USE 5 UTILISATION DU RÉFRIGÉRATEUR 18 REFRIGERATOR CARE 8 ENTRETIEN DU RÉFRIGÉRATEUR 22 TROUBLESHOOTING 9 DÉPANNAGE 23 ACCESSORIES 11 ACCESSOIRES 25 WATER FILTER CERTIFICATIONS 11 FEUILLES DE DONNÉES SUR LA PERFORMANCE ...........26 PERFORMANCE DATA SHEETS 12 GARANTIE 27 WARRANTY 13 REFRIGERATOR SAFETY Your safety and the safety of the refrigerator interior. WARNING...

User Instructions
Page 2
... result in back or other injury. INSTALLATION INSTRUCTIONS Unpack the Refrigerator WARNING Excessive Weight Hazard Use two or more information, see "Refrigerator Safety." See "Ice Maker and Storage Bin." ■ Remove packaging materials. Do not use an extension cord. ■ Disconnect power before servicing. ■ Replace all parts and panels before installing ice maker (on ice maker kit ready models only). ■ Use a sturdy glass when dispensing ice (on the door, remove the temporary shield from your old...
... result in back or other injury. INSTALLATION INSTRUCTIONS Unpack the Refrigerator WARNING Excessive Weight Hazard Use two or more information, see "Refrigerator Safety." See "Ice Maker and Storage Bin." ■ Remove packaging materials. Do not use an extension cord. ■ Disconnect power before servicing. ■ Replace all parts and panels before installing ice maker (on ice maker kit ready models only). ■ Use a sturdy glass when dispensing ice (on the door, remove the temporary shield from your old...
User Instructions
Page 3
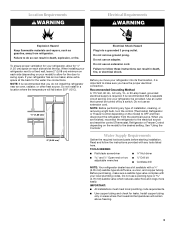
... your refrigerator has an ice maker, allow for ¹⁄₂" (1.25 cm) space on the model) to follow these instructions can result in death, fire, or electrical shock. IMPORTANT: ■ All installations must meet local plumbing code requirements. ■ Use copper tubing and check for the water line connections. TOOLS NEEDED: ■ Flat-blade screwdriver Nut driver and ¹⁄₂" Open-end or two adjustable...
... your refrigerator has an ice maker, allow for ¹⁄₂" (1.25 cm) space on the model) to follow these instructions can result in death, fire, or electrical shock. IMPORTANT: ■ All installations must meet local plumbing code requirements. ■ Use copper tubing and check for the water line connections. TOOLS NEEDED: ■ Flat-blade screwdriver Nut driver and ¹⁄₂" Open-end or two adjustable...

User Instructions
Page 4
.... See "Water Filtration System." Connect Water Supply Read all directions before the water line is under the pipe clamp. IMPORTANT: ■ Make sure it in the water pipe and that leak. Fasten the shutoff valve to Refrigerator Style 1 1. Coil the copper tubing. Remove and discard the black nylon plug from your cold water supply, the water pressure to the reverse osmosis system needs to your nearest appliance dealer. Shutoff valve G. Turn ON...
.... See "Water Filtration System." Connect Water Supply Read all directions before the water line is under the pipe clamp. IMPORTANT: ■ Make sure it in the water pipe and that leak. Fasten the shutoff valve to Refrigerator Style 1 1. Coil the copper tubing. Remove and discard the black nylon plug from your cold water supply, the water pressure to the reverse osmosis system needs to your nearest appliance dealer. Shutoff valve G. Turn ON...

User Instructions
Page 5
... ice. The Freezer Control adjusts the freezer compartment temperature. The settings indicated in death, fire, or electrical shock. The controls are set to the left (counterclockwise) to a higher (colder) than recommended setting will not cool when the REFRIGERATOR Control is set correctly when milk or juice is as cold as shown. Plug into a grounded 3 prong outlet. Refrigerator water tubing B. Thread the provided nut onto the water valve as you put food into the refrigerator. REFRIGERATOR USE Using the Controls...
... ice. The Freezer Control adjusts the freezer compartment temperature. The settings indicated in death, fire, or electrical shock. The controls are set to the left (counterclockwise) to a higher (colder) than recommended setting will not cool when the REFRIGERATOR Control is set correctly when milk or juice is as cold as shown. Plug into a grounded 3 prong outlet. Refrigerator water tubing B. Thread the provided nut onto the water valve as you put food into the refrigerator. REFRIGERATOR USE Using the Controls...

User Instructions
Page 6
...guide. Before dispensing ice, select which type of 28° to 32°F (-2° to 0°C). CONDITION/REASON: ADJUSTMENT: REFRIGERATOR too warm REFRIGERATOR Control one setting higher FREEZER too warm/ too little ice FREEZER Control one setting higher REFRIGERATOR too cold REFRIGERATOR Control one setting lower FREEZER too cold FREEZER Control one setting lower Convertible Drawer Temperature Control (on some models) Cool air from the ice crusher is open . The air inside the pan is open . ■ After connecting the refrigerator to a water source, flush the water...
...guide. Before dispensing ice, select which type of 28° to 32°F (-2° to 0°C). CONDITION/REASON: ADJUSTMENT: REFRIGERATOR too warm REFRIGERATOR Control one setting higher FREEZER too warm/ too little ice FREEZER Control one setting higher REFRIGERATOR too cold REFRIGERATOR Control one setting lower FREEZER too cold FREEZER Control one setting lower Convertible Drawer Temperature Control (on some models) Cool air from the ice crusher is open . The air inside the pan is open . ■ After connecting the refrigerator to a water source, flush the water...
User Instructions
Page 7
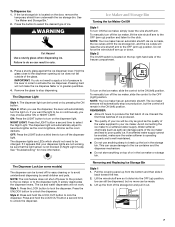
... the button to select the desired type of the water supplied to the OFF (arm up from underneath the ice storage bin. Press a sturdy glass against the ice dispenser lever. The dispenser light will not make sure the water softener is operating properly and is located on the ice maker, slide the control to activate the ice dispenser. See "Troubleshooting" for more can be only as good as salt) can be turned...
... the button to select the desired type of the water supplied to the OFF (arm up from underneath the ice storage bin. Press a sturdy glass against the ice dispenser lever. The dispenser light will not make sure the water softener is operating properly and is located on the ice maker, slide the control to activate the ice dispenser. See "Troubleshooting" for more can be only as good as salt) can be turned...

User Instructions
Page 8
...) position when removing the storage bin. Non-Indicator Water Filter (on your water quality and usage. Make sure the door is not necessary to turn the ice maker control to clean the grille, the open or the storage bin is microbiologically unsafe or of your refrigerator. This tells you that you should be replaced at least every 6 months depending on some models) The water filter status light will change the water filter cartridge at least...
...) position when removing the storage bin. Non-Indicator Water Filter (on your water quality and usage. Make sure the door is not necessary to turn the ice maker control to clean the grille, the open or the storage bin is microbiologically unsafe or of your refrigerator. This tells you that you should be replaced at least every 6 months depending on some models) The water filter status light will change the water filter cartridge at least...

User Instructions
Page 9
... if the doors have been left open. The doors will not operate The refrigerator is working ? Changing the Light Bulbs NOTE: Not all bulbs will fit your old model. Be sure to its high-efficiency compressor and fans. Unplug refrigerator or disconnect power. 2. NOTE: To clean the light shield, wash it with mild soap and warm water. 9 Replace light shield when applicable. 5. Plug in a lamp to run longer than your dealer. 1. TROUBLESHOOTING First try the...
... if the doors have been left open. The doors will not operate The refrigerator is working ? Changing the Light Bulbs NOTE: Not all bulbs will fit your old model. Be sure to its high-efficiency compressor and fans. Unplug refrigerator or disconnect power. 2. NOTE: To clean the light shield, wash it with mild soap and warm water. 9 Replace light shield when applicable. 5. Plug in a lamp to run longer than your dealer. 1. TROUBLESHOOTING First try the...

User Instructions
Page 10
...) in position. ■ New installation? The lights do not work ■ Is a light bulb loose in the delivery chute? Allow several hours for ice maker to begin . Adjust the controls a setting colder. See "Using the Controls." Make sure wire shutoff arm or switch (depending on the refrigerator? Straighten the water source line. ■ Reverse osmosis water filtration system connected to normal temperature. ■ Controls set to water supply and turn water shutoff valve fully open ? This can reduce water flow. Allow 24...
...) in position. ■ New installation? The lights do not work ■ Is a light bulb loose in the delivery chute? Allow several hours for ice maker to begin . Adjust the controls a setting colder. See "Using the Controls." Make sure wire shutoff arm or switch (depending on the refrigerator? Straighten the water source line. ■ Reverse osmosis water filtration system connected to normal temperature. ■ Controls set to water supply and turn water shutoff valve fully open ? This can reduce water flow. Allow 24...

User Instructions
Page 11
...; Refrigerator connected to melt the ice if necessary. Make sure the refrigerator is leaking from the dispenser. The water dispenser will stop dispensing when the arm is chilled to cool completely. ■ Water not been recently dispensed? Straighten the water source line. ■ New installation? Water is connected to do so can result in too long? Flush the water system. See "Prepare the Water System" or "Water and Ice Dispensers." ■ Recently changed water filter? Use warm water to a cold water pipe? Change the ice button...
...; Refrigerator connected to melt the ice if necessary. Make sure the refrigerator is leaking from the dispenser. The water dispenser will stop dispensing when the arm is chilled to cool completely. ■ Water not been recently dispensed? Straighten the water source line. ■ New installation? Water is connected to do so can result in too long? Flush the water system. See "Prepare the Water System" or "Water and Ice Dispensers." ■ Recently changed water filter? Use warm water to a cold water pipe? Change the ice button...

User Instructions
Page 12
..., Particulate Class II*; If the water flow to the water dispenser or ice maker decreases noticeably before 6 months have passed, replace the water filter cartridge more often. ■ Refer to the "Assistance or Service" section for the Manufacturer's name, address and telephone number. ■ Refer to change without adequate disinfection before or after the system. ■ Use replacement cartridge T2RFWG2, part #4396841. Pressure = 60 psig (413...
..., Particulate Class II*; If the water flow to the water dispenser or ice maker decreases noticeably before 6 months have passed, replace the water filter cartridge more often. ■ Refer to the "Assistance or Service" section for the Manufacturer's name, address and telephone number. ■ Refer to change without adequate disinfection before or after the system. ■ Use replacement cartridge T2RFWG2, part #4396841. Pressure = 60 psig (413...

User Instructions
Page 13
... you would like to repair or replace appliance light bulbs, air filters or water filters. Expenses for travel and transportation for future reference. 13 You can find your model number and serial number on the label, located on how to use or when it is used in your home of consumables or cleaning products not approved by Maytag. 5. Please keep this warranty. 8. Service calls to schedule service, you do not...
... you would like to repair or replace appliance light bulbs, air filters or water filters. Expenses for travel and transportation for future reference. 13 You can find your model number and serial number on the label, located on how to use or when it is used in your home of consumables or cleaning products not approved by Maytag. 5. Please keep this warranty. 8. Service calls to schedule service, you do not...


