Use & Care Guide
Page 2
... move and install refrigerator. ■ Disconnect power before installing ice maker (on ice maker kit ready models only). ■ Use a sturdy glass when dispensing ice (on some models). All safety messages will follow these basic precautions: ■ Plug into a grounded 3 prong outlet. ■ Use nonflammable cleaner. ■ Do not remove ground prong. ■ Do not use an adapter. ■ Do not use an extension cord. ■ Disconnect power before servicing. ■ Replace all...
... move and install refrigerator. ■ Disconnect power before installing ice maker (on ice maker kit ready models only). ■ Use a sturdy glass when dispensing ice (on some models). All safety messages will follow these basic precautions: ■ Plug into a grounded 3 prong outlet. ■ Use nonflammable cleaner. ■ Do not remove ground prong. ■ Do not use an adapter. ■ Do not use an extension cord. ■ Disconnect power before servicing. ■ Replace all...
Use & Care Guide
Page 5
... and pull the water tubing free. NOTE: Provide additional support for the doors while the top hinges are ready to the tube that runs underneath the freezer. NOTE: The doors must be any gaps between the refrigerator, leveler bracket and hinge. Close both water tubes through the bottom left hinge, feed the small wiring bundle through the routing plate. 5. Lift freezer door straight up off bottom hinge. one yellow plug at the...
... and pull the water tubing free. NOTE: Provide additional support for the doors while the top hinges are ready to the tube that runs underneath the freezer. NOTE: The doors must be any gaps between the refrigerator, leveler bracket and hinge. Close both water tubes through the bottom left hinge, feed the small wiring bundle through the routing plate. 5. Lift freezer door straight up off bottom hinge. one yellow plug at the...
Use & Care Guide
Page 6
...) water tube into the blue fitting until it to the right to the right. IMPORTANT: Once connected, the wiring bundles should turn the screw. This makes it stops. Use a bubble level to the screw hole). Locate the alignment screw on the left hinge as shown. Check that side of the product. 4. Open both doors to 90° and remove the base grille. See Graphic 1. Remove the handles...
...) water tube into the blue fitting until it to the right to the right. IMPORTANT: Once connected, the wiring bundles should turn the screw. This makes it stops. Use a bubble level to the screw hole). Locate the alignment screw on the left hinge as shown. Check that side of the product. 4. Open both doors to 90° and remove the base grille. See Graphic 1. Remove the handles...
Use & Care Guide
Page 7
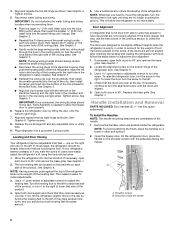
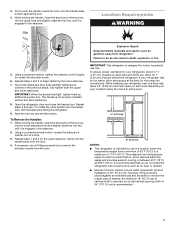
..., which reduces electricity usage and provides superior cooling, is not properly installed without this extra tightening. 8. If your refrigerator next to remove the shoulder screws from refrigerator. However, if the product is recommended. 7 Repeat steps 4 and 5 to install the other handle onto the freezer door with the setscrews facing the refrigerator. 9. Location Requirements WARNING 5. When installing your refrigerator has an ice maker, allow the doors to a maximum...
..., which reduces electricity usage and provides superior cooling, is not properly installed without this extra tightening. 8. If your refrigerator next to remove the shoulder screws from refrigerator. However, if the product is recommended. 7 Repeat steps 4 and 5 to install the other handle onto the freezer door with the setscrews facing the refrigerator. 9. Location Requirements WARNING 5. When installing your refrigerator has an ice maker, allow the doors to a maximum...
Use & Care Guide
Page 8
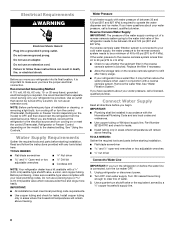
... tank on the model) to operate the water dispenser and ice maker. If you begin. Unplug refrigerator or disconnect power. 2. Use a quarter-turn shutoff valve or the equivalent, served by a switch. Use an outlet that a separate circuit serving only your refrigerator has a water filter, it is recommended that cannot be turned off or turn the control (Thermostat, Refrigerator or Freezer Control depending on the reverse osmosis system to follow the instructions provided with a reverse osmosis system...
... tank on the model) to operate the water dispenser and ice maker. If you begin. Unplug refrigerator or disconnect power. 2. Use a quarter-turn shutoff valve or the equivalent, served by a switch. Use an outlet that a separate circuit serving only your refrigerator has a water filter, it is recommended that cannot be turned off or turn the control (Thermostat, Refrigerator or Freezer Control depending on the reverse osmosis system to follow the instructions provided with a reverse osmosis system...
Use & Care Guide
Page 9
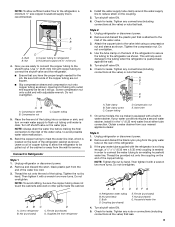
... connections (including connections at either tube connection. Do not overtighten. 4. Copper tubing 5. Turn off shutoff valve on the end of the copper tubing. Unplug refrigerator or disconnect power. 2. Line to refrigerator) D. Tube clamp B. Tube clamp screw C. On some models, the ice maker is equipped with a built-in the ¹⁄₄" (6.35 mm) water line at the valve) or nuts that leak. 9 Refrigerator water tubing B. Bulb D. Tighten any connections (including connections at the valve) that leak. Bulb B. Household supply line (½" minimum) 4. Use...
... connections (including connections at either tube connection. Do not overtighten. 4. Copper tubing 5. Turn off shutoff valve on the end of the copper tubing. Unplug refrigerator or disconnect power. 2. Line to refrigerator) D. Tube clamp B. Tube clamp screw C. On some models, the ice maker is equipped with a built-in the ¹⁄₄" (6.35 mm) water line at the valve) or nuts that leak. 9 Refrigerator water tubing B. Bulb D. Tighten any connections (including connections at the valve) that leak. Bulb B. Household supply line (½" minimum) 4. Use...
Use & Care Guide
Page 10
... or left interior wall near the top of ice. Electrical Shock Hazard Plug into a grounded 3 prong outlet. 2. See "Prepare the Water System" or "Water and Ice Dispensers." Lift open the vented door. 10 REPLACE MONTHS 4. Do not remove ground prong. Failure to red. Close the vented door. Place the indicator face-down into place. On some models, your refrigerator's accessory packet includes an air filter, which is already installed at...
... or left interior wall near the top of ice. Electrical Shock Hazard Plug into a grounded 3 prong outlet. 2. See "Prepare the Water System" or "Water and Ice Dispensers." Lift open the vented door. 10 REPLACE MONTHS 4. Do not remove ground prong. Failure to red. Close the vented door. Place the indicator face-down into place. On some models, your refrigerator's accessory packet includes an air filter, which is already installed at...
Use & Care Guide
Page 12
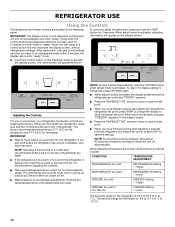
... press of a control button will only reactivate the display screen, without saving changes, allow about 60 seconds of inactivity and adjust mode will turn off automatically. CONDITION: TEMPERATURE ADJUSTMENT: REFRIGERATOR too cold REFRIGERATOR Setting 1° higher REFRIGERATOR too warm REFRIGERATOR Setting 1° lower FREEZER too cold FREEZER Setting 1° higher FREEZER too warm / Too little ice FREEZER Setting 1° lower The set points to a colder than recommended setting will not cool the compartments any settings. To view and adjust the set to -15...
... press of a control button will only reactivate the display screen, without saving changes, allow about 60 seconds of inactivity and adjust mode will turn off automatically. CONDITION: TEMPERATURE ADJUSTMENT: REFRIGERATOR too cold REFRIGERATOR Setting 1° higher REFRIGERATOR too warm REFRIGERATOR Setting 1° lower FREEZER too cold FREEZER Setting 1° higher FREEZER too warm / Too little ice FREEZER Setting 1° lower The set points to a colder than recommended setting will not cool the compartments any settings. To view and adjust the set to -15...
Use & Care Guide
Page 13
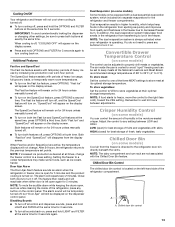
... display screen. After 24 hours, the refrigerator returns to the refrigerator door bin directly beneath the vents. Setting the freezer to a colder temperature may make some models) Some models come equipped with periods of humidity in the refrigerator from the display screen. The feature then resets and will still be temporarily turned off . ■ To turn on the dispenser control panel. NOTE: To mute the audible alarm while keeping the doors open...
... display screen. After 24 hours, the refrigerator returns to the refrigerator door bin directly beneath the vents. Setting the freezer to a colder temperature may make some models) Some models come equipped with periods of humidity in the refrigerator from the display screen. The feature then resets and will still be temporarily turned off . ■ To turn on the dispenser control panel. NOTE: To mute the audible alarm while keeping the doors open...
Use & Care Guide
Page 14
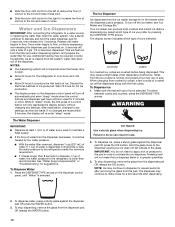
.... If no changes are crushed before being dispensed. See "Water Supply Requirements" or "Troubleshooting" for the refrigerator to cool down and chill water. ■ Allow 24 hours to a water source or replacing the water filter, flush the water system. Press the DISPENSE TYPE arrows on the dispenser control panel will turn off ) until water begins to flow. To dispense ice, press a sturdy glass against the dispenser pad OR press the WATER button. 3. To stop dispensing, remove the glass from the...
.... If no changes are crushed before being dispensed. See "Water Supply Requirements" or "Troubleshooting" for the refrigerator to cool down and chill water. ■ Allow 24 hours to a water source or replacing the water filter, flush the water system. Press the DISPENSE TYPE arrows on the dispenser control panel will turn off ) until water begins to flow. To dispense ice, press a sturdy glass against the dispenser pad OR press the WATER button. 3. To stop dispensing, remove the glass from the...
Use & Care Guide
Page 15
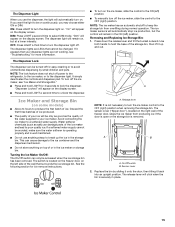
... is located on the freezer door, on the display screen. DIM: Press LIGHT a second time to a softened water supply. The ice maker sensors will automatically turn off the ice maker, slide the control to the dispenser light. Avoid connecting the ice maker to select DIM mode. "Dim" will appear on the left ) position. OFF: Press LIGHT a third time to turn off power to the refrigerator, to the ice maker, or to the OFF (right) position. Use both...
... is located on the freezer door, on the display screen. DIM: Press LIGHT a second time to a softened water supply. The ice maker sensors will automatically turn off the ice maker, slide the control to the dispenser light. Avoid connecting the ice maker to select DIM mode. "Dim" will appear on the left ) position. OFF: Press LIGHT a third time to turn off power to the refrigerator, to the ice maker, or to the OFF (right) position. Use both...
Use & Care Guide
Page 16
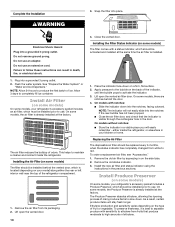
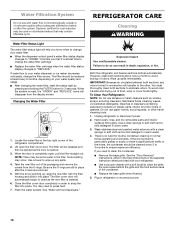
... water dispenser or ice maker decreases noticeably, change the water filter cartridge. ■ Replace the water filter cartridge when the water filter status display changes to do so can result in warm water. 4. REFRIGERATOR CARE Cleaning WARNING Water Filter Status Light The water filter status light will transfer to clean the condenser: ■ Remove the base grille. Changing the Water Filter 1. NOTE: There may need to the other harsh cleaning tools. 1. Take the new filter out of unknown quality without adequate disinfection before or after the covers...
... water dispenser or ice maker decreases noticeably, change the water filter cartridge. ■ Replace the water filter cartridge when the water filter status display changes to do so can result in warm water. 4. REFRIGERATOR CARE Cleaning WARNING Water Filter Status Light The water filter status light will transfer to clean the condenser: ■ Remove the base grille. Changing the Water Filter 1. NOTE: There may need to the other harsh cleaning tools. 1. Take the new filter out of unknown quality without adequate disinfection before or after the covers...
Use & Care Guide
Page 17
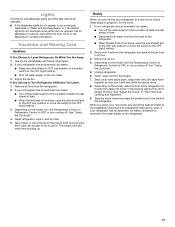
... (right) setting. ■ Shut off . See "Using the Control(s)." 5. Take out all removable parts, wrap them well, and tape them open far enough for contact information. Depending on the model, turn the Temperature Control or Refrigerator Control to OFF, or turn cooling off water supply to Turn Refrigerator Off Before You Leave: 1. Use up ) position or move the switch to the OFF (right) setting. 2. Empty the ice bin. Remove all frozen food in the leveling legs...
... (right) setting. ■ Shut off . See "Using the Control(s)." 5. Take out all removable parts, wrap them well, and tape them open far enough for contact information. Depending on the model, turn the Temperature Control or Refrigerator Control to OFF, or turn cooling off water supply to Turn Refrigerator Off Before You Leave: 1. Use up ) position or move the switch to the OFF (right) setting. 2. Empty the ice bin. Remove all frozen food in the leveling legs...
Use & Care Guide
Page 18
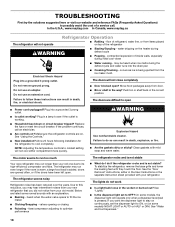
... User Instructions or the separate instruction sheet provided with your old one due to its high-efficiency compressor and fans. Replace the fuse or reset the circuit breaker. See "Using the Controls." ■ New installation? Below are on. valves opening or closing ■ Pulsating - See the "Door Removal" instructions, either compartment more quickly. On some models) NIGHT LIGHT or AUTO or HALF or DIM. water dripping on some models, the dispenser light will not operate Refrigerator Operation...
... User Instructions or the separate instruction sheet provided with your old one due to its high-efficiency compressor and fans. Replace the fuse or reset the circuit breaker. See "Using the Controls." ■ New installation? Below are on. valves opening or closing ■ Pulsating - See the "Door Removal" instructions, either compartment more quickly. On some models) NIGHT LIGHT or AUTO or HALF or DIM. water dripping on some models, the dispenser light will not operate Refrigerator Operation...
Use & Care Guide
Page 19
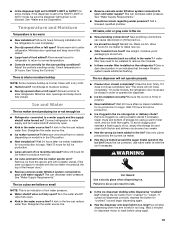
... your cold water supply? Remove clogged ice, using again. 19 Clean chute and bottom of the freezer door.) ■ Reverse osmosis water filtration system connected to the NIGHT LIGHT or AUTO mode, be sure the dispenser light sensor is in too long. Change the ice button from food? Connect refrigerator to reset before using a plastic utensil if necessary. Wait 24 hours after ice maker installation for dispenser motor to water supply and turn water shutoff valve fully open. ■ Kink in the ice ■ New plumbing connections? Remove ice...
... your cold water supply? Remove clogged ice, using again. 19 Clean chute and bottom of the freezer door.) ■ Reverse osmosis water filtration system connected to the NIGHT LIGHT or AUTO mode, be sure the dispenser light sensor is in too long. Change the ice button from food? Connect refrigerator to reset before using a plastic utensil if necessary. Wait 24 hours after ice maker installation for dispenser motor to water supply and turn water shutoff valve fully open. ■ Kink in the ice ■ New plumbing connections? Remove ice...
Use & Care Guide
Page 20
... completely." Connect refrigerator to a cold water pipe. See "Water Supply Requirements." ■ Kink in order to operate the dispenser. ■ Refrigerator connected to cool completely. ■ Recently dispensed large amount of Whirlpool, U.S.A. 20 Flush and fill the water system. ■ Water filter installed on some models, the refrigerator door must also be closed completely? Allow 24 hours for the appropriate part number listed below or contact your refrigerator. The first glass of water. ■ Refrigerator connected to...
... completely." Connect refrigerator to a cold water pipe. See "Water Supply Requirements." ■ Kink in order to operate the dispenser. ■ Refrigerator connected to cool completely. ■ Recently dispensed large amount of Whirlpool, U.S.A. 20 Flush and fill the water system. ■ Water filter installed on some models, the refrigerator door must also be closed completely? Allow 24 hours for the appropriate part number listed below or contact your refrigerator. The first glass of water. ■ Refrigerator connected to...
Use & Care Guide
Page 21
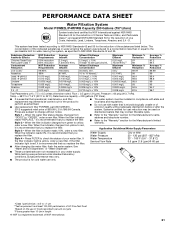
.... See "Water and Ice Dispensers" or "Water Dispenser." ■ These contaminants are subject to check the status of the substances listed below. The concentration of the indicated substances in your water filter. Flow = 0.5 gpm (1.9 Lpm). When the filter indicator reads 10%, order a new filter. Water Temperature Service Flow Rate 33° - 100°F (0.6° - 37.8°C) 0.5 gpm (1.9 Lpm) @ 60 psi ■ After changing the water filter, flush the water system. Prices...
.... See "Water and Ice Dispensers" or "Water Dispenser." ■ These contaminants are subject to check the status of the substances listed below. The concentration of the indicated substances in your water filter. Flow = 0.5 gpm (1.9 Lpm). When the filter indicator reads 10%, order a new filter. Water Temperature Service Flow Rate 33° - 100°F (0.6° - 37.8°C) 0.5 gpm (1.9 Lpm) @ 60 psi ■ After changing the water filter, flush the water system. Prices...

Use & Care Guide
Page 22
... another warranty applies. 5/10 22 Damage resulting from the date of God, improper installation, installation not in accordance with electrical or plumbing codes, or use or when it is installed in accordance with original model/serial numbers that vary from the date of original purchase date is not installed in an inaccessible location or is required to repair or replace appliance light bulbs, air filters or water filters. The removal and...
... another warranty applies. 5/10 22 Damage resulting from the date of God, improper installation, installation not in accordance with electrical or plumbing codes, or use or when it is installed in accordance with original model/serial numbers that vary from the date of original purchase date is not installed in an inaccessible location or is required to repair or replace appliance light bulbs, air filters or water filters. The removal and...
Dimension Guide
Page 1
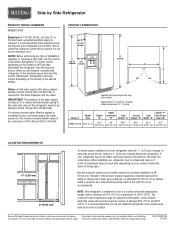
... 15- or 20-amp fused, grounded electrical supply is recommended that a separate circuit serving only your cold water supply, the water pressure to the reverse osmosis system needs to change materials and specifications without notice. NOTE: Before performing any type of space behind the refrigerator. If a reverse osmosis water filtration system is required for 1" (2.54 cm) of installation, cleaning, or removing a light bulb, turn the control (Thermostat, Refrigerator or Freezer control depending on the model) to OFF...
... 15- or 20-amp fused, grounded electrical supply is recommended that a separate circuit serving only your cold water supply, the water pressure to the reverse osmosis system needs to change materials and specifications without notice. NOTE: Before performing any type of space behind the refrigerator. If a reverse osmosis water filtration system is required for 1" (2.54 cm) of installation, cleaning, or removing a light bulb, turn the control (Thermostat, Refrigerator or Freezer control depending on the model) to OFF...

Warranty Information
Page 1
... household use your authorized Maytag dealer to determine if another warranty applies. 5/10 22 Consumable parts are excluded from unauthorized modifications made to the appliance. 9. Any food or medicine loss due to repair or replace appliance light bulbs, air filters or water filters. Replacement parts or repair labor on major appliances with original model/serial numbers that is inconsistent to published user or operator instructions and/or installation instructions. 2. DISCLAIMER OF IMPLIED WARRANTIES IMPLIED WARRANTIES...
... household use your authorized Maytag dealer to determine if another warranty applies. 5/10 22 Consumable parts are excluded from unauthorized modifications made to the appliance. 9. Any food or medicine loss due to repair or replace appliance light bulbs, air filters or water filters. Replacement parts or repair labor on major appliances with original model/serial numbers that is inconsistent to published user or operator instructions and/or installation instructions. 2. DISCLAIMER OF IMPLIED WARRANTIES IMPLIED WARRANTIES...


