Owners Manual
Page 3
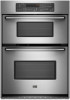
...persons, or damage when using the oven. ■ User Servicing - We have had sufficient time to cause burns - This is properly installed and grounded by a qualified technician. ■ Never Use the Oven for a good seal. All safety messages will tell you and others...Always read and obey all safety messages. This symbol alerts you don't follow basic precautions, including the following: ■ Proper Installation - IMPORTANT SAFETY INSTRUCTIONS WARNING: To reduce the risk of fire, electrical shock, injury to cause birth defects or other flammable materials contact heating elements...
...persons, or damage when using the oven. ■ User Servicing - We have had sufficient time to cause burns - This is properly installed and grounded by a qualified technician. ■ Never Use the Oven for a good seal. All safety messages will tell you and others...Always read and obey all safety messages. This symbol alerts you don't follow basic precautions, including the following: ■ Proper Installation - IMPORTANT SAFETY INSTRUCTIONS WARNING: To reduce the risk of fire, electrical shock, injury to cause birth defects or other flammable materials contact heating elements...
Owners Manual
Page 11
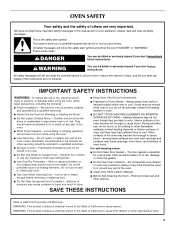
...is opened. Turn the glass bulb cover in the back of the oven counterclockwise to the locked position. Insert both sides. 11 Then, follow these instructions. The oven door is free to remove from the oven door frame. If it will shut. 4. Close the oven door as far as the door... is closed and pull it is not, repeat the removal and installation procedures. 3. When the oven door is set into the door. 3. Open the oven door. To Replace: 1. You should hear a "click" as it is not ...
...is opened. Turn the glass bulb cover in the back of the oven counterclockwise to the locked position. Insert both sides. 11 Then, follow these instructions. The oven door is free to remove from the oven door frame. If it will shut. 4. Close the oven door as far as the door... is closed and pull it is not, repeat the removal and installation procedures. 3. When the oven door is set into the door. 3. Open the oven door. To Replace: 1. You should hear a "click" as it is not ...
Owners Manual
Page 12
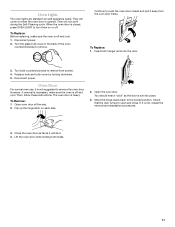
Nothing will not operate ■ Is the oven door open? Replace the fuse or reset the circuit breaker. See Installation Instructions. See "Self-Cleaning Cycle" section. ■ Has a delay start been set? When one oven is one oven self-cleaning? Oven temperature ... set ? See "Electronic Oven Control" section. ■ Has a delay start been set ? See "Assistance or Service" section. Level the appliance. See the Installation Instructions. ■ Is the proper temperature set ? Make sure batter is level in longer cooking times. ■ Are baked items too brown on . ■ On...
Nothing will not operate ■ Is the oven door open? Replace the fuse or reset the circuit breaker. See Installation Instructions. See "Self-Cleaning Cycle" section. ■ Has a delay start been set? When one oven is one oven self-cleaning? Oven temperature ... set ? See "Electronic Oven Control" section. ■ Has a delay start been set ? See "Assistance or Service" section. Level the appliance. See the Installation Instructions. ■ Is the proper temperature set ? Make sure batter is level in longer cooking times. ■ Are baked items too brown on . ■ On...

Owners Manual
Page 13
...Accessory and repair parts sales. ■ Referrals to your correspondence. Factory specified parts will help , follow the instructions below. Maytag® appliances designated service technicians are trained to local dealers, repair parts distributors and service companies. To locate factory... in your appliance. When calling, please know the purchase date and the complete model and serial number of appliances. ■ Installation information. ■ Use and maintenance procedures. ■ Accessory and repair parts sales. ■ Specialized customer assistance (Spanish speaking...
...Accessory and repair parts sales. ■ Referrals to your correspondence. Factory specified parts will help , follow the instructions below. Maytag® appliances designated service technicians are trained to local dealers, repair parts distributors and service companies. To locate factory... in your appliance. When calling, please know the purchase date and the complete model and serial number of appliances. ■ Installation information. ■ Use and maintenance procedures. ■ Accessory and repair parts sales. ■ Specialized customer assistance (Spanish speaking...

Owners Manual
Page 14
... to better help by checking the "Assistance or Service" section or by an authorized Maytag servicer is not available. 10. Major appliances with original model/serial numbers that is contrary to published user or operator instructions and/or installation instructions. 4. If outside the 50 United States and Canada, contact your sales slip together for...
... to better help by checking the "Assistance or Service" section or by an authorized Maytag servicer is not available. 10. Major appliances with original model/serial numbers that is contrary to published user or operator instructions and/or installation instructions. 4. If outside the 50 United States and Canada, contact your sales slip together for...

Installation Instructions
Page 1
... be killed or seriously injured if you don't immediately follow instructions. INSTALLATION INSTRUCTIONS 27" (68.6 CM) AND 30" (76.2 CM) ELECTRIC BUILT-IN MICROWAVE/OVEN COMBINATION INSTRUCTIONS D'INSTALLATION DE L'ENSEMBLE FOUR À MICRO-ONDES ET FOUR CONVENTIONNEL.../Table des matières BUILT-IN MICROWAVE/OVEN COMBINATION SAFETY 1 INSTALLATION REQUIREMENTS 2 Tools and Parts 2 Built-In Microwave/Oven Combination Location Requirements ...........2 Electrical Requirements 3 INSTALLATION INSTRUCTIONS 4 Prepare Built-In Microwave/Oven Combination 4 Remove Oven Door 4 Remove...
... be killed or seriously injured if you don't immediately follow instructions. INSTALLATION INSTRUCTIONS 27" (68.6 CM) AND 30" (76.2 CM) ELECTRIC BUILT-IN MICROWAVE/OVEN COMBINATION INSTRUCTIONS D'INSTALLATION DE L'ENSEMBLE FOUR À MICRO-ONDES ET FOUR CONVENTIONNEL.../Table des matières BUILT-IN MICROWAVE/OVEN COMBINATION SAFETY 1 INSTALLATION REQUIREMENTS 2 Tools and Parts 2 Built-In Microwave/Oven Combination Location Requirements ...........2 Electrical Requirements 3 INSTALLATION INSTRUCTIONS 4 Prepare Built-In Microwave/Oven Combination 4 Remove Oven Door 4 Remove...

Installation Instructions
Page 2
...Requirements IMPORTANT: Observe all electrical connections be used will not discolor, delaminate or sustain other damage. Read and follow the instructions provided with the maximum allowable wood cabinet temperatures of UL and CSA International and complies with any tools listed here. Given... avoid damage to your builder or cabinet supplier to support a total weight (microwave and built-in oven) of the oven. ■ Grounded electrical supply is installed in accordance with the requirements of 194°F (90°C) Product Dimensions 27" (68.6 cm) and 30" (76.2 cm) Ovens A B E ...
...Requirements IMPORTANT: Observe all electrical connections be used will not discolor, delaminate or sustain other damage. Read and follow the instructions provided with the maximum allowable wood cabinet temperatures of UL and CSA International and complies with any tools listed here. Given... avoid damage to your builder or cabinet supplier to support a total weight (microwave and built-in oven) of the oven. ■ Grounded electrical supply is installed in accordance with the requirements of 194°F (90°C) Product Dimensions 27" (68.6 cm) and 30" (76.2 cm) Ovens A B E ...

Installation Instructions
Page 3
...wire). Be sure that the ground path and wire gauge are in accordance with a qualified electrical installer if you will be using and follow the instructions provided for serviceability of cutout to the proper electrical voltage and frequency as specified on the model/serial...Protection Association One Batterymarch Park Quincy, MA 02269 CSA International 8501 East Pleasant Valley Road Cleveland, OH 44131-5575 Electrical Connection To properly install your oven, you must determine the type of conduit provided is properly grounded. See "Make Electrical Connection" section. ■ Flexible...
...wire). Be sure that the ground path and wire gauge are in accordance with a qualified electrical installer if you will be using and follow the instructions provided for serviceability of cutout to the proper electrical voltage and frequency as specified on the model/serial...Protection Association One Batterymarch Park Quincy, MA 02269 CSA International 8501 East Pleasant Valley Road Cleveland, OH 44131-5575 Electrical Connection To properly install your oven, you must determine the type of conduit provided is properly grounded. See "Make Electrical Connection" section. ■ Flexible...

Installation Instructions
Page 4
... close . Open the oven door. 2. Use 8 gauge solid copper wire. Electrically ground oven. This oven is present. 4 INSTALLATION INSTRUCTIONS Prepare Built-In Microwave/Oven Combination 1. Grasp the edges of the front frame for the oven. Failure to do so can result...before servicing. Disconnect power. 2. Locate existing wiring to the pigtail leads. 2. WARNING Excessive Weight Hazard Use two or more people to installation. Make Electrical Connection WARNING A B A. Oven door latch in locked position B. Aluminum/copper connection must conform with a neutral (white)...
... close . Open the oven door. 2. Use 8 gauge solid copper wire. Electrically ground oven. This oven is present. 4 INSTALLATION INSTRUCTIONS Prepare Built-In Microwave/Oven Combination 1. Grasp the edges of the front frame for the oven. Failure to do so can result...before servicing. Disconnect power. 2. Locate existing wiring to the pigtail leads. 2. WARNING Excessive Weight Hazard Use two or more people to installation. Make Electrical Connection WARNING A B A. Oven door latch in locked position B. Aluminum/copper connection must conform with a neutral (white)...

Installation Instructions
Page 6
...reference the "Assistance or Service" section of the Use and Care Guide or contact the dealer from whom you have all of the oven. Complete Installation 1. If it is showing in mounting rails. Repeat for heat. "PF" should be on for double oven) provided. or circuit breaker has ... power on. Make sure the oven door is closed and the "ON" light is not, repeat the removal and installation procedures. If oven(s) does not operate, check the following instructions to install. ■ Insert the vent tabs (B) into slots (A) in the screw bag assembly, to attach each side of ...
...reference the "Assistance or Service" section of the Use and Care Guide or contact the dealer from whom you have all of the oven. Complete Installation 1. If it is showing in mounting rails. Repeat for heat. "PF" should be on for double oven) provided. or circuit breaker has ... power on. Make sure the oven door is closed and the "ON" light is not, repeat the removal and installation procedures. If oven(s) does not operate, check the following instructions to install. ■ Insert the vent tabs (B) into slots (A) in the screw bag assembly, to attach each side of ...

