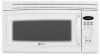

Use and Care Guide
Page 5
...is necessary when used by qualified service personnel. DO NOT cover or block filter or other combustible materials are placed reside the oven to excessive microwave energy. 1. Corrosive cleaning agents such as described in this oven ONLY for industrial or laboratory use this product near a kitchen sink, in ...equipment 36 inches or less wide. Remove wire twist-ties from HEATED surfaces. 17. READ all instructions before consumption, in this manual. Install or locate this oven ONLY in accordance with any appliance, CLOSE SUPERVISION is made for use this oven. 5. Use this...
...is necessary when used by qualified service personnel. DO NOT cover or block filter or other combustible materials are placed reside the oven to excessive microwave energy. 1. Corrosive cleaning agents such as described in this oven ONLY for industrial or laboratory use this product near a kitchen sink, in ...equipment 36 inches or less wide. Remove wire twist-ties from HEATED surfaces. 17. READ all instructions before consumption, in this manual. Install or locate this oven ONLY in accordance with any appliance, CLOSE SUPERVISION is made for use this oven. 5. Use this...

Use and Care Guide
Page 24
...OF IMPLIED WARRANTIES OF MERCHANTABILITY OR FITNESS, SO THESE EXCLUSIONS OR LIMITATIONS MAY NOT APPLY TO YOU. Transport the appliance to and from Maytag Services LLC, Customer Assistance. Outside of the product. Notes: When contacting about a service problem, please include a. Name and address... of your appliance was purchased or call 1-800-688-2080. • User's guides, service manuals and parts information are available from the servicer. 6. What is Not Covered By These Warranties 1. improper setting of any breach of service ...
...OF IMPLIED WARRANTIES OF MERCHANTABILITY OR FITNESS, SO THESE EXCLUSIONS OR LIMITATIONS MAY NOT APPLY TO YOU. Transport the appliance to and from Maytag Services LLC, Customer Assistance. Outside of the product. Notes: When contacting about a service problem, please include a. Name and address... of your appliance was purchased or call 1-800-688-2080. • User's guides, service manuals and parts information are available from the servicer. 6. What is Not Covered By These Warranties 1. improper setting of any breach of service ...
Installation Instructions
Page 11
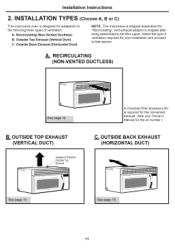
Outside Back Exhaust (Horizontal Duct) NOTE: This microwave is !_i!_i!_i Manual for adaptation to the following three types of ventilation required for "Recirculating". Outside Top Exhaust (Vertical Duct... Ductless) B. And exhaust adaptor is designed for the kit number.) iiiiiiiiiiiiiiiiiiiiiiiiiiiiiiiiiiiiiiiiiiiiiiiiiiiiiiiiiiiiiiiiiiiiiiiiiiiiiiiiiiiiiiiiiiiiiiiiiiiiiii__!ii_i B. INSTALLATION TYPES (Choose A, B or C) This microwave oven is shipped after being assembled to that section. A.__R. OUTSIDE BACK EXHAUST (HORIZONTAL DUCT) Outside Top AEdxahpatuosrt in Place for 11 ...
Outside Back Exhaust (Horizontal Duct) NOTE: This microwave is !_i!_i!_i Manual for adaptation to the following three types of ventilation required for "Recirculating". Outside Top Exhaust (Vertical Duct... Ductless) B. And exhaust adaptor is designed for the kit number.) iiiiiiiiiiiiiiiiiiiiiiiiiiiiiiiiiiiiiiiiiiiiiiiiiiiiiiiiiiiiiiiiiiiiiiiiiiiiiiiiiiiiiiiiiiiiiiiiiiiiiii__!ii_i B. INSTALLATION TYPES (Choose A, B or C) This microwave oven is shipped after being assembled to that section. A.__R. OUTSIDE BACK EXHAUST (HORIZONTAL DUCT) Outside Top AEdxahpatuosrt in Place for 11 ...
Installation Instructions
Page 13
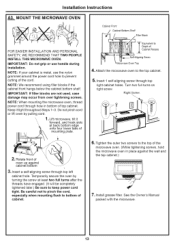
...two screws to Depth of the cord. IMPORTANT: If filler blocks are not used, case damage may occur from over tightening screws. Lift microwave, tilt it tight throughout Steps 1-3. Rotate front of top cabinet. NOTE: We recommend using filler blocks if the cabinet front hangs below... in bottom of oven up against the wall and the top cabinet.) 7, Install grease filter. See the Owner's Manual packed with the microwave. 13 NOTE: When mounting the microwave oven, thread power cord through hole in place against cabinetbottom 3. Keep it \ forward, and hook slots at least ...
...two screws to Depth of the cord. IMPORTANT: If filler blocks are not used, case damage may occur from over tightening screws. Lift microwave, tilt it tight throughout Steps 1-3. Rotate front of top cabinet. NOTE: We recommend using filler blocks if the cabinet front hangs below... in bottom of oven up against the wall and the top cabinet.) 7, Install grease filter. See the Owner's Manual packed with the microwave. 13 NOTE: When mounting the microwave oven, thread power cord through hole in place against cabinetbottom 3. Keep it \ forward, and hook slots at least ...

Installation Instructions
Page 17
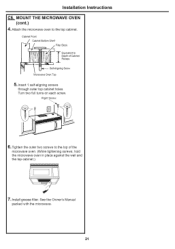
... using duct tape. 7. Tighten the outer two screws to the top of Cabinet ._ ERqeucievsaslent to Seif-Aligning Screw Microwave Oven Top 4, Attach the microwave oven to the house duct. Extend the house duct down to connect to -Side Adjustment, Slide the Exhaust Adaptor ...turns on each screw. Right Screw. See the Owner's Manual packed with the microwave oven. 17 ONNECTING DUCTWORK House Duct I 6. Installation Instructions B5.m.M. Back of Microwave Depth of the microwave oven. (While tightening screws, hold the microwave oven in place against the wall and the top cabinet.)...
... using duct tape. 7. Tighten the outer two screws to the top of Cabinet ._ ERqeucievsaslent to Seif-Aligning Screw Microwave Oven Top 4, Attach the microwave oven to the house duct. Extend the house duct down to connect to -Side Adjustment, Slide the Exhaust Adaptor ...turns on each screw. Right Screw. See the Owner's Manual packed with the microwave oven. 17 ONNECTING DUCTWORK House Duct I 6. Installation Instructions B5.m.M. Back of Microwave Depth of the microwave oven. (While tightening screws, hold the microwave oven in place against the wall and the top cabinet.)...
Installation Instructions
Page 21
...microwave oven. (While tightening screws, hold the microwave oven in place against the wall and the top cabinet.) i 1/_/1 7. Insert 1 self-aligning screws through outer top cabinet holes. Turn two full turns on each screw. Install grease filter. Attach the microwave oven to gning Screw Microwave... Oven Top 5. OUNT THE MICROWAVE OVEN (cont.) 4. Right Screw. 6, Tighten the outer two screws to the top of Cabinet -_ ERqeucievsalsent ...
...microwave oven. (While tightening screws, hold the microwave oven in place against the wall and the top cabinet.) i 1/_/1 7. Insert 1 self-aligning screws through outer top cabinet holes. Turn two full turns on each screw. Install grease filter. Attach the microwave oven to gning Screw Microwave... Oven Top 5. OUNT THE MICROWAVE OVEN (cont.) 4. Right Screw. 6, Tighten the outer two screws to the top of Cabinet -_ ERqeucievsalsent ...

Installation Instructions
Page 22
Replace house fuse or turn breaker back on. 7, KEEP INSTALLATION INSTRUCTIONS THE LOCAL INSPECTOR'S USE. Install turntable and ring in cavity. 4. FOR 5, Plug power cord into a dedicated 20 amp electrical outlet. 22 Read the Owner's Manual. 2, Remove all packing material from the microwave oven. 3. Installation Instructions BEFORE YOU USE YOUR MICROWAVE 1, Make sure the microwave oven has been installed according to instructions. 6.
Replace house fuse or turn breaker back on. 7, KEEP INSTALLATION INSTRUCTIONS THE LOCAL INSPECTOR'S USE. Install turntable and ring in cavity. 4. FOR 5, Plug power cord into a dedicated 20 amp electrical outlet. 22 Read the Owner's Manual. 2, Remove all packing material from the microwave oven. 3. Installation Instructions BEFORE YOU USE YOUR MICROWAVE 1, Make sure the microwave oven has been installed according to instructions. 6.


