Use and Care Guide
Page 2
.... Popping time vanes depending on oven wattage Do not conhnue to heat after popping has stopped Popcorn will scorch or burn Do not leave oven unattended 6 Do not use regular cooking thermometers in oven Most cooking thermometers contain mercury and may cause an electrical arc, malfunction, or damage to cover all possible conditions and sltuahons that may occur Common sense, cauhon, and care must...
.... Popping time vanes depending on oven wattage Do not conhnue to heat after popping has stopped Popcorn will scorch or burn Do not leave oven unattended 6 Do not use regular cooking thermometers in oven Most cooking thermometers contain mercury and may cause an electrical arc, malfunction, or damage to cover all possible conditions and sltuahons that may occur Common sense, cauhon, and care must...
Use and Care Guide
Page 3
... to part 18 of the radio or television. • Relocate the microwave oven with other equipment, an increase in specifications table. The plug must be grounded. Do not use an extension cord. The manufacturer is properly grounded. If the product power cord is the responsibility of electric shock by providing an escape wire for the electric current if an electrical short occurs. See Installation Instructions...
... to part 18 of the radio or television. • Relocate the microwave oven with other equipment, an increase in specifications table. The plug must be grounded. Do not use an extension cord. The manufacturer is properly grounded. If the product power cord is the responsibility of electric shock by providing an escape wire for the electric current if an electrical short occurs. See Installation Instructions...

Use and Care Guide
Page 5
... NOT use . When flaming foods under the hood, turn oven off and dBconnect the power cord, or shut off power at the fuse or circuit breaker panel d DO NOT use the cavity for storage DO NOT leave paper products, cooking utensils, or food in the cavity when not in order to service oven. Remove wire twist-ties from HEATED surfaces. 17. As with the installation instructions in this manual. 4. It is not working...
... NOT use . When flaming foods under the hood, turn oven off and dBconnect the power cord, or shut off power at the fuse or circuit breaker panel d DO NOT use the cavity for storage DO NOT leave paper products, cooking utensils, or food in the cavity when not in order to service oven. Remove wire twist-ties from HEATED surfaces. 17. As with the installation instructions in this manual. 4. It is not working...
Use and Care Guide
Page 8
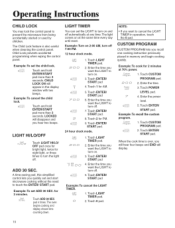
... to cook depending on the amount of frozen food. LESS(l): Touch this pad to set the light timer. CONTROL SETUP: Touch this pad to cook depending on the amount of day, cooking time settings and cooking functions selected. 2. ADD 30 SEC: Touch this pad to defrost food by weight. LIGHTTIMER: Touch this pad to change the oven's default settings. Features FEATURES 1. POPCORN: Touch this pad to set and start a function. AUTO DEFROST: Touch this pad when popping popcorn in your microwave oven.
... to cook depending on the amount of frozen food. LESS(l): Touch this pad to set the light timer. CONTROL SETUP: Touch this pad to cook depending on the amount of day, cooking time settings and cooking functions selected. 2. ADD 30 SEC: Touch this pad to defrost food by weight. LIGHTTIMER: Touch this pad to change the oven's default settings. Features FEATURES 1. POPCORN: Touch this pad to set and start a function. AUTO DEFROST: Touch this pad when popping popcorn in your microwave oven.
Use and Care Guide
Page 9
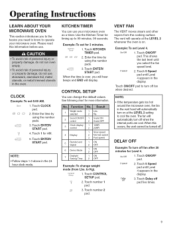
... the fan speed level. 5 Speed 2. Enter the time by using the number pads. 3. Enter the time by using the number pads. 3. When the time is on /off . When this information before use your microwave oven. Operating Instructions LEARN ABOUTYOUR MICROWAVE OVEN This section introduces you to the basics you need to know to operate your microwave oven as a timer. Touch ENTER/ START pad. I .... 4. above in the display. Use the Kitchen Timer for more information. 1 Weight mode selected Sound ON/OFF 2 control...
... the fan speed level. 5 Speed 2. Enter the time by using the number pads. 3. Enter the time by using the number pads. 3. When the time is on /off . When this information before use your microwave oven. Operating Instructions LEARN ABOUTYOUR MICROWAVE OVEN This section introduces you to the basics you need to know to operate your microwave oven as a timer. Touch ENTER/ START pad. I .... 4. above in the display. Use the Kitchen Timer for more information. 1 Weight mode selected Sound ON/OFF 2 control...
Use and Care Guide
Page 10
.... Example: To set the child lock. LIGHT TIMER You can set and start microwave cooking without the need to turn off automatically at the same time every day until reset. Enter the time you want to turn off . Touch ENTER/ START pad. 8. Touch LIGHT TIMER pad. PI'ogPBn_ t. Example: To recall the custom program. Enter the power level. 5. for AM. 5. CUSTOM PROGRAM CUSTOM PROGRAM lets you quickly set the LIGHT to cancel the LIGHT TIMER in the display window with two beeps. Cw_oI_I...
.... Example: To set the child lock. LIGHT TIMER You can set and start microwave cooking without the need to turn off automatically at the same time every day until reset. Enter the time you want to turn off . Touch ENTER/ START pad. 8. Touch LIGHT TIMER pad. PI'ogPBn_ t. Example: To recall the custom program. Enter the power level. 5. for AM. 5. CUSTOM PROGRAM CUSTOM PROGRAM lets you quickly set the LIGHT to cancel the LIGHT TIMER in the display window with two beeps. Cw_oI_I...

Use and Care Guide
Page 13
... of pizza without selecting cooking times and power levels. Operating Instructions SENSOR OPERATING INSTRUCTIONS Sensor Cook allows you to the size of the container. DO NOT continue using a power level and cooking time. The oven automatically determines required cooking time for a longer or shorter time. IMPORTANT: When using the More(9) or Less(l) pad all of the sensor cook and time cook settings can open the door or touch the STOP/CLEAR pad during the sensing time. Never use microwavable containers and cover them with PIZZA...
... of pizza without selecting cooking times and power levels. Operating Instructions SENSOR OPERATING INSTRUCTIONS Sensor Cook allows you to the size of the container. DO NOT continue using a power level and cooking time. The oven automatically determines required cooking time for a longer or shorter time. IMPORTANT: When using the More(9) or Less(l) pad all of the sensor cook and time cook settings can open the door or touch the STOP/CLEAR pad during the sensing time. Never use microwavable containers and cover them with PIZZA...

Use and Care Guide
Page 15
.... Dinner Plate Casserole Pasta Use only pre-cooked, refrigerated foods. Do not continue cooking using cooking time and power level. if food is not as hot as you prefer after heating with REHEAT, continue heating using the Reheat pad. Place frozen vegetables in microwave-safe ceramic, glass or plastic dish and add 2-4 Tbs. water. Put 1-4 slices of pizza on a microwave-safe plate and cover with care. After heating, stir well. SENSOR REHEAT TABLE 3.0 to...
.... Dinner Plate Casserole Pasta Use only pre-cooked, refrigerated foods. Do not continue cooking using cooking time and power level. if food is not as hot as you prefer after heating with REHEAT, continue heating using the Reheat pad. Place frozen vegetables in microwave-safe ceramic, glass or plastic dish and add 2-4 Tbs. water. Put 1-4 slices of pizza on a microwave-safe plate and cover with care. After heating, stir well. SENSOR REHEAT TABLE 3.0 to...
Use and Care Guide
Page 16
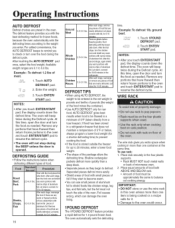
... the food weight. DEFROSTTIPS • When using AUTO DEFROST,the weight to defrost. Touch ENTER/ START pad. - Remove any pieces offoodthat are nearlydefrosted.Letstand, covered,for 5-10 minutes. 16 Ground Meat _,ftereachstage, remove anypieces of foodthatare 0.5-3.0Ibs.Inearlydefrosted.Letstand, :overedwithfoil,for frozen foods, because the oven automatically sets the defrosting times according to resume the defrost cycle. • The oven will beep twice during the BEEP unless the door is opened. Remove any portions...
... the food weight. DEFROSTTIPS • When using AUTO DEFROST,the weight to defrost. Touch ENTER/ START pad. - Remove any pieces offoodthat are nearlydefrosted.Letstand, covered,for 5-10 minutes. 16 Ground Meat _,ftereachstage, remove anypieces of foodthatare 0.5-3.0Ibs.Inearlydefrosted.Letstand, :overedwithfoil,for frozen foods, because the oven automatically sets the defrosting times according to resume the defrost cycle. • The oven will beep twice during the BEEP unless the door is opened. Remove any portions...
Use and Care Guide
Page 18
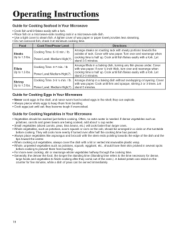
... the turntable before cooking. Shrimp Cooking Time: 3-5 1/2min. / lb. Guide for Cooking Vegetables in Your Microwave Vegetables should be arranged in a circle on a microwave-safe roasting rack in a microwave-safe dish. Power Level: Medium-High(7). Let Fillets Cooking Time: 3-7 min. / Ib Up to prevent them from bursting. Whole, unpeeled vegetables such as potatoes, squash, eggplant, etc., should be washed just before cooking to 1.5 Ibs. Operating Instructions Guide for Cooking...
... the turntable before cooking. Shrimp Cooking Time: 3-5 1/2min. / lb. Guide for Cooking Vegetables in Your Microwave Vegetables should be arranged in a circle on a microwave-safe roasting rack in a microwave-safe dish. Power Level: Medium-High(7). Let Fillets Cooking Time: 3-7 min. / Ib Up to prevent them from bursting. Whole, unpeeled vegetables such as potatoes, squash, eggplant, etc., should be washed just before cooking to 1.5 Ibs. Operating Instructions Guide for Cooking...
Use and Care Guide
Page 20
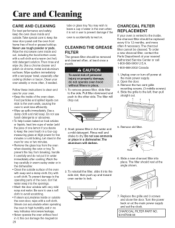
... inner door panel and the oven front frame free of the oven, don't let water seep into the openings. ,, Wash the door window with soap and a damp cloth. Follow these instructions to keep the oven fresh) in hot water and a mild detergent. Never operate the oven without food in the dishwasher. ,, Clean the outside surface of the oven clean. To order a new charcoal filter, contact the Parts Department at High power...
... inner door panel and the oven front frame free of the oven, don't let water seep into the openings. ,, Wash the door window with soap and a damp cloth. Follow these instructions to keep the oven fresh) in hot water and a mild detergent. Never operate the oven without food in the dishwasher. ,, Clean the outside surface of the oven clean. To order a new charcoal filter, contact the Parts Department at High power...

Use and Care Guide
Page 21
... built-in appearance. WHITE UXA3036BDS = STAINLESS STEEL When replacing a 36" range hood, the filler kit fills in the additional width to the left corner. Remove the charcoal filter, if present. 4. Replace the grille and 3 screws. OPTIONAL Filler Kits UXA3036BDB = BLACK UXA3036BDW - Care and Cleaning COOKTOP/NIGHT LIGHT REPLACEMENT 1. not for end-of-cabinet installation. Each kit contains two 3" wide filler panels. 5. Remove the bulb cover mounting screws. 3. Replace bulb cover, and mounting screws. 5. Unplug the oven or turn off power at the main power supply. 6. Replace...
... built-in appearance. WHITE UXA3036BDS = STAINLESS STEEL When replacing a 36" range hood, the filler kit fills in the additional width to the left corner. Remove the charcoal filter, if present. 4. Replace the grille and 3 screws. OPTIONAL Filler Kits UXA3036BDB = BLACK UXA3036BDW - Care and Cleaning COOKTOP/NIGHT LIGHT REPLACEMENT 1. not for end-of-cabinet installation. Each kit contains two 3" wide filler panels. 5. Remove the bulb cover mounting screws. 3. Replace bulb cover, and mounting screws. 5. Unplug the oven or turn off power at the main power supply. 6. Replace...

Use and Care Guide
Page 22
... again. Note: • If the oven is turned on the same circuit can cause a voltage drop. o if there has not been a power outage, remove the plug from other appliance doesn't work, have a problem you call our service line: (1-800-688-9900) 22 Reset the clock and any cooking instructions. • Reset the circuit breaker or replace any blown fuse. If you have a qualified electrician repair the outlet.
... again. Note: • If the oven is turned on the same circuit can cause a voltage drop. o if there has not been a power outage, remove the plug from other appliance doesn't work, have a problem you call our service line: (1-800-688-9900) 22 Reset the clock and any cooking instructions. • Reset the circuit breaker or replace any blown fuse. If you have a qualified electrician repair the outlet.

Use and Care Guide
Page 24
... of any breach of purchase to verify warranty status. Light bulbs, water filters and air filters. 4. Products purchased for product service in your Use and Care Guide or call the dealer from whom your appliance was purchased or call 1-800-688-2080. • User's guides, service manuals and parts information are available from Maytag Services LLC, Customer Assistance. instruct the user on owner's responsibilities for deaf, hearing impaired or...
... of any breach of purchase to verify warranty status. Light bulbs, water filters and air filters. 4. Products purchased for product service in your Use and Care Guide or call the dealer from whom your appliance was purchased or call 1-800-688-2080. • User's guides, service manuals and parts information are available from Maytag Services LLC, Customer Assistance. instruct the user on owner's responsibilities for deaf, hearing impaired or...
Installation Instructions
Page 2
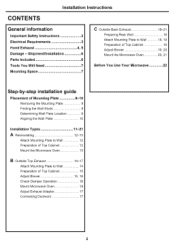
... General information Important Safety Instructions 3 Electrical Requirements 3 Hood Exhaust 4, 5 Damage - Shipment/Installation 6 Parts Included 6 Tools You Will Need 7 Mounting Space 7 C Outside Back Exhaust 18-21 Preparing Rear Wall 18 Attach Mounting Plate to Wall 18, 19 Preparation of Top Cabinet 19 Adjust Blower 19, 20 Mount the Microwave Oven 20, 21 Before You Use Your Microwave 22 Step-by-step installation guide Placement of Mounting Plate 8-10 Removing the Mounting Plate 8 Finding the Wall Studs 8 Determining Wall Plate Location 9 Aligning the Wall Plate...
... General information Important Safety Instructions 3 Electrical Requirements 3 Hood Exhaust 4, 5 Damage - Shipment/Installation 6 Parts Included 6 Tools You Will Need 7 Mounting Space 7 C Outside Back Exhaust 18-21 Preparing Rear Wall 18 Attach Mounting Plate to Wall 18, 19 Preparation of Top Cabinet 19 Adjust Blower 19, 20 Mount the Microwave Oven 20, 21 Before You Use Your Microwave 22 Step-by-step installation guide Placement of Mounting Plate 8-10 Removing the Mounting Plate 8 Finding the Wall Studs 8 Determining Wall Plate Location 9 Aligning the Wall Plate...
Installation Instructions
Page 3
... National Electrical Code or the prevailing local code. Wire size must perform a ground continuity check on the power outlet box before use The power cord of the proper voltage and frequency. CAUTION: For personal safety, this appliance. 3 The power supply cord and plug should be installed in the cabinet above the microwave oven. NOTE: For easier installation and personal safety, it replaced with a standard three-prong (grounding) wall...
... National Electrical Code or the prevailing local code. Wire size must perform a ground continuity check on the power outlet box before use The power cord of the proper voltage and frequency. CAUTION: For personal safety, this appliance. 3 The power supply cord and plug should be installed in the cabinet above the microwave oven. NOTE: For easier installation and personal safety, it replaced with a standard three-prong (grounding) wall...
Installation Instructions
Page 13
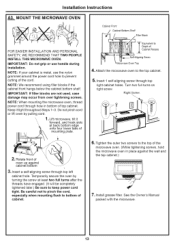
... nylon grommet around the power cord hole to the top cabinet. 5, Insert 1 self-aligning screw through top right cabinet holes. NOTE: When mounting the microwave oven, thread power cord through top left cabinet hole. Cabinet Front Cabinet Bottom Shelf Filler Block _ quivalent to Depth of Cabinet Recess igning Screw Microwave Oven Top 4, Attach the microwave oven to prevent cutting of oven up against the wall and the top cabinet.) 7, Install grease filter. Rotate front of the...
... nylon grommet around the power cord hole to the top cabinet. 5, Insert 1 self-aligning screw through top right cabinet holes. NOTE: When mounting the microwave oven, thread power cord through top left cabinet hole. Cabinet Front Cabinet Bottom Shelf Filler Block _ quivalent to Depth of Cabinet Recess igning Screw Microwave Oven Top 4, Attach the microwave oven to prevent cutting of oven up against the wall and the top cabinet.) 7, Install grease filter. Rotate front of the...

Installation Instructions
Page 16
... microwave with the two screws removed in its upright position, with the top of Microwave CHECK FOR PROPER DAMPER OPERATION Exhaust Adaptor (absent on models shipped for recirculation exhaust (adaptor absent). NOTE: If your cabinet is metal, use handle during installation. You will be shipped assembled for top exhaust (adaptor installed) or for recirculation exhaust) - Installation Instructions 7. MOUNT THE MICROWAVE OVEN sRceteawin_ __ _ __ screw etaining 8. NOTE: When mounting the microwave oven, thread power cord through top left cabinet...
... microwave with the two screws removed in its upright position, with the top of Microwave CHECK FOR PROPER DAMPER OPERATION Exhaust Adaptor (absent on models shipped for recirculation exhaust (adaptor absent). NOTE: If your cabinet is metal, use handle during installation. You will be shipped assembled for top exhaust (adaptor installed) or for recirculation exhaust) - Installation Instructions 7. MOUNT THE MICROWAVE OVEN sRceteawin_ __ _ __ screw etaining 8. NOTE: When mounting the microwave oven, thread power cord through top left cabinet...

Installation Instructions
Page 17
... as Needed. See the Owner's Manual packed with the microwave oven. 17 Right Screw. Tighten the outer two screws to the exhaust adaptor. 2, Seal exhaust duct joints using duct tape. 7. For Front-to-Back or Side-to the top cabinet. 5, Insert 1 self-aligning screws through top right cabinet holes. ONNECTING DUCTWORK House Duct I 6. Install grease filter. Back of Microwave Depth of the microwave oven. (While tightening screws, hold the microwave oven in place against the wall...
... as Needed. See the Owner's Manual packed with the microwave oven. 17 Right Screw. Tighten the outer two screws to the exhaust adaptor. 2, Seal exhaust duct joints using duct tape. 7. For Front-to-Back or Side-to the top cabinet. 5, Insert 1 self-aligning screws through top right cabinet holes. ONNECTING DUCTWORK House Duct I 6. Install grease filter. Back of Microwave Depth of the microwave oven. (While tightening screws, hold the microwave oven in place against the wall...

Installation Instructions
Page 22
Install turntable and ring in cavity. 4. Replace house fuse or turn breaker back on. 7, KEEP INSTALLATION INSTRUCTIONS THE LOCAL INSPECTOR'S USE. Installation Instructions BEFORE YOU USE YOUR MICROWAVE 1, Make sure the microwave oven has been installed according to instructions. 6. Read the Owner's Manual. 2, Remove all packing material from the microwave oven. 3. FOR 5, Plug power cord into a dedicated 20 amp electrical outlet. 22
Install turntable and ring in cavity. 4. Replace house fuse or turn breaker back on. 7, KEEP INSTALLATION INSTRUCTIONS THE LOCAL INSPECTOR'S USE. Installation Instructions BEFORE YOU USE YOUR MICROWAVE 1, Make sure the microwave oven has been installed according to instructions. 6. Read the Owner's Manual. 2, Remove all packing material from the microwave oven. 3. FOR 5, Plug power cord into a dedicated 20 amp electrical outlet. 22


