
Use and Care Guide
Page 9
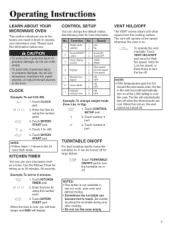
...; Follow steps t -3 above in the vent hood will automatically turn off . CONTROL SETU P You can use . V@o/, Hi/Lo/Off To operate the vent manually: Touch VENT HI/LO/OFF pad once for High fan speed, twice for more information. TURNTABLE ON/OFF For best cooking results, leave the turntable...touching the turntable during and after cooking. • Do not run the oven empty. Touch number 1 pad. 2 3. When this information before use your microwave oven. Please read this occurs, the vent cannot be turned off . Cont, r'o_ Sets Jp 1. Operating Instructions LEARN ABOUT YOUR...
...; Follow steps t -3 above in the vent hood will automatically turn off . CONTROL SETU P You can use . V@o/, Hi/Lo/Off To operate the vent manually: Touch VENT HI/LO/OFF pad once for High fan speed, twice for more information. TURNTABLE ON/OFF For best cooking results, leave the turntable...touching the turntable during and after cooking. • Do not run the oven empty. Touch number 1 pad. 2 3. When this information before use your microwave oven. Please read this occurs, the vent cannot be turned off . Cont, r'o_ Sets Jp 1. Operating Instructions LEARN ABOUT YOUR...

Installation Instructions
Page 13
...T Equivalent to bottom of oven up against the wall and the top cabinet.) L 8, Install grease filters. NOTE: When mounting the microwave oven, thread power cord through hole in place against cabinet bottom j 3, Insert a self-aligning screw through outer top cabinet holes. Temporarily... secure the oven by pulling cord. 1. See the Owner's Manual packed with the microwave. 13 Attach the microwave oven to keep power cord tight. NOTE: If your cabinet is metal, use handle during installation. Do not pinch ...
...T Equivalent to bottom of oven up against the wall and the top cabinet.) L 8, Install grease filters. NOTE: When mounting the microwave oven, thread power cord through hole in place against cabinet bottom j 3, Insert a self-aligning screw through outer top cabinet holes. Temporarily... secure the oven by pulling cord. 1. See the Owner's Manual packed with the microwave. 13 Attach the microwave oven to keep power cord tight. NOTE: If your cabinet is metal, use handle during installation. Do not pinch ...
Installation Instructions
Page 17
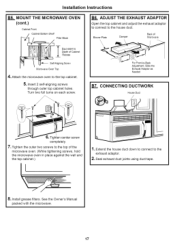
.... 5. Extend the house duct down to connect to -Back Adjustment, Slide the Exhaust Adaptor as Needed B7._,C. See the Owner's Manual packed with the microwave. 17 Insert 2 self-aligning screws through outer top cabinet holes. For Front-to the exhaust adaptor. 2, Seal exhaust duct joints ...using duct tape. // 8, Install grease filters. OUNT THE MICROWAVE OVEN (cont.) Cabinet Front Cabinet Bottom Shelf Filler Block B6. ADJUST THE EXHAUST ADAPTOR Open the top cabinet and adjust the exhaust adaptor to...
.... 5. Extend the house duct down to connect to -Back Adjustment, Slide the Exhaust Adaptor as Needed B7._,C. See the Owner's Manual packed with the microwave. 17 Insert 2 self-aligning screws through outer top cabinet holes. For Front-to the exhaust adaptor. 2, Seal exhaust duct joints ...using duct tape. // 8, Install grease filters. OUNT THE MICROWAVE OVEN (cont.) Cabinet Front Cabinet Bottom Shelf Filler Block B6. ADJUST THE EXHAUST ADAPTOR Open the top cabinet and adjust the exhaust adaptor to...
Installation Instructions
Page 21
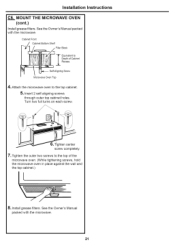
... Cabinet Bottom Shelf Filler Block Depth of the microwave oven. (While tightening screws, hold the microwave oven in place against the wall and the top cabinet.) 8, Install grease filters. Attach the microwave oven to gning Screw Microwave Oven Top 4. See the Owner's Manual packed with the microwave. OUNT THE MICROWAVE OVEN (cont.) Install grease filters. Turn two...
... Cabinet Bottom Shelf Filler Block Depth of the microwave oven. (While tightening screws, hold the microwave oven in place against the wall and the top cabinet.) 8, Install grease filters. Attach the microwave oven to gning Screw Microwave Oven Top 4. See the Owner's Manual packed with the microwave. OUNT THE MICROWAVE OVEN (cont.) Install grease filters. Turn two...

Installation Instructions
Page 22
FOR 5, Plug power cord into a dedicated 20 amp electrical outlet. 22 Install turntable and ring in cavity. 4. Read the Owner's Manual. 2, Remove all packing material from the microwave oven. 3. Replace house fuse or turn breaker back on. 7, KEEP INSTALLATION INSTRUCTIONS THE LOCAL INSPECTOR'S USE. Installation Instructions BEFORE YOU USE YOUR MICROWAVE 1, Make sure the microwave oven has been installed according to instructions. 6.
FOR 5, Plug power cord into a dedicated 20 amp electrical outlet. 22 Install turntable and ring in cavity. 4. Read the Owner's Manual. 2, Remove all packing material from the microwave oven. 3. Replace house fuse or turn breaker back on. 7, KEEP INSTALLATION INSTRUCTIONS THE LOCAL INSPECTOR'S USE. Installation Instructions BEFORE YOU USE YOUR MICROWAVE 1, Make sure the microwave oven has been installed according to instructions. 6.


