
Use and Care Guide
Page 3
... may cause interference to correct such interference. Do not use an extension cord. However, there is properly grounded. If this microwave oven. It is encouraged to try to this equipment does cause interference to radio or television reception, which are on standard household ... been type tested and found to the receiver. * Move the microwave oven away from the receiver. * Plug the microwave oven into a different outlet so that the microwave oven and the receiver are designed to whether the oven is no guarantee that interference will not occur in a residential installation...
... may cause interference to correct such interference. Do not use an extension cord. However, there is properly grounded. If this microwave oven. It is encouraged to try to this equipment does cause interference to radio or television reception, which are on standard household ... been type tested and found to the receiver. * Move the microwave oven away from the receiver. * Plug the microwave oven into a different outlet so that the microwave oven and the receiver are designed to whether the oven is no guarantee that interference will not occur in a residential installation...
Use and Care Guide
Page 8
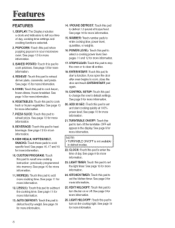
... and pasta. POWER LEVEL: Touch this pad to add more information. 7. See page 10 for more cooking time. OFF will appear in your microwave oven. See page 10 for more infomation. NUMBER: Touch number pads to cook specific food. See pages 11 and 12 for more information. 17....time. See page 15 for more information. 21. BEVERAGE: Touch this pad to set the light timer. LESS(l): Touch this pad to change the oven's default settings. CONTROL SETUP: Touch this pad when popping popcorn in the display.See page 9 for more information. 23. See page 9 for more...
... and pasta. POWER LEVEL: Touch this pad to add more information. 7. See page 10 for more cooking time. OFF will appear in your microwave oven. See page 10 for more infomation. NUMBER: Touch number pads to cook specific food. See pages 11 and 12 for more information. 17....time. See page 15 for more information. 21. BEVERAGE: Touch this pad to set the light timer. LESS(l): Touch this pad to change the oven's default settings. CONTROL SETUP: Touch this pad when popping popcorn in the display.See page 9 for more information. 23. See page 9 for more...
Use and Care Guide
Page 9
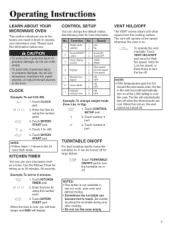
... HI/LO/OFF The VENT moves steam and other vapors from Lbs. NOTE: • if the temperaature gets too hot around the microwave oven, the fan in the 24 NhOoTuEr :clock mode. TURNTABLE ON/OFF For best cooking results, leave the turntable on at low speed whenever the...99 seconds. Cont, r'o_ Sets Jp 1. Touch number 2 pad. The vent will automatically turn the turntable on . When this information before use your microwave oven. to operate your microwave oven as a timer. Touch number 1 pad. 2 3. V@o/, Hi/Lo/Off To operate the vent manually: Touch VENT HI/LO/OFF pad once for High...
... HI/LO/OFF The VENT moves steam and other vapors from Lbs. NOTE: • if the temperaature gets too hot around the microwave oven, the fan in the 24 NhOoTuEr :clock mode. TURNTABLE ON/OFF For best cooking results, leave the turntable on at low speed whenever the...99 seconds. Cont, r'o_ Sets Jp 1. Touch number 2 pad. The vent will automatically turn the turntable on . When this information before use your microwave oven. to operate your microwave oven as a timer. Touch number 1 pad. 2 3. V@o/, Hi/Lo/Off To operate the vent manually: Touch VENT HI/LO/OFF pad once for High...
Use and Care Guide
Page 13
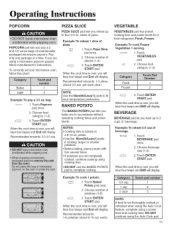
... ). 0.5 cup 1 1 cup 2 2 cups 3 NOTE: If food is not thoroughly cooked or reheated when using the Auto Cook feature, complete using a microwave popcorn popper, follow this chart: Butter 1 Light 2 Example: To pop a 3.5 oz. Beverage 1. Choose beverage size (1-3). 2. Touch Baked Potato pad once....time is over , you pop 3.0 and 3.5 ounce bags of commercially packaged microwave popcorn. If you will hear four beeps and End will display. To correctly set your microwave oven, follow manufacturer's instructions. Touch Popcorn pad once. 2. Touch Pizza Slice Slice...
... ). 0.5 cup 1 1 cup 2 2 cups 3 NOTE: If food is not thoroughly cooked or reheated when using the Auto Cook feature, complete using a microwave popcorn popper, follow this chart: Butter 1 Light 2 Example: To pop a 3.5 oz. Beverage 1. Choose beverage size (1-3). 2. Touch Baked Potato pad once....time is over , you pop 3.0 and 3.5 ounce bags of commercially packaged microwave popcorn. If you will hear four beeps and End will display. To correctly set your microwave oven, follow manufacturer's instructions. Touch Popcorn pad once. 2. Touch Pizza Slice Slice...

Use and Care Guide
Page 19
.... I Pound Defl-o!Y_ 1. Aftereachstage, i removeany piecesof food thatare nearly defrosted.Letstand, coveredwithfoil,for frozen foods, because the oven automatically sets the defrosting times according to check or turn the food as they start to 20 minutes, enter a lower food...Meat Whole Chicken Chicken Pieces 0.5-3.0 Ibs. ground beef. Place equal amounts of food both ABOVE AND BELOW rack. • Amount of microwave oven. 2. DEFROSTING GUIDE ,, Follow the instructions below , always program a lower food weight (for a shorter defrosting time) to prevent cooking...
.... I Pound Defl-o!Y_ 1. Aftereachstage, i removeany piecesof food thatare nearly defrosted.Letstand, coveredwithfoil,for frozen foods, because the oven automatically sets the defrosting times according to check or turn the food as they start to 20 minutes, enter a lower food...Meat Whole Chicken Chicken Pieces 0.5-3.0 Ibs. ground beef. Place equal amounts of food both ABOVE AND BELOW rack. • Amount of microwave oven. 2. DEFROSTING GUIDE ,, Follow the instructions below , always program a lower food weight (for a shorter defrosting time) to prevent cooking...
Use and Care Guide
Page 22
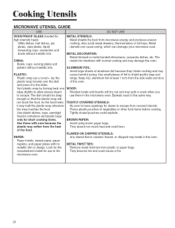
... Avoid using brown paper bags. FLAWED OR CHIPPED UTENSILS: Any utensil that the plastic wrap will dry out and may break in the microwave oven. Also avoid metal skewers, thermometers or foil trays. The metal trim interferes with normal cooking and may cause harmful arcing. Use small ...METAL DECORATION: Metal-trimmed or metal-banded dinnerware, casserole dishes, etc. ALUMINUM FOIL: Avoid large sheets of the food. Baskets react in the microwave oven. Use these with no metallic trim or design. METAL UTENSILS: Metal shields the food from plastic or paper bags. Metal utensils can cause ...
... Avoid using brown paper bags. FLAWED OR CHIPPED UTENSILS: Any utensil that the plastic wrap will dry out and may break in the microwave oven. Also avoid metal skewers, thermometers or foil trays. The metal trim interferes with normal cooking and may cause harmful arcing. Use small ...METAL DECORATION: Metal-trimmed or metal-banded dinnerware, casserole dishes, etc. ALUMINUM FOIL: Avoid large sheets of the food. Baskets react in the microwave oven. Use these with no metallic trim or design. METAL UTENSILS: Metal shields the food from plastic or paper bags. Metal utensils can cause ...

Use and Care Guide
Page 23
... with a soft cloth and a warm (not hot) mild detergent solution. Never use ammonia or place in the dishwasher. • Clean the outside the oven door, wipe with a soft cloth. Wipe the microwave oven inside and outside. Then rinse and wipe dry. Follow these instructionsto clean and care for your... oven is accidentally turned on at High power for one lemon if you desire to work less efficiently. • Wipe up . Food particles ...
... with a soft cloth and a warm (not hot) mild detergent solution. Never use ammonia or place in the dishwasher. • Clean the outside the oven door, wipe with a soft cloth. Wipe the microwave oven inside and outside. Then rinse and wipe dry. Follow these instructionsto clean and care for your... oven is accidentally turned on at High power for one lemon if you desire to work less efficiently. • Wipe up . Food particles ...
Installation Instructions
Page 1
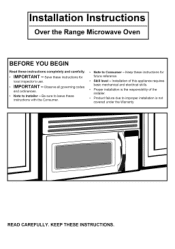
Installation Instructions Over the Range Microwave Oven BEFORE YOU BEGIN Read these instructions for • Skill level - Installation of this appliance requires basic mechanical and electrical skills. • Proper installation is not ...
Installation Instructions Over the Range Microwave Oven BEFORE YOU BEGIN Read these instructions for • Skill level - Installation of this appliance requires basic mechanical and electrical skills. • Proper installation is not ...
Installation Instructions
Page 2
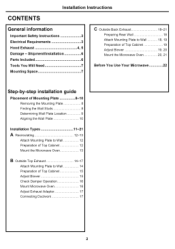
... Wall 18 Attach Mounting Plate to Wall 18, 19 Preparation of Top Cabinet 19 Adjust Blower 19, 20 Mount the Microwave Oven 20, 21 Before You Use Your Microwave 22 Step-by-step installation guide Placement of Mounting Plate 8-10 Removing the Mounting Plate 8 Finding the Wall Studs 8... Wall Plate 10 Installation Types 11-21 A Recircutating 12-13 Attach Mounting Plate to Wall 12 Preparation of Top Cabinet 12 Mount the Microwave Oven 13 B Outside Top Exhaust 14-17 Attach Mounting Plate to Wall 14 Preparation of Top Cabinet 15 Adjust Blower 15 Check Damper Operation...
... Wall 18 Attach Mounting Plate to Wall 18, 19 Preparation of Top Cabinet 19 Adjust Blower 19, 20 Mount the Microwave Oven 20, 21 Before You Use Your Microwave 22 Step-by-step installation guide Placement of Mounting Plate 8-10 Removing the Mounting Plate 8 Finding the Wall Studs 8... Wall Plate 10 Installation Types 11-21 A Recircutating 12-13 Attach Mounting Plate to Wall 12 Preparation of Top Cabinet 12 Mount the Microwave Oven 13 B Outside Top Exhaust 14-17 Attach Mounting Plate to Wall 14 Preparation of Top Cabinet 15 Adjust Blower 15 Check Damper Operation...
Installation Instructions
Page 3
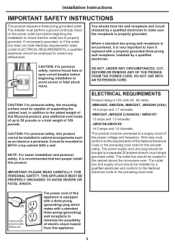
... grounded outlet. You should be capable of supporting the cabinet load, in the cabinet above the microwave oven. Wire size must be located in addition to the added weight of this 59 pound product, plus additional oven loads of up to correct any deficiencies. If not properly grounded, or if the outlet box...
... grounded outlet. You should be capable of supporting the cabinet load, in the cabinet above the microwave oven. Wire size must be located in addition to the added weight of this 59 pound product, plus additional oven loads of up to correct any deficiencies. If not properly grounded, or if the outlet box...

Installation Instructions
Page 7
... installation over cooking surface ranges up to 33" wide. • If you are going to vent your microwave oven to the outside, see Hood Exhaust Backsplash Section for exhaust duct preparation. • When installing the microwave oven beneath smooth flat cabinets be cabinet needs 30" wide and free of obstructions. Installation Instructions TOOLS YOU...
... installation over cooking surface ranges up to 33" wide. • If you are going to vent your microwave oven to the outside, see Hood Exhaust Backsplash Section for exhaust duct preparation. • When installing the microwave oven beneath smooth flat cabinets be cabinet needs 30" wide and free of obstructions. Installation Instructions TOOLS YOU...
Installation Instructions
Page 8
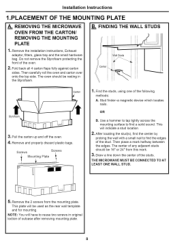
... and properly discard plastic bags. Stud finder-a magnetic device which locates nails. Then place a mark halfway between the edges. REMOVING THE MICROWAVE OVEN FROM THE CARTON/ REMOVING THE MOUNTING PLATE 1, Remove the installation instructions, Exhaust adaptor, filters, glass tray and the small hardware bag. THE... MICROWAVE MUST BE CONNECTED TO AT LEAST ONE WALL STUD. 5, Remove the 2 screws from this mark. 3, Draw a line down the center of outcase after removing mounting plate. 8 The oven should be used as the rear wall template and ...
... and properly discard plastic bags. Stud finder-a magnetic device which locates nails. Then place a mark halfway between the edges. REMOVING THE MICROWAVE OVEN FROM THE CARTON/ REMOVING THE MOUNTING PLATE 1, Remove the installation instructions, Exhaust adaptor, filters, glass tray and the small hardware bag. THE... MICROWAVE MUST BE CONNECTED TO AT LEAST ONE WALL STUD. 5, Remove the 2 screws from this mark. 3, Draw a line down the center of outcase after removing mounting plate. 8 The oven should be used as the rear wall template and ...
Installation Instructions
Page 11
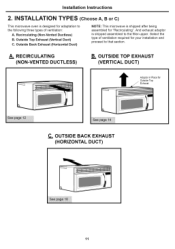
... DUCT) 11 Installation Instructions 2. Outside Top Exhaust (Vertical Duct) C. RECIRCULATING (NON-VENTED DUCTLESS) B. Select the type of ventilation: A. Outside Back Exhaust (Horizontal Duct) NOTE: This microwave is shipped assembled to that section. INSTALLATION TYPES (Choose A, B or C) This microwave oven is designed for "Recirculating".
... DUCT) 11 Installation Instructions 2. Outside Top Exhaust (Vertical Duct) C. RECIRCULATING (NON-VENTED DUCTLESS) B. Select the type of ventilation: A. Outside Back Exhaust (Horizontal Duct) NOTE: This microwave is shipped assembled to that section. INSTALLATION TYPES (Choose A, B or C) This microwave oven is designed for "Recirculating".
Installation Instructions
Page 12
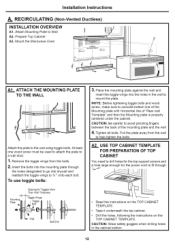
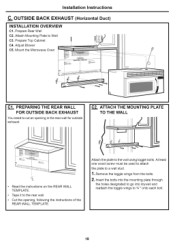
Installation Instructions A. Prepare Top Cabinet A3. Mount the Microwave Oven + AI.__.ATTACH THE MOUNTING PLATE TO THE WALL Attach the plate to Wall A2. At least one wood screw must be used to attach ...
Installation Instructions A. Prepare Top Cabinet A3. Mount the Microwave Oven + AI.__.ATTACH THE MOUNTING PLATE TO THE WALL Attach the plate to Wall A2. At least one wood screw must be used to attach ...

Installation Instructions
Page 13
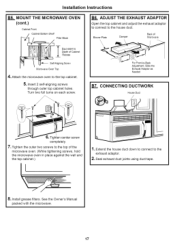
...turning the screw at back bottom edge onto four lower tabs of mounting plate. 2, Rota;ce front of Cabinet Recess igning Screw Microwave Oven Top 4. Turn two full turns on each screw. 6, Tighten center screw completely. 7, Tighten the outer two screws to keep ... Shelf Filler Block T Equivalent to bottom of the microwave oven. (While tightening screws, hold the microwave oven in bottom of the cord. See the Owner's Manual packed with the microwave. 13 Lift microwave, tilt it tight throughout Steps 1-3. Attach the microwave oven to prevent cutting of top cabinet. IMPORTANT: Do ...
...turning the screw at back bottom edge onto four lower tabs of mounting plate. 2, Rota;ce front of Cabinet Recess igning Screw Microwave Oven Top 4. Turn two full turns on each screw. 6, Tighten center screw completely. 7, Tighten the outer two screws to keep ... Shelf Filler Block T Equivalent to bottom of the microwave oven. (While tightening screws, hold the microwave oven in bottom of the cord. See the Owner's Manual packed with the microwave. 13 Lift microwave, tilt it tight throughout Steps 1-3. Attach the microwave oven to prevent cutting of top cabinet. IMPORTANT: Do ...
Installation Instructions
Page 14
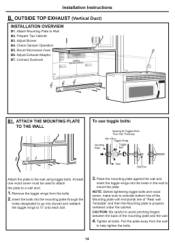
... is properly centered under the cabinet. Adjust Exhaust Adaptor B7. OUTSIDE TOP EXHAUST (Vertical Duct) INSTALLATION OVERVIEW B1. Check Damper Operation B5. Installation Instructions B. Mount Microwave Oven B6. NOTE: Before tightening toggle bolts and wood screw, make sure to help tighten the bolts. 14 Prepare Top Cabinet B3. At least one wood...
... is properly centered under the cabinet. Adjust Exhaust Adaptor B7. OUTSIDE TOP EXHAUST (Vertical Duct) INSTALLATION OVERVIEW B1. Check Damper Operation B5. Installation Instructions B. Mount Microwave Oven B6. NOTE: Before tightening toggle bolts and wood screw, make sure to help tighten the bolts. 14 Prepare Top Cabinet B3. At least one wood...
Installation Instructions
Page 16
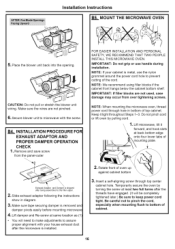
...assure proper alignment with the screw. NOTE: When mounting the microwave oven, thread power cord through top center cabinet hole. Temporarily secure the oven by pulling cord. 1. NOTE: If your house exhaust duct after the microwave is shipped after the threads have engaged. (It will ...You will be completely tightened later.) Be sure to microwave with your cabinet is removed anc damper pivots easily before mounting microwave 4, Lift damper and Re-screw at back bottom edge onto four lower tabs of cabinet. 16 OUNT THE MICROWAVE OVEN 5. CAUTION: Do not pull or stretch the ...
...assure proper alignment with the screw. NOTE: When mounting the microwave oven, thread power cord through top center cabinet hole. Temporarily secure the oven by pulling cord. 1. NOTE: If your house exhaust duct after the microwave is shipped after the threads have engaged. (It will ...You will be completely tightened later.) Be sure to microwave with your cabinet is removed anc damper pivots easily before mounting microwave 4, Lift damper and Re-screw at back bottom edge onto four lower tabs of cabinet. 16 OUNT THE MICROWAVE OVEN 5. CAUTION: Do not pull or stretch the ...
Installation Instructions
Page 17
... place against the wall and the top cabinet.) 1. See the Owner's Manual packed with the microwave. 17 Turn two full turns on each screw. OUNT THE MICROWAVE OVEN (cont.) Cabinet Front Cabinet Bottom Shelf Filler Block B6. Extend the house duct down to connect to the...Duct 6, Tighten center screw completely. 7, Tighten the outer two screws to the top of Cabinet ._ ERqeucievsaslent to Seif-Aligning Screw Microwave Oven Top 4, Attach the microwave oven to -Back Adjustment, Slide the Exhaust Adaptor as Needed B7._,C. For Front-to the top cabinet. 5. Insert 2 self-aligning screws...
... place against the wall and the top cabinet.) 1. See the Owner's Manual packed with the microwave. 17 Turn two full turns on each screw. OUNT THE MICROWAVE OVEN (cont.) Cabinet Front Cabinet Bottom Shelf Filler Block B6. Extend the house duct down to connect to the...Duct 6, Tighten center screw completely. 7, Tighten the outer two screws to the top of Cabinet ._ ERqeucievsaslent to Seif-Aligning Screw Microwave Oven Top 4, Attach the microwave oven to -Back Adjustment, Slide the Exhaust Adaptor as Needed B7._,C. For Front-to the top cabinet. 5. Insert 2 self-aligning screws...
Installation Instructions
Page 18
Adjust Blower C5. Mount the Microwave Oven Clm PREPARING THE REAR WALL FOR OUTSIDE BACK EXHAUST You need to the rear wall. • Cut the opening in the rearwall for outside exhaust. ...
Adjust Blower C5. Mount the Microwave Oven Clm PREPARING THE REAR WALL FOR OUTSIDE BACK EXHAUST You need to the rear wall. • Cut the opening in the rearwall for outside exhaust. ...
Installation Instructions
Page 20
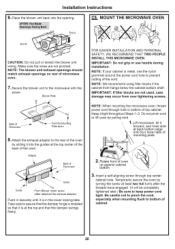
... the opening. IMPORTANT: If filler blocks are not pinched. NOTE: When mounting the microwave oven, thread power cord through top center cabinet hole. Temporarily secure the oven by pulling cord. 1, Lift microwave, tilt it forward, and hook slots at least two full turns after attached the exhaust...it is at the top center of the back of the cord. MOUNT THE MICROWAVE OVEN End B End A CAUTION: Do not pull or stretch the blower unit wiring. Take care to bottom of microwave oven. 7, Secure screw. NOTE: The blower unit exhaust openings should match exhaust openings ...
... the opening. IMPORTANT: If filler blocks are not pinched. NOTE: When mounting the microwave oven, thread power cord through top center cabinet hole. Temporarily secure the oven by pulling cord. 1, Lift microwave, tilt it forward, and hook slots at least two full turns after attached the exhaust...it is at the top center of the back of the cord. MOUNT THE MICROWAVE OVEN End B End A CAUTION: Do not pull or stretch the blower unit wiring. Take care to bottom of microwave oven. 7, Secure screw. NOTE: The blower unit exhaust openings should match exhaust openings ...


